 WooCommerce is backed up by more than 5 million active installations in the WordPress community, and this number continues to grow each day.
With all the user data, WooCommerce can get enough feedback to improve significantly towards what their users want.
It is no doubt that WooCommerce cannot make changes on a whim.
This is because there are many factors that you need to put into consideration, especially if you have a complicated site.
This implies that small changes may cause a significant difference in what you see on the front end, and at worst, you may even create a significant negative customer experience.
That is why I decided to create the Ultimate WooCommerce Hide Guide.
WooCommerce Ultimate Hide Guide
In this post, you will learn how to hide certain elements in your WooCommerce store.
It is important to note the flexibility that comes with WooCommerce is understated.
However, you need to have the skill set and experience to do a lot of what you want to be done with your WordPress/WooCommerce site. This ultimate guide will ensure that you will be able to hide any element without breaking your site.
Before we start, make sure that you always have backups ready, as updating and adding features and functionalities to your WordPress site needs a lot of attention.
This is just a fair warning. The biggest disadvantage is that any modifications made to the theme in this way will be lost once the developer updates the theme.
The best way to overcome this is to use a child theme.
A child theme allows you to make any number of changes to a website without touching any original theme files.
A child theme depends entirely on its parent to work. Without its parent theme present, it will not do a thing and cannot even be activated.
You can learn more about creating child themes here.
With that said, let us look at how you can hide different elements in your WooCommerce store pages like the Shop page, Single Product page, My Account page, Homepage, Checkout page, and Cart page.
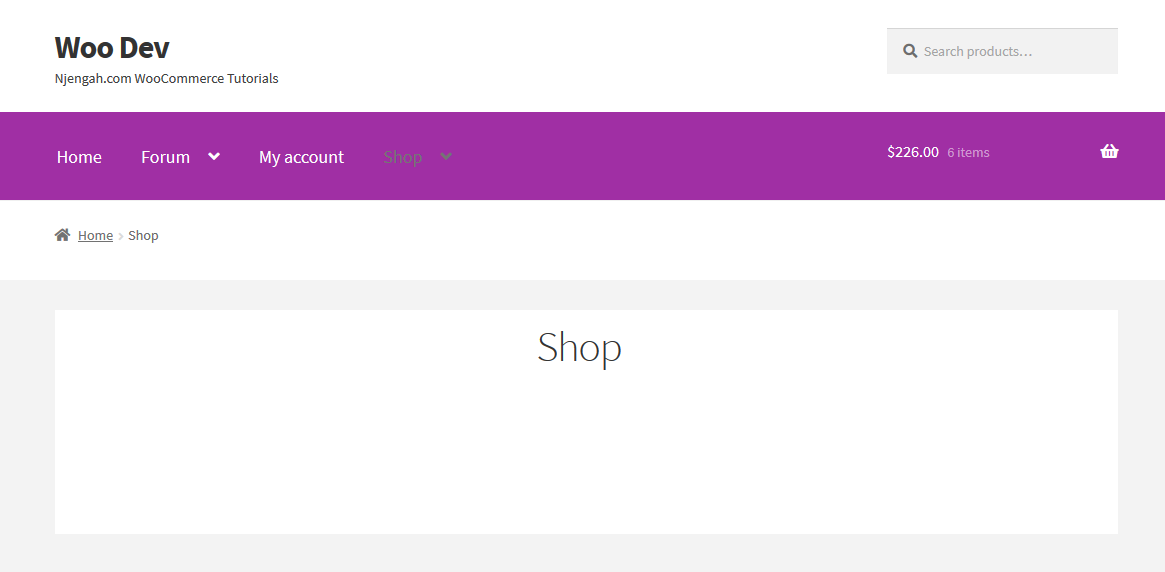
WooCommerce Hide Shop Page
In this section, you will learn how to hide different elements on the Shop page.
The shop page is where you display your products, so it is one of the most important pages in your store. That is why it should have an attractive and user-friendly design.
However, the shop page is a pre-designed component of your store and does not have a built-in tool to change its look and feel.
That is why we will use custom code snippets to hide the elements.
WooCommerce Product Visibility
There are scenarios you may need to hide a product from your WooCommerce store. Some of them include:
- If products are only available to certain customers, the products need to be hidden from the public.
- If products are no longer sold but may be sold again in the future.
- If you offer service-based products, they require to be manually added to a sales representative quote.
There are many other scenarios, but these stand out.
To start, I will share how to hide a single WooCommerce product from the front end using the built-in WooCommerce and WordPress functionality.
I will also share how you can hide hidden products from the WooCommerce cart, checkout, order, and email.
You can learn more about product visibility here.
Steps to Hide a WooCommerce Product (Single Product)
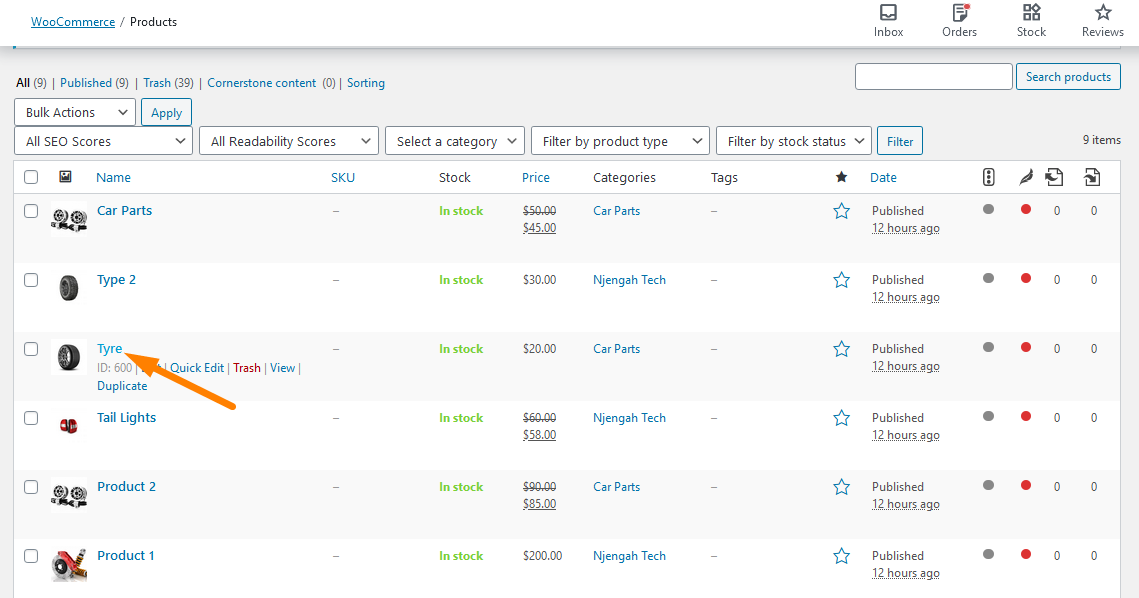
- Log into your WordPress site and access the Dashboard as the admin user.
- From the Dashboard menu, click on Products and select the product you would like to hide from the site. Click on the Product title and go to the edit page, as shown below:
- On the right-hand side, you will see the familiar “Publish” meta box. It allows you to set publishing options and publish your posts, products, or pages. There is an option there called “Catalog visibility.”
- Click on the Edit link next to it. You will be presented with a list of options for the Product’s visibility on the front end.
- Select the Hidden option
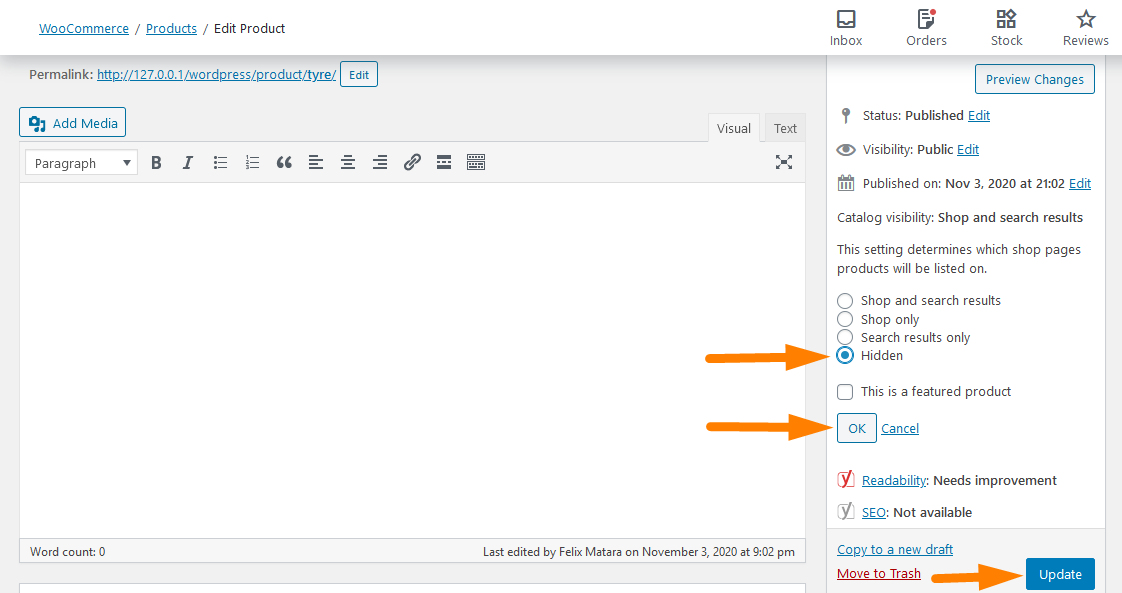
- Click on the Update button, and the product will completely disappear from the front end of your WooCommerce Store.
It is important to note that hidden products appear on the cart if they are added to the cart “programmatically.”
Steps to Hide Hidden Products from WooCommerce Cart, Checkout, Order, and Emails
If you want to hide hidden products from WooCommerce Cart, Checkout, Order, and Emails, you should consider adding the following code in your child theme functions.php file.
/**

  * Hide Hidden Products from Cart, Checkout, Order - WooCommerce

   */

   add_filter( 'woocommerce_cart_item_visible', 'njengah_hide_hidden_product_from_cart' , 10, 3 );

add_filter( 'woocommerce_widget_cart_item_visible', 'njengah_hide_hidden_product_from_cart', 10, 3 );
add_filter( 'woocommerce_checkout_cart_item_visible', 'njengah_hide_hidden_product_from_cart', 10, 3 );

add_filter( 'woocommerce_order_item_visible', 'njengah_hide_hidden_product_from_order_woo333', 10, 2 );
   function njengah_hide_hidden_product_from_cart( $visible, $cart_item, $cart_item_key ) {
    $product = apply_filters( 'woocommerce_cart_item_product', $cart_item['data'], $cart_item, $cart_item_key );

    if ( $product->get_catalog_visibility() == 'hidden' ) {
        $visible = false;
     }
     return $visible;

 }

   function njengah_hide_hidden_product_from_order_woo333( $visible, $order_item ) {

    $product = $order_item->get_product();

    if ( $product->get_catalog_visibility() == 'hidden' ) {

         $visible = false;
     }
     return $visible;
 }
Remember to save the changes you make.
WooCommerce Hide Empty Category
WooCommerce allows you to sort products into different categories and tags. This means that even empty categories are displayed on the shop and home page. You may want to hide the empty categories so that users cannot find them.
However, WooCommerce does not have a built-in option to hide categories from the homepage or archives. It will display the category even when it is empty. Hiding an empty category is an easy task if you are an experienced WordPress developer.
We will use a PHP code snippet to hide the empty categories. However, you can also use CSS, but this will receive negative points from search engines, which will harm your SEO. You can learn about hiding empty categories here.
Steps to Hide Empty Categories from Category Widget in WooCommerce
Here are the steps that you should follow:
- Log into your WordPress site and access the Dashboard as the admin user.
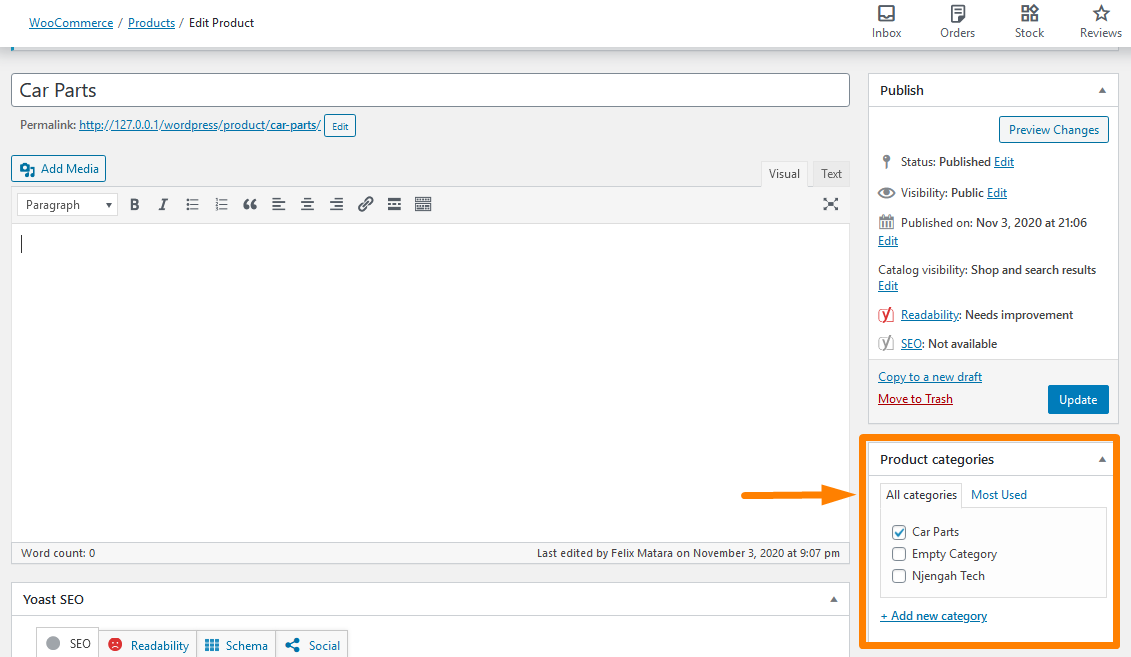
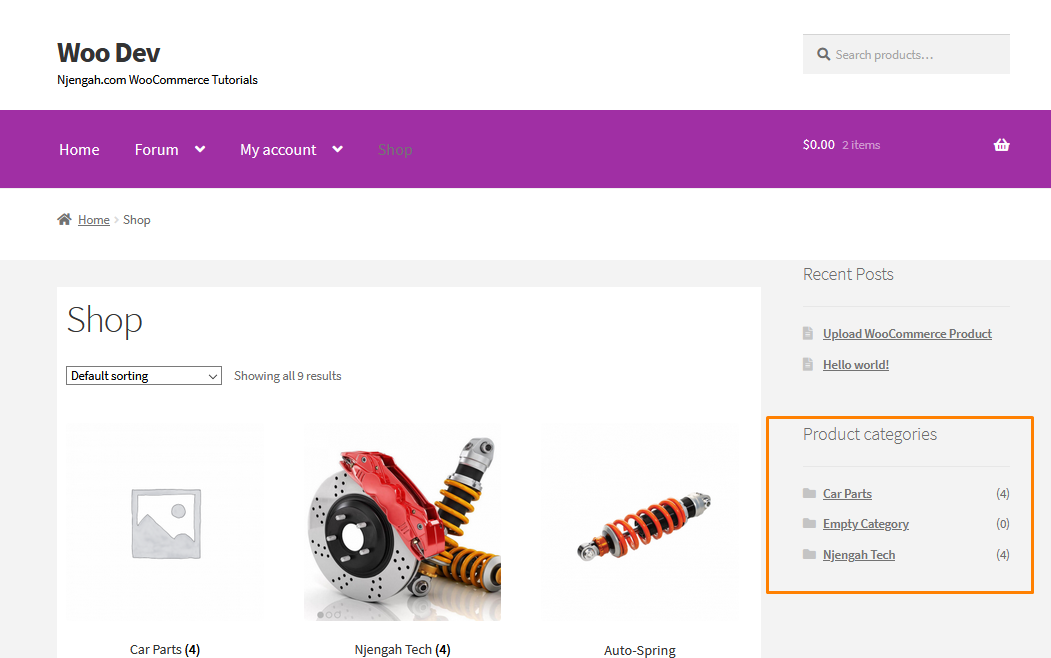
- First, we need to create some categories and assign products. To do this, click on Products > Categories. You can assign categories from here. You have seen that I have assigned five products to the Car Parts Category and four to Njengah Tech from the screenshot below. The first category is empty.

- Alternatively, you can also assign categories to products from the product add/edit screen, as shown below:
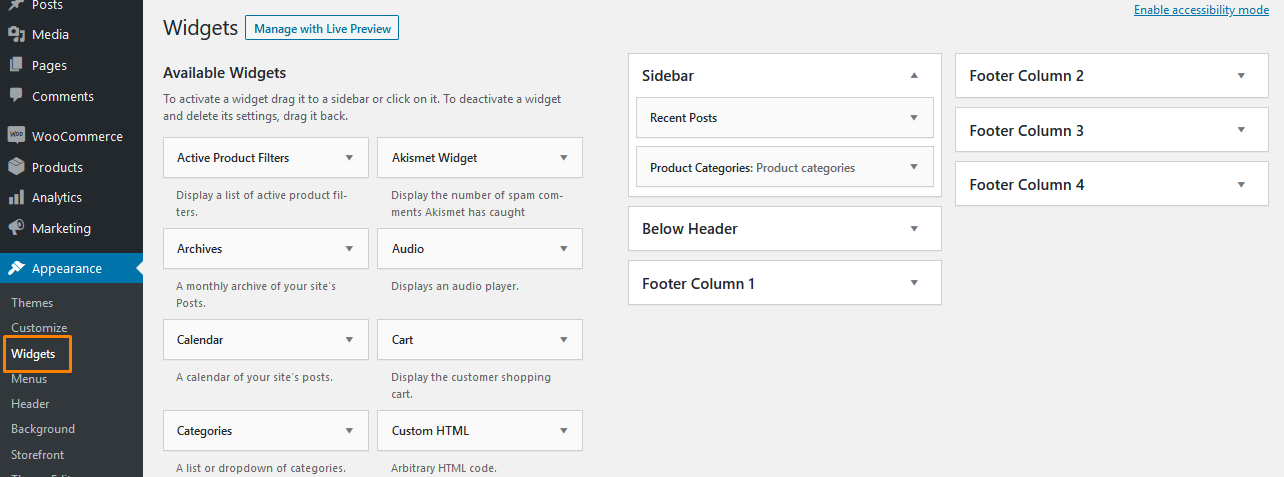
- The next step is to add the category widget to the sidebar or any other area you want your WooCommerce store. To do this, go to Appearance > Widgets, drag the WooCommerce product categories widget, and drop to the primary sidebar area, as shown below:
- If you refresh the front end, you’ll see all the categories being listed:
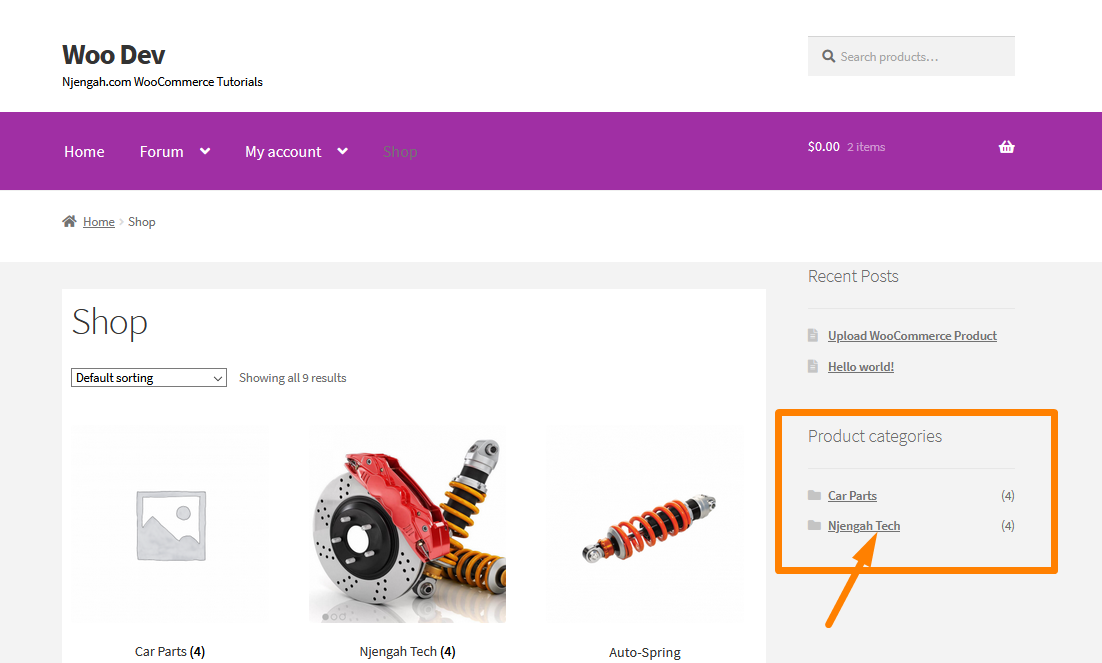
- To hide or remove the empty categories listed here, add the following code lines at the end of your theme’s functions.php file.
function woo_hide_product_categories_widget( $list_args ){

            $list_args[ 'hide_empty' ] = 1;

            return $list_args;

}

add_filter( 'woocommerce_product_categories_widget_args', 'woo_hide_product_categories_widget' )
- After placing the code above, remember to save the file. Go to the front end and refresh the page. You will notice that the empty category has been removed from the list.
Steps to Hide Price and Add to Cart for Logged-Out Users
The image below shows how the prices and the Add to Cart button are displayed by default, even for logged-out users: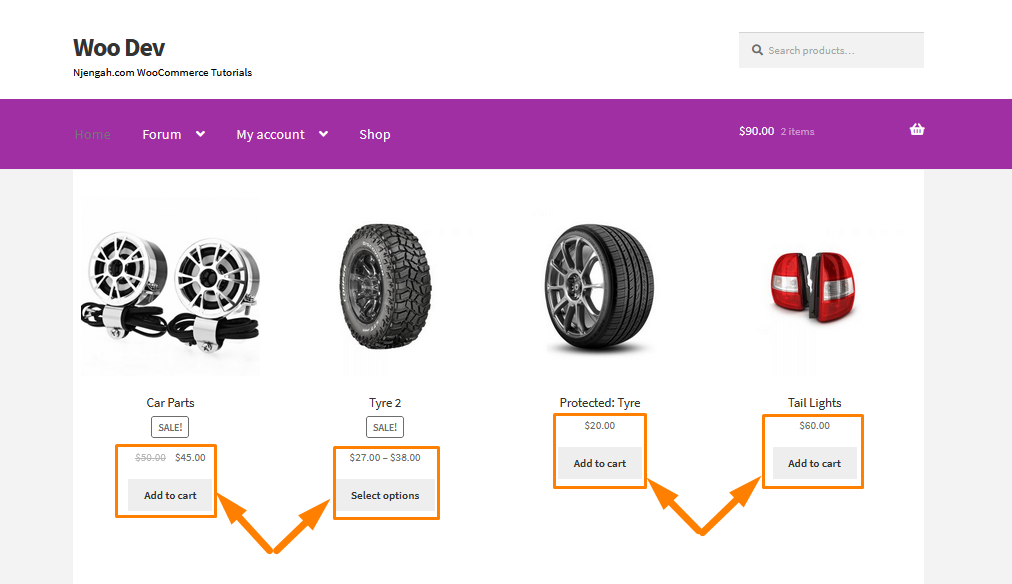
If you want to hide the prices and the Add to Cart button for logged-out users, you should consider adding the following code in your child theme functions.php file:
/**

  *       Hide Price & Add to Cart for Logged Out Users

 */

 add_action( 'init', 'njengah_hide_price_add_cart_not_logged_in' );

 function njengah_hide_price_add_cart_not_logged_in() {

    if ( ! is_user_logged_in() ) {

       remove_action( 'woocommerce_after_shop_loop_item', 'woocommerce_template_loop_add_to_cart', 10 );

       remove_action( 'woocommerce_single_product_summary', 'woocommerce_template_single_add_to_cart', 30 );

       remove_action( 'woocommerce_single_product_summary', 'woocommerce_template_single_price', 10 );

       remove_action( 'woocommerce_after_shop_loop_item_title', 'woocommerce_template_loop_price', 10 );

       add_action( 'woocommerce_single_product_summary', 'njengah_print_login_to_see', 31 );

       add_action( 'woocommerce_after_shop_loop_item', 'njengah_print_login_to_see', 11 );

    }

 }

 function njengah_print_login_to_see() {

    echo '<a href="' . get_permalink(wc_get_page_id('myaccount')) . '">' . __('Login to see prices', 'theme_name') . '</a>';

 }
Remember to save the changes.
This will be the outcome on the front end:
You can remove the figure from the price fields, meaning that the product will no longer have a price and, consequently, the Add to Cart button.
Alternatively, you can write a filer. This filter will detect the product id of the target product and return a false. This will remove the Add to Cart button.
/**

* Hide the button for the product with ID = 10 AND for variable products

 */

 add_filter('woocommerce_loop_add_to_cart_link', function( $add_to_cart_html, $product ) {

 if( $product->get_id() == 604 || $product->is_type( 'variable' ) ) {

 return '';

 }

 return $add_to_cart_html;

 }, 10, 2 );
Remember to add the correct product ID. This is the outcome:
WooCommerce Hide Out of Stock Products
WooCommerce provides users with an excellent inventory management system that helps build an eCommerce website within the shortest time possible.
One of the most important requirements for inventory management in eCommerce is an option to hide out-of-stock products.
Luckily WooCommerce comes with an out-of-box solution to hide out-of-stock products in the settings. You can learn more about adding products here.
Steps to Hide Out-of-Stock Products in Single Product
- Go to WooCommerce -> Settings sub-menu in the WordPress dashboard.
- Click on the Products Tab > Inventory sub-tab.
- Check the option Out Of Stock Visibility that hides the out-of-stock products.
Navigate to the WooCommerce dashboard menu and use the Products tab click on the inventory sub-tab to see the option to hide out-of-stock products as shown in the image below:
Check on this option and save the settings, and you will successfully hide the out-of-stock products from the catalog.
Alternatively, you can add a custom PHP script to the functions.php file.
You can add an action hook that hooks on pre_get_posts , and the callback function should have the logic to hide the out-of-stock product using a taxonomy query.
Here is an example of a code snippet that works perfectly for hiding the out of stock products:
<?php

add_action( 'pre_get_posts', 'njengah_hide_out_of_stock_products' );

function njengah_hide_out_of_stock_products( $query ) {

if ( ! $query->is_main_query() || is_admin() ) {

return;

}

if ( $outofstock_term = get_term_by( 'name', 'outofstock', 'product_visibility' ) ) {

$tax_query = (array) $query->get('tax_query');

$tax_query[] = array(

'taxonomy' => 'product_visibility',

'field' => 'term_taxonomy_id',

'terms' => array( $outofstock_term->term_taxonomy_id ),

'operator' => 'NOT IN'

);

$query->set( 'tax_query', $tax_query );

}

remove_action( 'pre_get_posts', 'njengah_hide_out_of_stock_products' );

}
Remember to save the changes.
WooCommerce Hide All Products From Shop Page
If you are running something like a B2B/wholesale or members-only store and do not want every product available to the public, this solution will help you.
This developer-friendly solution involves the use of a custom PHP script.
WooCommerce has a built-in solution for hiding particular products on the Shop Page. You can learn more about this solution here.
Steps to Hide All Products WooCommerce Shop Page
Here are the steps that you need to follow:
- Log into your WordPress site and access the Dashboard as the admin user.
- From the Dashboard menu, click on Appearance Menu > Theme Editor Menu. When the Theme Editor page is opened, look for the theme functions file to add the function that will add the function to hide all products on the WooCommerce shop page.
- Add the following code to the functions.php file:
/**
* @snippet Remove Product Loop @ WooCommerce Shop
*/
add_action( 'pre_get_posts', 'njengah_remove_products_from_shop_page' );
function njengah_remove_products_from_shop_page( $q ) {
if ( ! $q->is_main_query() ) return;
if ( ! $q->is_post_type_archive() ) return;
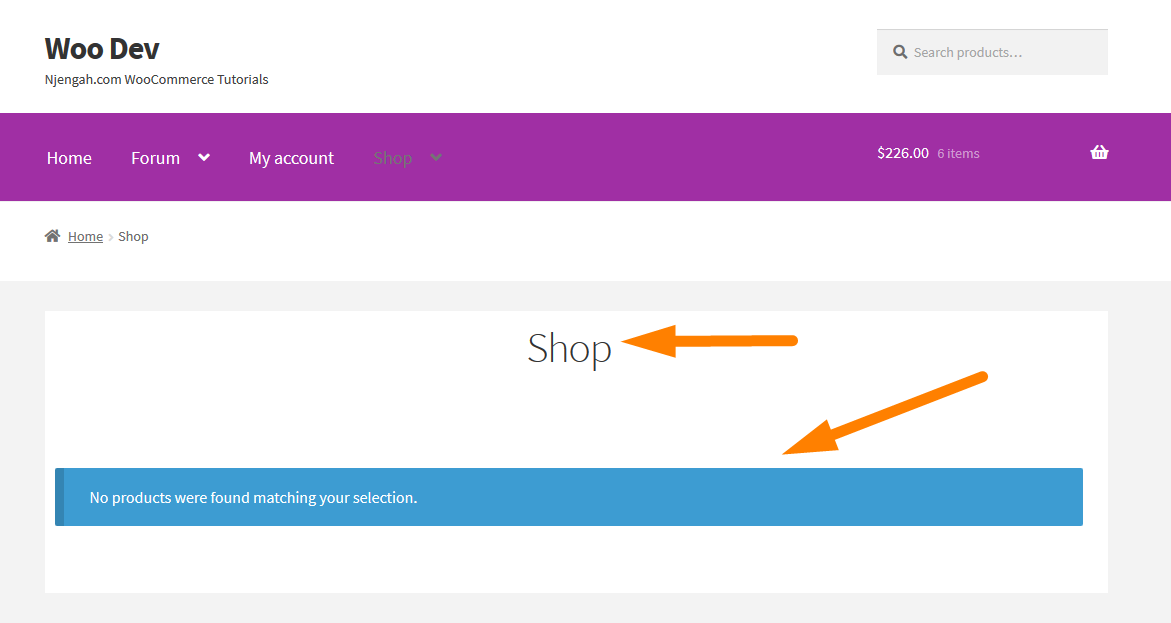
if ( ! is_admin() && is_shop() ) {
$q->set( 'post__in', array(0) );
}
remove_action( 'pre_get_posts', 'njengah_remove_products_from_shop_page' );
}
- This will be the Outcome:
- To hide the ‘No products were found matching your selection’, add this line of code at the end of the functions.php file.
/**

* @snippet Remove "No products were found matching your selection" @ WooCommerce Loop Pages

*/

remove_action( 'woocommerce_no_products_found', 'wc_no_products_found' );
- This will be the outcome:
In the code above, the ‘pre_get_posts‘, ‘njengah_remove_products_from_shop_page‘ action that will target the shop page. To hide the products, I created a function that will remove the products, aided by a series of loops and a remove action.
WooCommerce Hide Trailing Zeros
WooCommerce, by default, displays prices with trailing zeros. Moreover, WooCommerce does not have the option to hide or disable this feature.
If you are looking for a way to hide trailing zeros in your WooCommerce store, you are in the right place.
In this section, we will use a custom PHP script that I have prepared for this purpose. You can also learn how you can display trailing zeros here if your theme does not support it.
It is worth mentioning that this solution will remove trailing zeros from your entire store.
Tor you to hide the trailing zeros in your WooCommerce Shop page, add the following code at the bottom of your functions.php file:
// Hide trailing zeros on prices.

add_filter( 'woocommerce_price_trim_zeros', 'njengah_hide_trailing_zeros', 10, 1 );

function njengah_hide_trailing_zeros( $trim ) {

return true;

}
Remember to click on the Save Changes button at the bottom of the text editor screen.
Now you have successfully added the code snippet required to hide trailing zeros. This will be the outcome on the front end: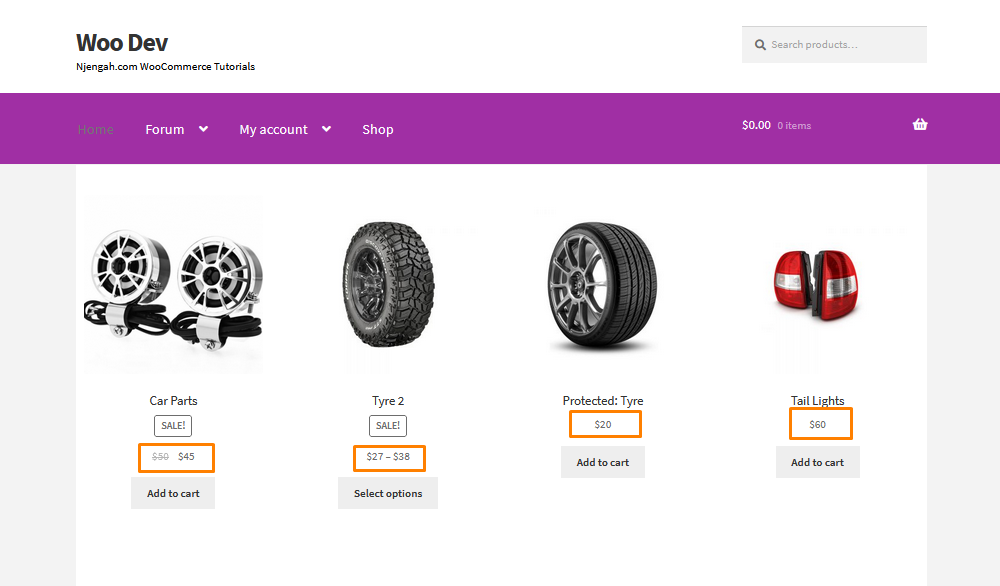
How to Hide WooCommerce Product Count
There are many reasons you may want to remove the product count on categories or subcategories. If your theme does not display the product count well, I highly recommend that you hide it.
This post shares how to hide the category count number completely using a custom PHP script.
Additionally, you will learn how to hide it using a CSS code snippet that I will share.
You can also use CSS to hide the WooCommerce product count. You can learn how to add the CSS code snippet here.
However, it is important to note that these code snippets should be added to your child theme functions.php file. You can also use a Site Customization plugin so that you do not lose your changes when you update your WordPress theme.
By default, this is how WooCommerce displays the product count on the Shop page:
If you want to hide the product count on the WooCommerce Shop page, you should consider adding the following code in your child theme functions.php file:
/*

 *

 * Removes products count after categories name

 *

 */

add_filter( 'woocommerce_subcategory_count_html', 'njengah_remove_category_products_count' );

function njengah_remove_category_products_count() {

  return;

}
Remember to save the changes. This will be the outcome on the front end:
It is worth mentioning that WooCommerce also displays the product count on subcategories as well. You can hide the product count by adding the following code at the bottom of the functions.php file:
add_filter( 'woocommerce_subcategory_count_html', '__return_false' );
This code will remove the product count on the subcategories.
WooCommerce Hide Product Prices by User Role
You may want to hide the product prices based on certain user roles in your WooCommerce store as a marketing strategy.
However, WooCommerce, by default, does not have the option to hide prices.
This post focuses on pricing based on the user role, or lack thereof (guest users).
The main aim of doing this is to encourage users to sign up to see the prices.
If you want to add this functionality, stick to the end. The best part is I’ll give you a step-by-step guide on how to hide the prices. However, you need to have some technical knowledge.
You can move a step further and hide the Cart and Checkout prices and totals for guest users. You can learn how to do that here.
Steps to Hide Prices for Guest Users
If you want to hide prices for guest users in your WooCommerce store, you should consider adding the following code to the functions.php file of your theme:
/**

  * Hide product price based on user role.

  */

 function njengah_hide_prices_guests( $price ) {

             if ( ! is_user_logged_in() ) {

                         return ''; // Return a empty string for no price display.

            }

             return $price;

}

add_filter( 'woocommerce_get_price_html', 'njengah_hide_prices_guests' ); // Hide product price
Remember to save the changes. This is the outcome on the front end: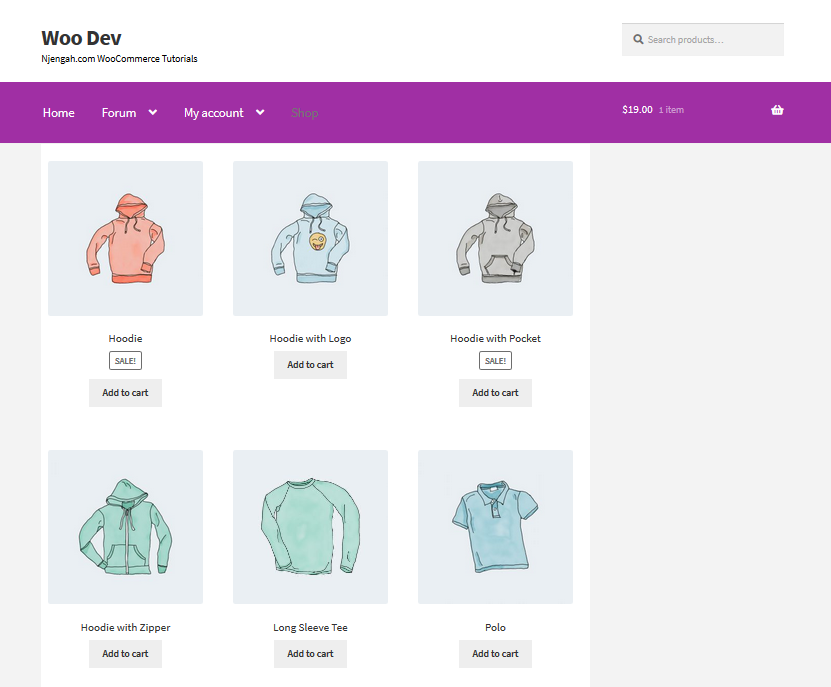
WooCommerce Hide Category
In this section, I will show you how how to hide WooCommerce categories from being displayed on the shop page.
WooCommerce allows you to decide how you want your products to be displayed on the Shop page. You can learn how to display categories here.
For various reasons, you may not want to display some categories on the Homepage.
In this example, I will remove the ‘Accessories’ category. We can do this either by giving the correct name to this category or hiding it from being listed.
This is how the categories are displayed on the front end: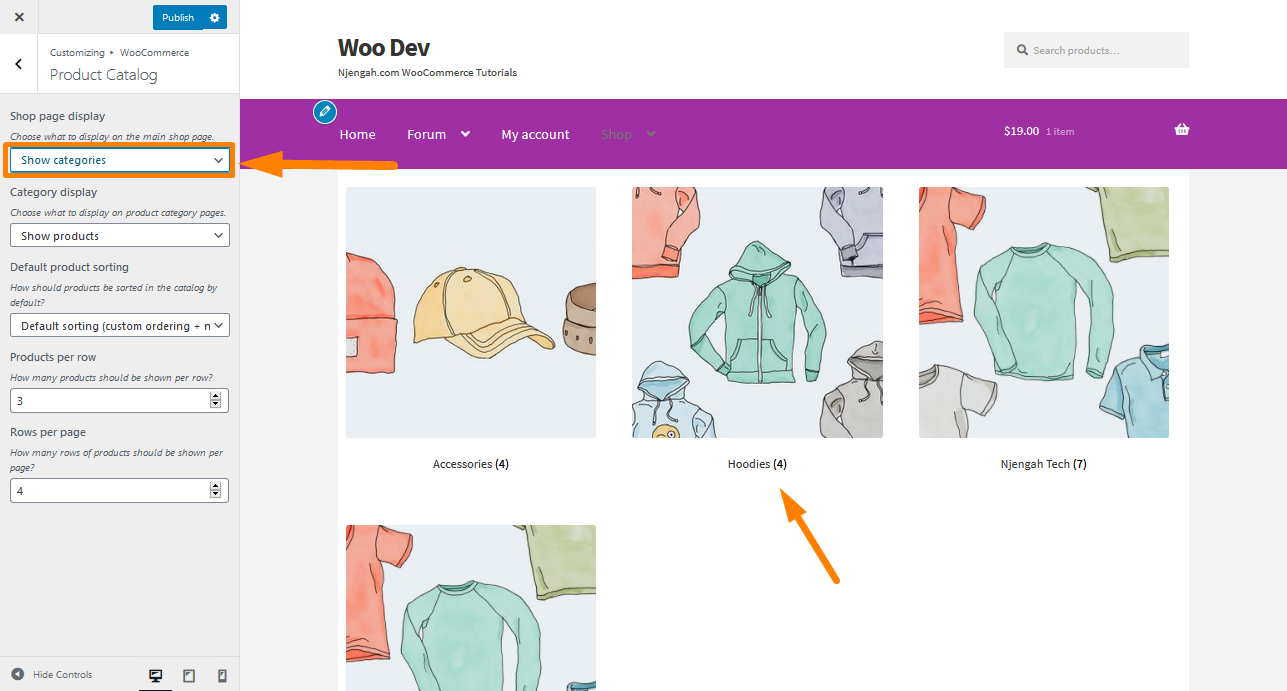
If you want to hide a category, you should consider adding the following code at the bottom of the functions.php file:
/**

  * Show products only of the selected category.

  */

 function get_subcategory_terms( $terms, $taxonomies, $args ) {

             $new_terms    = array();

             $hide_category           = array( 19 ); // Ids of the category you don't want to display on the shop page

                          // if a product category and on the shop page

             if ( in_array( 'product_cat', $taxonomies ) && !is_admin() && is_shop() ) {

                 foreach ( $terms as $key => $term ) {

                         if ( ! in_array( $term->term_id, $hide_category ) ) {

                                     $new_terms[] = $term;

                         }

                 }

                 $terms = $new_terms;

             }

   return $terms;

}

add_filter( 'get_terms', 'get_subcategory_terms', 10, 3 );
To see the outcome, refresh the page.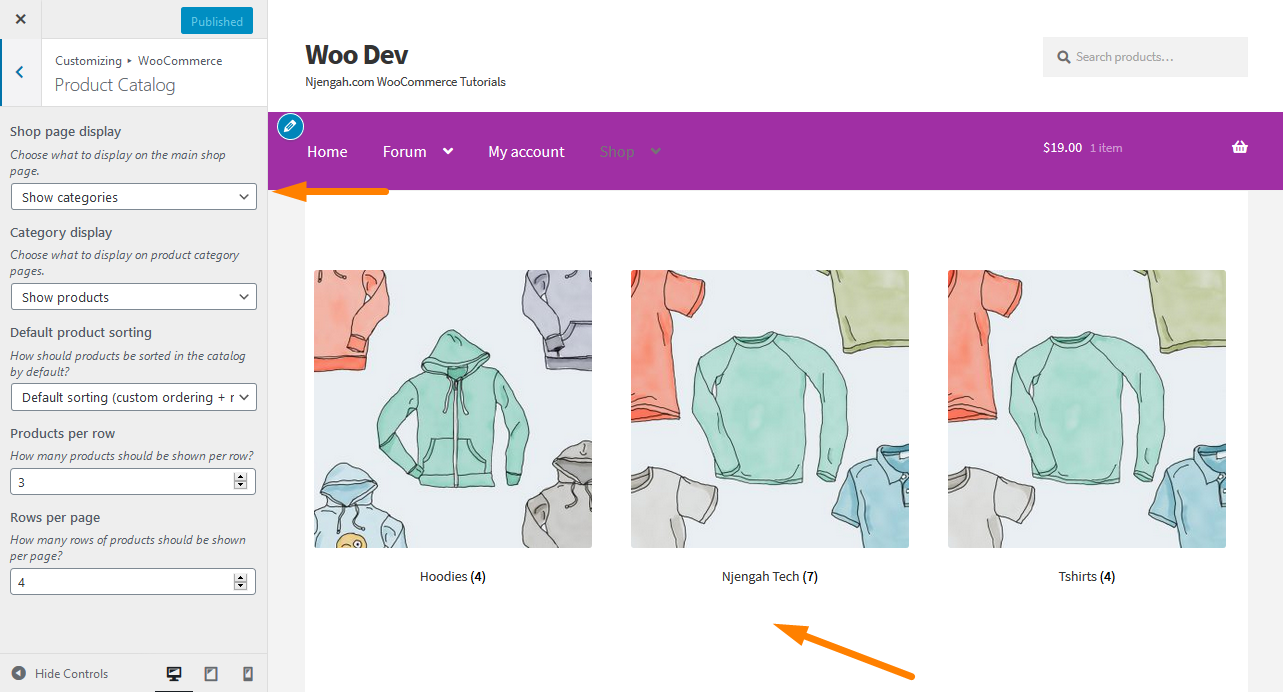
From the screenshot above, you can see that the code removed the ‘Accessories’ category ID=19.
Remember to add the correct ID so that the code can work.
How to Hide Products Without Price in WooCommerce
If you want to hide products without the price, you can quickly implement this snippet in your functions.php or your plugin code, and all the products without a price will be hidden from the customer view.
It is not complicated. All you need to do is add the code to the theme functions or the plugin files.
First, you need to create a meta query for all the products that will get the products, and in the meta query, you will look for the empty value of the key – price, and if the value is empty, you can reset the meta query.
This meta query needs to hook on this action woocommerce_product_query, and the callback function will contain the logic to show all products apart from those without the price. You can learn more about Meta queries and the accepted arguments here.
Here is the code:
add_action( 'woocommerce_product_query', 'njengah_hide_products_without_price' );

 function njengah_hide_products_without_price( $q ){

   $meta_query = $q->get( 'meta_query' );

   $meta_query[] = array(

      'key'       => '_price',

      'value'     => '',

      'compare'   => '!='

   );

   $q->set( 'meta_query', $meta_query );

}
This code should be added to the functions.php, and you will successfully hide all the products without the price.
As you can see on the code callback function, the meta query’s value is set to an empty string ” “This is the basis of the WooCommerce hides products without price logic.
WooCommerce Hide Sale Badge
WooCommerce on-sale badge is a label displayed on the single product page, product archives pages, up-sell, cross-sells, and related products.
Ideally, this button is designed to notify your shop visitors that certain products have on sale offer.
You can set up the WooCommerce on-sale badge for each product by adding the sales price and the regular price for the same product.
In this post, I want to illustrate how you can change the sales badge and how you can remove it or hide it altogether.
An on-sale badge design may vary from one WooCommerce site to another, depending on the store’s theme. The default WooCommerce theme – Storefront comes with a default plain on-sale badge without any design as shown on the image below:![]()
If you want to remove the sale badge from your WooCommerce store, you should consider adding the following code to your child theme functions.php file:
// Add filter to remove the sale_badge

  add_filter( 'woocommerce_sale_flash', 'njengah_remove_on_sale_badge' );

  function njengah_remove_on_sale_badge( $sale_badge ){

    return '';

 }
This code is a filter that checks for the sales badge on the page and replaces it with an empty string in the return statement of the callback function. This is the outcome:
Alternatively, you can learn how to hide the sale badge using CSS and change the badge here.
WooCommerce Hide Quantity in Stock
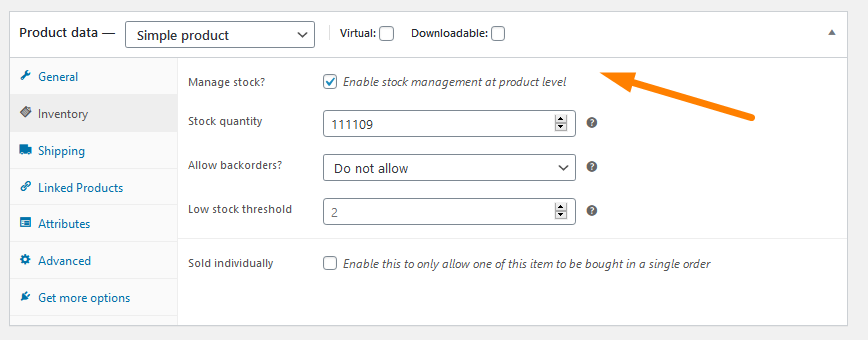
You can hide stock messages on your products by making code-related changes to the theme you are using for your WooCommerce store.
I highly recommend that you make a complete backup of your WooCommerce store.
This can help you revert to how things were if anything goes wrong with your code changes. Alternatively, you can use a child theme.
WooCommerce comes equipped with a decent inventory control capability.
You can turn this option in your store using the “Inventory” tab of the Product editing screen in the WordPress admin area. You can see how you can display the quantity in stock here.
By default, this is how the stock message is displayed on the single product page: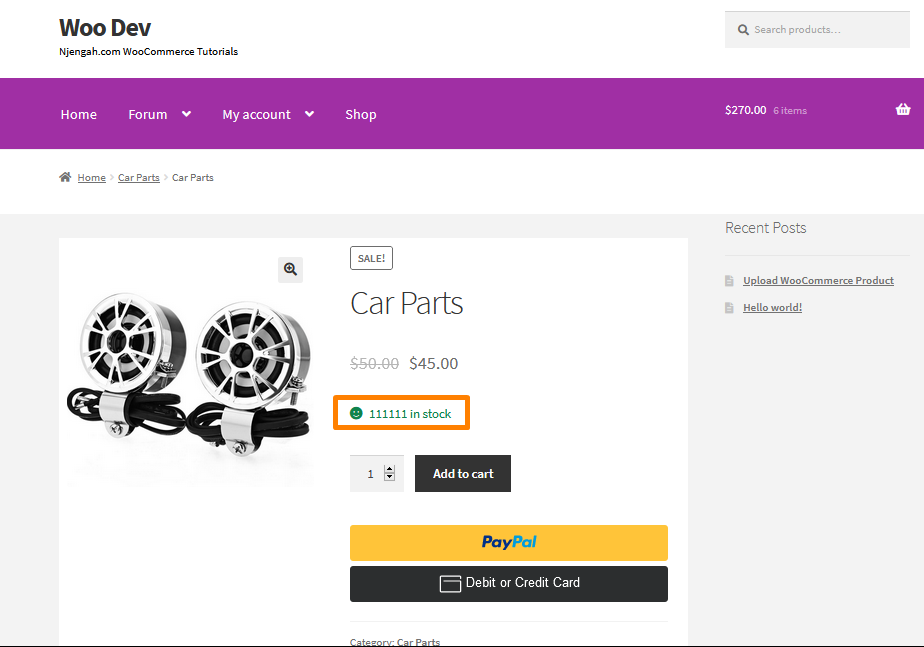
If you want to hide this element, you should consider adding the following code snippet at the bottom of the functions.php file:
/**

 * Hide the "In stock" message on product page.

 *

 * @param string $html

* @param string $text

 * @param WC_Product $product

 * @return string

 */

 function njengah_wc_hide_in_stock_message( $html, $text, $product ) {

 $availability = $product->get_availability();

 if ( isset( $availability['class'] ) && 'in-stock' === $availability['class'] ) {

 return '';

}

 return $html;

 }

 add_filter( 'woocommerce_stock_html', 'njengah_wc_hide_in_stock_message', 10, 3 );
To see the outcome, refresh the product page, and you will see that the message has been removed: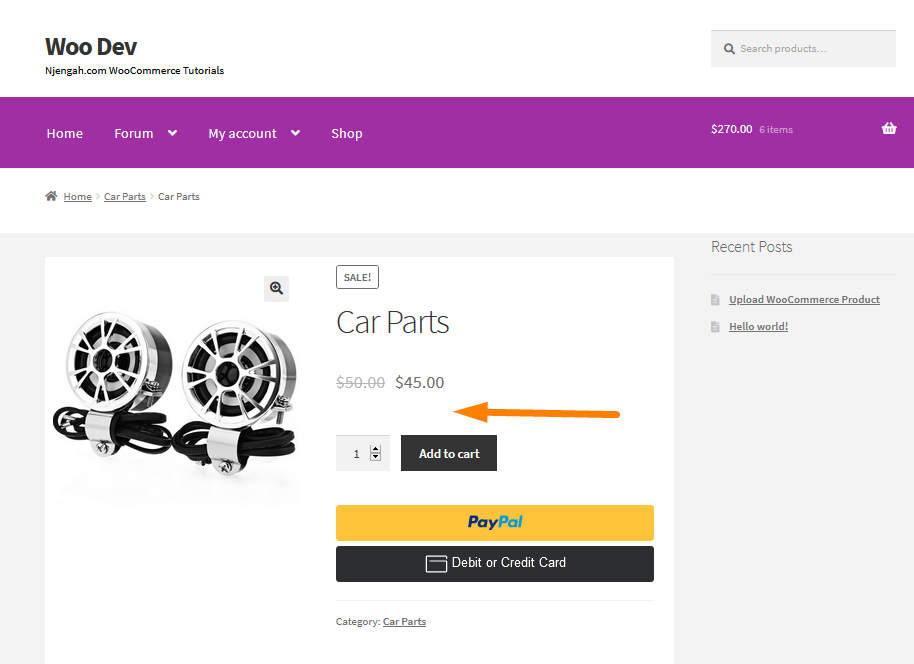
WooCommerce Hide Weight of Product
If you are selling digital products, you might not need to display your product’s weight and dimensions.
Additionally, if you are not shipping the product, there is no need to display its weight.
However, before we start, it is worth mentioning that your theme will not display the weight and dimensions of a product unless this information is added in the back end.
You can learn more about adding the weight of products here.
From the image, you can see I have added the weight, and this is how it is displayed in the front end: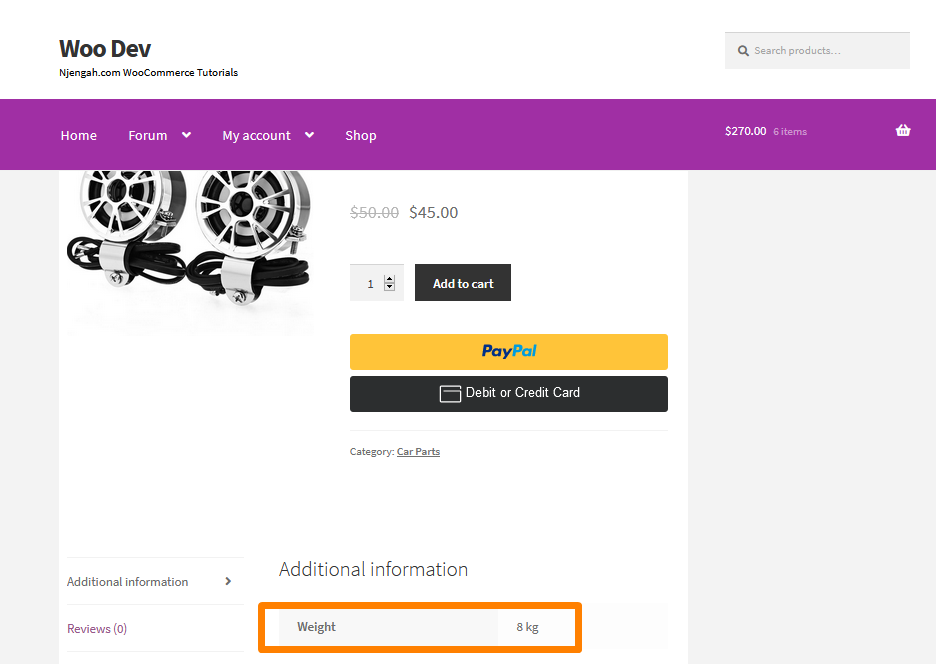
If you want to hide this element, consider adding the following code at the bottom of the theme’s functions.php file:
/**

* Hides the product's weight and dimension on the single product page.

 */

 add_filter( 'wc_product_enable_dimensions_display', '__return_false' );
Remember to save the changes you make on this file. Here is the outcome on the front end: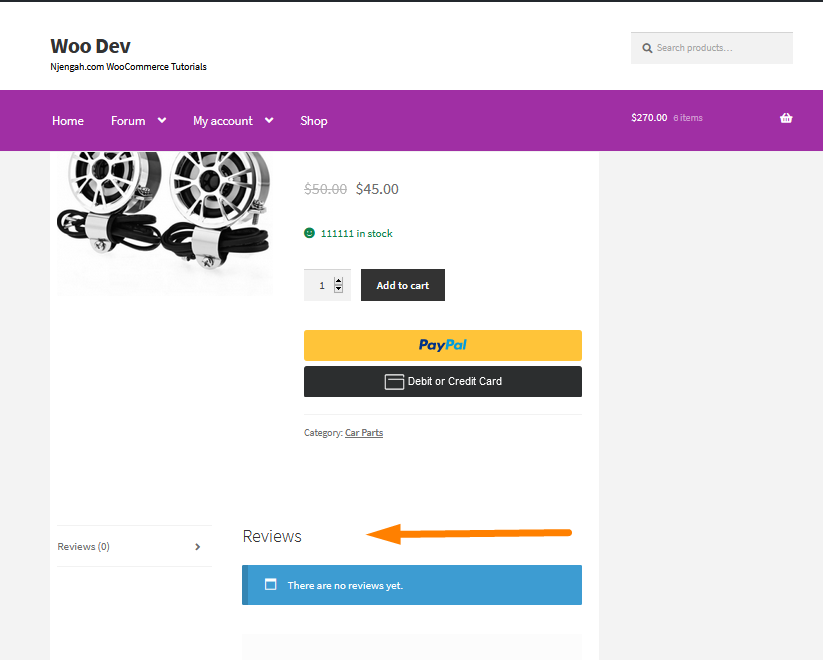
WooCommerce Hide SKU, Category, and Tags on Product Page
If you are a WordPress developer, you would think there is a specific WooCommerce filter for this.
However, there is no filter for this. This means that we have to remove the whole “product meta” block.
Additionally, you can add back the information you want, for example, the categories.
If you are not a developer, copy-paste the snippet into your functions.php and observe the changes.
Additionally, you need to learn how to display the product summary and show them again if you remove them. You can learn how to do that here.
This is how the product summary is displayed on the front end: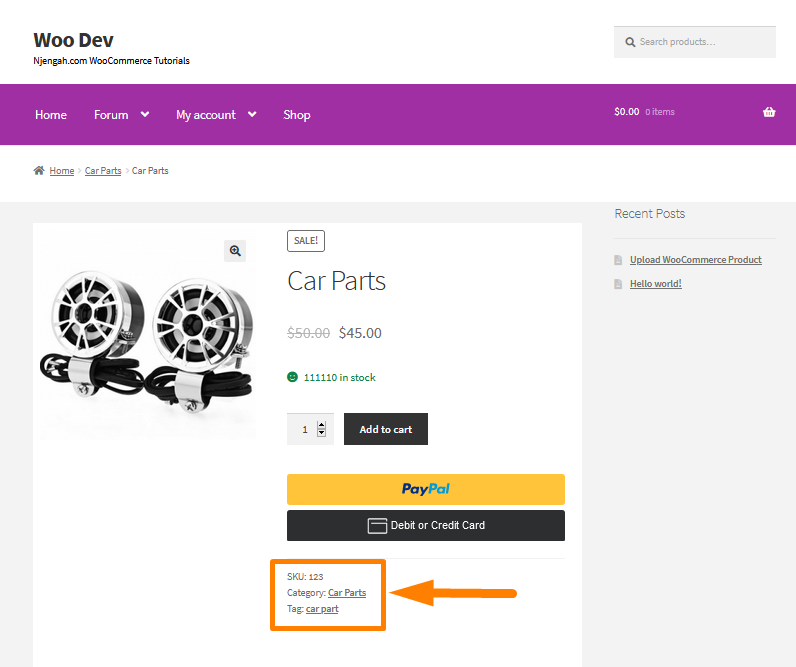
If you want to hide the product summary, you should consider adding the following code at the bottom of your theme’s functions.php file:
/**

  *        Hide SKU, Cats, Tags @ Single Product Page - WooCommerce

 */

  remove_action( 'woocommerce_single_product_summary', 'woocommerce_template_single_meta', 40 );
Remember to save your changes. This will be the outcome on the front end: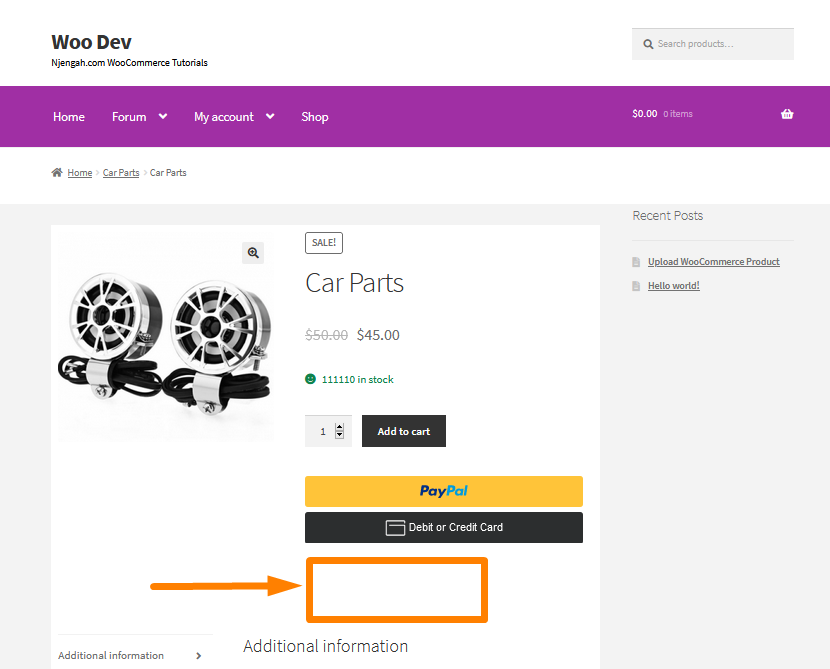
WooCommerce Hide Price When Out of Stock
WooCommerce takes care of your inventory needs.
WooCommerce is an optimized system that and saves you the time and effort needed to update your stock.
Moreover, it is flexible for customization to make up for the features it lacks.
Potential buyers are frustrated when they see the out-of-stock notification or if the product is unavailable.
One of the things you can do is hide the price of products out of stock.
Additionally, there are many situations where this functionality makes sense.
For example, if you have a WooCommerce membership store, you probably want to hide your prices from visitors who are not registered. You can learn more about hiding the price here.
If you want to hide the price for out-of-stock products on the single product page, add the following code in the functions.php file of your theme:
/**

  *       Hide Price When Out of Stock

  */

 add_filter( 'woocommerce_variable_sale_price_html', 'njengah_remove_prices', 10, 2 );

 add_filter( 'woocommerce_variable_price_html', 'njengah_remove_prices', 10, 2 );

 add_filter( 'woocommerce_get_price_html', 'njengah_remove_prices', 10, 2 );

 function theanand_remove_prices( $price, $product ) {

 if ( ! $product->is_in_stock()) {

 $price = '';

 }

 return $price;

 }
This is the outcome: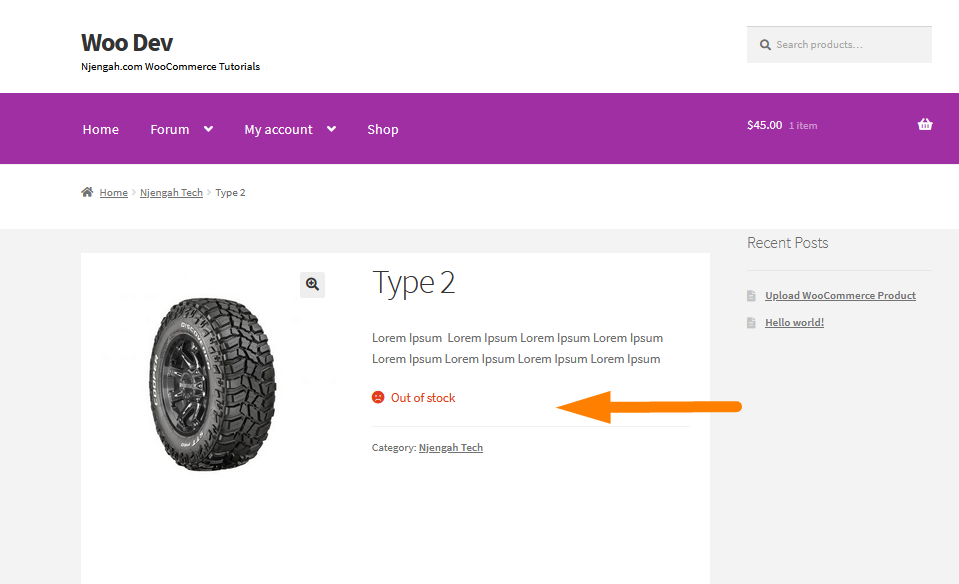
WooCommerce Hide Additional Information
When you add shipping information to your product (weight and dimensions), they are automatically added to the WooCommerce Additional Information tab on the product page.
The template for the “Additional Information” tab adds a list of the entire product attributes.
If you do some research, you will find that these attributes are added from the product-attributes.php template via this function: enable_dimensions_display(). You can learn why a PHP solution is better than a CSS solution here.
This is how the Additional information tab is displayed in the Storefront theme: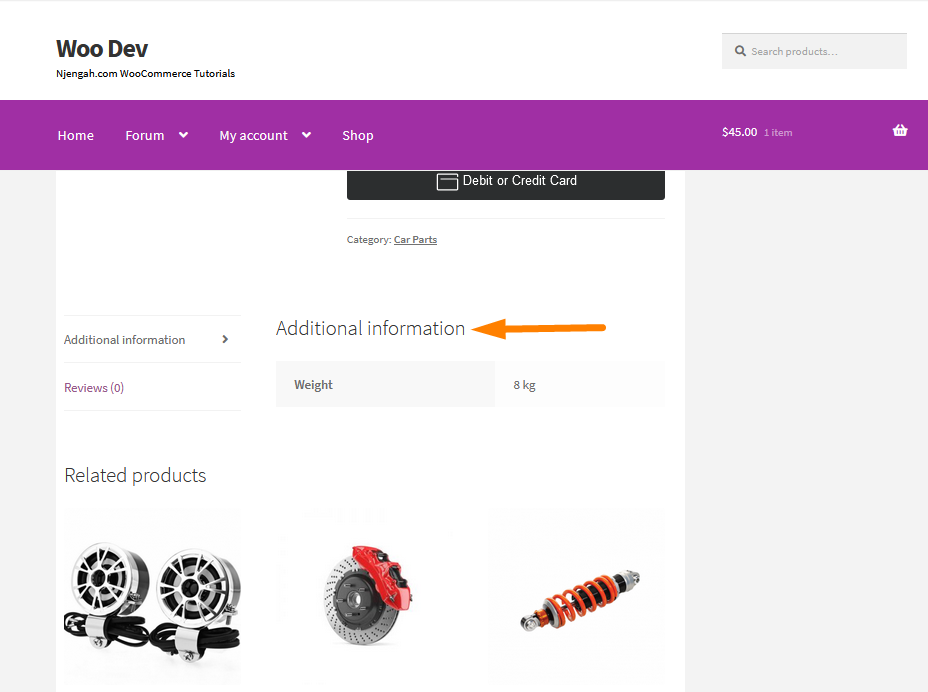
If you want to hide the Additional Information section, you should consider adding the following code at the bottom of the functions.php file:
/**

*        Remove Additional Information Tab @ WooCommerce Single Product Page

*/

add_filter( 'woocommerce_product_tabs', 'njengah_remove_product_tabs', 9999 );

function njengah_remove_product_tabs( $tabs ) {

unset( $tabs['additional_information'] );

return $tabs;

}
This is the outcome on the single product page: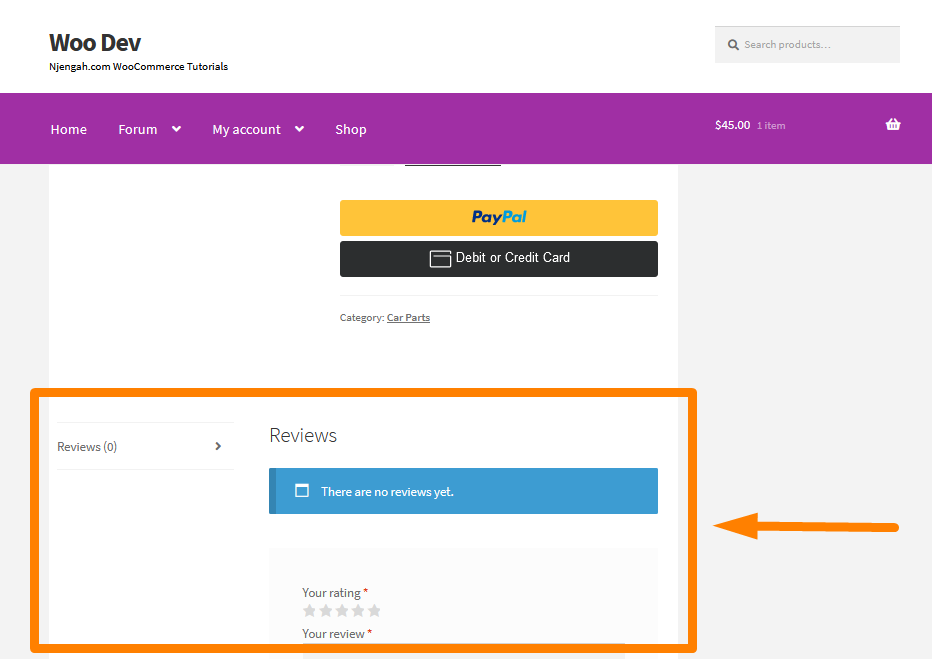
WooCommerce Hide Tab Title
WooCommerce has three different tabs, and they have headings. These tabs are:
- Additional information
- Reviews
- Description (displayed if you have added description content for the product)
This section will show you how to hide and change the title of the Description tab title on the single product page.
If you want to hide and change the Additional Information and Reviews tab title, you can find the full solution here.
This is how the Description tab title is displayed on the front end: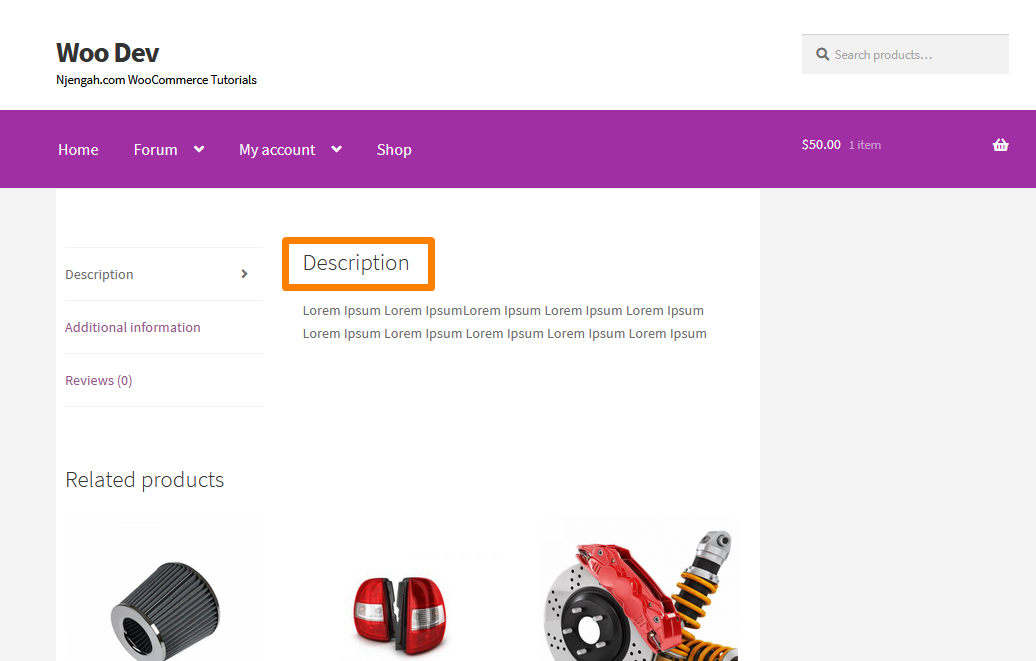
To hide and change the Description tab heading, you should consider adding the following code snippet at the end of the functions.php file:
// Remove the product description Title

 add_filter( 'woocommerce_product_description_heading', '__return_null' );

 // Change the product description title

 add_filter('woocommerce_product_description_heading', 'change_product_description_heading');

 function change_product_description_heading() {

  return __('NEW TITLE HERE', 'woocommerce');

 }
This is the outcome on the front end: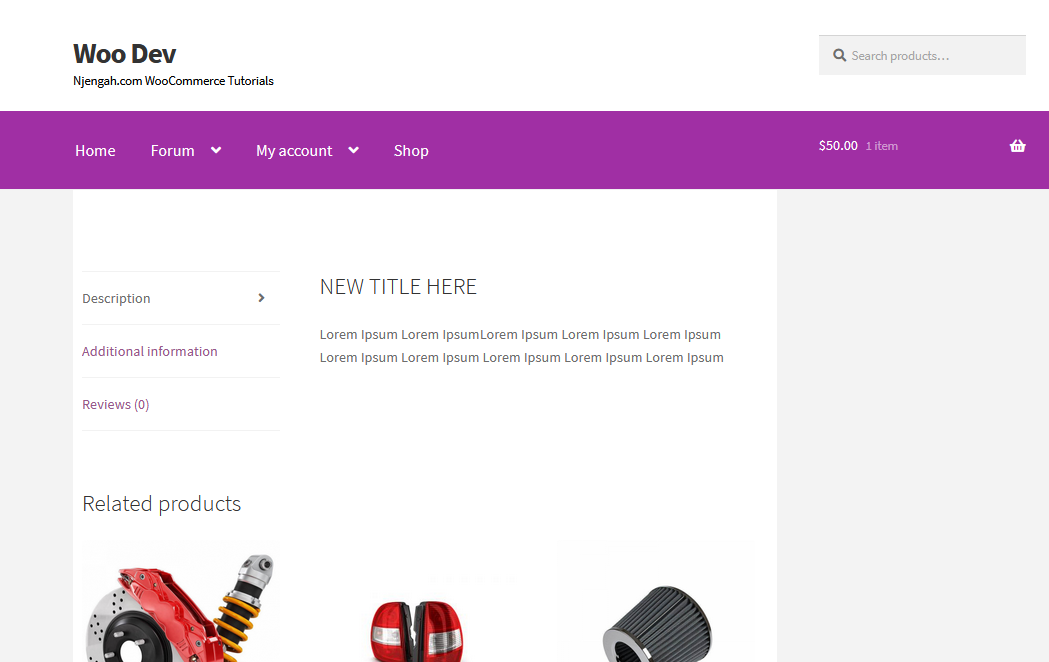
WooCommerce Hide SKU
WooCommerce allows you to add SKU for any product on the product settings page on the back end.
This section will learn how to hide the product SKU even in the admin section completely.
However, if your store keeps SKU for administration, but you do not want to disable it on the admin area, you can learn how to do that here.
This is how the SKU is displayed on the product page: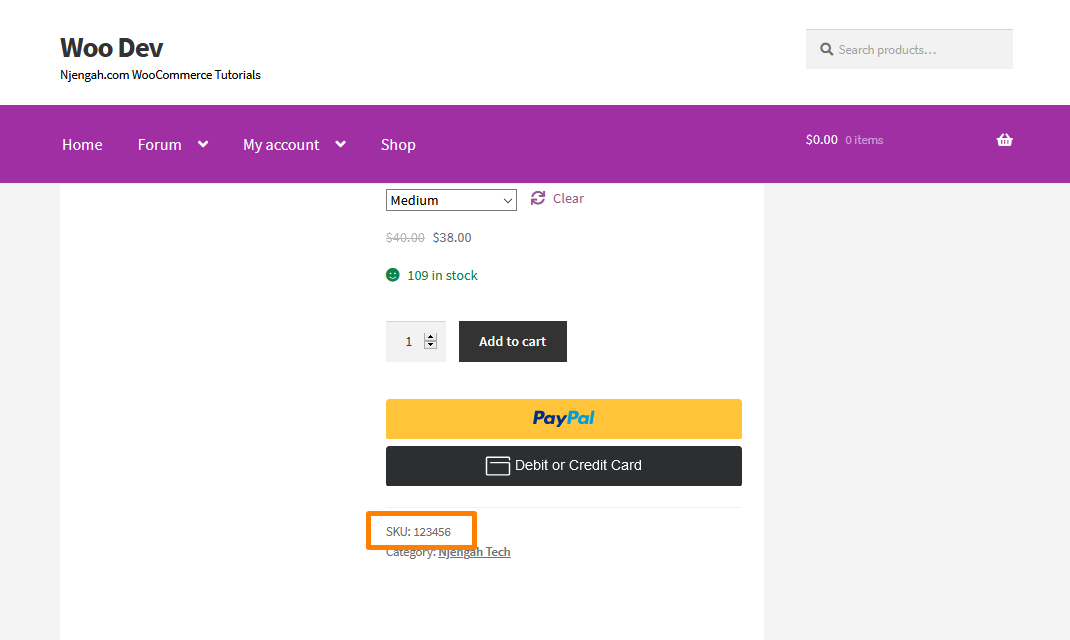
If you want to hide the SKU even in the Admin area completely, add the following custom PHP script at the bottom of your theme’s functions.php file:
add_filter( 'wc_product_sku_enabled', '__return_false' );
This will be the outcome: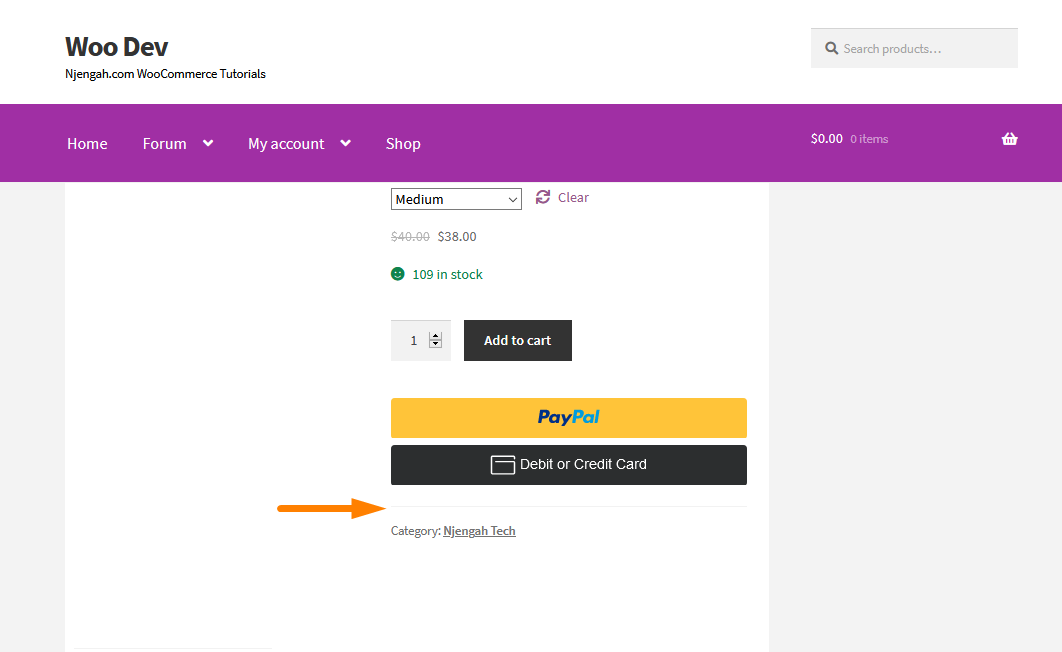
Remember that this solution removes the SKU from your entire WooCommerce store.
How to Hide Add to Cart Button in WooCommerce Single Product Page
Before we get to the detailed steps to do this, you might wonder why you may hide the add to cart button for a specific product.
There are many reasons you might want to do this, for example, if you are dealing with electronics such as mobile devices, many products are introduced a few days before they are allowed to purchase.
The specifications are released early, so many online shop owners give detailed specifications of the products before they are available to be bought.
This means that the store owner cannot have the ‘Add to Cart’ button on the page, as they do not want people to buy the product just yet until it is available for purchase.
Alternatively, you may decide to hide the cart button for a specific product for a specific period. You can learn how you can achieve this functionality here.
This is how the Add to Cart button is displayed on the single product page: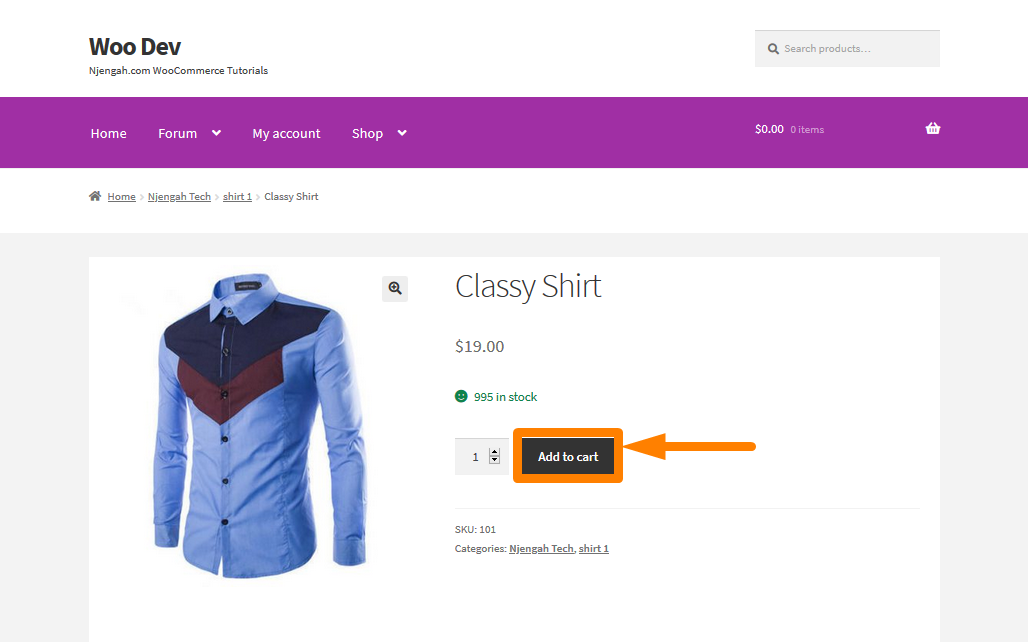
If you want to hide the Add to Cart button in WooCommerce for a particular product, add the following code at the bottom of the functions.php file. Remember to add the correct product ID:
/**

  * @snippet       Hide Add to Cart Button in WooCommerce

 */

 add_filter( 'woocommerce_is_purchasable', 'woocommerce_hide_add_to_cart_button', 10, 2 );

 function woocommerce_hide_add_to_cart_button( $is_purchasable = true, $product ) {

     return ( $product->get_id() == 185 ? false : $is_purchasable );

 }
This is the outcome: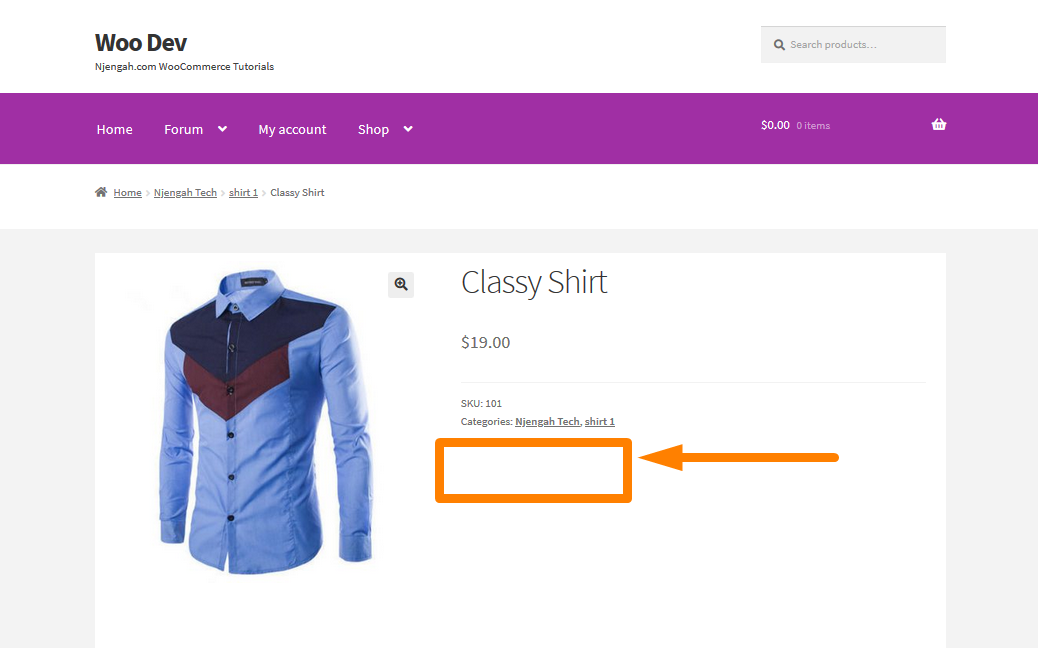
WooCommerce Hide Featured Image on Single Product Page Gallery
WooCommerce uses the featured image to represent a product in product archive pages like the Shop page, home page, category page, product search results page, etc.
WooCommerce uses the featured image on the product page thumbnail images in the product image gallery.
However, you may want not want to include the featured image in the product image gallery.
In this post, you will see how it is very easy to hide the WooCommerce product featured image from the product image gallery in single product single pages.
If you do not know how to add a product gallery, you can learn how to do it here.
This is how the images appear on the front end: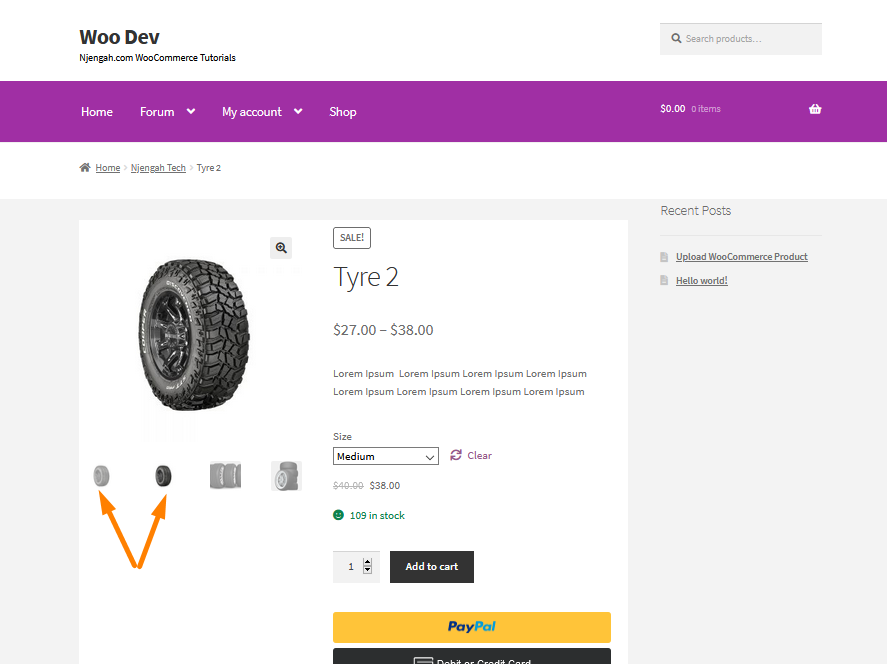
From the screenshot, you can see that the featured image is repeated twice.
To hide the featured image, you should consider adding the following code at the bottom of the functions.php file:
/**

 * Exclude the featured image from appearing in the product gallery, if there's a product gallery.

 *

 * @param array $html Array of HTML to output for the product gallery.

 * @param array $attachment_id ID of each image variables.

 */

function njengah_woocommerce_remove_featured_image( $html, $attachment_id ) {

            global $post, $product;

            // Get the IDs.

            $attachment_ids = $product->get_gallery_image_ids();

            // If there are none, go ahead and return early - with the featured image included in the gallery.

            if ( ! $attachment_ids ) {

                        return $html;

            }

            // Look for the featured image.

            $featured_image = get_post_thumbnail_id( $post->ID );

            // If there is one, exclude it from the gallery.

            if ( is_product() && $attachment_id === $featured_image ) {

                        $html = '';

            }

            return $html;

}

add_filter( 'woocommerce_single_product_image_thumbnail_html', 'njengah_woocommerce_remove_featured_image', 10, 2 );
This is the outcome: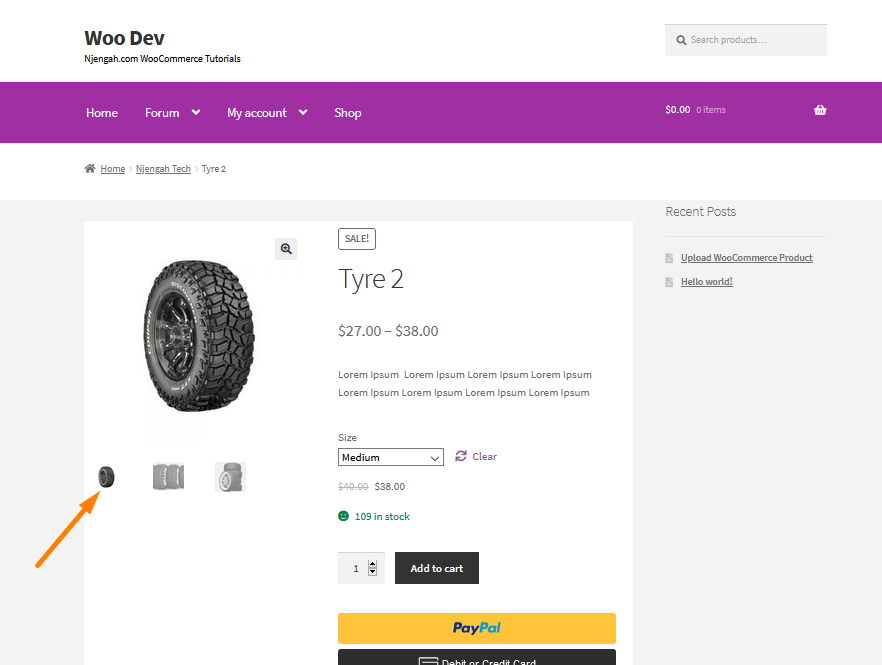
Hide WooCommerce Product Quantity Field from the Product Page
In this section, you will see how it is easy to hide the product quantity filed from the single product page.
I will show you how to do it for many products. However, you can hide the quantity selector for a particular product using a custom PHP or CSS snippet.
You can learn more about that here.
This is how the quantity selector is displayed on the products page: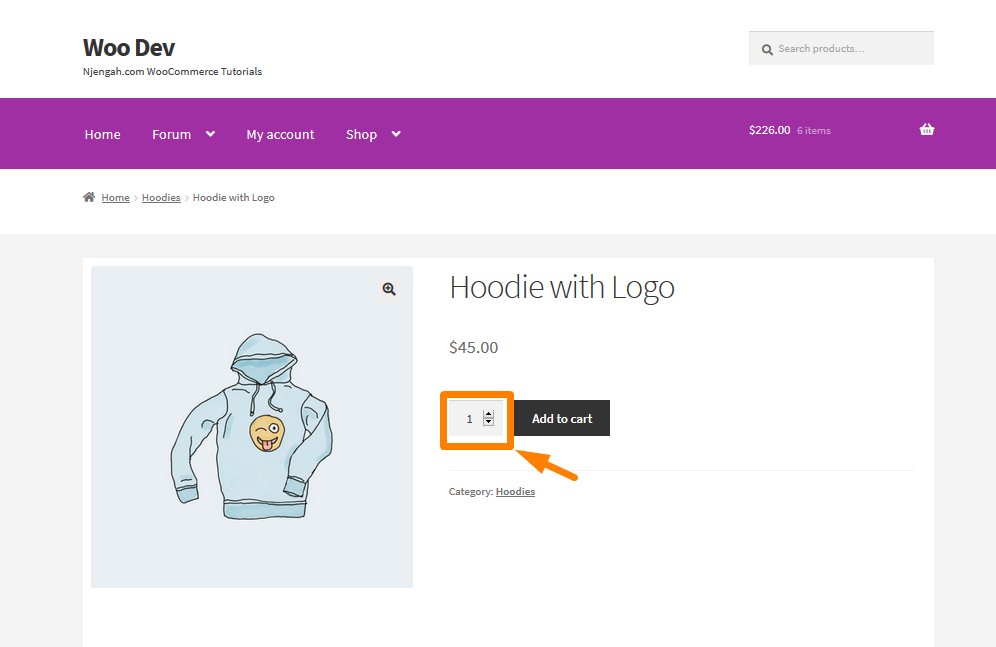
The following code will help you to hide or remove the quantity when there are lots of products.
It is very simple to do this, as you need to copy and paste the code in the functions.php file:
/** * @desc Remove in all product type */

 function woo_remove_all_quantity_fields( $return, $product ) {

   return true;

 }

 add_filter( 'woocommerce_is_sold_individually', 'woo_remove_all_quantity_fields', 10, 2 );
This is the outcome: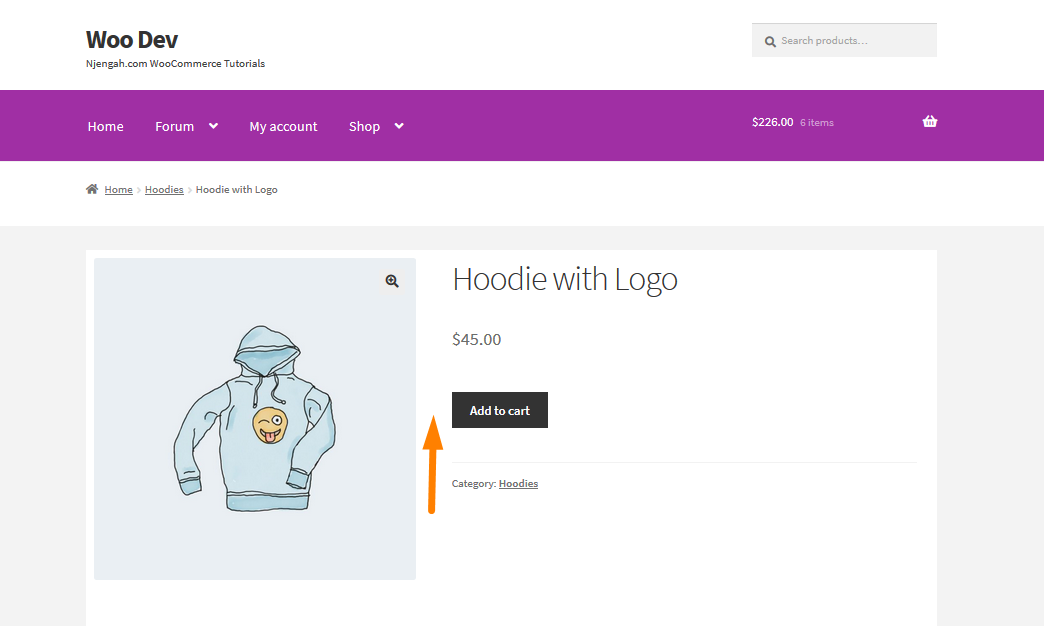
How to Hide Out-of-Stock Variations in WooCommerce
Having digital products will create a convenient place where users can access your products.
A good example is the iTunes Store created by Apple Company, which provides the convenience of finding music. Users are also willing to pay for this convenience as these products can be downloaded.
You need to avoid user frustration by never letting them pick a product or a product variation out of stock, only to realize that they cannot purchase it.
WooCommerce, by default, does not grey out any variations that are out of stock. It only informs the user that the product is out of stock after selecting the variation first.
The default look of the product page for an out-of-stock variation looks like this:
If you do not know how to sell complex WooCommerce downloadable products, you can learn how to create and add them here.
Now that you know how to sell complex downloadable products, you need to add the following code at the bottom of your theme’s functions.php file:
/**

 * @snippet       Disable out of stock variations @ WooCommerce Single

 */

 add_filter( 'woocommerce_variation_is_active', 'njengah_grey_out_variations_out_of_stock', 10, 2 );

 function njengah_grey_out_variations_out_of_stock( $is_active, $variation ) {

     if ( ! $variation->is_in_stock() ) return false;

     return $is_active;

 }
To see the outcome, refresh the product page, and you will see that the product variation has been disabled when out of stock: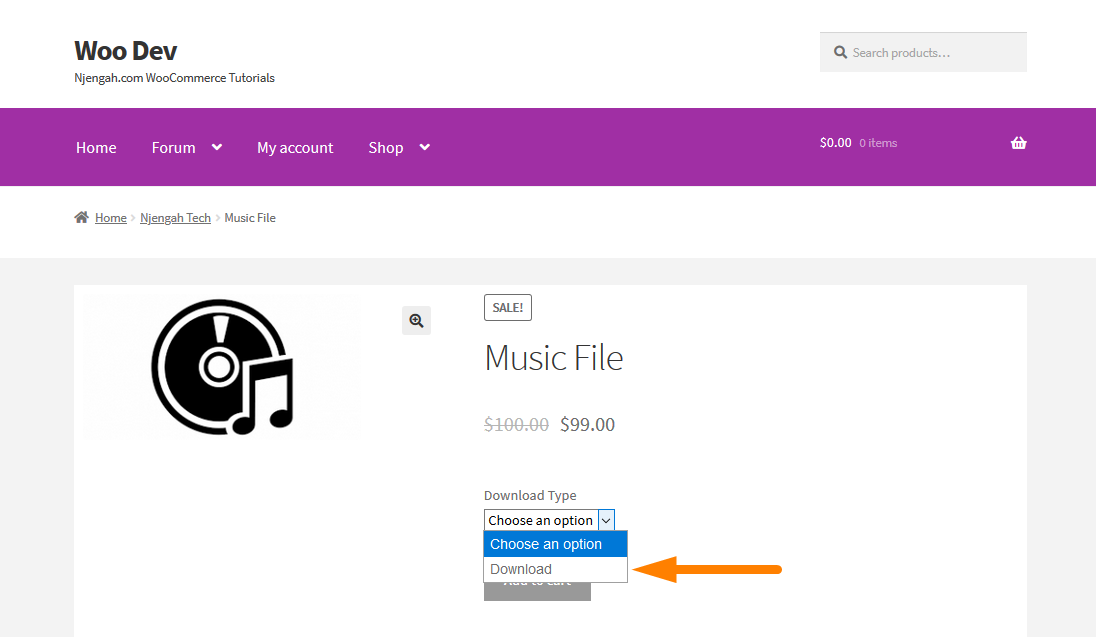
WooCommerce Hide Mobile Elements
One of the biggest things WooCommerce store owners need to do is make sure their site is mobile-friendly.
However, this may not be as simple as it sounds. You can have a site that works on mobile devices and has a designed site for mobile devices.
I highly recommend that you should ensure your site works on mobile devices.
In this section, you will learn how to hide some WooCommerce mobile elements.
How to Hide Storefront Mobile Cart Icon In WooCommerce
The Storefront theme is dubbed the WooCommerce official theme and is very responsive. In this section, you will learn how you can hide the mobile cart icon.
I will use the “Customize” option under “Appearance” in the dashboard to hide this element. This section lets you change your theme easily in many ways that are allowed by the theme author. However, the trick is just finding out what CSS to use.
When visitors come to your store, they see a small menu cart icon located on the mobile screen’s bottom.
You might want to hide this element and place it somewhere else. You can learn how to identify the element you need to change here.
This is how the mobile cart icon is displayed on the storefront theme:![]()
If you want to remove this icon, you should consider adding the following CSS code in the Additional CSS section:
.footer-cart-contents{

             display: none!important;

 }
This is the outcome: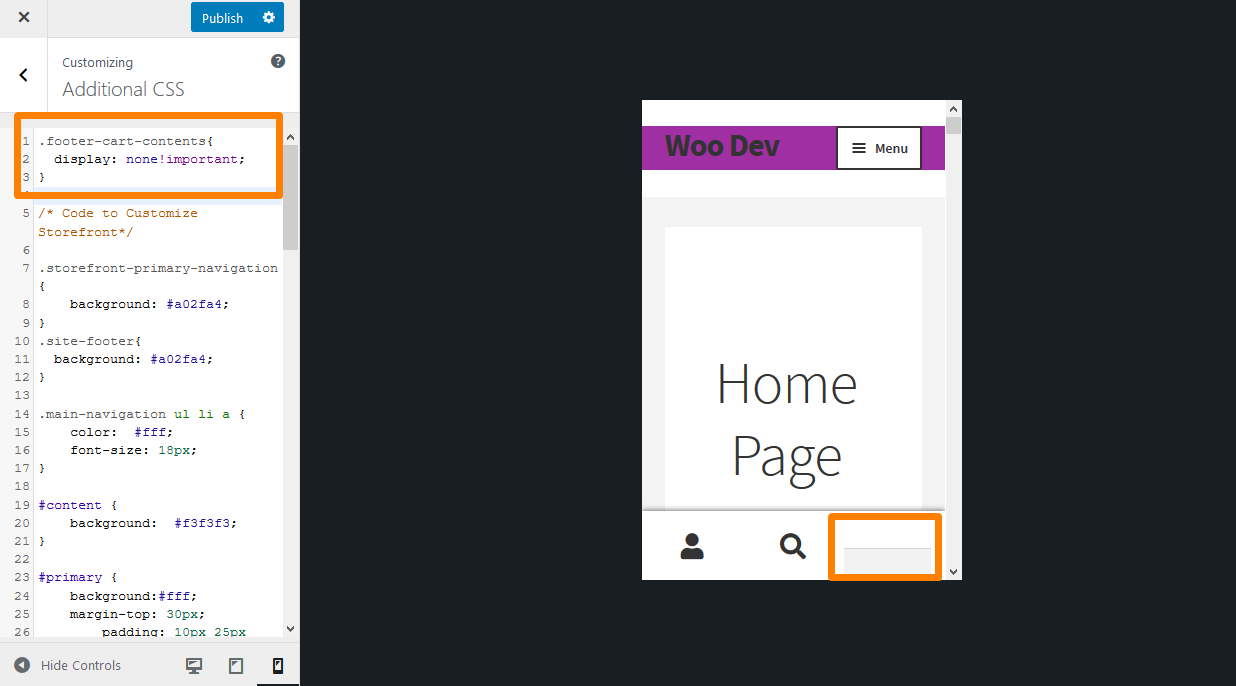
How to Hide Mobile Footer From Storefront WooCommerce
Many people use the Storefront theme with WooCommerce but only as a catalog, so customers can look at the products but not buy them.
In this case, you probably do not need the Cart and Checkout pages, so you remove them.
However, Storefront still shows a menu in the Footer area when you visit the site on a mobile device. This menu leads you to the Cart page as well, which you removed. You can get a detailed tutorial on how you can use CSS to hide the mobile footer here.
This is how mobile footer is displayed: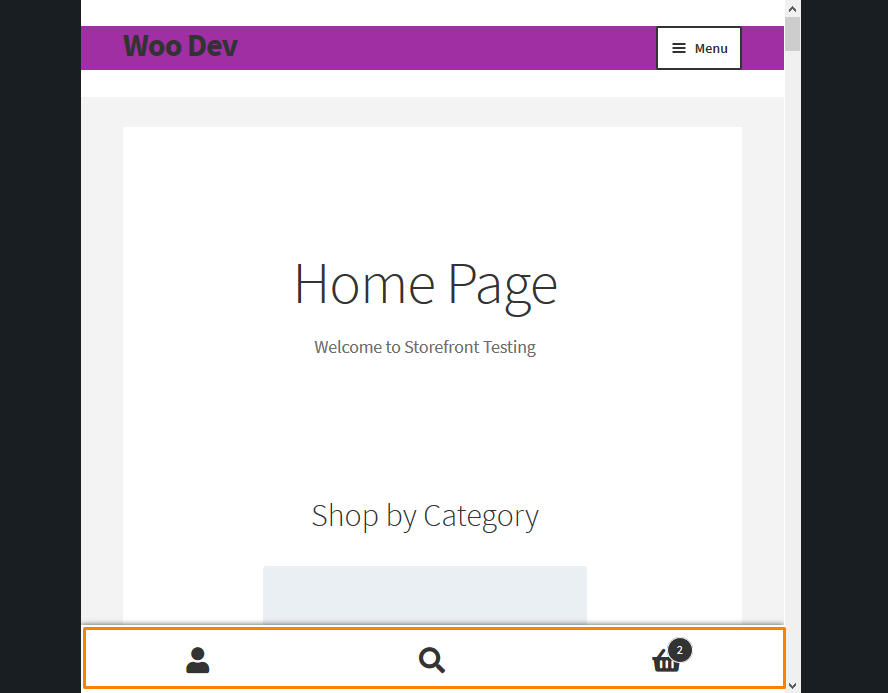
If you want to remove the mobile footer, you should consider adding the following CSS code at the bottom of your theme’s functions.php file:
remove_action( 'storefront_footer', 'storefront_handheld_footer_bar', 999 );
To see the outcome, refresh the site on a mobile device, and you will see that the footer bar has been removed: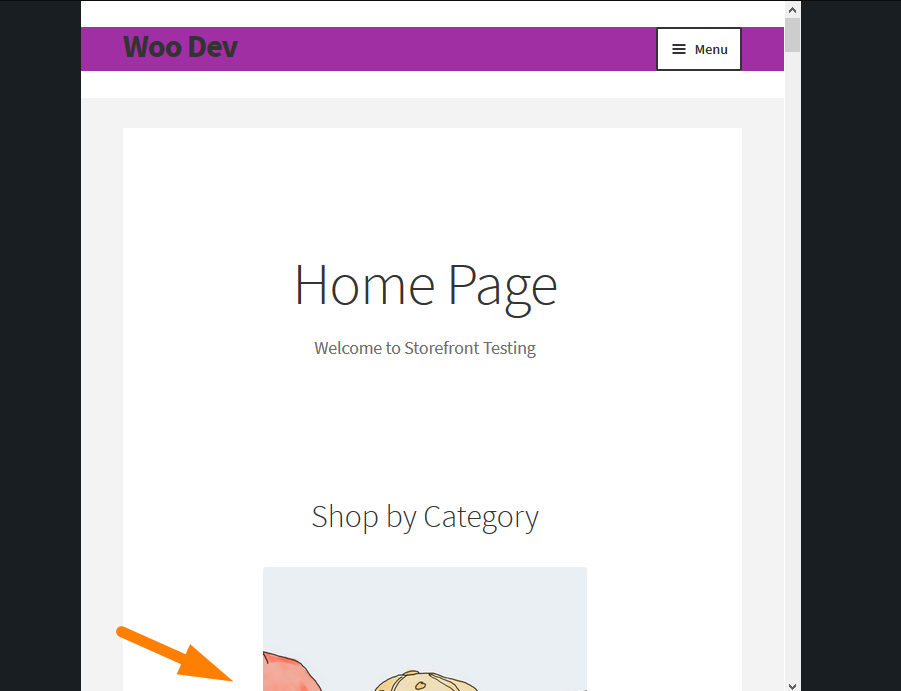
WooCommerce Hide Header
The header of a WordPress site is a universal element that appears on every page and post.
Considering its prominent placement, the header often serves as your visitors’ first impression of your site.
You can add critical information and Calls To Action (CTAs) critical information and Calls To Action (CTAs). This important area is worth customizing. In this section, you will learn how to hide some elements on the header.
How to Hide WooCommerce Cart in Nav Menu
By default, WooCommerce does not allow you to disable the WooCommerce Cart Icon from the header or navigation.
There are two ways to hide the Cart icon in the nav menu. You can use PHP or CSS.
The CSS solution requires you first to identify the element you need to change. You can learn more about it here.
If you are using Chrome or Firefox, they make it easy to inspect and manipulate elements in the DOM.
These browsers allow you to review a web page’s entire structure, including all elements and their properties. In our case, we want to select a specific element called the cart icon.
This is how the cart icon is displayed on the header:![]()
If you want to hide this element, you should consider adding the following PHP code at the bottom of your theme’s functions.php file:
/**

* Disable Cart Icon

*/

function remove_sf_actions() {

remove_action( 'storefront_header', 'storefront_header_cart', 60 );

}

add_action( 'init', 'remove_sf_actions' );
This is the outcome on the front end: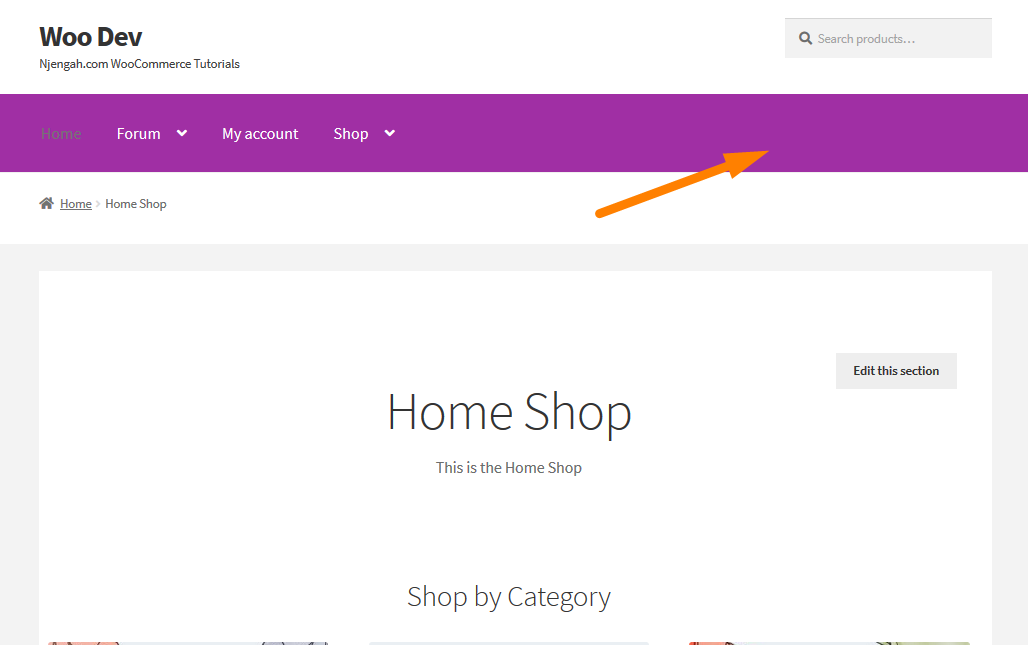
WooCommerce Hide Header
Editing a theme’s header can be a difficult task for the average WordPress user. However, the Storefront theme is very easy to customize.
It only takes you a handful of clicks to edit the header’s format, hide header elements, and change the background, text, and link colors.
This section will share with you an easy way to remove the header in the Storefront Theme.
First, we need to identify the header and all its elements using the console. After that, I will add a new rule to the console to see if it works.
When I get the desired results, I will make the changes permanent by adding the new rule in the Additional CSS section. You can learn more about that here.
If you want to hide the header on the Storefront theme, add the following CSS code in the Additional CSS section:
.site-header {

display: none;

}
This will be the outcome: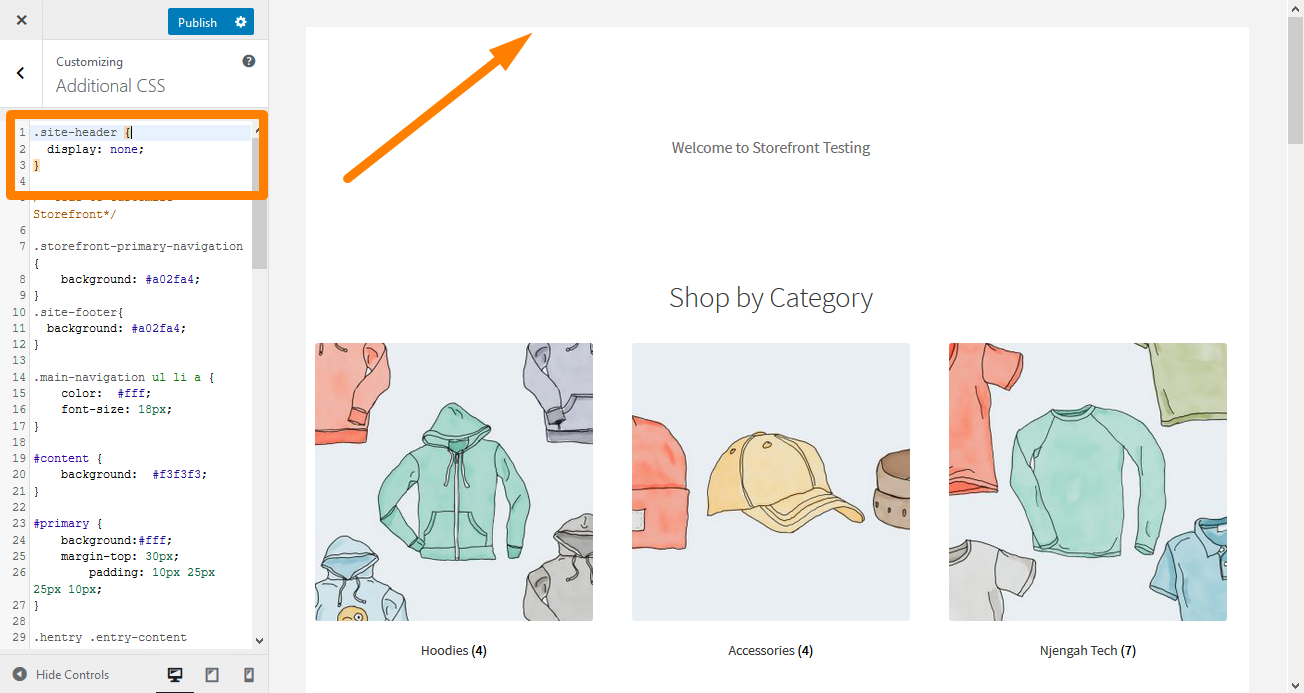
WooCommerce Hide My Account Page
Customizing the WooCommerce “My Account” page is one of the most requested features by developers.
This page is vital to the smooth running of its operations.
Therefore, this page should have a clean design to allow users to make the most of account management.
You can customize this page to convert more sales or entice customers to return to your store. In this section, I will share how you can hide elements on this page.
This is how the My Account page is displayed on the front end: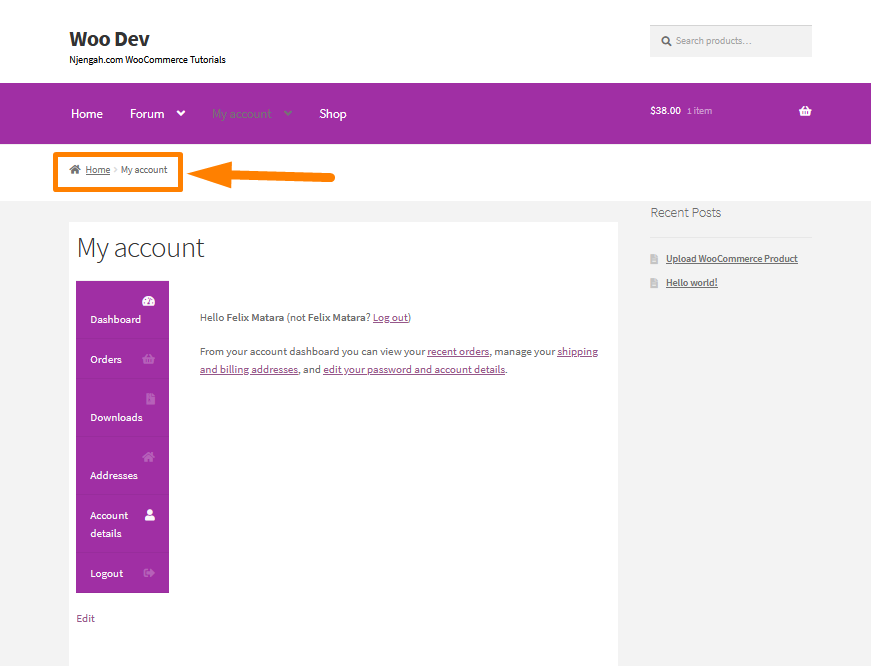
WooCommerce Hide Downloads From My Account
To remove the downloads menu My Account page in your WooCommerce store, you do not need to write any code since a simple settings option is often overlooked.
WooCommerce endpoints allow users to create URL extensions that are custom for the most common WooCommerce pages.
Ideally, this feature is supposed to make WooCommerce more flexible and customizable to fit a wide range of end-user needs.
The following is a quick summary of the various WooCommerce endpoints that you can customize from your site WooCommerce Settings > Advanced Settings > Endpoints.
You can learn more about WooCommerce endpoint here.
One of the many reasons you may want to remove the Downloads menu from the ‘My Account’ page is when you do not sell digital or downloadable products.
Go to WooCommerce settings to remove it, then to Advanced Settings and look for the endpoints section.
Under this section, look for the Downloads endpoint, delete the text field’s contents, and update the settings.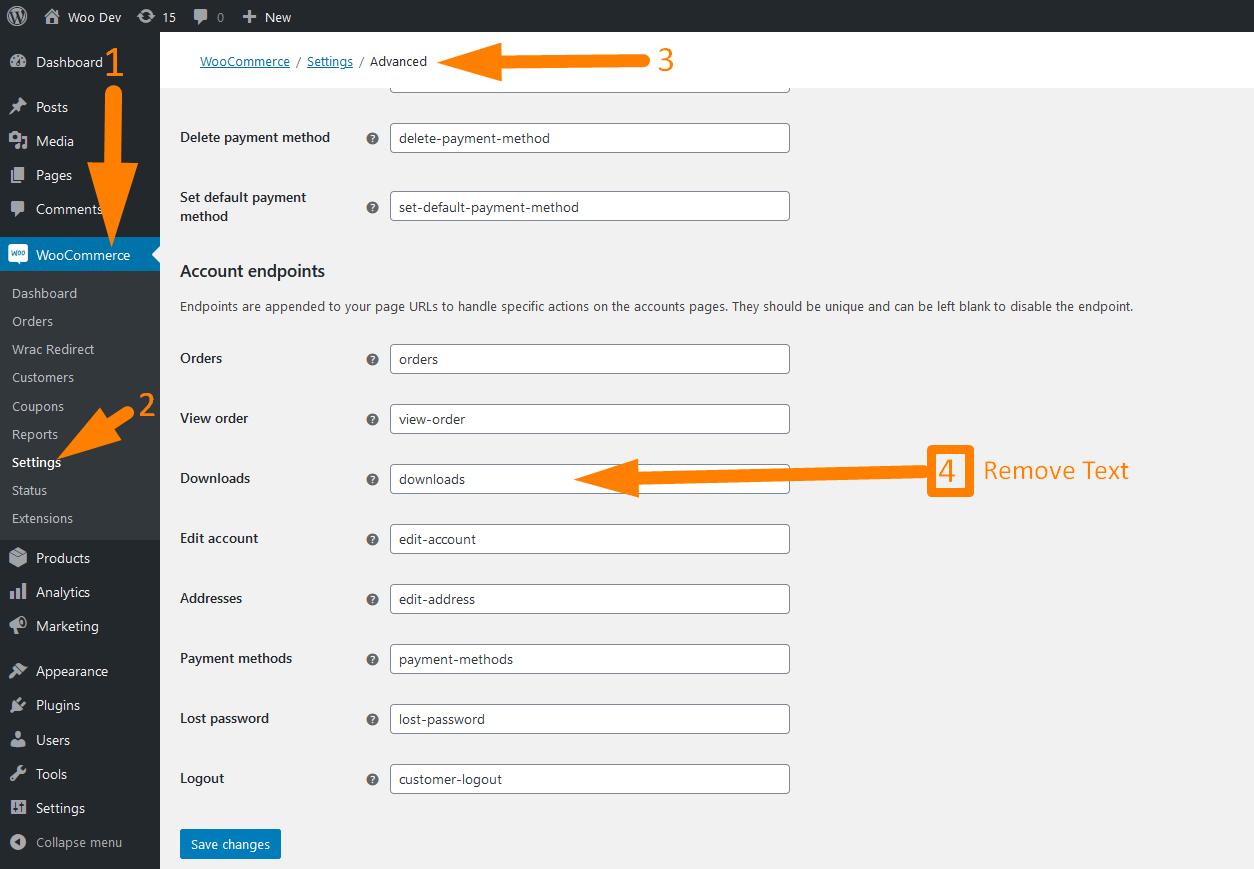
This will be the outcome on the front end:
WooCommerce Hide Dashboard
The ‘My Account’ page is really important because it’s where your users’ and customers’ important information will be stored.
Moreover, it is where your customers can manage their accounts, and add billing details, addresses, etc., for your use.
However, I highly recommend that you customize this section so that you can impress your registered users and let go of more business possibilities with them.
You should note that the Dashboard page is the only page among the account pages, which does not have an endpoint.
Therefore, we require a custom PHP script for this.
If you want to hide the Dashboard tab, you should consider adding the following code at the bottom of your theme’s functions.php file:
/**

  * @snippet       Hide Dashboard on the My Account Page

   */

 add_filter( 'woocommerce_account_menu_items', 'njengah_remove_my_account_dashboard' );

 function njengah_remove_my_account_dashboard( $menu_links ){

             unset( $menu_links['dashboard'] );

             return $menu_links;

  }
You can learn how the code and how you can detect the dashboard page and redirect to the orders work here.
This is the outcome: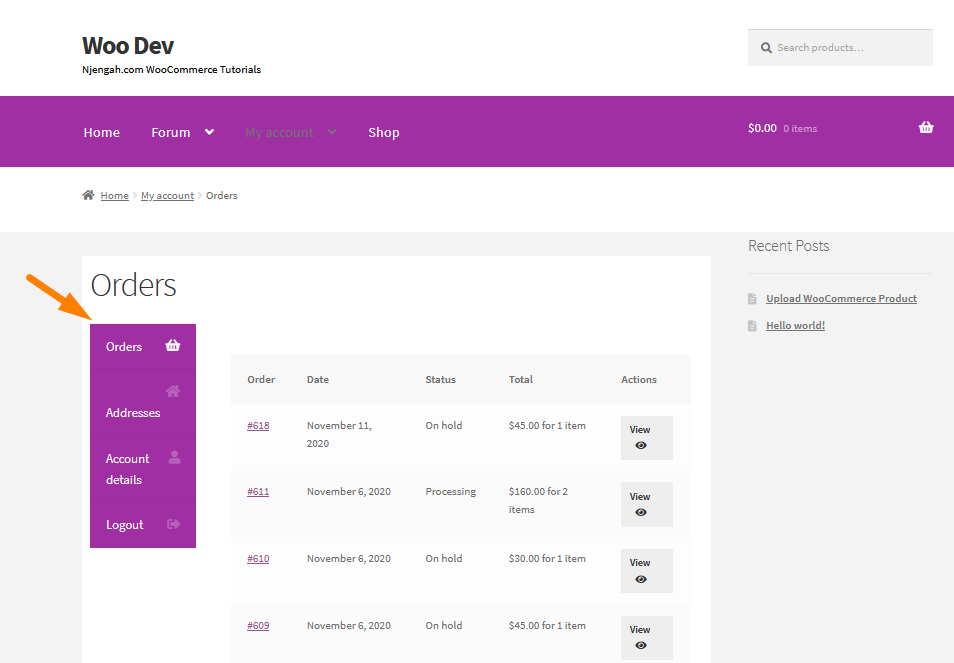
How to Hide Any Tab My Account Page WooCommerce
In this section, you will learn how to hide any My Account page tab using a custom PHP code snippet.
If you are familiar with PHP customization, almost anything can be achieved with simple snippets.
You can learn more about endpoints here. Additionally, you can also rename any tab.
If you want to hide any tab, you should consider adding the following code at the bottom of your theme’s functions.php file:
add_filter ( 'woocommerce_account_menu_items', 'njengah_remove_my_account_links' );

 function njengah_remove_my_account_links( $menu_links ){

             unset( $menu_links['edit-address'] ); // Addresses

             //unset( $menu_links['dashboard'] ); // Remove Dashboard

             //unset( $menu_links['payment-methods'] ); // Remove Payment Methods

             //unset( $menu_links['orders'] ); // Remove Orders

             //unset( $menu_links['downloads'] ); // Disable Downloads

             //unset( $menu_links['edit-account'] ); // Remove Account details tab

             //unset( $menu_links['customer-logout'] ); // Remove Logout link

             return $menu_links;

 }
The code works well, but you do not need any coding when you want to remove both the menu item and its page.
This is because you can find all the default My Account subpages in WooCommerce > Settings > Advanced. Scroll down to Account Endpoints.
All you need is just to set a specific endpoint empty.
WooCommerce Hide Admin Area
The WooCommerce Admin area is one of the most important sections in any WooCommerce site. You can check your reports in the admin area to track your performance with statistics.
In this section, you will learn how to hide different elements in your WooCommerce site’s admin area.
WooCommerce Hide Errors From Visitors
Outdated plugins and themes mostly cause PHP error messages.
The core files will often change with WordPress updates, which makes some parts of the code obsolete.
Additionally, themes and plugins can also show PHP warning messages when used with incompatible something.
Two different plugins can work well by themselves but have issues when paired together. This is because not all developers use the same syntax when developing website files.
However, some of these warnings do not necessarily mean that your site is broken. They do not look good to an unsuspecting visitor. The developer can create an update to fix the warning, but it takes a longer time.
This section involves customizing the wp-config.php file.
I highly recommend that you create a backup of your site before making any changes to the code. This is a precautionary measure in the event something goes wrong. You can quickly restore your site.
Inside your wp-config.php file, look for the following line:
define('WP_DEBUG', true);
However, in some cases, it might be set to false:
define('WP_DEBUG', false);
In both cases, you need to replace this line with the following code:
ini_set('display_errors','Off');

ini_set('error_reporting', E_ALL );

define('WP_DEBUG', false);

define('WP_DEBUG_DISPLAY', false);
Remember to save your changes and upload your wp-config.php file back to the server.
The next step is to visit the front end to confirm that the PHP errors, notices, and warnings have disappeared.
You can also turn them back on a local server or staging area if you are working on a website.
WooCommerce Hide Update Notification
This section illustrates how you can hide update notifications in your WooCommerce Store.
It is also worth mentioning that WordPress is such a delicate piece of software. Therefore, you should always know what to do before actually doing it.
Ideally, it would be best to run regular backups and test new releases of WooCommerce before updating your WooCommerce store.
With the right tools in place, you can keep your WooCommerce site up-to-date. However, you might want to hide the update notification.
You can use a staging environment to test the update provided by your hosting company.
When it comes to WooCommerce updates, there are four schools of thought among store owners.
If you want to hide the update notifications, you should consider adding the following code at the bottom of the functions.php file:
/**

  *    Disable Update Notifications on the WordPress Dashboard

 */

  add_action( 'admin_init', 'njengah_hide_update_notifications_users' );

  function njengah_hide_update_notifications_users() {

     global $menu, $submenu;

     $user = wp_get_current_user();

     // ENTER HERE THE ONLY ALLOWED USERNAME

     $allowed = array( 'felixmatara' );

     // HIDE WP, PLUGIN, THEME NOTIFICATIONS FOR ALL OTHER USERS

     if ( $user && isset( $user->user_login ) && ! in_array( $user->user_login, $allowed ) ) {

         add_filter( 'pre_site_transient_update_core', 'njengah_disable_update_notifications' );

         add_filter( 'pre_site_transient_update_plugins', 'njengah_disable_update_notifications' );

         add_filter( 'pre_site_transient_update_themes', 'njengah_disable_update_notifications' );

            // ALSO REMOVE THE RED UPDATE COUNTERS @ SIDEBAR MENU ITEMS

         $menu[65][0] = 'Plugins up to date';

         $submenu['index.php'][10][0] = 'Updates disabled';

     }

 }

  function njengah_disable_update_notifications() {

     global $wp_version;

     return (object) array( 'last_checked' => time(), 'version_checked' => $wp_version, );

 }
Once you enter the code, remember to update the functions.php file. This will hide the update notifications from other users, as shown below:
WooCommerce Hide Order Status
For various reasons, you might want to hide some of the core order statuses.
However, the default version of WooCommerce allows you to mark orders with one of the following statuses completed processing, pending payment, on hold, refunded, canceled, or failed.
Let us look at how you can hide order status in WooCommerce using a code snippet.
To check the default order status messages, log into your WordPress site, and access the Dashboard as the admin user. Then, click on WooCommerce > Orders. You will see this: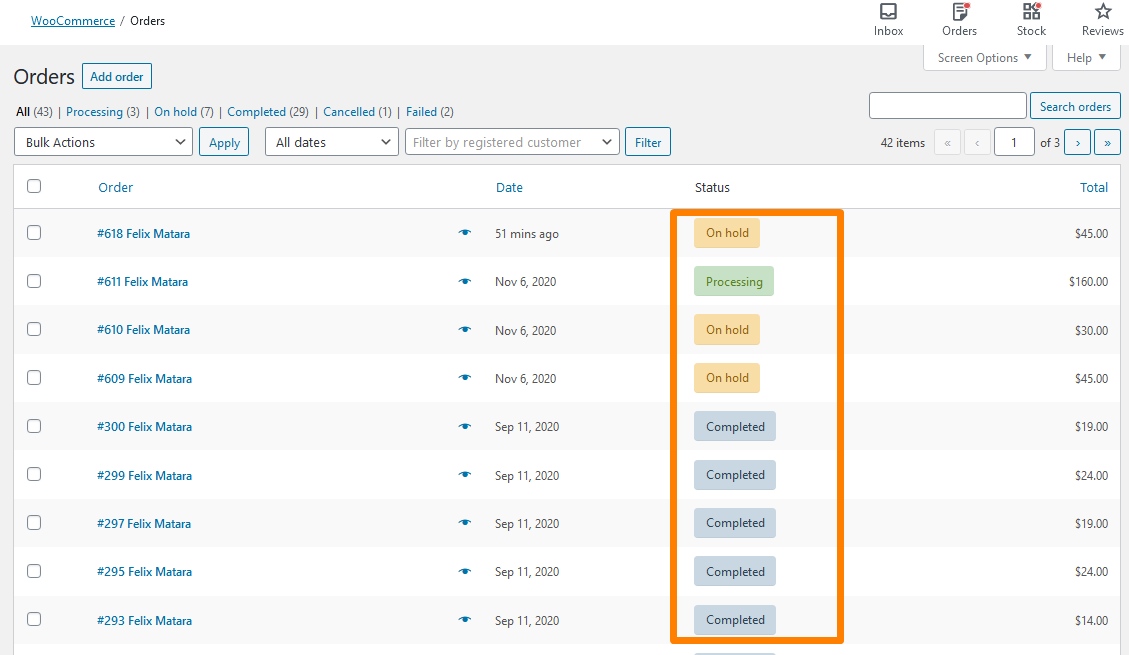
It is worth mentioning that when you hide core order statuses, make sure that there are no products with that status.
Moreover, you should make sure that your WooCommerce shop does not use that status anywhere because it can lead to errors.
For example, if you do not plan to make refunds in your WooCommerce store, you can hide the Refund status.
If you want to hide an order status, add the following code at the bottom of your theme’s functions.php file:
/*

  * Removing core order statuses

  * @param array $wc_statuses_arr Array of all order statuses on the website

  */

 function njengah_remove_order_statuses( $wc_statuses_arr ){

             // Processing

             if( isset( $wc_statuses_arr['wc-processing'] ) ) { // if exists

                         unset( $wc_statuses_arr['wc-processing'] ); // remove it from array

             }

             // Refunded

             if( isset( $wc_statuses_arr['wc-refunded'] ) ){

                         unset( $wc_statuses_arr['wc-refunded'] );

             }

             // On Hold

             if( isset( $wc_statuses_arr['wc-on-hold'] ) ){

                         unset( $wc_statuses_arr['wc-on-hold'] );

             }

             // Failed

             if( isset( $wc_statuses_arr['wc-failed'] ) ){

                         unset( $wc_statuses_arr['wc-failed'] );

             }

             // Pending payment

             if( isset( $wc_statuses_arr['wc-pending'] ) ){

                         unset( $wc_statuses_arr['wc-pending'] );

             }

             // Completed

             //if( isset( $wc_statuses_arr['wc-completed'] ) ){

             //    unset( $wc_statuses_arr['wc-completed'] );

             //}

             // Cancelled

             //if( isset( $wc_statuses_arr['wc-cancelled'] ) ){

             //    unset( $wc_statuses_arr['wc-cancelled'] );

             //}

             return $wc_statuses_arr; // return result statuses

 }

 add_filter( 'wc_order_statuses', 'njengah_remove_order_statuses' );
This is the outcome: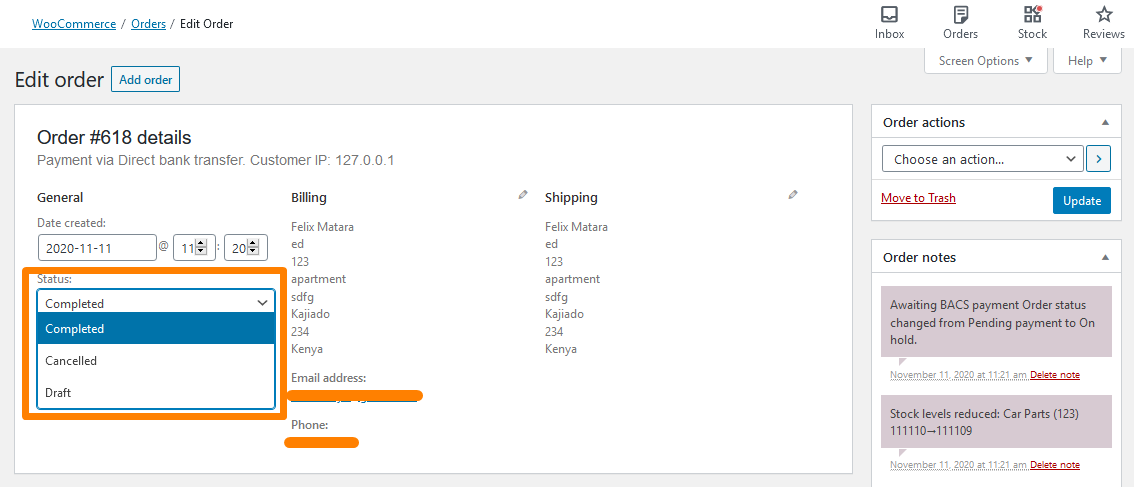
You can also add a custom order status.
WooCommerce Hide Prices From Google
Google is a powerful organization when it comes to product searches. Google beats out Amazon in product search reach.
Moreover, it is worth mentioning that many online purchases start with a Google search. Google uses rich snippets, and that is why it excels at product searches.
Rich snippets give shoppers the ability to see products relevant to their search.
Additionally, they can read reviews and compare prices from one place. Rich snippets act as a complete product encyclopedia. Therefore, your online store needs to get on the Google rich-snippet bandwagon.
By default, the schema markup displays the product price on Google’s search results. Additionally, data such as review stars, stock status, and the number of reviews are displayed.
However, you might want to hide the WooCommerce product prices from Google search results in certain cases.
To hide the prices from Google, add the following code at the bottom of your theme’s functions.php file:
/**

 * @snippet       Hide Prices from search engines

 */

 add_filter( 'woocommerce_structured_data_product_offer', '__return_empty_array' );
Remember to save the changes you make.
WooCommerce Hide Marketing Hub
Since WooCommerce 4.1, there is a Marketing tab below the Analytics menu item. This section is dubbed the WooCommerce Marketing Hub.
This section reveals a list of recommended plugins to help store owners get started with marketing their stores.
This is an excellent start for any new WooCommerce store owner. Additionally, you can create coupons in this section.
However, some store owners might want to hide the marketing hub, as it only suggests the best marketing plugins you can use.
In the future, this section might grow to include more usable information, but if your store does not give out coupons, it seems abstract and maybe even pointless.
This is how the Marketing Hub is displayed in the admin area:
If you want to remove this section, you should add the following code at the bottom of your theme’s functions.php file:
/**

 * @ snippet        Hide the WooCommerce Marketing Hub

 */

 add_filter( 'woocommerce_admin_features', function( $features ) {

     /**

      * Filter list of features and remove those not needed     *

      */

     return array_values(

         array_filter( $features, function($feature) {

             return $feature !== 'marketing';

         }

  )

     );

 }

 );
Remember to save the changes you make.
WooCommerce Hide Customer Order Email for Free Orders
While making impressive HTML emails is truly an achievement in itself, WooCommerce offers several options so that even WordPress beginners can create emails.
You can learn more about what “Vanilla” offers WooCommerce email notifications sent to customers in response to their interactions with the store.
There are times when you sell free products to give customers access to registered members.
This means you might not want to send them the “Order Completed” email, as your email marketing software does the follow-up work, or they are automatically redirected to the resource upon checkout.
You will want to keep the “Order Completed” emails for orders that are not $0.
However, WooCommerce does not have this built-in functionality. We will use a custom PHP code snippet to achieve this:
/**

  * @snippet       Disable Customer Order Email for Free Orders - WooCommerce

   */

   // To target another email you can change the filter to e.g.:

 // "woocommerce_email_recipient_customer_processing_order"

 add_filter( 'woocommerce_email_recipient_customer_completed_order', 'njengah_disable_customer_order_email_if_free', 10, 2 );

 function njengah_disable_customer_order_email_if_free( $recipient, $order ) {

     $page = $_GET['page'] = isset( $_GET['page'] ) ? $_GET['page'] : '';

     if ( 'wc-settings' === $page ) {

         return $recipient;

     }

     if ( (float) $order->get_total() === '0.00' ) $recipient = '';

     return $recipient;

 }
Remember to save the changes you make.
How to Hide Tags In Storefront Theme WooCommerce
In any WooCommerce store, there are two major taxonomy options: categories and tags.
Product tags are like product categories, but there is no hierarchy in tags. This means that there are no ‘subtags’. For example, if you are selling clothes and have many checked prints, you can tag as ‘checked’.
However, the “product_tag” taxonomy is something that we rarely need to use in our WooCommerce store.
When you are not using it, you can easily remove it to keep the admin interface clean. If your WordPress Admin is cluttered, it decreases usability, and things that do not work can confuse even technical users.
If you go to any product’s edit page, you will find the “Product tags” meta box, similar to WordPress “Tags” meta box. You need to remove it because it allows you to choose from available tags and create new ones.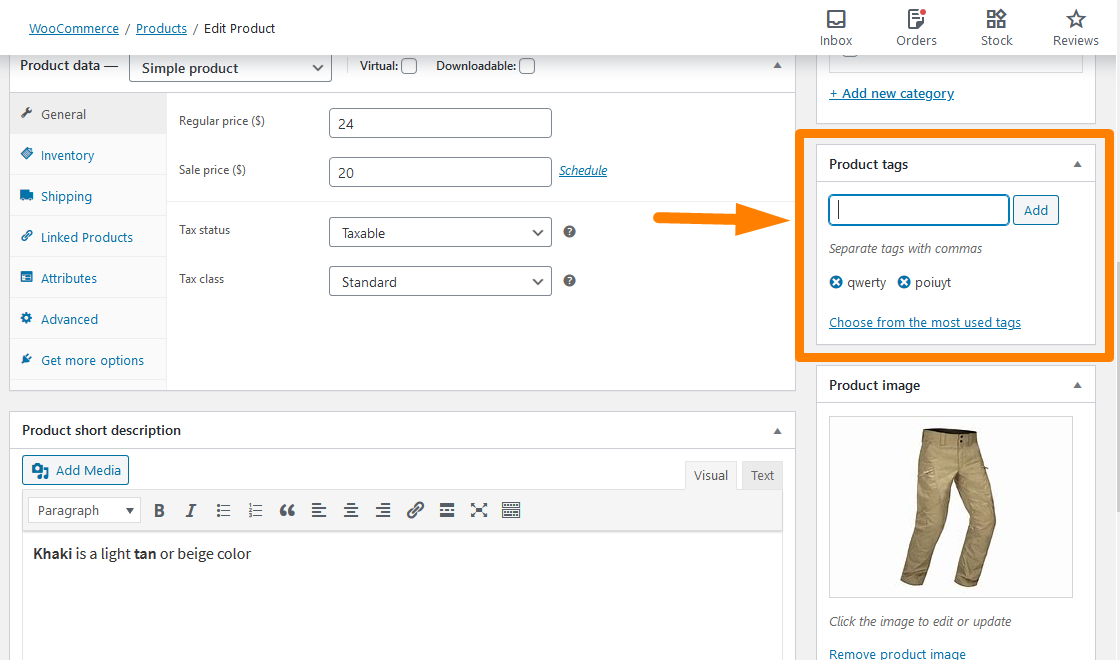
You can use CSS to hide it in the Screen Options, but it is not enough. You can add the following PHP script in your functions.php file to hide it:
/**

* Remove Product Tags Metabox

 */

 add_action( 'admin_menu', 'njengah_hide_product_tags_metabox' );

 function njengah_hide_product_tags_metabox() {

 remove_meta_box( 'tagsdiv-product_tag', 'product', 'side' );

 }
This is the outcome: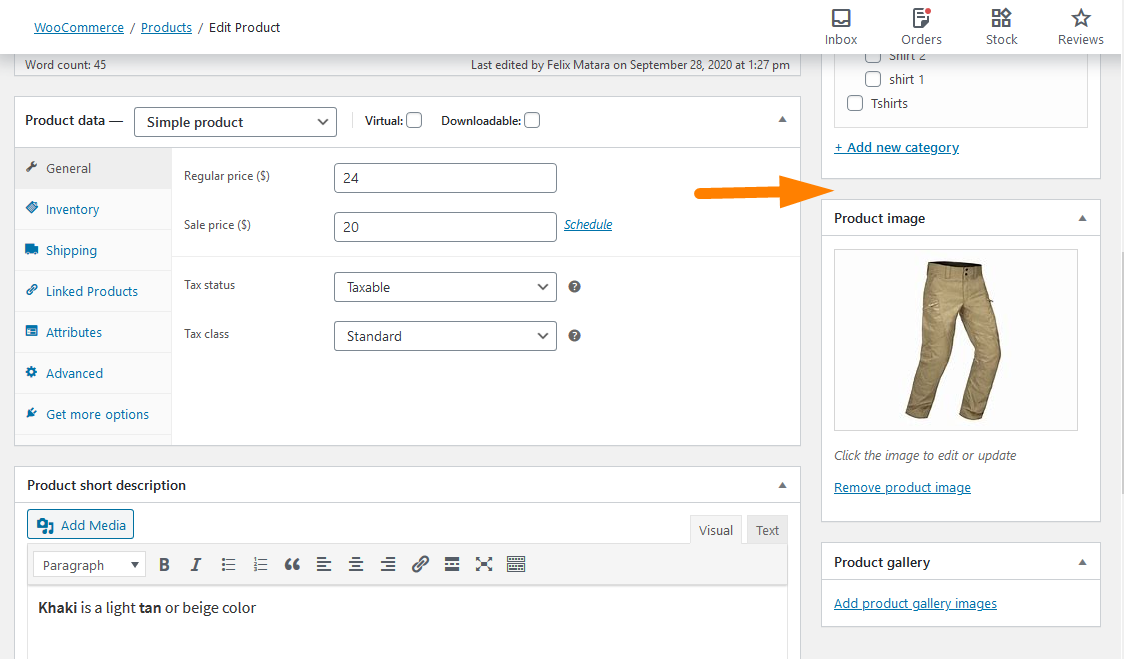
You can also learn how to hide the “all products > tags” link from the admin menu, remove the tags column from the all products page, and remove the product tags text area from quick edit and bulk edit here.
How to Hide Products Without Price in WooCommerce
If you want to hide products without the price, you can quickly implement this snippet in your functions.php or your plugin code, and all the products without a price will be hidden from the customer view.
It is not complicated just adding the following code in the theme functions or the plugin files:
add_action( 'woocommerce_product_query', 'njengah_hide_products_without_price' );

function njengah_hide_products_without_price( $q ){

$meta_query = $q->get( 'meta_query' );

$meta_query[] = array(

'key'       => '_price',

'value'     => '',

'compare'   => '!='

);

$q->set( 'meta_query', $meta_query );

}
This meta query needs to hook on this action woocommerce_product_query, and the callback function will contain the logic to show all products apart from those without the price.
How to Hide Admin Bar for WooCommerce Customers or By User Roles
It is important to hide the admin bar in WooCommerce from subscribers, customers, and non-admin users to avoid access to the WordPress dashboard.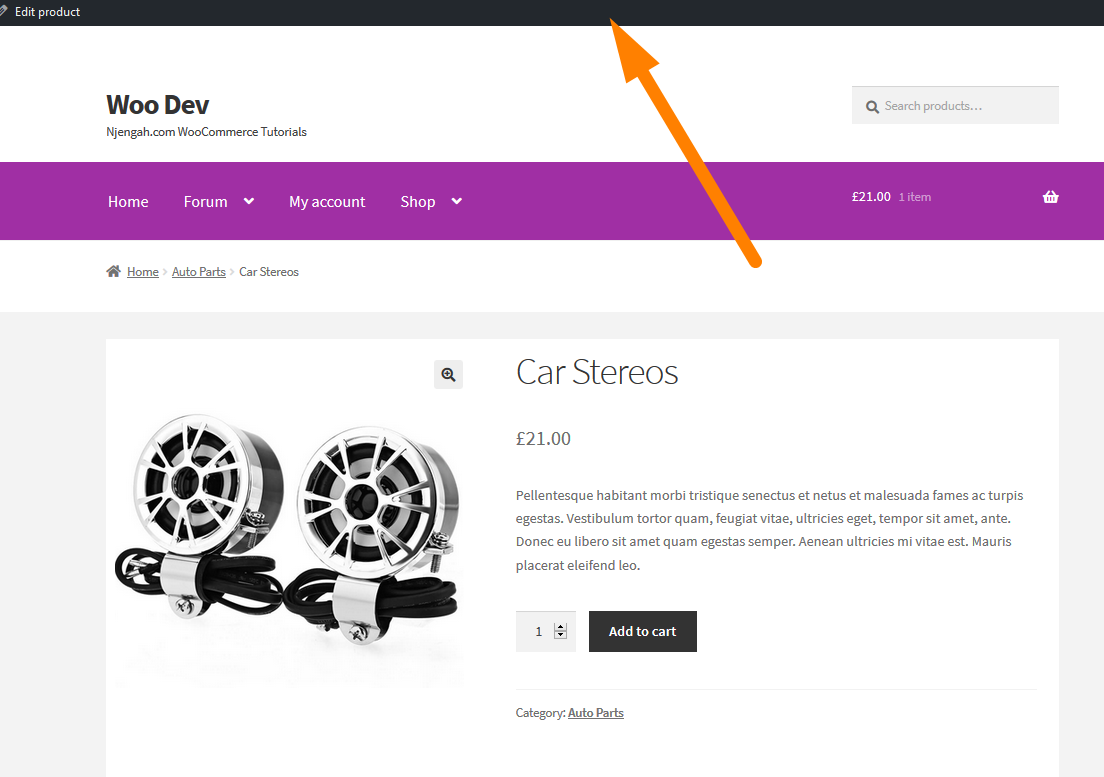
To hide the admin bar for the administrator, there are probably some plugins that can also help and work for WooCommerce.
Before you use a plugin, you should first try out this quick option in the WordPress admin dashboard.
This option works well for WooCommerce sites as well. There is no difference.
Go to the administrator user profile settings and check out for this option to hide the admin bar for admins when viewing the site.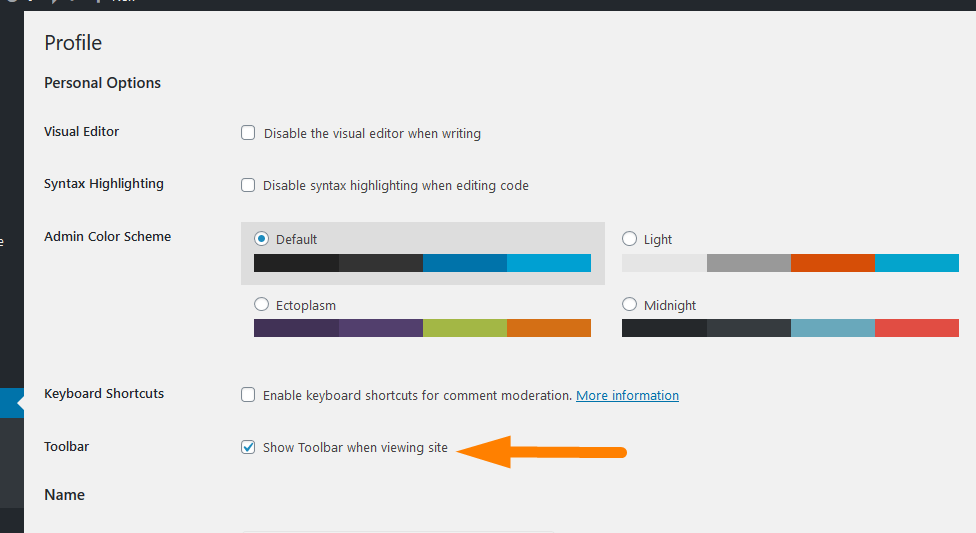
Uncheck this option, save the settings, and then visit the front end to see if the admin bar has been hidden.
As you can see in the image below, the admin bar will be hidden for the admin user when viewing the site.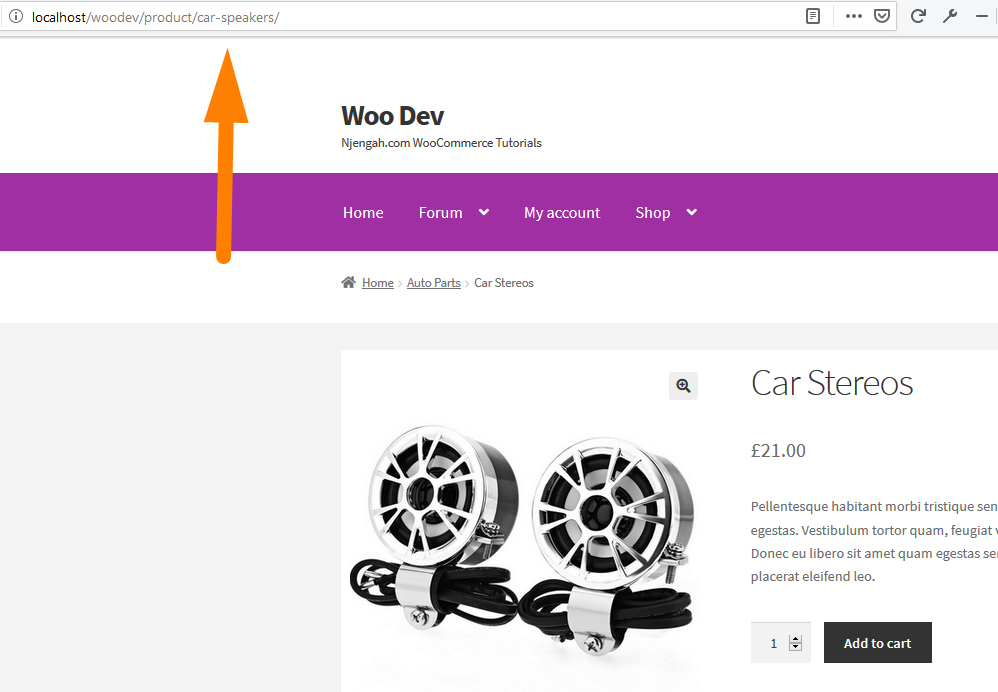
You can also hide the admin bar code option using a PHP function. You further can improve this further and add a conditional test where you allow the admin to view the admin bar while the customer should not view it.
You can learn how to hide the WordPress admin bar programmatically without a plugin here.
WooCommerce Hide Shipping
If you sell physical goods, shipping is one of the most important aspects of your store’s success. This is because it directly influences the customer experience.
Customers shopping online expect to pay as little as possible but receive products quickly and in perfect condition. Therefore, you need to have a good shipping strategy.
However, it is one of the most challenging areas for eCommerce store owners because of the technical and logistic challenges. In this section, you will learn how to hide WooCommerce shipping methods when there is free shipping and in certain conditions.
How to Hide WooCommerce Shipping Methods For Certain Conditions
WooCommerce is one of the best eCommerce solutions that provides shipping methods like Free shipping, Flat rate, and Local Pickup. You can set them up for various shipping zones based on the locations. For example, the Free shipping option can be used only for postcodes near the store location and the Flat rate option for other delivery zones.
It is worth mentioning that location-based shipping can be achieved by using a plugin. However, in conditions where the location is not the most important role, it becomes very hard for store owners to achieve that. Some of the conditions could be:
- Free shipping should not be available if the order weight is more than a certain number of lbs or kg.
- When the shipping method is available, it is also based on the number of quantities or the price of that order.
For illustration purposes, let us use the first condition where free shipping is available if the order weight is more than 7kgs. This requires the following custom PHP script that should be added at the bottom of the functions.php file:
/**

  * Hide free shipping when the order weight is more than 10kgs.

  *

  * @param array $rates Array of rates found for the package.

  * @return array

  */

 function njengah_hide_free_shipping_for_order_weight( $rates, $package ) {

     $order_weight = WC()->cart->get_cart_contents_weight();

     if ( $order_weight > 7 ) {

         foreach( $rates as $rate_id => $rate_val ) {

             if ( 'free_shipping' === $rate_val->get_method_id() ) {

                 unset( $rates[ $rate_id ] );

             }

         }

     }

     return $rates;

 }

 add_filter( 'woocommerce_package_rates', 'njengah_hide_free_shipping_for_order_weight', 100, 2 );
This is the outcome: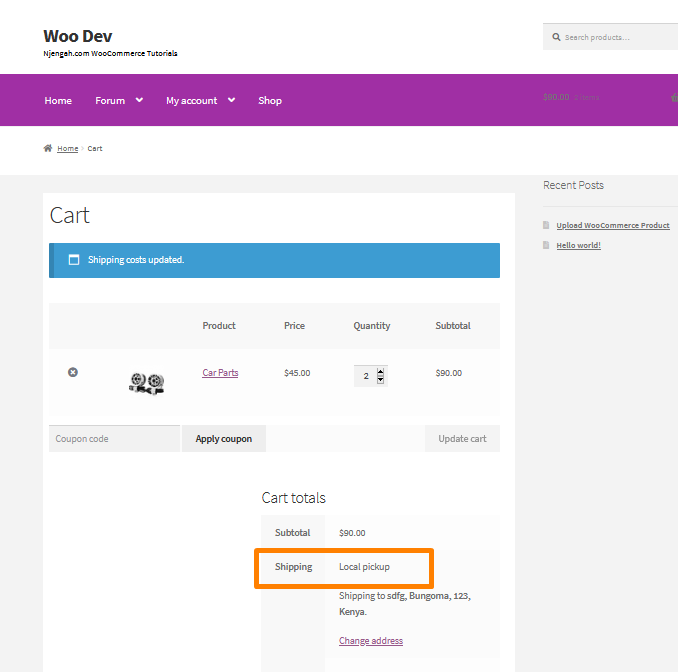
WooCommerce How to Hide Shipping Rates if Free Shipping Available WooCommerce
The increasing shipping method and their availability on the cart page, even when not required, could be adversely affecting your site’s user experience or confusing the buyers. This, in turn, reduces the sales in your WooCommerce store.
For example, if Free Shipping is available, you may not want to show the other paid shipping options. WooCommerce, by default, displays all the shipping rates that match a given shipping zone, so it is not possible to achieve this from the settings alone. You need PHP for that.
I will show you how to disable all shipping methods but “Free Shipping” so that free shipping remains the only possible choice.
Add the following code in the functions.php file:
/**

  *           Hide one shipping option in one zone when Free Shipping is available

 */

 add_filter( 'woocommerce_package_rates', 'njengah_unset_shipping_when_free_is_available_in_zone', 10, 2 );

   function njengah_unset_shipping_when_free_is_available_in_zone( $rates, $package ) {

      // Only unset rates if free_shipping is available

 if ( isset( $rates['free_shipping:8'] ) ) {

      unset( $rates['flat_rate:1'] );

 }

   return $rates;

   }
Unset all shipping rates in all zones when any free shipping rate is available by adding the following code in the functions.php file:
/**

*       Hide ALL shipping rates in ALL zones when Free Shipping is available

*/

add_filter( 'woocommerce_package_rates', 'njengah_unset_shipping_when_free_is_available_all_zones', 10, 2 );

function njengah_unset_shipping_when_free_is_available_all_zones( $rates, $package ) {

$all_free_rates = array();

foreach ( $rates as $rate_id => $rate ) {

if ( 'free_shipping' === $rate->method_id ) {

$all_free_rates[ $rate_id ] = $rate;

break;

}

}

if ( empty( $all_free_rates )) {

return $rates;

} else {

return $all_free_rates;

}

}
This is the outcome: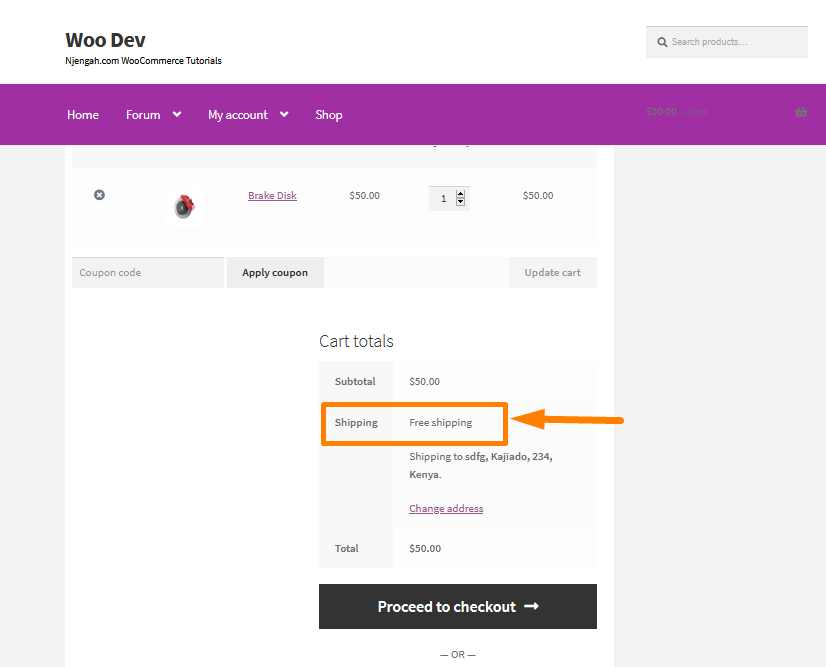
WooCommerce Hide Cart Page
The WooCommerce Cart is an essential page where users can pile up what they want to buy from the website and then simply checkout by paying online. It acts as the normal shopping cart in a store. People can keep adding whatever they want to buy in the shopping cart, and later, check out at the counter.
Let me show you how you can hide different elements on this page.
WooCommerce Hide Update Cart Button
If you are familiar with WooCommerce, you know that if a customer has added a product to their cart and decided to change the quantity, the only way the order can be reflected with that change is by clicking on the update cart button.
This is just another step for your customer, who probably wants to see the updated total. Therefore, this functionality needs to be optimized to save time.
This is how the Update button is displayed on the Cart page: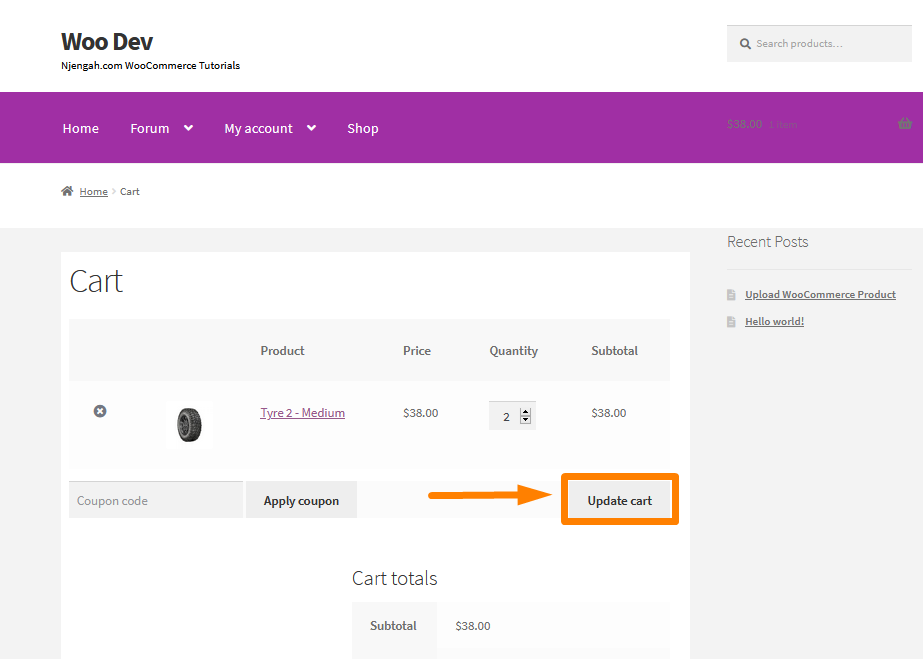
To hide the Update Cart button, add the following CSS on the Additional CSS section:
input[name='update_cart'] {

 display: none !important;

 }

 /* OR YOU CAN TRY THIS */

 button[name='update_cart'] {

display: none !important;

 }
This is the outcome:
You can go a step further and “click” the button via JQuery and let WooCommerce update the cart totals and taxes.
WooCommerce Hide Subtotal
If you want to hide the subtotal row in the WooCommerce cart page, you can either use CSS or use a filter hook that unsets the cart_subtotal value. It is very easy to implement this solution in your theme.
The subtotal is displayed before other charges are added like the shipping so that we have a total that is a combination of all the costs of the product as shown in the image below:
If you want to hide this section, you should consider adding the following CSS code in the Additional CSS section:
.cart-subtotal {

       display: none;

 }
This is how you can extract the element we need to change:
How to Hide the WooCommerce Coupon Code Field
Offering coupons to loyal customers is a great way that WooCommerce store owners give back to the community. Through these coupons, they can offer rewards or discounts as a purchase incentive. This is just a way for WooCommerce store owners to say thank you for purchasing their products.
You do not need to show or train your customers on how to look for discounts or coupons, as they might abandon your cart to hunt for coupons that are available in your store.
When users go for coupon hunting, they may not complete a purchase because they may not be satisfied since they feel like they missed out on a discount.
You can hide the coupon code completely using the WooCommerce built-in option or the following custom PHP script that you should add in the functions.php file:
// hide coupon field on the cart page

 function disable_coupon_field_on_cart( $enabled ) {

             if ( is_cart() ) {

                         $enabled = false;

             }

             return $enabled;

 }

 add_filter( 'woocommerce_coupons_enabled', 'disable_coupon_field_on_cart' );
To see the outcome of this code, you need access the cart page, and you will see this: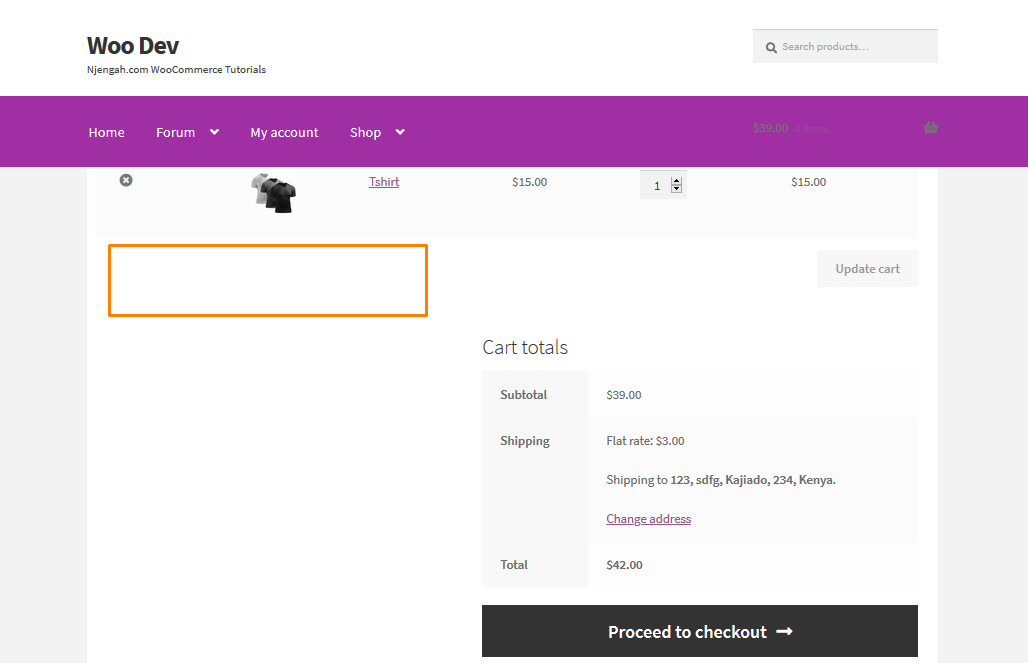
WooCommerce Hide Checkout Page
The checkout process is one of the most important steps in the customer’s journey in your store. However, it is important to note that it is the last chance you have to convince shoppers to make a purchase. Many customers may abandon your store because of this page. Therefore, this page needs to be optimized.
One way to optimize your checkout page is to customize the checkout fields based on your business needs and target audience. For example, if you do not typically sell to companies, remove the Company Name field.
In this section, we will walk you through how to hide elements on the checkout page.
WooCommerce Hide Tax Label
If you want to remove the “ex. tax” label that appears in the order details on invoices, this section is for you. If your WooCommerce store sells items excluding tax, you do not require a notice that pricing is excluding tax, especially if the invoice contains a tax line item.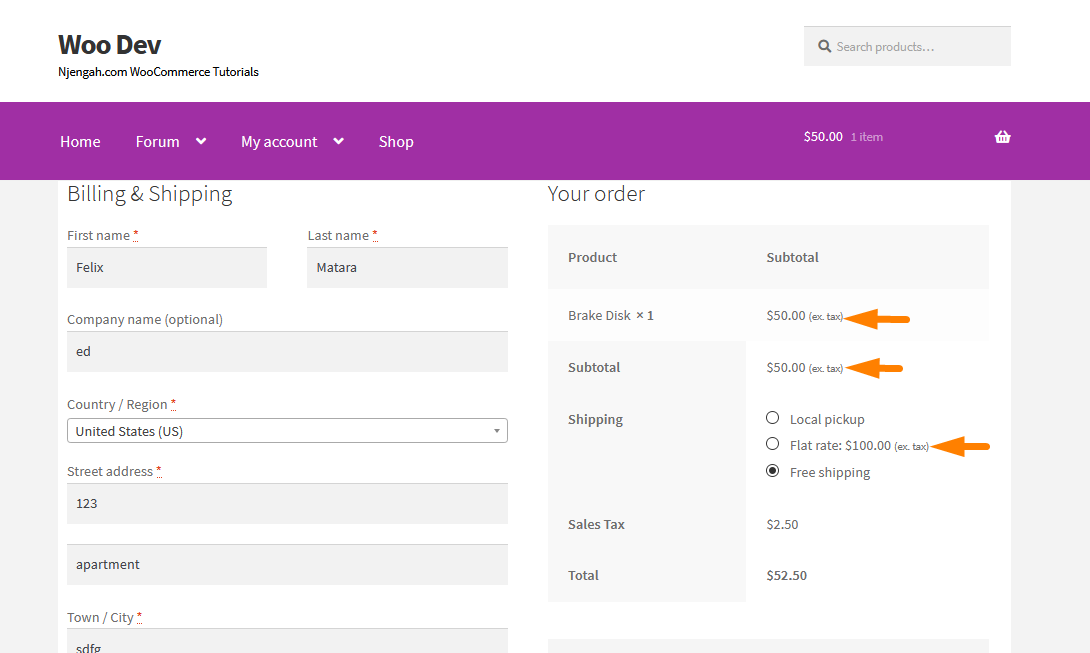
In the US, subtotals are usually displayed exclusive of tax. The tax is included as a line item on invoices. This means that stores that sell only within the US do not typically need this label in email invoices.
To remove the labels, add the following code at the bottom of the functions.php file:
function njengah_change_email_tax_label( $label ) {

    $label = '';

     return $label;

 }

 add_filter( 'woocommerce_countries_ex_tax_or_vat', 'njengah_change_email_tax_label' );
Now the order details table will return only amounts without a label included to indicate that prices are displayed exclusive of tax:
How to Hide PayPal Icon on WooCommerce Checkout Page
One of the best WooCommerce Payment Gateways that you should include in your store is PayPal. Many users trust this gateway due to its return policies. Therefore, you need to add this payment method to your WooCommerce store to increase your conversions.
One of the shortcomings of the WooCommerce PayPal gateway is the icon that is displayed on the frontend. Most users often want to get rid of it since it does not match their themes’ design.![]()
You can change the filter to hide the PayPal icon by returning an empty string, as shown in the code snippet below:
/**

 * Hide PayPal Icon Filter

*/

 add_filter( 'woocommerce_paypal_icon', 'njengah_hide_the_paypal_icon' );

  function njengah_hide_the_paypal_icon() {

   return '';

}
Alternatively, you can hide the PayPal icon using CSS. You can also change the WooCommerce PayPal Icon on the checkout page.
This is the outcome:![]()
WooCommerce Hide Company Name Field on Checkout
There are many reasons why you may want to hide the Company Name field from the WooCommerce Checkout.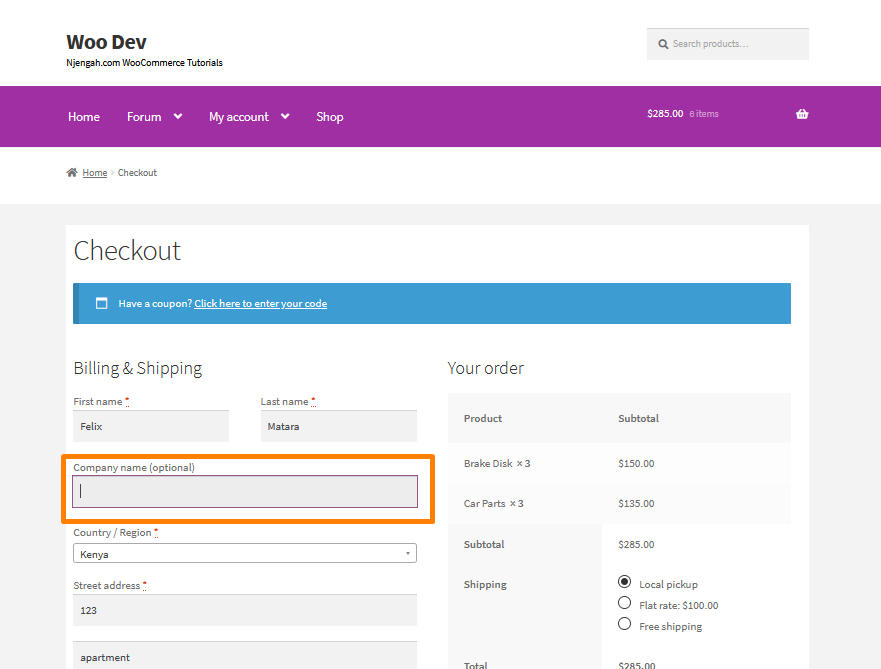
One of the situations that may force you to hide this field is selling to consumers rather than businesses. If you own a consumer-focused WooCommerce store, having the company name field is just added friction on your Checkout. This could potentially confuse customers if they are not sure whether it needs to be filled out or not.
To hide the Company Name field, add the following code at the bottom of the functions.php file:
/**

 * @ snippet         Hide the Company Name Field from the Checkout Page

 */

 add_filter( 'woocommerce_checkout_fields' , 'remove_company_name' );

 function remove_company_name( $fields ) {

      unset($fields['billing']['billing_company']);

      return $fields;

 }
You can learn how the code works here.
This will be the outcome on the front end: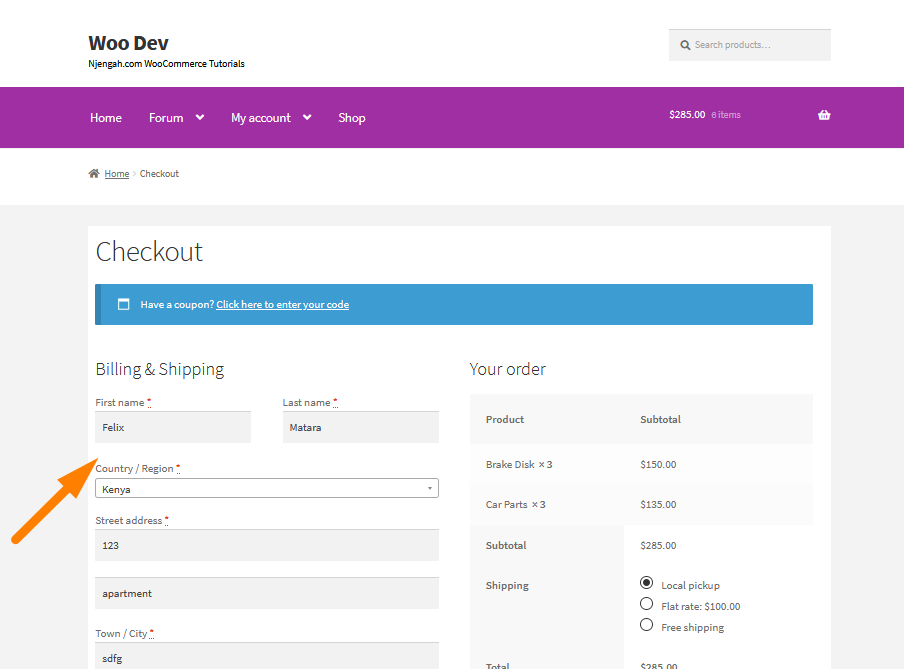
WooCommerce Hide Billing Fields
WooCommerce adds a form for the client to enter their billing details by default. However, you might want to remove a section of the billing details for some products in some cases. For example, you can hide the billing fields for downloadable products.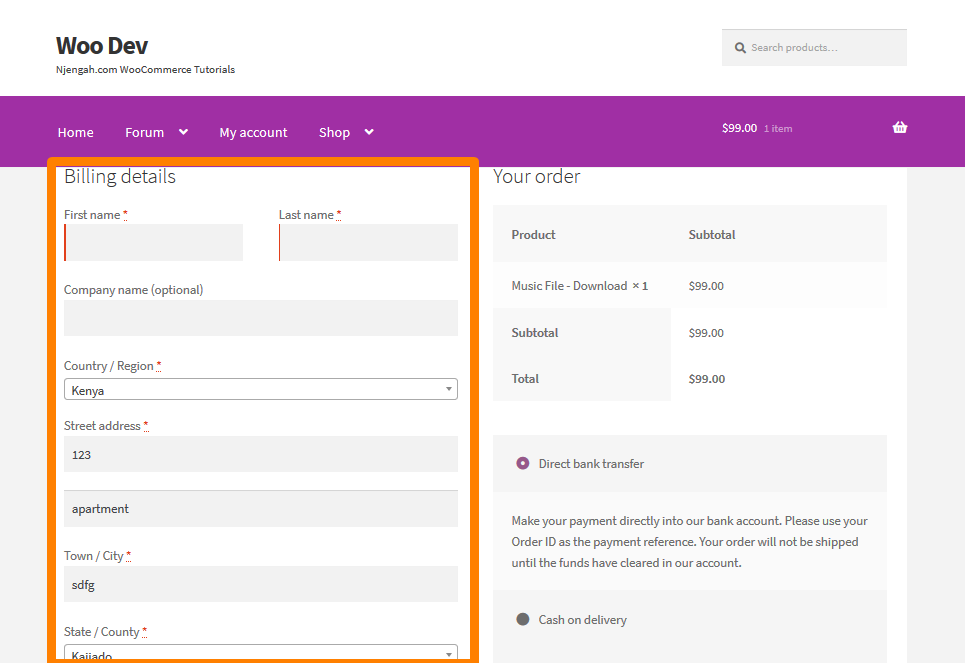
You can use a plugin like the WooCommerce Checkout Field Editor prices at $49. However, this might be a bit pricy.
The billing details we are going to hide are:
- Name
- Company
- Address
- City
- Postcode
- State
- Phone
- Country
To remove the billing details from the WooCommerce Checkout, add the following code at the bottom of the functions.php file:
/**

 * @snippet Simplify Checkout if Only Virtual Products

*/

 add_filter( 'woocommerce_checkout_fields' , 'njengah_simplify_checkout_virtual' );

 function njengah_simplify_checkout_virtual( $fields ) {

    $only_virtual = true;

    foreach( WC()->cart->get_cart() as $cart_item_key => $cart_item ) {

       // Check if there are non-virtual products

      if ( ! $cart_item['data']->is_virtual() ) $only_virtual = false;

   }

     if( $only_virtual ) {

        unset($fields['billing']['billing_company']);

        unset($fields['billing']['billing_address_1']);

        unset($fields['billing']['billing_address_2']);

        unset($fields['billing']['billing_city']);

        unset($fields['billing']['billing_postcode']);

        unset($fields['billing']['billing_country']);

        unset($fields['billing']['billing_state']);

        unset($fields['billing']['billing_phone']);

        add_filter( 'woocommerce_enable_order_notes_field', '__return_false' );

      }

     return $fields;

 }
This is the outcome: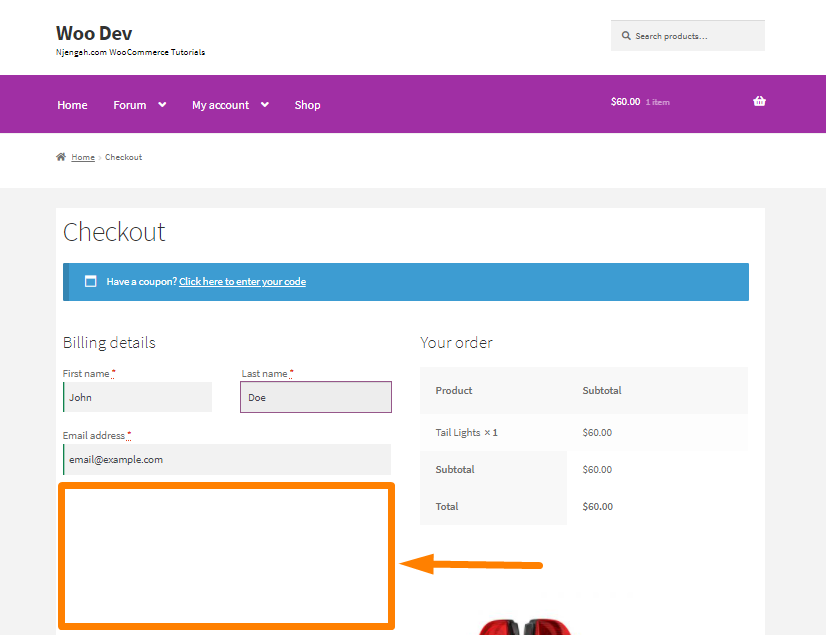
WooCommerce Hide Registration
WooCommerce allows you to set up a login straight out of the box, with or without compulsory registration and social login. Additionally, there are many different types of WooCommerce login, which you can add to your store.
The term ‘WooCommerce Login’ is the process where customers log into your online store. However, this is quite a vague term, and there are several ways to set it up.
How to Hide WooCommerce Registration Form
There are different types of WooCommerce login:
- Public WooCommerce store with guest checkout – This setup allows anyone to browse the products in your store. There is no hidden content.
- Public WooCommerce store with mandatory user accounts – Customers need to register or login in to their accounts to purchase products.
- Customer portal with protected product categories – This setup uses password protection on different parts of the store.
- Private WooCommerce store – Hide the whole store.
To hide the user registration at the WooCommerce Checkout, go to WooCommerce > Settings. On the settings page, click on the Accounts and Privacy tab. Untick or uncheck the fields in orange:
You can learn how you can move the registration below to the billing section at the WooCommerce Checkout.
WooCommerce Hide Footer
Hide built with storefront & WooCommerce
One of the onboarding WooCommerce wizard steps allows you to install along the Storefront WooCommerce theme, which is a good thing. If you intend to keep the theme as your WooCommerce shop theme, you need to customize it.
One of the most common problems of this theme is the persistent footer credit links that many users would wish to remove or replace. You may also want to add more custom features like the supported payment methods, social icons, cookie notices, and much more.
If you want to remove the footer links, add the following code at the bottom of your functions.php file:
remove_action('storefront_footer', 'storefront_credit',20);
Remember to save the changes you make.
You can learn how to use the Child Theme Function to Override the Footer Link so that you can add your own credit links.
Conclusion
In summary, this post shares how you can hide different elements. As you can see, you can always hide any WooCommerce elements depending on your goals or your programming experience.
You can place PHP snippets at the bottom of your child theme functions. CSS, on the other hand, goes in your child theme style.css file. Make sure you know what you are doing when editing such files. This is a code-level guide, and if you have any problems, please consider hiring a qualified WordPress developer.

Joe is an experienced full-stack web developer with a decade of industry experience in the LAMP & MERN stacks, WordPress, WooCommerce, and JavaScript – (diverse portfolio). He has a passion for creating elegant and user-friendly solutions and thrives in collaborative environments. In his spare time, he enjoys exploring new tech trends, tinkering with new tools, and contributing to open-source projects. You can hire me here for your next project.
Similar Articles
- WooCommerce Redirect After Logout [Ultimate Guide]
- WooCommerce Redirect After Checkout: Redirect to Custom Thank You Page
- How to Hide Unavailable Variations In WooCommerce
- How to Get Order ID on Checkout Page WooCommerce
- How to Create Custom Order Received Page WooCommerce
- How to Create Coupon In WooCommerce
- How to Add View Cart Button In WooCommerce
- How to Remove Coupon From Checkout In WooCommerce
- How to Change Button Color Storefront Theme
- How To Display Product Attributes In WooCommerce
- How to Create WooCommerce Custom Shop Page
- How to Import Products WooCommerce
- How to Set Up WooCommerce Product Price Per Kg
- How to Change Shop Page Title In WooCommerce
- How to Add Fields in WooCommerce Registration Form
- How to Change Add to Cart Button to Read More WooCommerce
- How to Install WooCommerce Storefront Step By Step [Complete Guide]
- How to Add Currency to WooCommerce [Custom Currency]
- How to Customize WooCommerce Product Pages
- How to Add Product SKU In WooCommerce
Comments are closed.