One of the ways to customize the Storefront theme is by using CSS. In this post, I share with you examples of Storefront CSS customization tips and tricks that you can apply to your store.
With more than 200,000 active installations, the Storefront theme is designed, developed, and maintained by WooCommerce Core developers.
It is therefore dubbed as the official WooCommerce theme.
This theme is designed to be flexible as WooCommerce.
The latest version has more than 40 action hooks and more than 60 filter hooks.
WooCommerce Storefront CSS
However, the main question is how you can tweak the look and layout of your theme.
If you are an experienced WordPress user, this will not be an issue. Users who do not want to get their hands dirty with CSS and PHP find it hard to customize the theme.
For this tutorial, you need to have some coding skills. We will add the CSS rules in the Additional CSS section via the customizer.
The advantage of using this section is that the WordPress customizer allows you to edit in a real-time manner.
You can see the changes you make before you can publish your changes.
It is also worth mentioning that the Storefront theme needs to be the active theme when customizing it.
In this post, I will provide you with the ultimate guide to making CSS customization in the Storefront theme.
The trick is identifying the element that you need to change and adding a rule to that element.
With that said, here are some of the CSS rules you can use for the storefront theme.
1. Customize Header Size
Here we will use the Theme Customizer again, but we will write some CSS code in the ‘Additional CSS’ section.
Add the following code:
* Masthead */

#masthead.site-header {

    height: 155px!important;

    margin-bottom:0px

}

/* Mobile CSS for Masthead */

@media only screen and (max-width: 320px) {

    #masthead.site-header {

    height: 80px!important;

    margin-bottom:0px;

}

}

/* Masthead menu */

.storefront-primary-navigation a, .cart-contents a {

    margin:0 0 0 0;

}

.main-navigation ul {

    padding:0 0 10px 4px!important;

}

.main-navigation li {

    height:38px!important;}

/* Mobile CSS for Masthead menu */

@media only screen and (max-width: 320px) {

.main-navigation ul {

    background:#D6DDE4!important;

}

}

/* Header area */

.site-header {

padding-top:0.5em;

}

.site-header .custom-logo-link img, .site-header .site-logo-anchor img, .site-header .site-logo-link img {

margin-bottom: -45px;

}
Here is the result: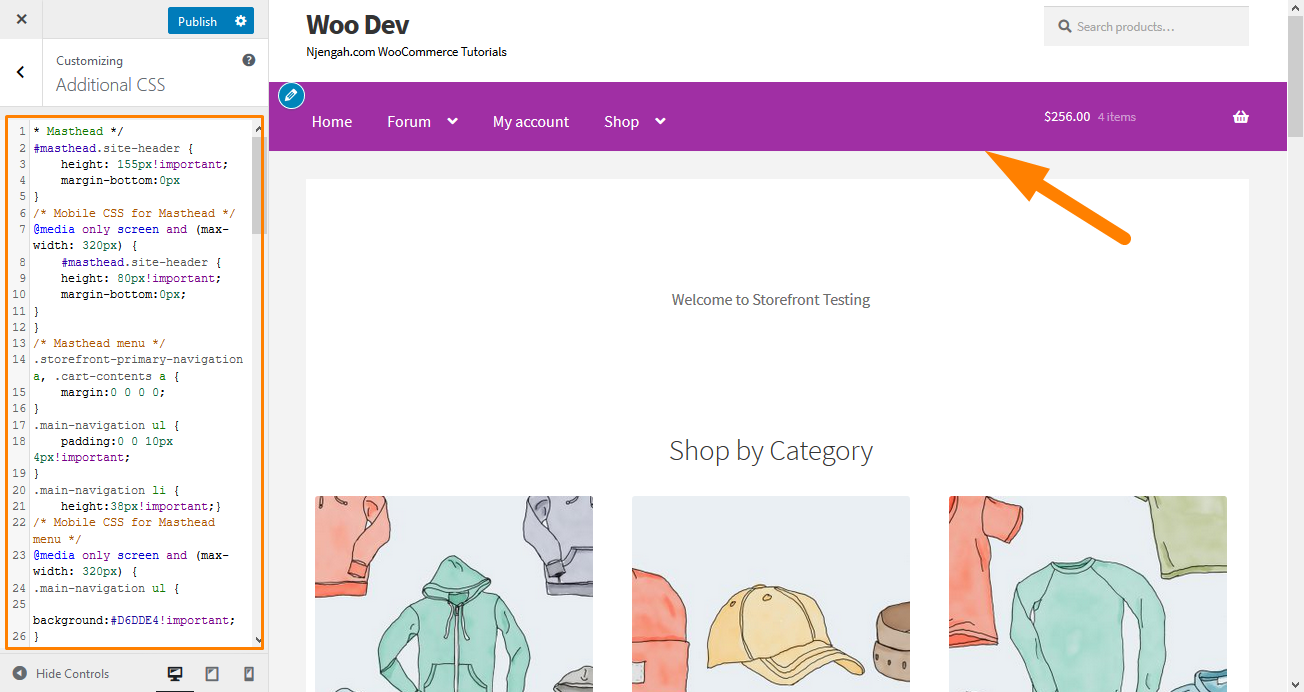
2. Remove the Search Bar from the Theme’s Header
Add this code to the ‘Additional CSS’ section.
.site-header .widget_product_search {

display: none;

}
Here is the result: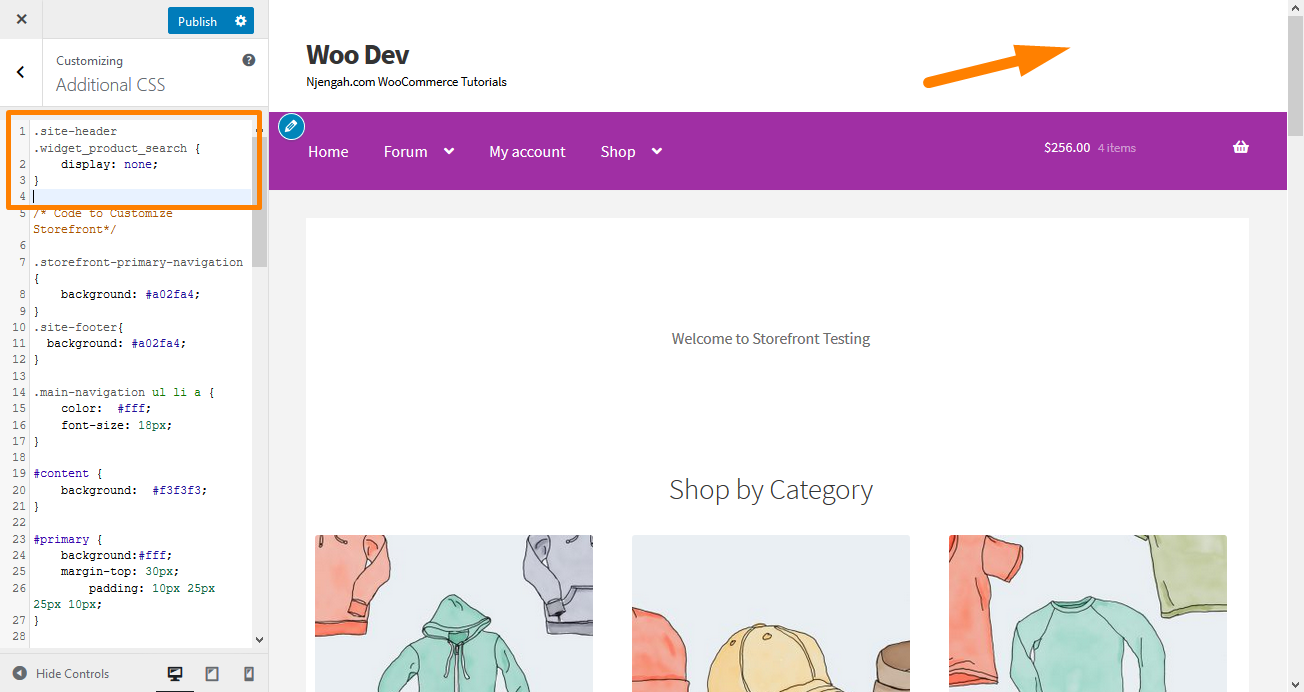
3. Change the Header Menu Color
The customizer allows us to customize the header with the colors that you want. You can do this by navigating to Customize, then Header, and picking the color you want.
However, this option colors the entire header region, including the search bar, login section, and logo.
To get a different background to the header menu, add the following code snippet to the Additional CSS panel.
.storefront-primary-navigation,

.main-navigation ul.menu ul.sub-menu{

background-color: green;

}
Here is the result: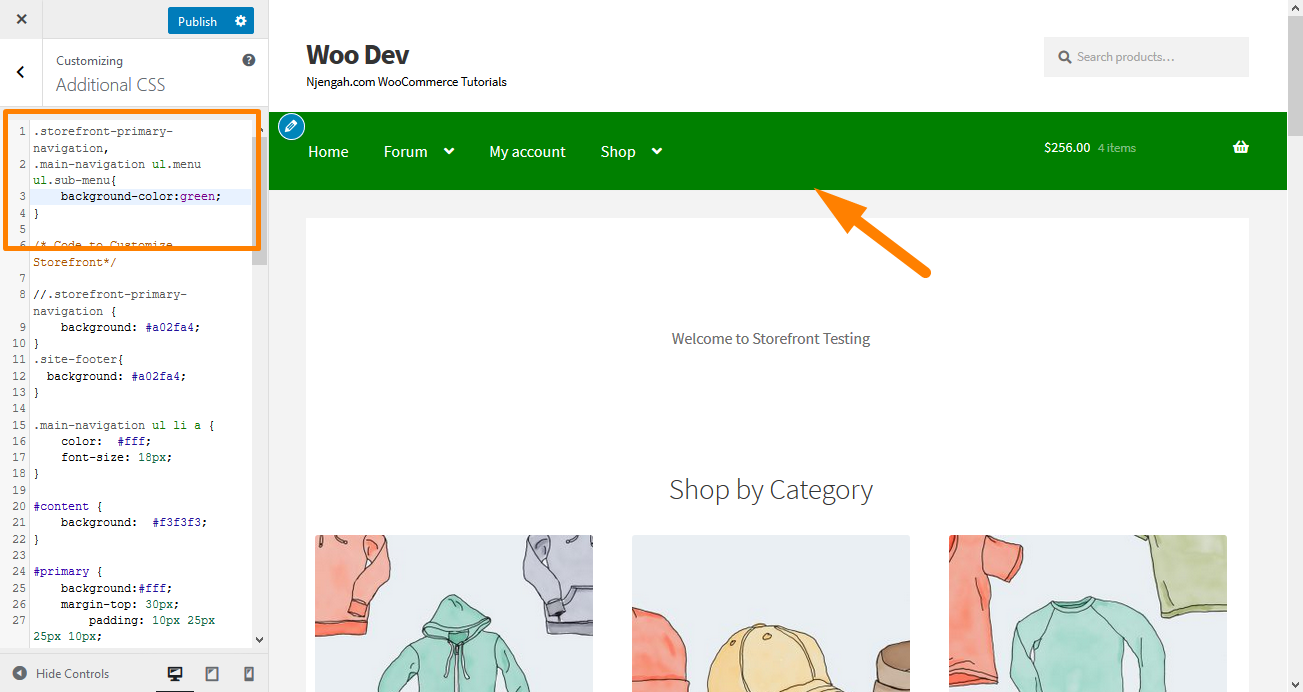
4. Hide the Primary Navigation Bar
Storefront Theme, by default, displays all the pages as a menu.
If you want to hide the primary navigation bar, deleting the menu is not enough.
Navigate to Customize, then Additional CSS section, and add the following lines:
.storefront-primary-navigation {

display: none;

}
Here is the result: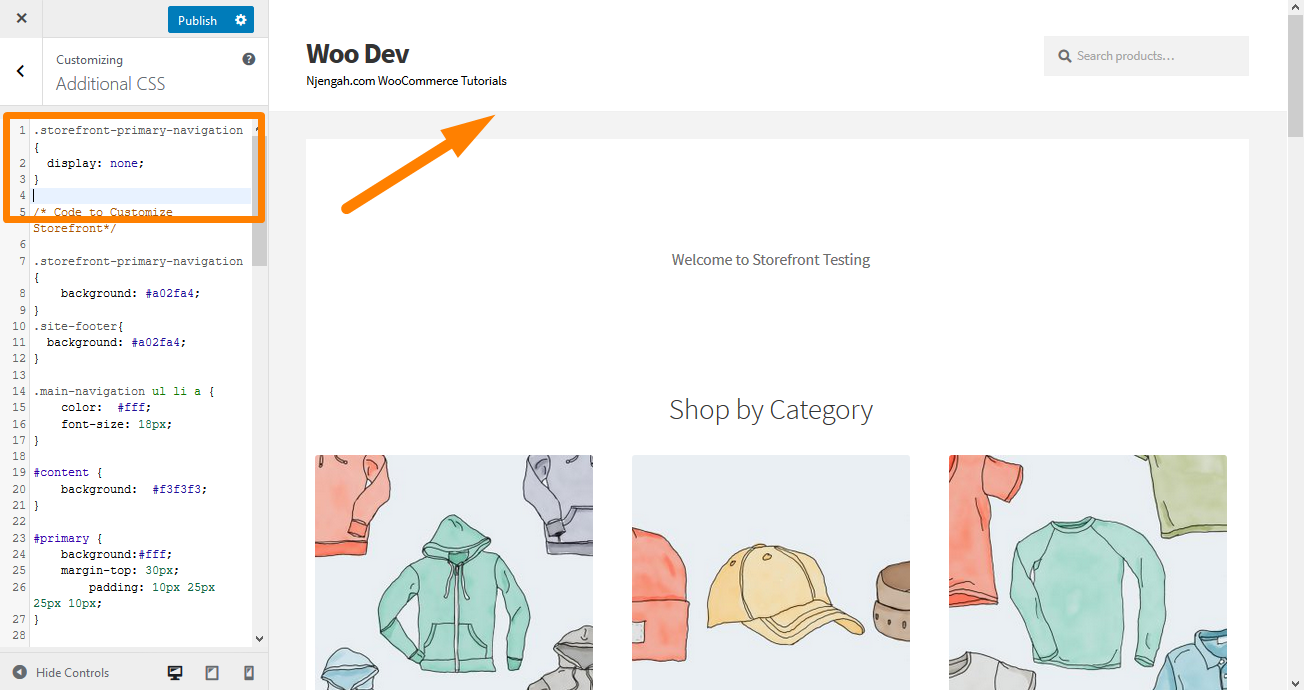
5. Remove Blank Space from the Header
Navigate to Customize, then Additional CSS section, and add the following lines:
.site-branding {

margin-bottom: 0px;

}
Here is the result: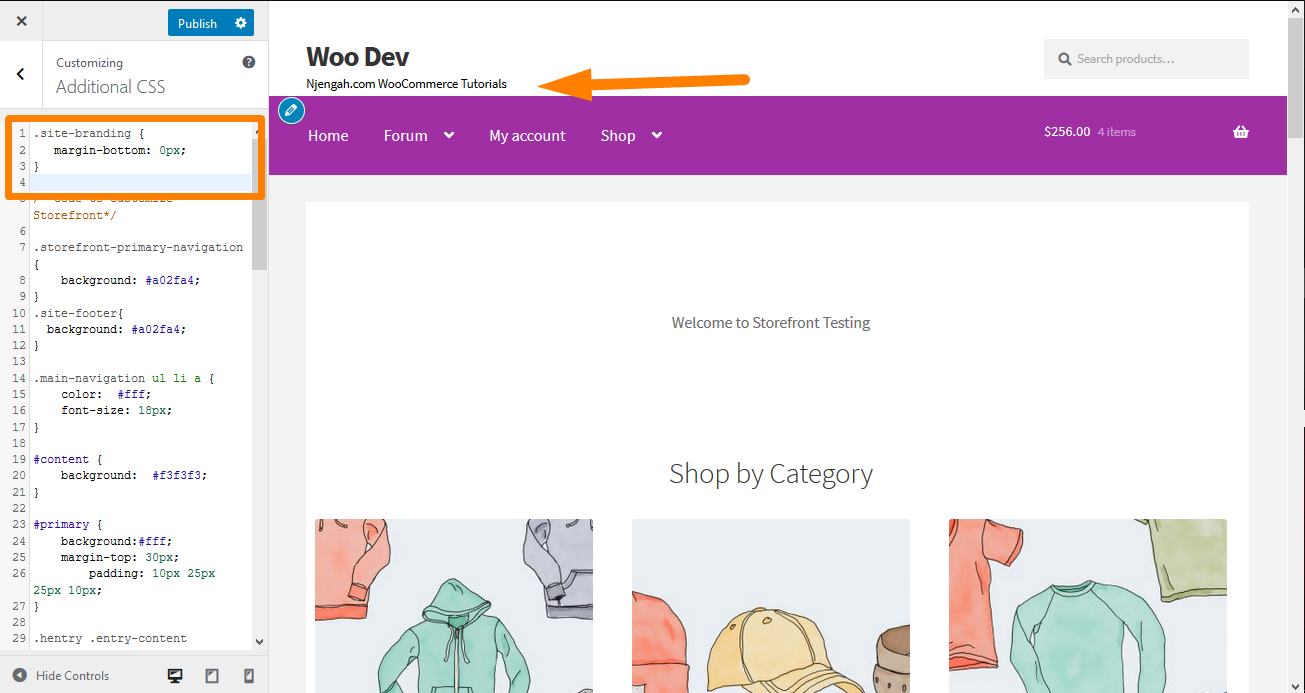
6. Increase the Width of the Search Bar
What would you do if you want to extend the width of the search bar?
Using the Additional CSS section, add the following lines:
.woocommerce-active .site-header .site-search {

width: 44.739%;

}

#masthead .site-search .widget_product_search input[type="search"] {

width: 700px !important;

}
Here is the result: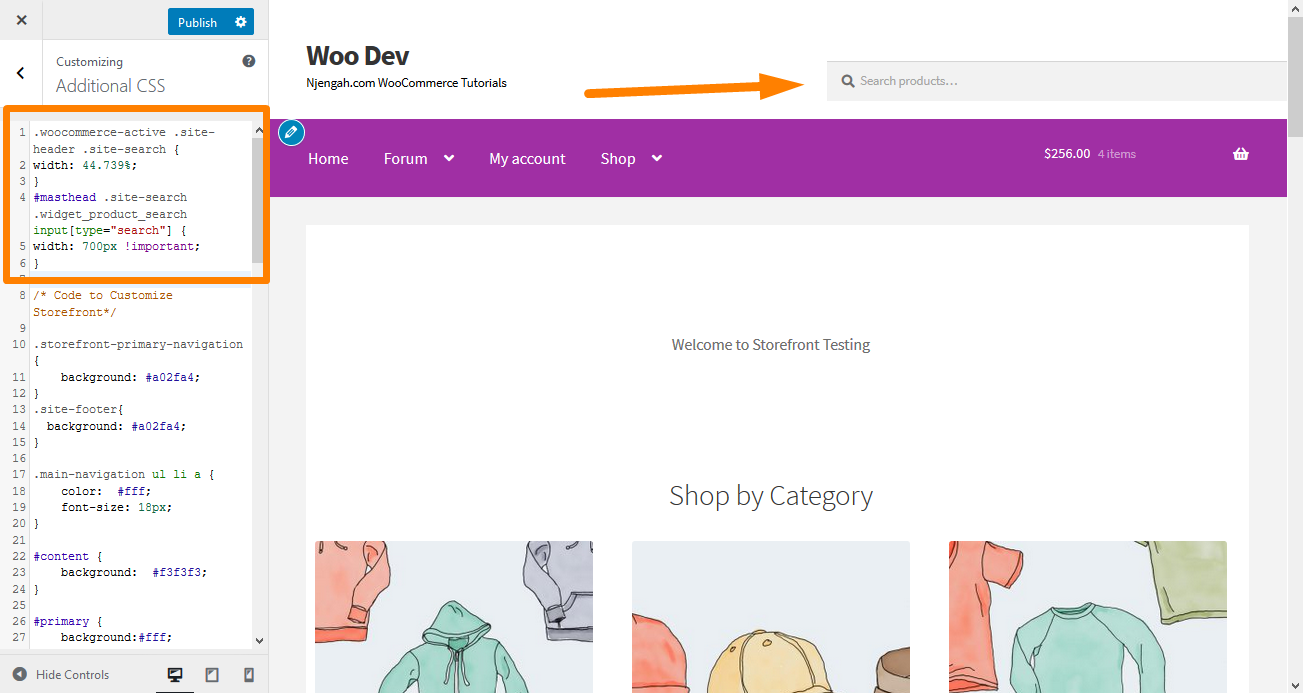
7. How to Change the Size of the Logo, Secondary Navigation, and Search Bar
To change them all at once, add the following code to your Additional CSS section:
@media screen and (min-width: 768px) {

/* LOGO */

.site-header .site-branding, .site-header .site-logo-anchor, .site-header .site-logo-link { width: 30% !important; /* Use px values if you want, eg. 350px */ }

/* SECONDARY NAVIGATION */

.site-header .secondary-navigation { width: 40% !important;  /* Use px values if you want, eg. 350px */ }

/* SEARCH BAR */

.site-header .site-search { width: 30% !important;  /* Use px values if you want, eg. 350px */ }
Here is the result:![]()
8. Remove the Cart from the Header
In this example, I will remove the cart icon by adding a new rule ‘display: none;’.
Add the following CSS code in the Additional CSS section:
.site-header-cart .cart-contents {

display: none;

}
Here is the outcome: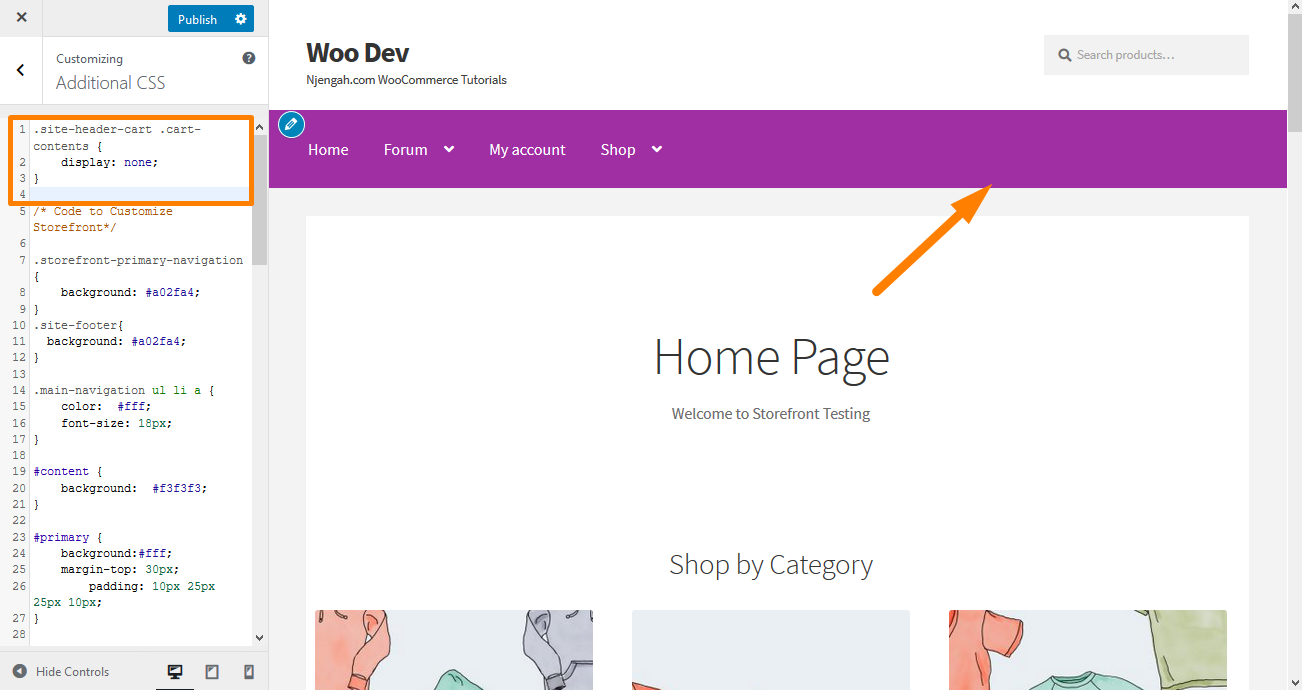
9. Hide the Header
To hide the header, add the following CSS code in the Additional CSS section:
.site-header {

display: none;

}
Here is the result: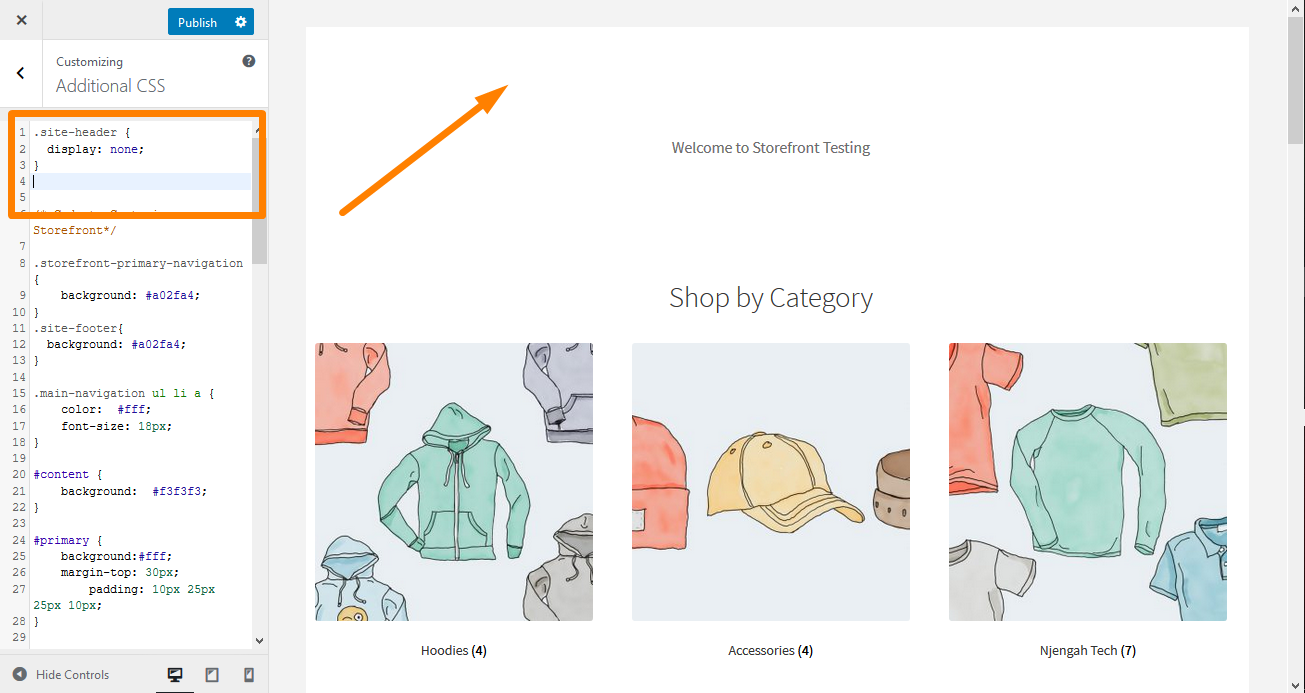
10. Increase the Size of the Menu Link in the Storefront Header
Menus are slightly smaller, according to the preferences of many users. However, they need to upgrade the font size of menu links in the storefront theme.
Add the following code in the Additional CSS section:
.main-navigation ul.menu > li > a, .main-navigation ul.nav-menu > li > a {

font-size:28px;

}
Here is the outcome:
11. Change the Size of the Cart Icon in the Storefront Header
You can do this by adding the following CSS code in the Additional CSS section
.site-header-cart .cart-contents {

font-size:30px;

}
Here is the result:![]()
12. Change the Size of the Site Header Title in the Storefront Theme
Add the following Code in the Additional CSS section:
.site-header {

font-size: 20px;

}
Here is the outcome:
13. Change the Size of the Mobile Menu Button
It is important to note that the way the menu is displayed is part of making the menu responsive.
Therefore, if your primary navigation menu is in the form of a list on a desktop device, the same menu can be displayed as a hamburger menu on a mobile device.
To change the size, add the following CSS code in the Additional CSS section:
.button.menu-toggle {

font-size: 19px;

}
Here is the result: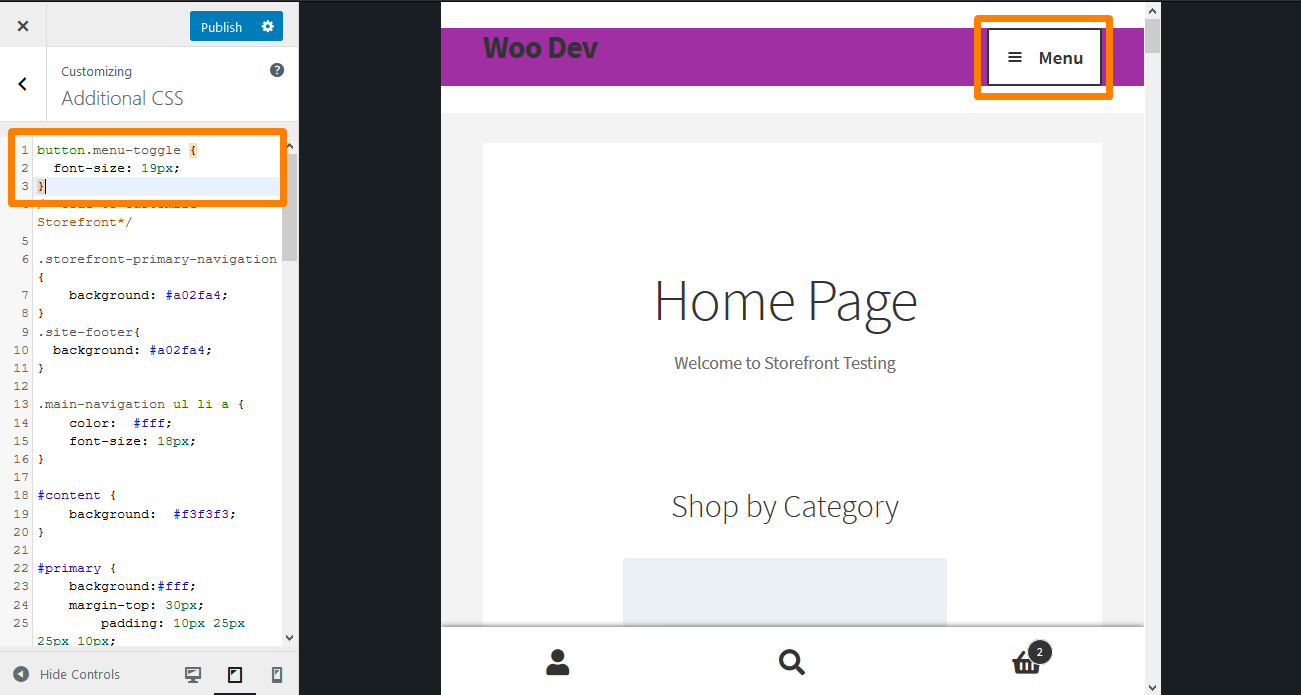
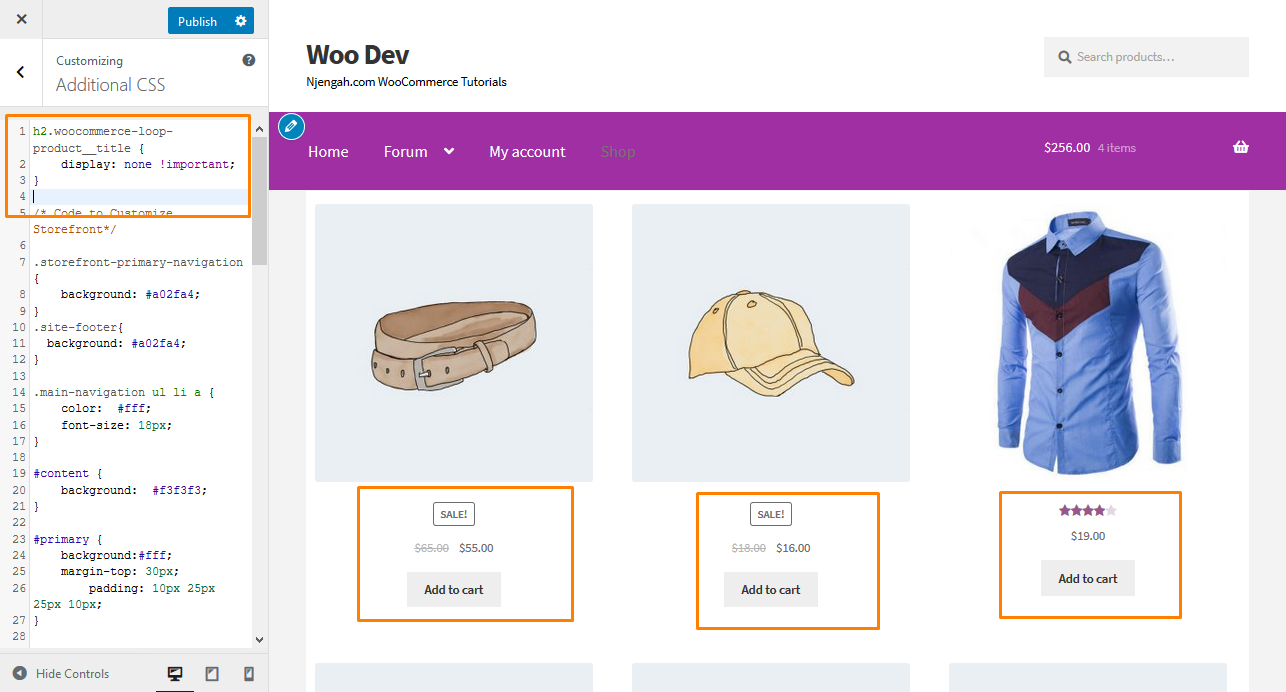
14. Hide the Products Title on the Shop Page
To hide the product’s title on the shop page, simply navigate to Customize then the Additional CSS section, and add the following lines:
h2.woocommerce-loop-product__title {

display: none !important;

}
Here is the result:
15. Hide the Product Quantity Plus and Minus Buttons from the Product Page
For you to hide the text field with the plus and minus buttons to increase or decrease product quantity, all you need to do is add the following CSS code in the Additional CSS section:
.quantity {

display: none !important;

}
Here is the outcome:
16. Hide the “Add to cart” Button on the Product Page
To do this, simply navigate to Customize then the Additional CSS section, and add the following lines:
.single_add_to_cart_button {

display: none !important;

}
Here is the result: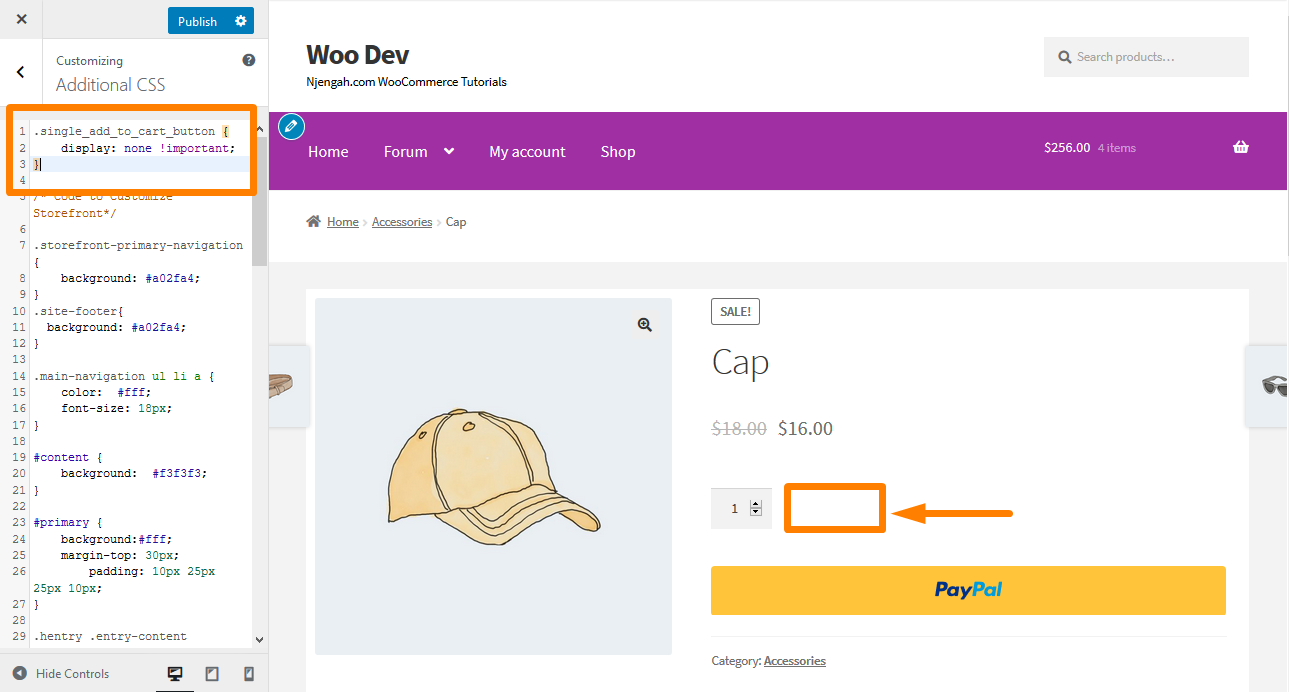
17. Change the Storefront Widget Section Color and Font Size
There is no direct way to change font color or size for the page widgets using the customizer. You can easily change this by adding the following lines of CSS code. To do this, navigate to Customize, then the Additional CSS section, and add the following lines:
.widget-area .widget {

color: green;

font-size: 1em;

}
Here is the result: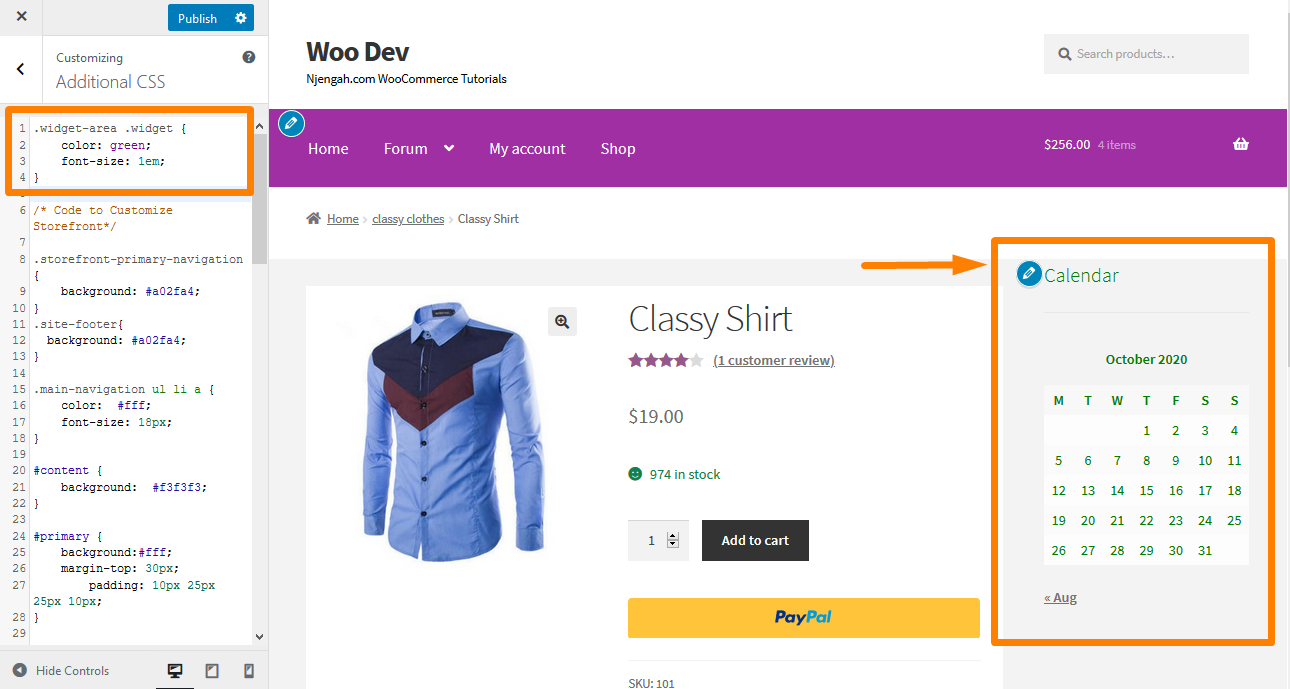
18. Show the Storefront “Sale” Badge on the Product Image
The default version of the WooCommerce Storefront theme allows you to define a sale or a discounted price for a certain product. However, if you want to add the Sale badge on the product image, navigate to Customize, then Additional CSS section, and add the following lines:
ul.products li.product .onsale {

position: absolute;

top: 137px;

right: 62px;

}
Here is the result:![]()
19. Change the Color of the “Sale” badge
To change the color of the Sale badge, simply navigate to Customize then the Additional CSS section, and add the following lines:
.onsale {

background-color: black;

border-color: red;

color: red;

}
Here is the result:![]()
20. Change Quantity “plus-minus” Box Color
This can be done by changing the background color of the quantity plus and minus buttons. To do this, navigate to Customize, then the Additional CSS section, and add the following lines:
.quantity .qty {

color: #000;

background-color: #f5df72;

}
Here is the result: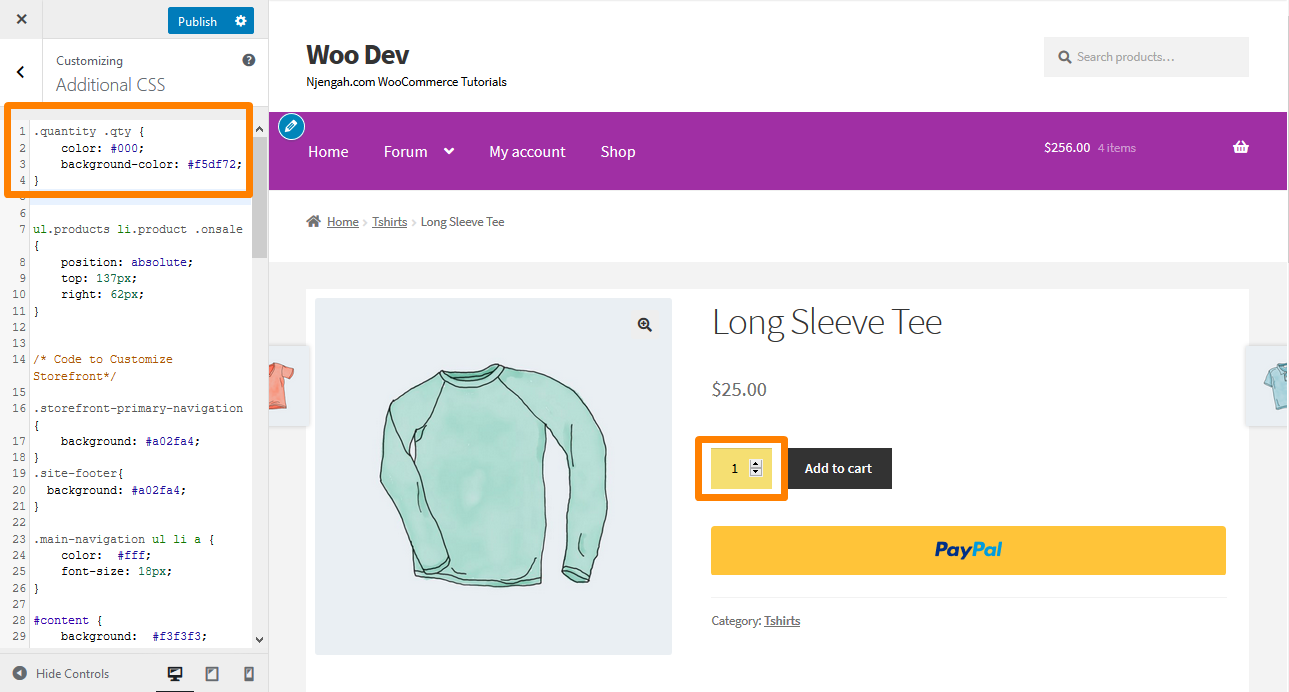
21. Change the Background Color of the Minicart on the Header
When changing the color of the header, the mini cart dropdown inherits this color.
However, you can change this by using the following CSS rules for added visibility.
Navigate to Customize, then Additional CSS section, and add the following lines:
.woocommerce.widget_shopping_cart {

background: red;

border-radius: 12px;

}
Here is the result: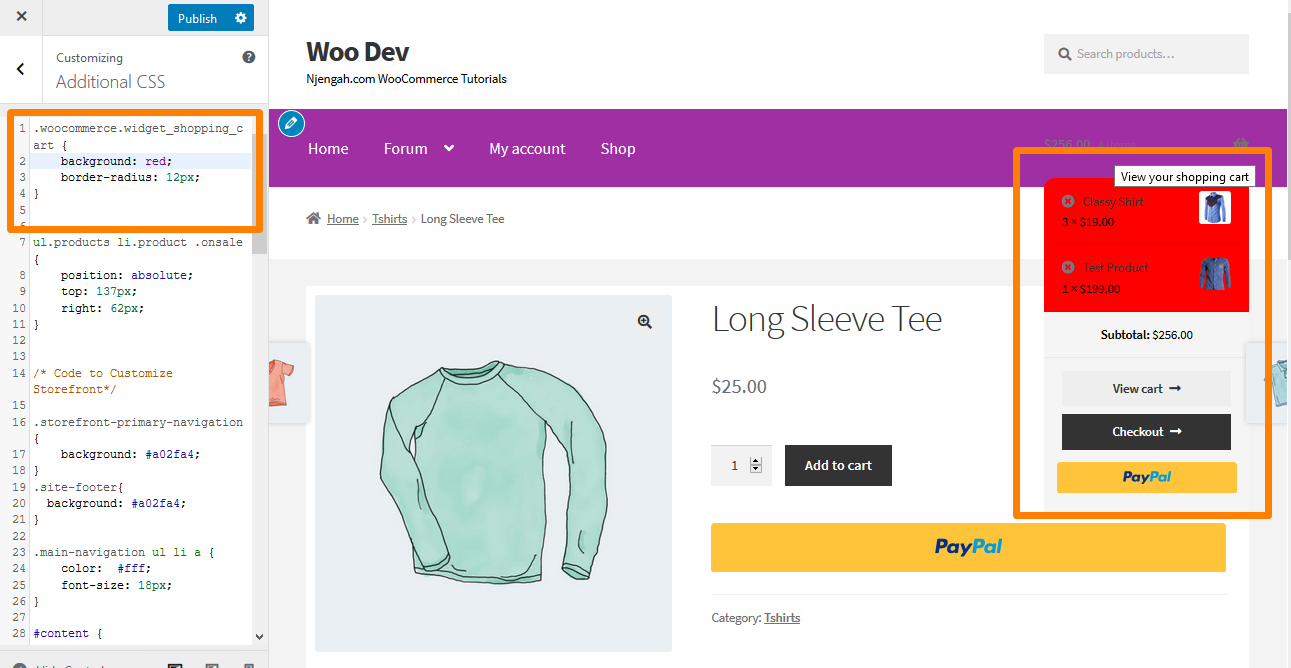
22. Add Image in Storefront Footer Using CSS below Copyright
If you want to add your own logo, accepted payments, or partner badge below the copyright text, navigate to Layers, Customize, and then click on Footer.
Click on Customization to expand the panel and click on Select Image in the background.
Please select the image you want and add it.
Select No Repeat and Bottom, or position it manually as desired.
Navigate back to the Customizer and click on CSS to expand the panel.
However, you should ensure that the percentages are according to your specifications. Then add the following lines:
.site-info:after {

content: '';

background-image: url(add your own URL);

display: block;

width: 100px;

height: 100px;

margin: 0 auto;

}
Here is the result: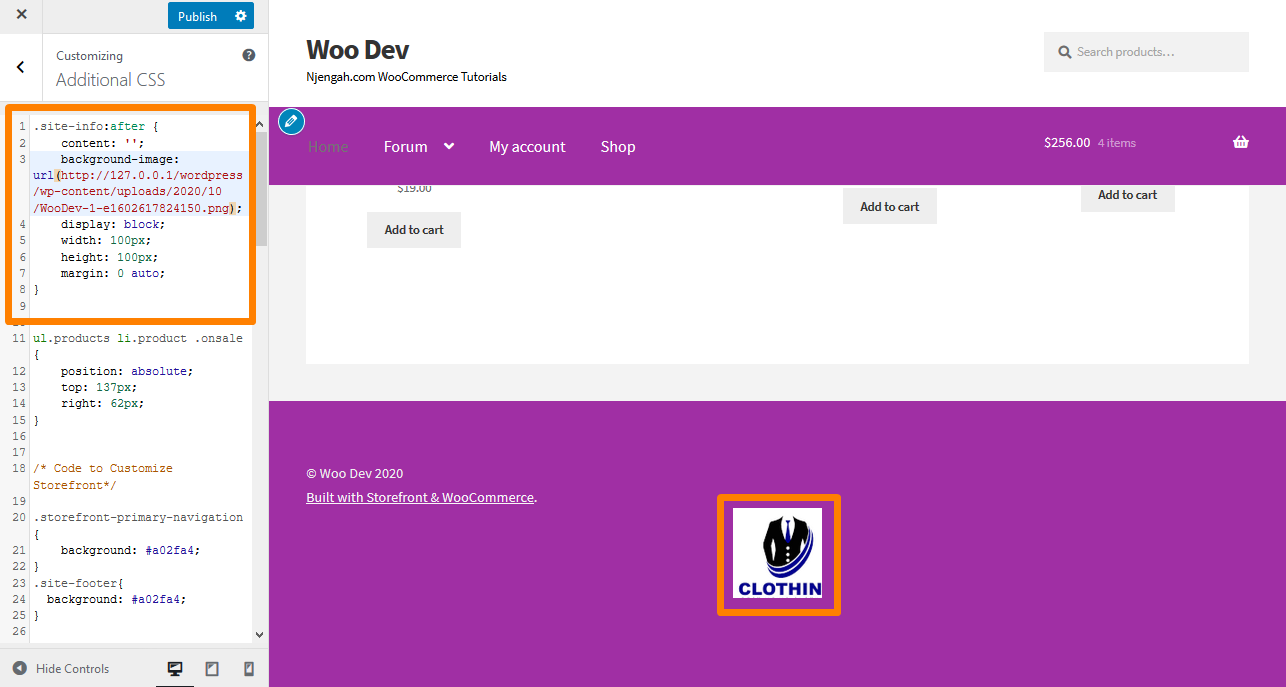
-
How to Remove Gap in Footer
Navigate to Customize, then Additional CSS section, and add the following line:
.footer-widgets { padding-top: 0; }
Here is the result: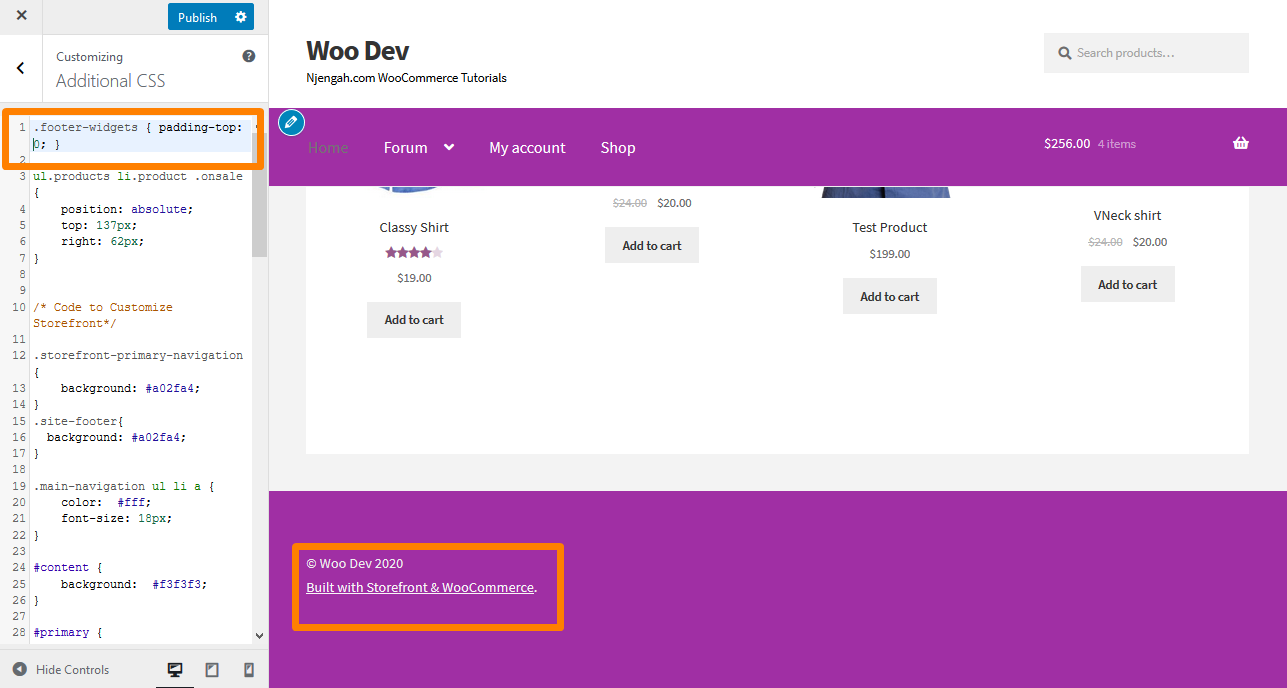
24. How to Remove the Underline from Hyperlinks
By default, the Storefront theme underlines links, and if you want to remove them, navigate to Customize, then Additional CSS section, and add the following lines:
a {

text-decoration: none !important;

}
Here is the result: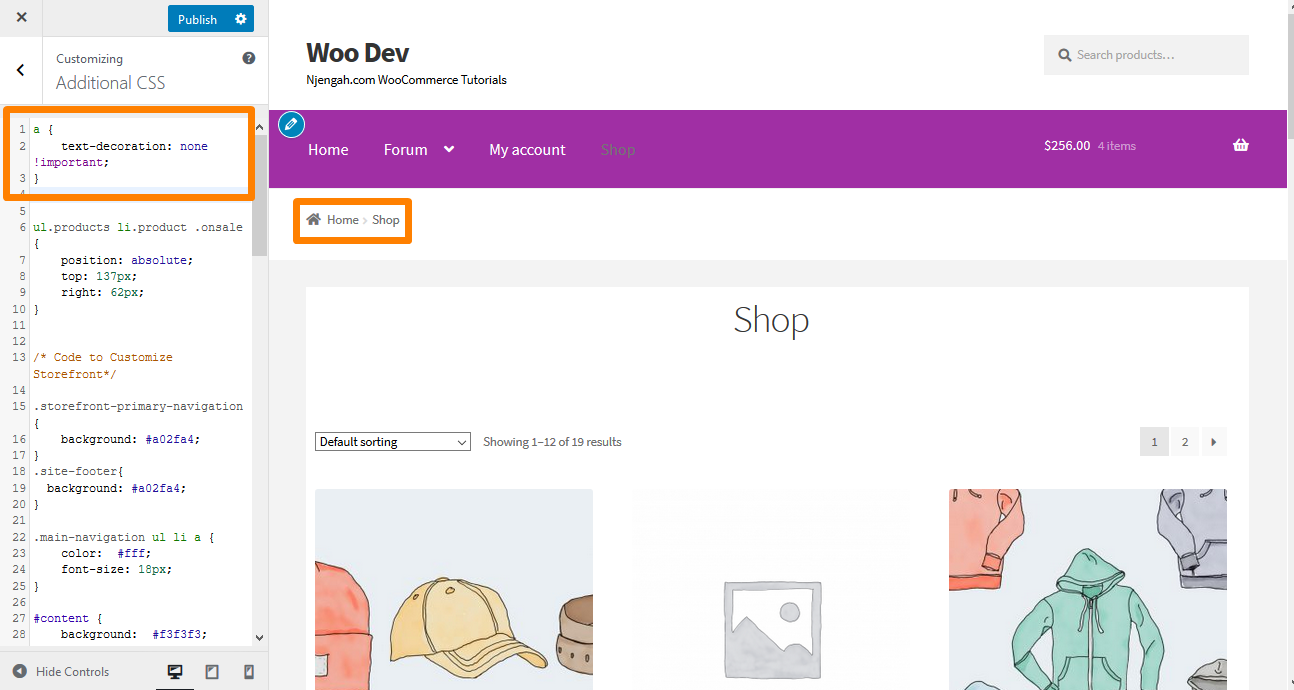
25. How to Change the Color of the Horizontal Lines on the Storefront Homepage
Simply add the following code to your child theme’s custom.css file:
.page-template-template-homepage .hentry .entry-header,

.page-template-template-homepage .hentry,

.page-template-template-homepage .storefront-product-section {

border-color: red;

}
26. How to Customize the Storefront WooCommerce on Sale Badge
Simply add the following code to your Additional CSS section:
.onsale {

background-color: #FFFFFF;

border-color: #FF0000;

color: #FF0000;

}
Here is the result:![]()
27. How to Change the WooCommerce Storefront Footer Height
It is very easy to change the WooCommerce Storefront footer height by adding the following CSS code in the Additional CSS section:
section.footer-widgets {

padding-top: 25px;

}

div.site-info {

padding-top: 16px;

padding-bottom: 25px;

}
Here is the result:
28. Adding Background Image to Storefront a particular Homepage Section
The default Storefront theme has six sections namely, product categories, recent products, featured products, popular products, on sale products and best-selling products. Simply add the following code to the Additional CSS section:
.storefront-featured-products{

background-image: url(Add your URL here);

background-position: center center;

background-repeat: no-repeat;

background-size: cover;

-o-background-size: cover;

}
Here is the result: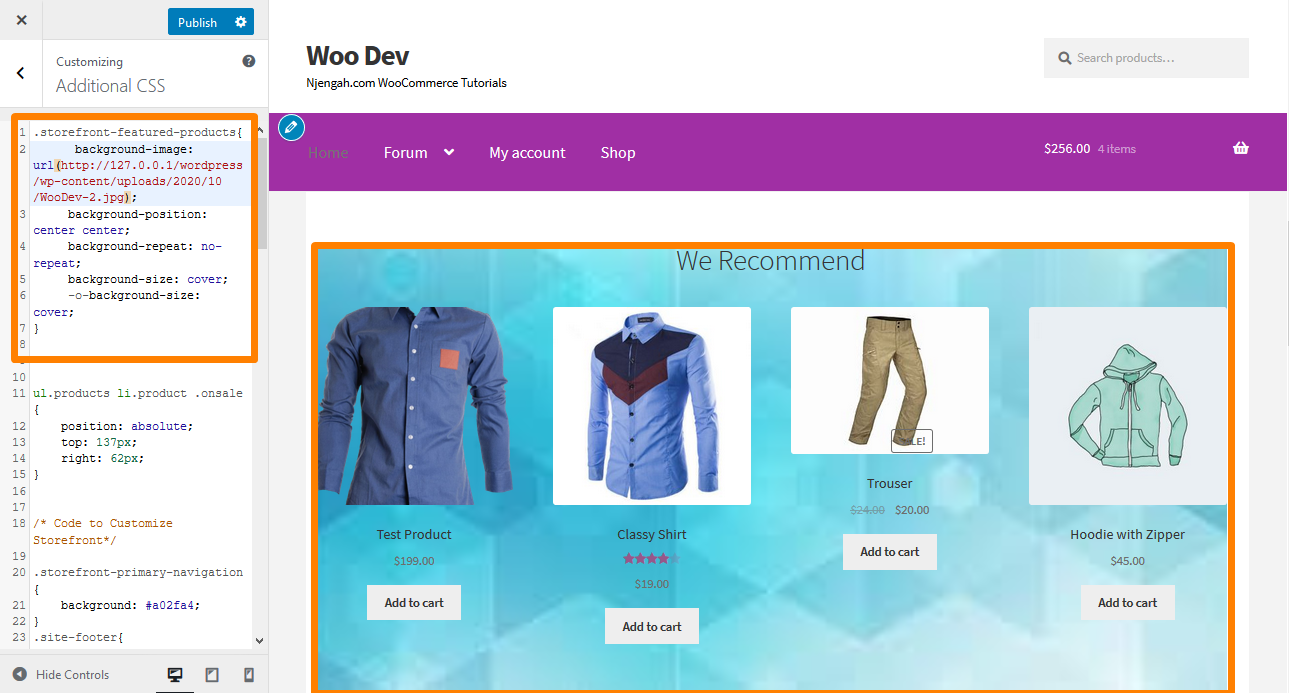
29. Adding Background Color to Storefront Homepage Sections
To do this, you need first to identify the section you want to add color. This can easily be done by adding the following code to the Additional CSS section:
.storefront-featured-products{

background-color:#FFEB3B;

}
Here is the result: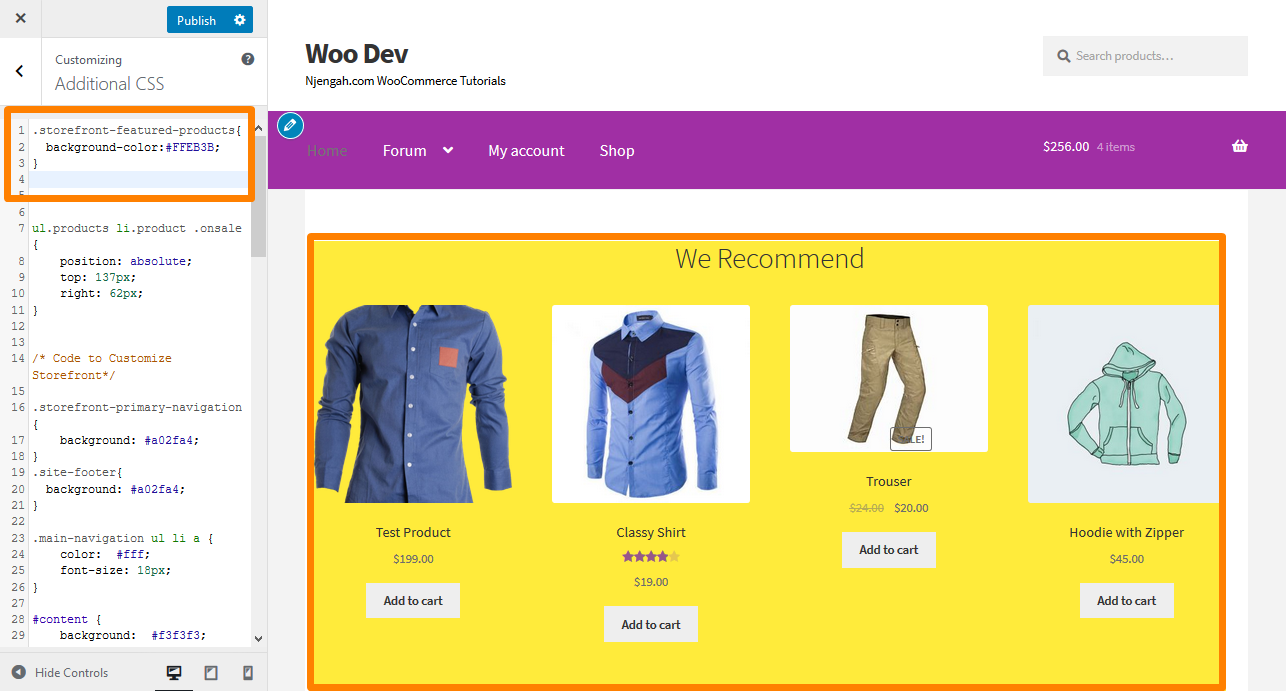
30. How to Remove or Hide the Homepage Section Title
To do this you need to first identify the section you want to remove or hide. This can be done by adding the following code to the Additional CSS section:
.storefront-recent-products .section-title {display:none;}

.storefront-product-categories .section-title {display:none;}

.storefront-featured-products .section-title {display:none;}

.storefront-popular-products .section-title {display:none;}

.storefront-on-sale-products .section-title {display:none;}

.storefront-best-selling-products .section-title {display:none;}
Here is the result: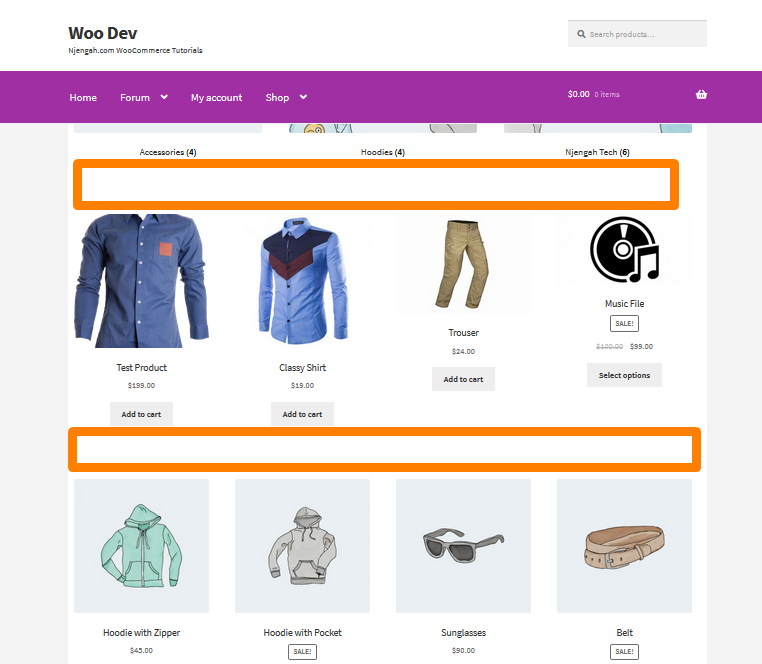
31. How to Change the Background Color of On-Sale Products
This can be done by adding the following code to the Additional CSS section:
.storefront-on-sale-products{

background-color:#FFEB3B;

}
Here is the result:
32. How to Automatically Add Space under the Header for Pages without a Title
Whenever you disable the main Page Title for any page, there is no space left under the header. This code snippet will help you add the spacing to insert a slider, image, or other content flushes with the top. Add the following code to the Additional CSS section:
body.page-header-disabled #main {

padding-top: 30px;

}
Here is the result: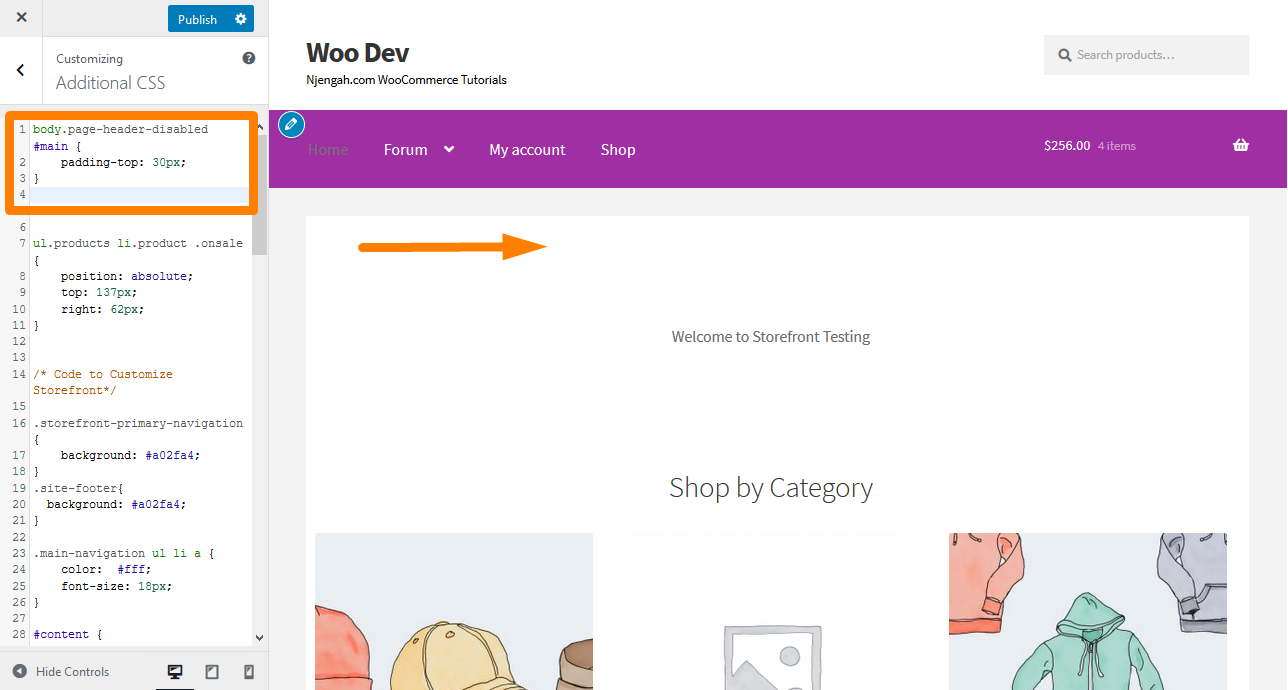
33. How to Hide Scroll to Top Button on Mobile
Simply add the following code to the Additional CSS section:

@media only screen and (max-width: 959px) {

#site-scroll-top { display: none !important; }

}
Here is the result: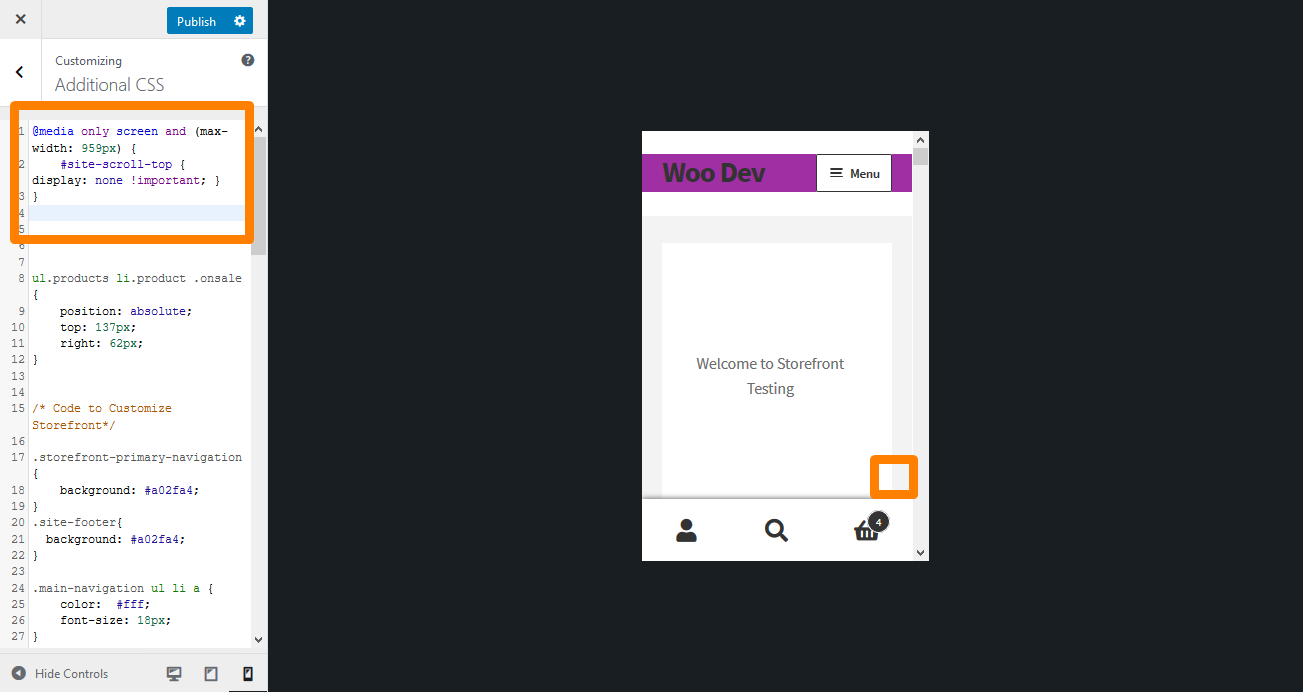
Conclusion
I have shared some CSS tips in this guide that you can use to style the Storefront theme.
I highly recommend that you add the CSS rules in the Additional CSS section so that you can preview the changes in real time.
Previewing your changes will allow you to change the rule to your specification.
To add the rule, copy/paste it into the “Additional CSS” section of your Storefront theme customization interface. To do this:
- Log into your WordPress site and access the Dashboard as the admin user.
- From the Dashboard menu, click on Appearance Menu > Customize.
- Navigate down to Additional CSS in the left sidebar that appears.
- Add the CSS rule.
- If you are satisfied with the changes, click on Publish.
However, it is essential to note that the CSS tips shared here only work for the Storefront theme.

Joe is an experienced full-stack web developer with a decade of industry experience in the LAMP & MERN stacks, WordPress, WooCommerce, and JavaScript – (diverse portfolio). He has a passion for creating elegant and user-friendly solutions and thrives in collaborative environments. In his spare time, he enjoys exploring new tech trends, tinkering with new tools, and contributing to open-source projects. You can hire me here for your next project.
Similar Articles
- How to Adjust WooCommerce Storefront Height of Header
- How to Set Up Homepage in WooCommerce Storefront
- How to Add Logout Option Menu WooCommerce Storefront Theme [Example]
- How to Change Storefront Theme Tagline WooCommerce
- How to Change Main Menu Font Size Storefront Theme
- WooCommerce Storefront Header CSS Customization Guide
- WooCommerce Storefront Show all Categories on the Homepage
- How to Change the Size of Mobile Menu Button Storefront Theme
- How to Change Menu Color WooCommerce Storefront
- How to Change WooCommerce Storefront Footer Height
- How to Remove Footer Storefront Theme WooCommerce
- How to Change the Size of Site Title WooCommerce Storefront Theme
- How to Remove Header WooCommerce Storefront Theme
- WooCommerce Storefront Theme Homepage Customization [Ultimate Guide]
- How to Change WooCommerce Storefront Featured Image Size
- How to Make Divi Mobile Menu Scrollable Quick Fix Solution
- How to Hide Category WooCommerce Storefront Theme
- How to Change the Size of Cart Icon In WooCommerce Storefront Theme
- How to Remove Related Products WooCommerce Storefront Theme
- How to Hide Best Sellers WooCommerce Storefront Frontpage