 It is no doubt that images are vital components of every website. Before thinking about changing the size of an image, just try to imagine your favorite WooCommerce store without images. It would even make it hard to generate sales in your store. This is because visitors in your store will not be interested in buying products that they do not see.
WooCommerce Storefront Featured Image Size
In the past when websites came into the picture, images couldn’t play a significant role in their existence. This is because internet connections were too slow, and no one could load dozens of pictures per page. Luckily, those are all in the past and now we cannot live without online media.
Even though featured images are just like any other media file that you can add to WordPress, it deserves special treatment. This image helps you grab the attention of your visitors. Moreover, it is used to entice individuals into reading your stories, boost up the visual quality of your product, and it even plays a notable role in social media sharing.
Where Do Featured Images Appear?
The Storefront theme allows you to add featured images and is used as thumbnails, which represent the entire post. Additionally, selecting a featured image for a post, you can set the entire tone of your story. Moreover, featured images appear on top of the single posts, pages, and custom post types.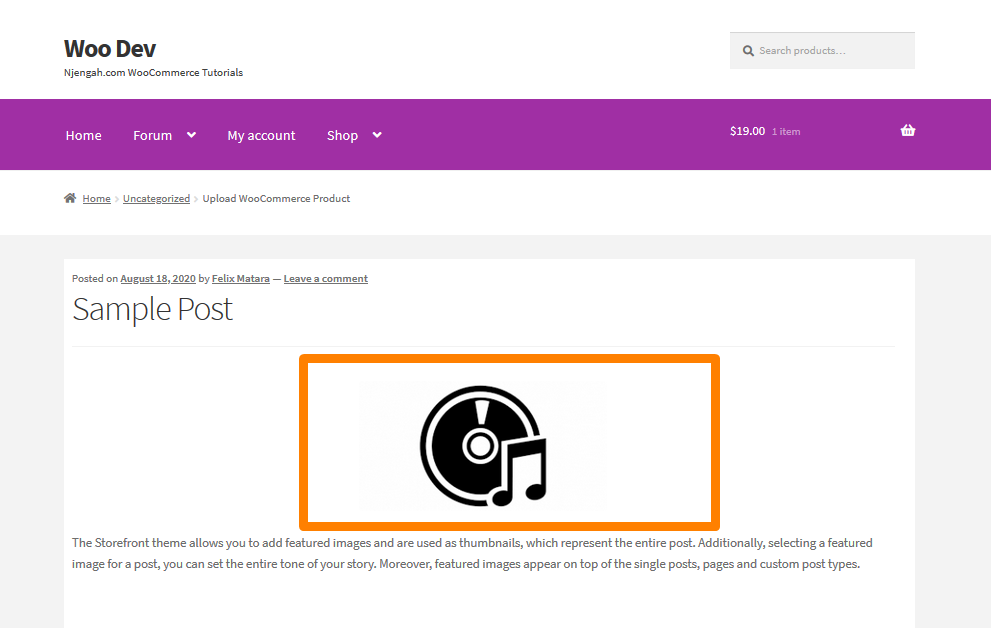
How to Change Featured Image Size
If you alter the look of your featured images, it makes a major change to the appearance of your site. I will take you through a step by step guide on how you can change the size of your featured images. However, I recommend testing the modifications on a staging site, to hide any formatting errors from the public until you make your changes to the live site. Here are the simple steps that you need to follow when changing the size of the featured image. I will be using the Storefront theme.
- Understand WordPress Image Sizes
For you to change the size of featured images on pages and posts, it is important to first get a handle on WordPress default image sizing. By default, WordPress automatically makes three copies of the original image, when you add an image to the media library. The three default dimensions are:
- Thumbnail size cropped to 150×150 pixels.
- Medium size, with a maximum width/height of 300 pixels.
- Large size, with a maximum width/height of 1024 pixels.
They are created so that the image can be placed in different sections of your website without the need to resize the original image each time. Resizing the original image would decrease page performance and increase the bandwidth used.
For example, if you upload a 2000 x 1200-pixel image as a featured image, this relatively high resolution makes sense when placing the image full-width on the top of a post. However, it would not be advisable to squeeze this large image into a smaller area, like an image gallery. This is why there are smaller versions of the same file.
- Change Your Featured Image Dimensions
The Storefront theme uses the default WordPress dimensions for all images. This means that you can change the default featured image size in your WordPress settings by following these steps:
- Log into your WordPress site and access the Dashboard as the admin user.
- From the Dashboard menu, click on Settings > Media.
- Next to the Thumbnail size, there are number fields where you can input the desired dimensions for your featured images. WordPress uses the terms “thumbnail” and “featured image” interchangeably.
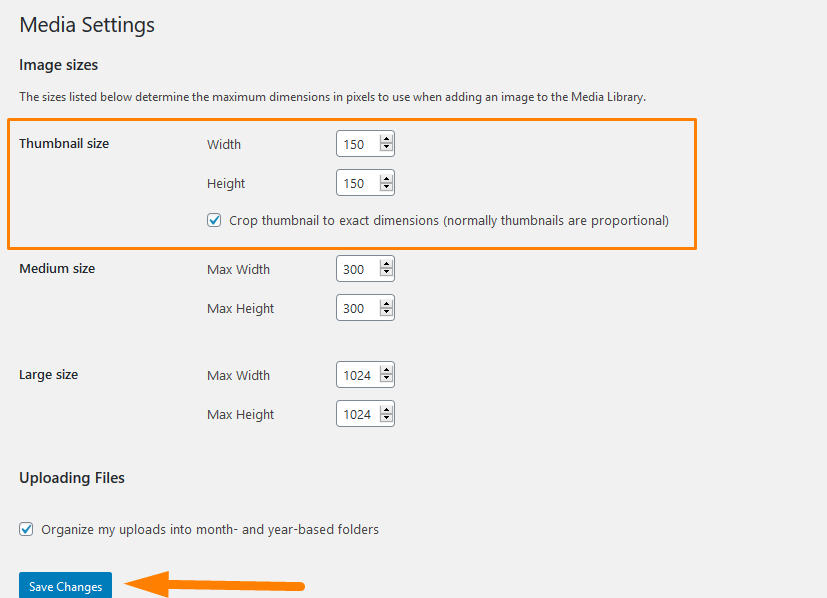
- Click on Save Changes
- Reformat Your Old Featured Images
The default image sizes are only applied when you upload images, therefore, the new dimensions will only apply to images uploaded after you change these settings. So that you can resize the old images to the new specifications, reupload them manually or use the Regenerate Thumbnails WordPress plugin to handle this for you.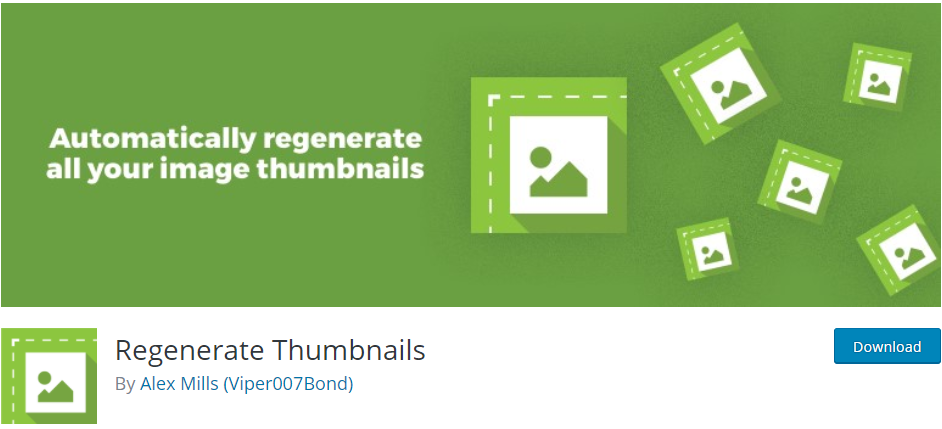
This means that when you upload a new featured image, size it at least as large as the featured image dimensions you have set to avoid blurry or warped photos. Additionally, consider cropping featured images to the WordPress thumbnail dimensions before uploading to avoid issues with auto-cropping. You need to experiment so that you can get the desired outcome.
Conclusion
In this post, I have shown you how to change the size of your featured image. Featured images engage and inform your visitors, unify your brand, provide a professional look, boost SEO, and increase the overall value of your website for your leads and customers. They matter a lot and you should not skimp on the details and fudge your pages. This is because it is your featured image, so you should treat it like one.
Similar Articles
- How to Adjust WooCommerce Storefront Height of Header
- How to Change Size of Mobile Menu Button Storefront Theme
- 35+ Best Image Optimization Plugins for WordPress Loading Speed Optimization
- How to Set up WooCommerce Storefront Footer Widgets
- How to Redirect User If Not Logged in WordPress » Page Redirect
- How to Fix Uncaught TypeError: wp.template is not a function
- Complete Guide to Using WordPress Custom Hooks do_action & apply_filters With Examples
- How to Set WooCommerce Storefront Thumbnail Sizes
- 30+ Best Comment Plugin for WordPress to Boost Engagement
- WooCommerce Redirect Users After Registration by Roles
- 40+ Best WordPress Contact Form Plugins for Easy Contact
- How to Create WooCommerce Storefront Child Theme [Complete Guide]
- 30+ Best WordPress Gallery Plugins for Attractive Galleries
- How to Change Size of Site Title WooCommerce Storefront Theme
- How to Count Items Added to Cart WooCommerce Cart Count Code
- 100+ Best Free WordPress Plugins By Popularity, Ratings & Users
- How to Resize WooCommerce Product Images