When setting up your WooCommerce store, it takes a lot of your time and finding the right theme.
This is why the creators of WooCommerce created the Storefront theme that is available for free and is very flexible for customization.
However, it is important to note that it takes many hours to create a perfect layout design that users will love. For example, you may want to change the menu font size or the size of some other element that bugs you.
WooCommerce Storefront Main Menu Font Size
In this brief tutorial, I will show you how to do just that. You will see how it is very easy to change the main menu font size in the Storefront theme.
This can be done using the “Customize” option under “Appearance” in the dashboard.
This section allows you to change your theme easily in many ways that are allowed by the theme author.
However, the theme author cannot think of everything, and changing the menu color can fall under that category.
It is also worth mentioning that the custom CSS is saved separately depending on the theme and the trick is just figuring out what CSS to use. With that said, let us look at how you can change the menu font size in the Storefront theme.
Steps to Change the Main Menu Font Size of the Storefront Theme
It is very easy to say this, but implementing this is a very different thing. It is worth mentioning that each theme has a different way of referring to its elements so it is recommended to use the right one so that the CSS styling can work.
This means that before you change anything, you need to get a handle on what you want to change.
- Identify the Element you need to Change
Simply right-click on the area you want to change in a browser like Chrome or Firefox and click “Inspect Element” like this: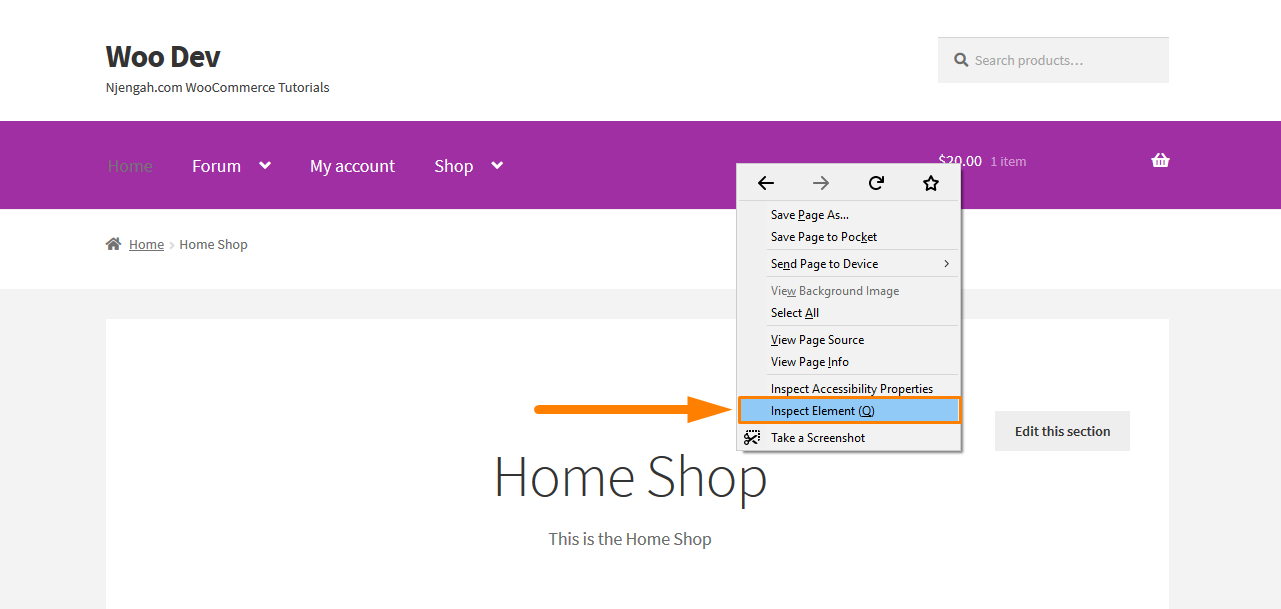
After clicking on that, this will bring up the console containing the various elements of the page on the left and the settings for those elements on the right. Now you need to find the element responsible for changing the font size.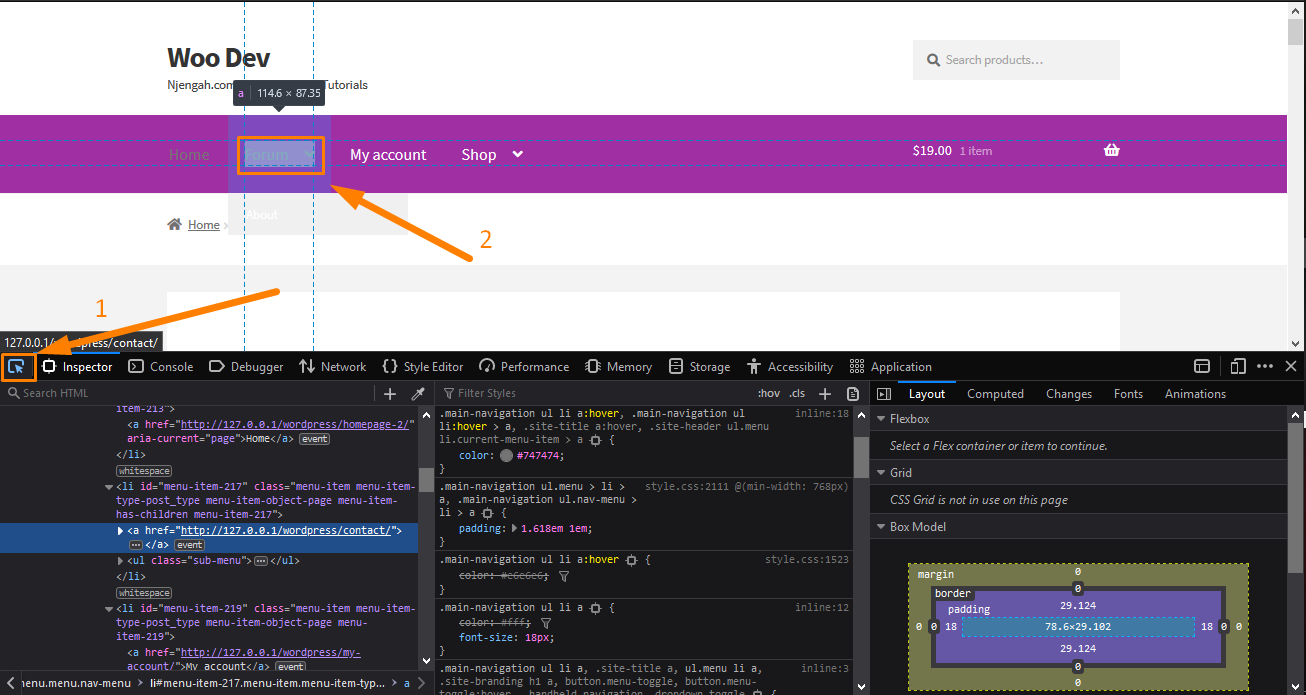
To select the element, click on the element picker as shown in the screenshot. Then point the cursor to the menu element to check the styling.
Search for words like “font” or “font size”. When you find it, uncheck and check the “tick” mark next to them to see if they result in a change in the menu font size. If the size does not change, then that is not the one you are looking for.
- Choose your Desired Size
Now that you have done the hard work, the next step is to change the size. This can be done by unchecking the existing size option and click near the closing bracket “}”. This will allow you to enter your CSS rule. You need to enter something like “font size”, press tab, and type in the size you want.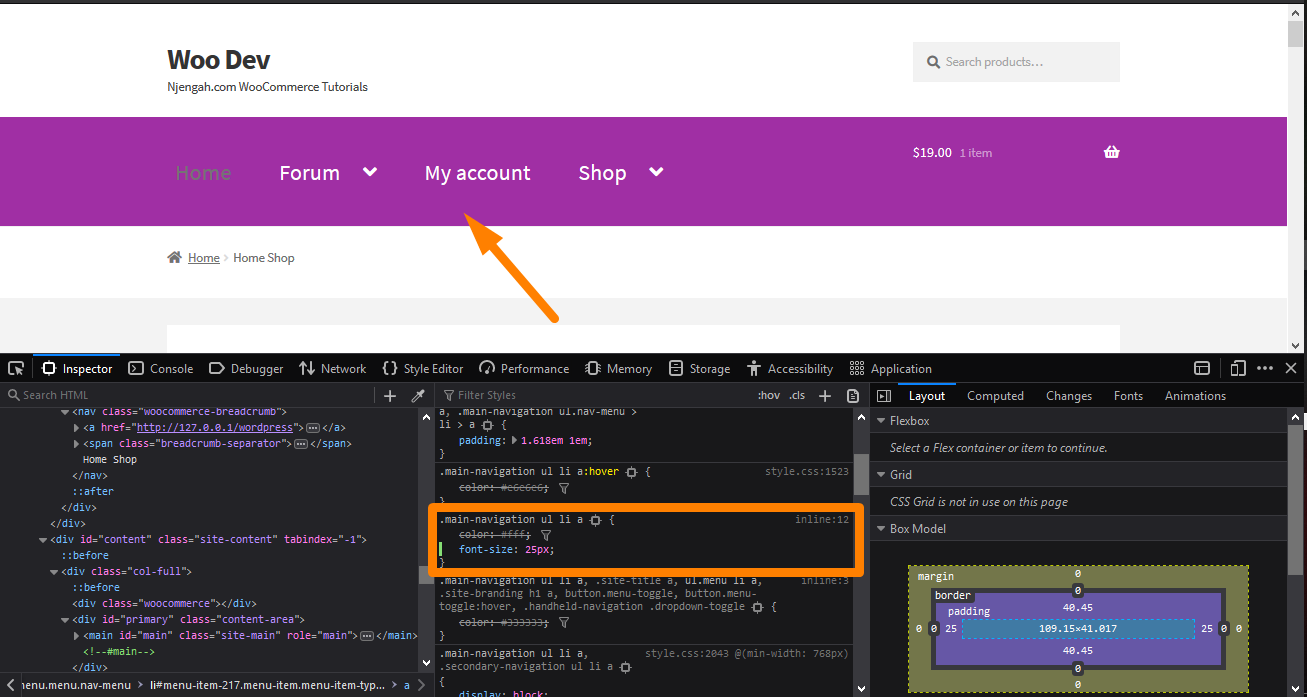
In my example, I have changed the size and you can see that the size of the menu above the console has changed.
However, it is important to note that this does not make any actual changes to your site. It acts as just a temporary change that is visible in your browser.
It allows you to experiment to your heart’s content. Moreover, you can even decide to place an image as the background. Now that you are satisfied with your changes, it is time to make them permanent.
- Extracting the New Rule
You need to extract the rule by right-clicking it (on Firefox) like this and selecting “Copy Rule”: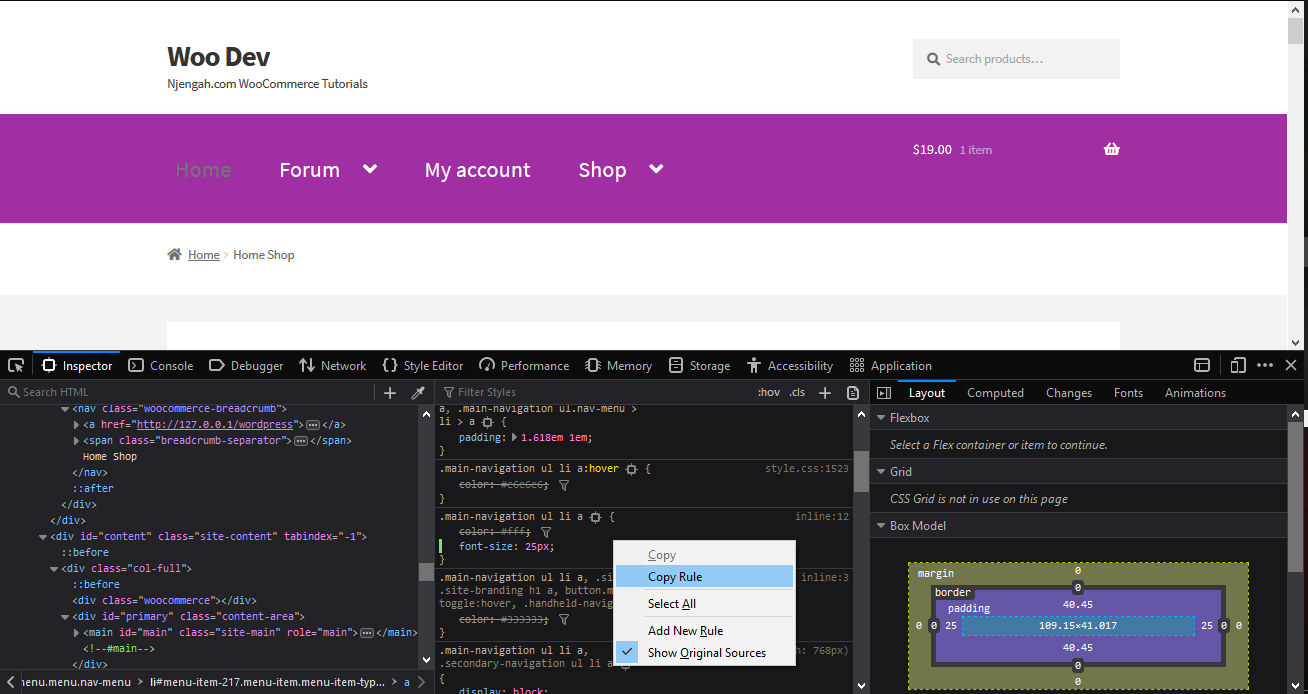
However, if you are using Chrome, you can just select the entire rule with your mouse and copy the text. Paste it into an editor and delete all the existing rules except for the new one you just added if there are any.
- Adding the Rule
The remaining part is to copy/paste into the “Additional CSS” section of your Storefront theme customization interface. To do this:
- Log into your WordPress site and access the Dashboard as the admin user.
- From the Dashboard menu, click on Appearance Menu > Customize.
- Navigate down to Additional CSS in the left sidebar that appears.
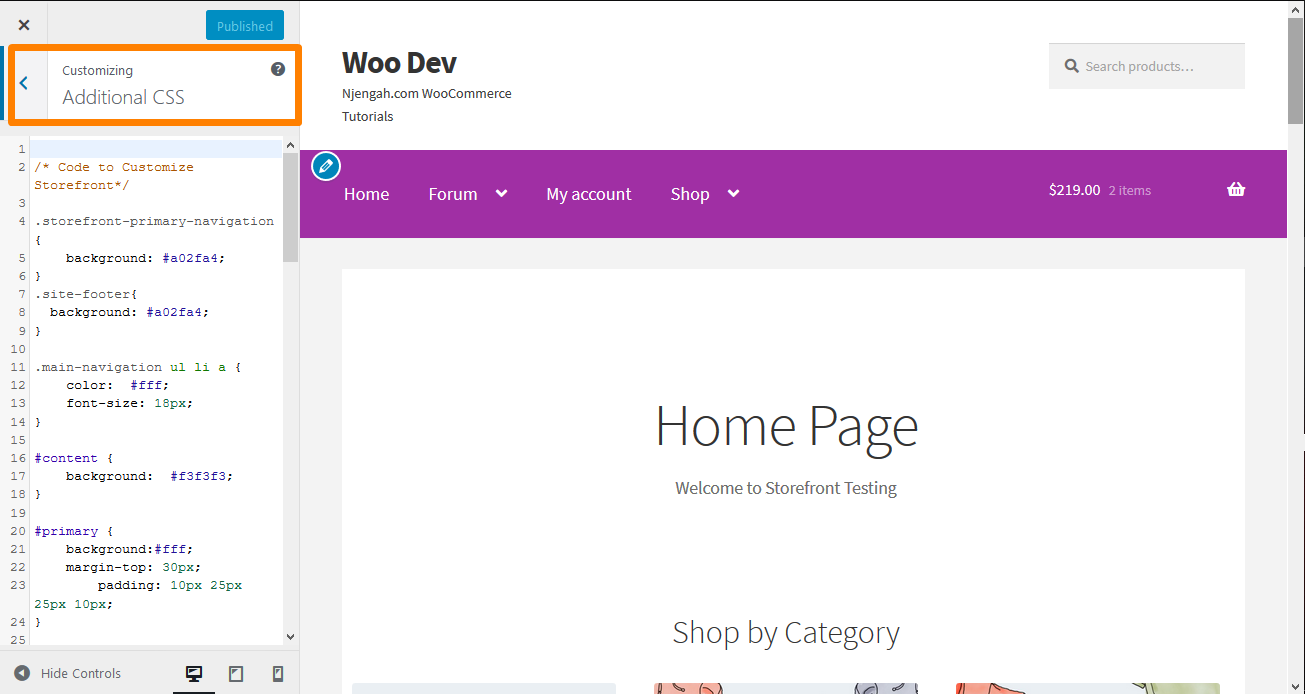
- Add the CSS rule as shown below:
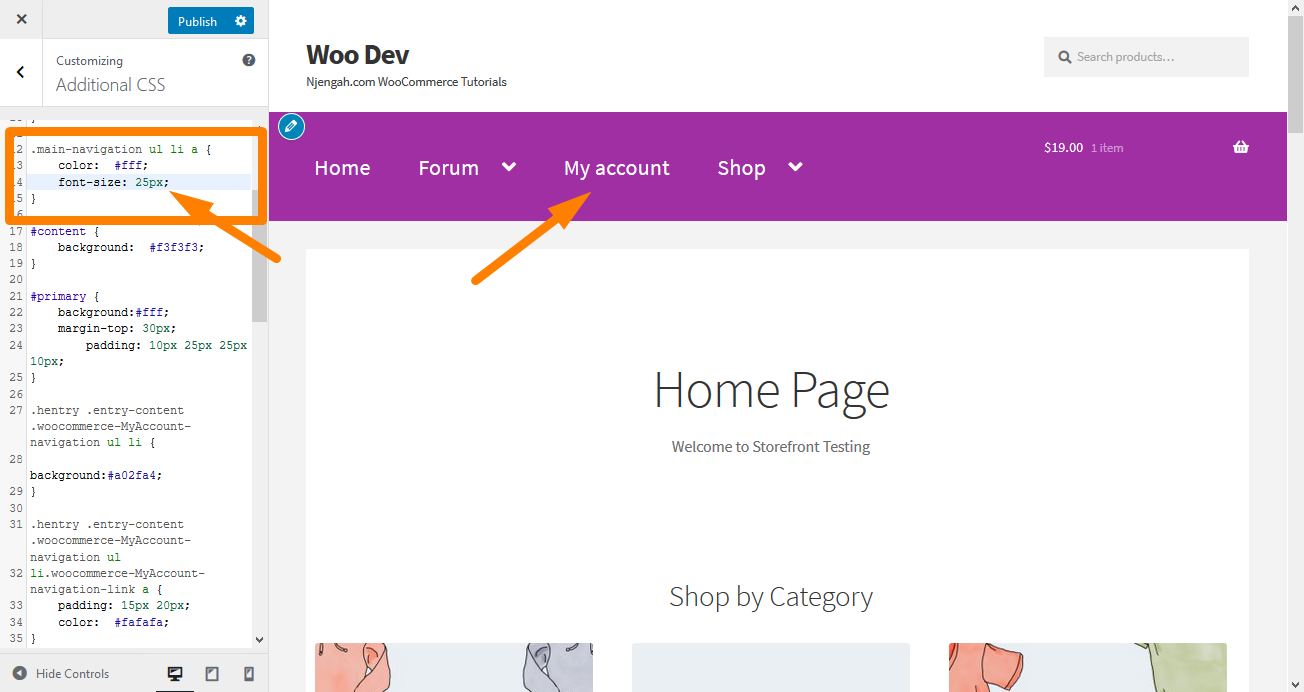
- Click on publish once you are satisfied with the changes.

Joe is an experienced full-stack web developer with a decade of industry experience in the LAMP & MERN stacks, WordPress, WooCommerce, and JavaScript – (diverse portfolio). He has a passion for creating elegant and user-friendly solutions and thrives in collaborative environments. In his spare time, he enjoys exploring new tech trends, tinkering with new tools, and contributing to open-source projects. You can hire me here for your next project.
Conclusion
In this brief tutorial, I have shared with you four simple steps that you can use to change the size of the main menu in your Storefront theme. Moreover, you can use the above procedure to modify the appearance of any element on your site, not just menus. The difficult part is just finding the right element and the right rule to change.
Additionally, I have shown you how you can add the new rule in the Additional CSS section of your Storefront customization interface.
You can check in the preview on the right to see the changes that you are making. If you are impressed with the changes, you can click on publish.
Similar Articles
- How to Make Divi Mobile Menu Scrollable Quick Fix Solution
- How to Change the WooCommerce ‘Added to Cart’ Notice
- How to Change Checkout Button Text in WooCommerce [Place Order]
- How to Redirect a WordPress Page Without Plugins?
- How to Change Add to Cart Button Text On WooCommerce Shop Page
- How to Remove Email Footer Text ‘Built With WooCommerce’
- How to Count Items Added to Cart WooCommerce Cart Count Code
- How to Change Proceed To Checkout Text In WooCommerce
- How to Adjust WooCommerce Storefront Height of Header
- How to Change the Size of Mobile Menu Button Storefront Theme
- 80+ Tricks to Customize Storefront WooCommerce Theme : The Ultimate Storefront Theme Customization Guide
- How to Change the Size of Cart Icon In WooCommerce Storefront Theme
- How to Change the Size of Site Title WooCommerce Storefront Theme