When you have created a WordPress site one of the many SEO steps that you should take immediately is to verify your Webmaster tool account for the site. Ideally it is advisable to use one account for both Google Webmaster tools and Google Analytics since it will be easier for you to link up the two accounts for verification.
In the event that you don’t want to use your Google Analytics account to verify your webmaster tool, you can add a Meta tag in the header and easily verify your Google Webmaster tools in two steps. This tutorial will illustrate the two simple steps you should follow.
Why Verify Google Webmaster Tools?
If you are new to both WordPress and SEO this is one of the questions you are likely to ask. Google Webmaster Tools includes a set of SEO tools that are offered free by Google to help Webmasters monitor the performance of their website as rated by search engines. There are a number of things you can learn from Webmaster tools about your site. To just mention a few;
- You are notified about crawl error on your site
- You get notification on traffic change in your URLS
- You get to know the position and ranks of keyword used in your site and their average position in Google results
- You submit your site map on Google Webmaster tools for indexing
There are many other things you can learn from Google Webmaster tools that are relevant to your SEO. It is also possible to verify your Google webmaster tools using plugins but to be safer since plugins are third party dependent you should learn how to add your Google Webmaster tool in your header.php where other Meta tags appear.
Adding Google Webmaster Tools Meta Tag to WordPress Header
To add your Google Webmaster tools Meta tag you should first log in to your Google Account and navigate to Webmaster tools. Alternatively, if you are not logged into your Gmail account you can search for webmaster tools and log in directly. If you don’t have a Gmail account you have to create one to access Google Webmaster tools.
Step 1: Getting Meta Tag from Google Webmaster Tools Dashboard
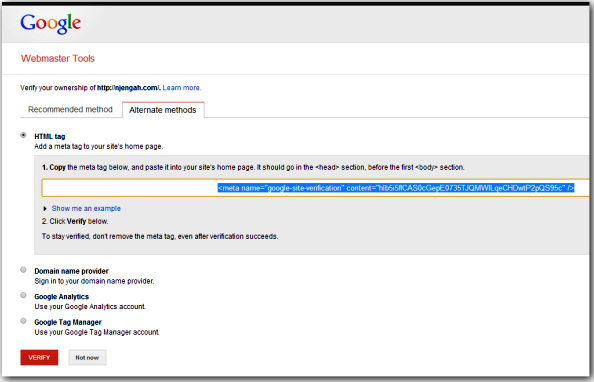
When you are logged into your Google Webmaster tools dashboard, you should navigate to add site, fill your website URL in the pop up box and navigate using the screenshots below to obtain the Meta Tag.
1 )

Joe is an experienced full-stack web developer with a decade of industry experience in the LAMP & MERN stacks, WordPress, WooCommerce, and JavaScript – (diverse portfolio). He has a passion for creating elegant and user-friendly solutions and thrives in collaborative environments. In his spare time, he enjoys exploring new tech trends, tinkering with new tools, and contributing to open-source projects. You can hire me here for your next project.
Step 2: Adding Meta Tag to WordPress header.php
You should now copy the Meta tag and open your header.php file in your theme files and add the copied Meta tag anywhere before the closing header tag (</header>)
Ideally the Meta tag you copy will be something like :
<meta name="google-site-verification" content="VerificationKeyCode" />
It’s good practice to look for where such Meta tags are located in your header.php file (usually in the beginning of the file) and add the tag there; either below or above some of those other Meta tags.
You should update your header file and go back to your Google Webmaster tools account to click on the verify button. When you have successfully verified your Google Webmaster tools account you should get a message congratulating you.


