 Do you want to create conditional logic on the WooCommerce checkout page? In this guide, you will learn how to add conditional fields to the WooCommerce checkout.
The checkout page is one of the most important pages in any WooCommerce store. There are many online stores in the world today. Therefore, to be ahead of your competitors, you need to optimize your checkout page.
WooCommerce Conditional Checkout Fields
One of the best ways to optimize the checkout page is to add conditional fields. These fields allow you to create conditional logic and display only the fields that the customers need to fill in on the checkout page to speed up the purchase process.
Conditional fields have conditional logic so that when the condition is met, another field appears or is hidden. When you create conditional logic, you want the conditional field to do X if the condition is met or true, but do Y if the condition is false or not met.
if(condition){action}
Steps to Add Conditional Checkout Fields in the WooCommerce Checkout Page
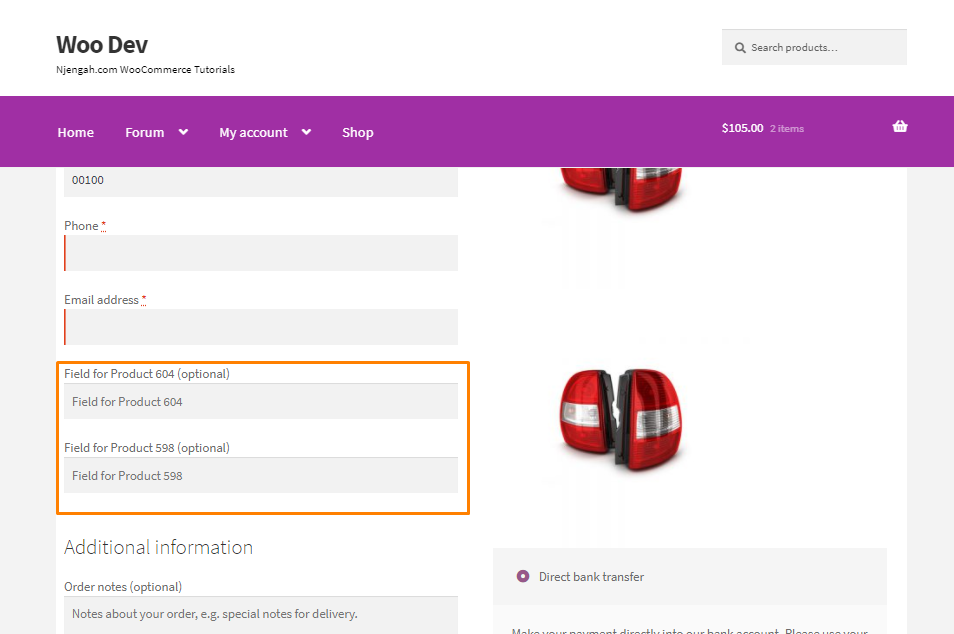
In my example, I will add a conditional field that only appears when a certain product id is added to the cart.
Here are the steps that you need to follow:
- Log into your WordPress site and access the dashboard as the admin user
- From the dashboard menu, click on the Appearance Menu > Theme Editor Menu. When the theme editor page is opened, look for the theme functions file with the extension functions.php. Open this functions file to add the function to add conditional checkout fields in the WooCommerce checkout page.
- Add the following code to the functions.php file:
/**

 * Add fields to the checkout page based on products in the cart.

 *

*/

add_action( 'woocommerce_checkout_fields', 'njengah_add_conditional_checkout_fields' );

function njengah_add_conditional_checkout_fields( $fields ) {

            foreach( WC()->cart->get_cart() as $cart_item ){

                $product_id = $cart_item['product_id'];

                                    if( $product_id == 604 ) {

                                                $fields['billing']['billing_field_' . $product_id] = array(

                                                            'label'     => __('Field for Product ' . $product_id, 'woocommerce'),

                                                            'placeholder'   => _x('Field for Product ' . $product_id, 'placeholder', 'woocommerce'),

                                                            'required'  => false,

                                                            'class'     => array('form-row-wide'),

                                                            'clear'     => true
                                                );
                                    }

                                    if( $product_id == 598 ) {

                                                $fields['billing']['billing_field_' . $product_id] = array(

                                                            'label'     => __('Field for Product ' . $product_id, 'woocommerce'),

                                                            'placeholder'   => _x('Field for Product ' . $product_id, 'placeholder', 'woocommerce'),

                                                            'required'  => false,

                                                            'class'     => array('form-row-wide'),

                                                            'clear'     => true

                                                );

                                    }

            }

            // Return checkout fields.

            return $fields;

}
- This is the outcome:
Conclusion
In summary, you have learned how to add conditional fields on the WooCommerce checkout page. The fields will appear only when the product id is in the cart. This means that you have to add the correct product id in the code snippet. If you want added functionality, you can use a conditional logic checkout plugin.
Similar Articles
- How to Hide Tax On Checkout If Field Value Exists WooCommerce
- How to Remove Cart Page WooCommerce Storefront Theme
- How to Hide WooCommerce Registration Form
- How to Replace Add to Cart Button With Link WooCommerce
- How to Set up WooCommerce Storefront Footer Widgets
- How to Setup WooCommerce Storefront Blog
- How to Remove Checkout Button WooCommerce
- How to Change Quantity In Checkout WooCommerce
- How to Add Extra Field in WooCommerce Checkout Form
- How to Hide Company Name Field WooCommerce Checkout Page
- How to Remove Additional Information Checkout Page WooCommerce
- How to Change WooCommerce Checkout Labels
- How to Send to Mpesa WooCommerce Payment for Free
- How to Simplify Checkout Free Items Storefront Theme
- How Move Hamburger Menu WooCommerce Storefront
- How to Hide Prices From Google In WooCommerce
- How to Hide Weight of Product in WooCommerce
- How to Hide Downloads From My Account WooCommerce
- How to Hide Any Tab My Account Page WooCommerce