Do you want to allow customers on your WooCommerce store to change the quantity of the products in the cart or delete a product right on the WooCommerce checkout page?
In this article, we will discuss how to add change quantity, and delete product buttons on WooCommerce checkout.
WooCommerce Change Quantity in Checkout
This solution will reduce the hustle of customers, as they will avoid leaving the checkout page and going back to the cart, updating the cart, and then going to the checkout page again.
This is a bit frustrating for the customers, especially for guest users.
Customizing the checkout page is very important for better conversion rates and complete orders.
How to Add Change Quantity and Delete Product Buttons on WooCommerce Checkout
To achieve this, we need to make UI changes on the cart section of the checkout page. We need to modify the “Product” column in the “Your order” table, then add the “Delete” icon and the “Quantity selector” for each item in the cart.
WooCommerce has a filter that allows you to modify the Product name row of each cart item. It is the woocommerce_cart_item_name filter.
The selected quantity displayed on your order table is modified using the woocommerce_checkout_cart_item_quantity filter.
Here are the steps that you need to follow:
- Log into your WordPress site and access the dashboard as the admin user
- From the dashboard menu, click on the Appearance Menu > Theme Editor Menu.
- When the theme editor page is opened, look for the theme functions file with the extension functions.php. Open this functions file to add the function to add change quantity and delete product buttons on WooCommerce checkout.
- Add the following line of code to the functions.php file:
/*

* It will remove the selected quantity count from the checkout page table.

*/

function njengah_remove_quantity_count( $cart_item, $cart_item_key ) {

$product_quantity= '';

return $product_quantity;

}

add_filter ('woocommerce_checkout_cart_item_quantity', 'njengah_remove_quantity_count', 10, 2 );
- The next step is to modify the Product name row using the filter
woocommerce_cart_item_nameand add the quantity field and delete the icon. Add the following line of code to the functions.php file:
/*
* It will add the Delete button, Quantity field on the checkout page Your Order Table.
*/
function njengah_add_delete_and_quantity_on_checkout( $product_title, $cart_item, $cart_item_key ) {
/* Checkout page check */
if ( is_checkout() ) {
/* Get Cart of the user */
$cart = WC()->cart->get_cart();
foreach ( $cart as $cart_key => $cart_value ){
if ( $cart_key == $cart_item_key ){
$product_id = $cart_item['product_id'];
$_product = $cart_item['data'] ;
/* Step 1 : Add delete icon */
$return_value = sprintf(
'<a href="%s" class="remove" title="%s" data-product_id="%s" data-product_sku="%s">×</a>',
esc_url( wc_get_cart_remove_url( $cart_key ) ),
__( 'Delete', 'woocommerce' ),
esc_attr( $product_id ),
esc_attr( $_product->get_sku() )
);
/* Step 2 : Add product name */
$return_value .= ' <span class = "product_name" >' . $product_title . '</span>' ;
/* Step 3 : Add quantity selector */
if ( $_product->is_sold_individually() ) {
$return_value .= sprintf( ' <input type="hidden" name="cart[%s][qty]" value="1" />', $cart_key );
} else {
$return_value .= woocommerce_quantity_input( array(
'input_name' => "cart[{$cart_key}][qty]",
'input_value' => $cart_item['quantity'],
'max_value' => $_product->backorders_allowed() ? '' : $_product->get_stock_quantity(),
'min_value' => '1'
), $_product, false );
}
return $return_value;
}
}
}else{
/*
* It will return the product name on the cart page.
* As the filter used on checkout and cart are the same.
*/
$_product = $cart_item['data'] ;
$product_permalink = $_product->is_visible() ? $_product->get_permalink( $cart_item ) : '';
if ( ! $product_permalink ) {
$return_value = $_product->get_title() . ' ';
} else {
$return_value = sprintf( '<a href="%s">%s</a>', esc_url( $product_permalink ), $_product->get_title());
}
return $return_value;
}
}
add_filter ('woocommerce_cart_item_name', 'njengah_add_delete_and_quantity_on_checkout' , 10, 3 );
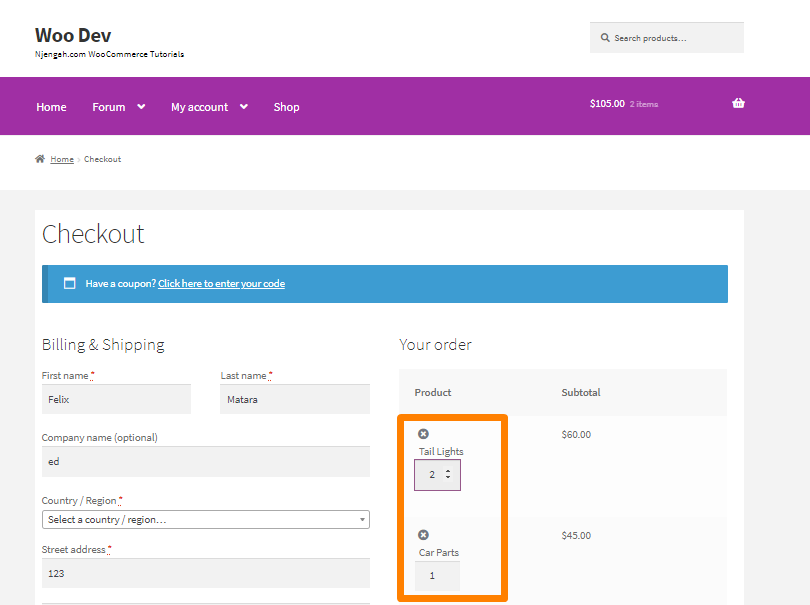
- This is the outcome:
How the Code Works
We have one condition, if ( is_checkout() ). The filter, which we used to modify the product name column value (woocommerce_cart_item_name), is also called on the Cart page of your store.
Therefore, to make sure that the code, we write, does not break the Cart page’s functionality, we have ensured that changes are only applied on the checkout page.
Updating WooCommerce Cart via Ajax Call
To make things dynamic and change the quantity and update the cart totals on the Checkout page, we will use Ajax call:
/* Add js at the footer */

function njengah_add_quanity_js(){

if ( is_checkout() ) {

wp_enqueue_script( 'checkout_script', get_stylesheet_directory_uri() . '/js/add_quantity.js', '', '', false );

$localize_script = array(

'ajax_url' => admin_url( 'admin-ajax.php' )

);

wp_localize_script( 'checkout_script', 'add_quantity', $localize_script );

}

}

add_action( 'wp_footer', 'webroom_add_quanity_js', 10 );

function njengah_load_ajax() {

if ( !is_user_logged_in() ){

add_action( 'wp_ajax_nopriv_update_order_review', 'njengah_update_order_review' );

} else{

add_action( 'wp_ajax_update_order_review', 'njengah_update_order_review' );

}

}

add_action( 'init', 'njengah_load_ajax' );

function njengah_update_order_review() {

$values = array();

parse_str($_POST['post_data'], $values);

$cart = $values['cart'];

foreach ( $cart as $cart_key => $cart_value ){

WC()->cart->set_quantity( $cart_key, $cart_value['qty'], false );

WC()->cart->calculate_totals();

woocommerce_cart_totals();

}

wp_die();

}
We will enqueue “add_quantity.js” file in the footer and make sure that it is included when we are on the checkout page. You need to create a file, named add_quantity.js to your theme/child theme.
jQuery(function( $ ) {

$( "form.checkout" ).on( "click", "input.qty", function( e ) {

var data = {

action: 'update_order_review',

security: wc_checkout_params.update_order_review_nonce,

post_data: $( 'form.checkout' ).serialize()

};


jQuery.post( add_quantity.ajax_url, data, function( response )

{

$( 'body' ).trigger( 'update_checkout' );

});

});

});
Conclusion
In summary, you have learned how you can add change quantity, and delete product buttons in the cart section of the WooCommerce checkout page.
However, you need to update the WooCommerce cart via an Ajax call. This will help you avoid customer frustration, especially for guest users who make up most of your store.
If you are an advanced developer, you can add some CSS code to modify the cart section. If you are a WordPress beginner, please consider hiring a qualified WordPress developer.
This will ensure that you do not break your site.

Joe is an experienced full-stack web developer with a decade of industry experience in the LAMP & MERN stacks, WordPress, WooCommerce, and JavaScript – (diverse portfolio). He has a passion for creating elegant and user-friendly solutions and thrives in collaborative environments. In his spare time, he enjoys exploring new tech trends, tinkering with new tools, and contributing to open-source projects. You can hire me here for your next project.
Similar Articles
- How to Hide Read More and Add to Cart Button WooCommerce
- How to Hide Tax On Checkout If Field Value Exists WooCommerce
- How to Remove the Checkout Button WooCommerce
- What is WooCommerce Storefront Theme? [Answered]
- How to Remove Cart Page WooCommerce Storefront Theme
- How to Hide Product Tab Title In WooCommerce
- How to Hide Product SKU In WooCommerce
- How to Send to Mpesa WooCommerce Payment for Free
- How to Change the Size of Cart Icon In WooCommerce Storefront Theme
- WooCommerce Logout PHP Snippet to Create Logout Button
- How to Change Storefront Theme Product Page Tabs Colors
- How to Hide Company Name Field WooCommerce Checkout Page
- How to Get Payment Methods in WooCommerce » Code Example
- How to Hide WooCommerce Products from Search Results
- How to Remove or Rename Sale Badge WooCommerce Storefront
- How to Move Hamburger Menu WooCommerce Storefront
- How to Hide Shipping Rates if Free Shipping Available WooCommerce
- Change Proceed To Checkout Text In WooCommerce
- How to Hide SKU, Category, Tags Meta Product Page WooCommerce
- How to Set up WooCommerce Storefront Footer Widgets