 If you are running a WooCommerce store, then you already know about the significance of a checkout page. However, there are times when you need to add extra field in WooCommerce checkout form or other custom checkout fields on a checkout page according to your project requirements. This can be a hefty job for some WooCommerce store owners and that is why I decided to create a brief tutorial on how you can add an extra field in the WooCommerce checkout form.
WooCommerce Checkout Page
In general, the checkout page is an eCommerce term that refers to a page shown to a customer during the systematic checkout process, at the last step before they make the purchase. There are several ways to improve checkout page conversions but one of the ways is to add extra field in WooCommerce checkout form that is related to your specific product as well as remove all other unnecessary checkout page fields.
This page contains fields that customers need to fill. It is also worth mentioning that this is the most important page for both the seller and the customer, as customers have to provide important pieces of information like addresses, billing details, payment method, which will help the seller to deliver the product to the customer.
When there are errors on this page, no customer will be able to make any purchase. This would greatly affect the performance of your store, as you will not be able to make any sales.
If you are using WooCommerce to power your online store, you also get your checkout page. However, if you are familiar with WooCommerce then you know that it does not give you the opportunity of customizing your checkout page from settings.
Add Extra Field in WooCommerce Checkout Form
There are many ways to modify the checkout page of your WooCommerce stores like using a third-party plugin, WooCommerce extensions, or custom development.
As I had mentioned earlier, the WooCommerce custom checkout field is important in assembling to get further data from the purchasers before they complete an order.
There are times that you need some extra information from your customers, and you need an extra field to do so.
Now that you have known the basics, let us take a deep dive into the tutorial. To add a custom field to the checkout page, we will use two approaches:
- Using a plugin.
- Creating a custom code.
a) Steps to Add an Extra Field to your WooCommerce Checkout Page Using Code
This solution is for individuals who know how to code like developers. This custom code will help you to add the custom field to the checkout page using some simple steps.
Here are the simple steps that you need to follow:
- Log into your WordPress site and access the Dashboard as the admin user.
- From the Dashboard menu, click on Appearance Menu > Theme Editor Menu. When the Theme Editor page is opened, look for the theme functions file where we will add the function that will add an extra field to the checkout page in WooCommerce.
- Add the following code to the php file:
/**
* Add custom field to the checkout page
*/
add_action('woocommerce_after_order_notes', 'custom_checkout_field');
function custom_checkout_field($checkout)
{
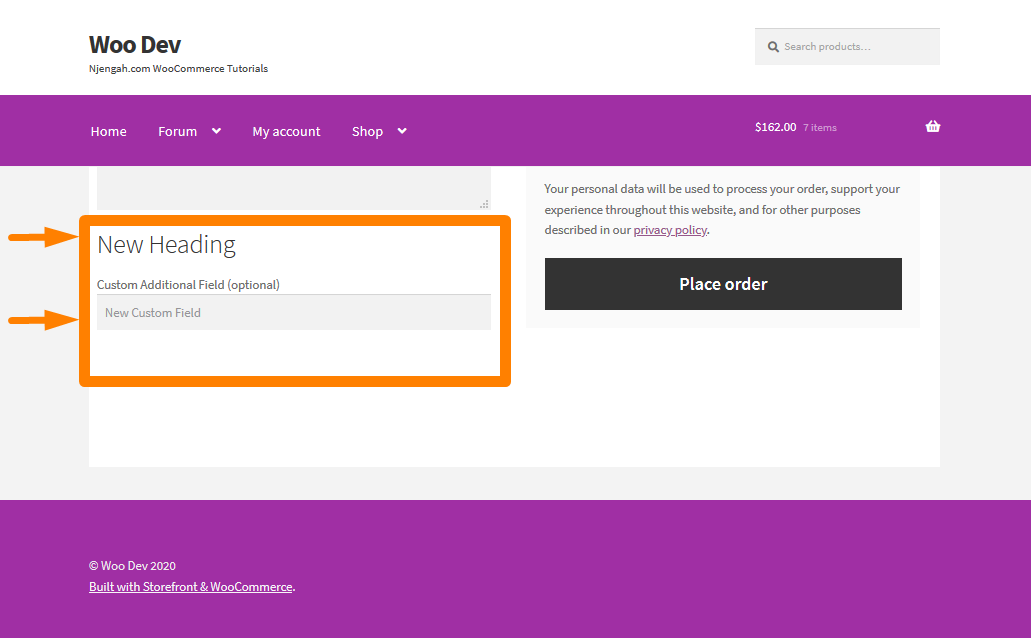
echo '<div id="custom_checkout_field"><h2>' . __('New Heading') . '</h2>';
woocommerce_form_field('custom_field_name', array(
'type' => 'text',
'class' => array(
'my-field-class form-row-wide'
) ,
'label' => __('Custom Additional Field') ,
'placeholder' => __('New Custom Field') ,
) ,
$checkout->get_value('custom_field_name'));
echo '</div>';
}
- To see the outcome, you need to refresh the checkout page and you should see this:
- However, it is important to note that we need to validate the data of the custom field. to do that, simply add the following code to the functions.php file:
/**

* Checkout Process

*/

add_action('woocommerce_checkout_process', 'customised_checkout_field_process');

function customised_checkout_field_process()

{

// Show an error message if the field is not set.

if (!$_POST['customised_field_name']) wc_add_notice(__('Please enter value!') , 'error');

}
If there is no input in the custom field, there will be an error and this will be the outcome: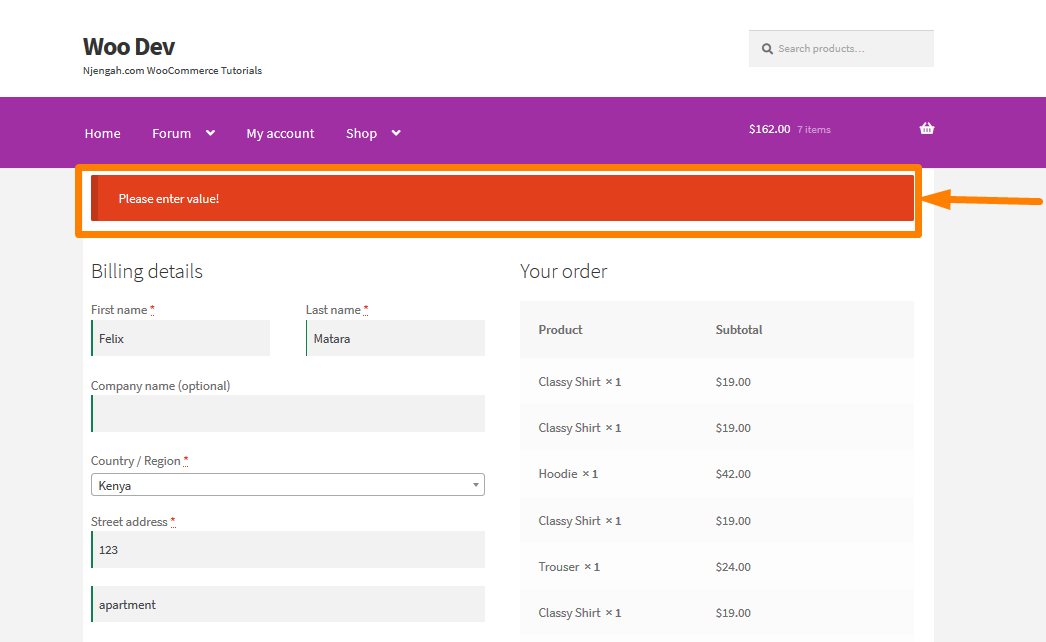
- Now that we have added the custom checkout field and we have validated it, let us now confirm that the details entered into the custom field are being saved or not. This can be done using the following code that will be added to the functions.php file:
/**

* Update the value given in the custom field

*/

add_action('woocommerce_checkout_update_order_meta', 'custom_checkout_field_update_order_meta');

function custom_checkout_field_update_order_meta($order_id)

{

if (!empty($_POST['customised_field_name'])) {

update_post_meta($order_id, 'Some Field',sanitize_text_field($_POST['customised_field_name']));

}

}
How the Code Works.
This code works in three simple steps. In the first code snippet, I created the custom field with the heading. Then the second snippet is for validating if there is an input in the custom field.
The third code snippet is used to confirm that the details entered into the custom field by the client, is being saved or not. It is also important to note that these code snippets should be added to the functions.php file of your WooCommerce store.
b) Steps to Add an Extra Field to your WooCommerce Checkout Page Using a plugin
This solution is for WordPress users who are not familiar with coding. This solution involves the use of the WooCommerce Checkout Manager Plugin.
I will give you a detailed systematic guide that will help you to download the plugin and using it to add an extra field on the checkout page.
Here are the steps you need to follow:
- Log into your WordPress site and access the Dashboard as the admin user.
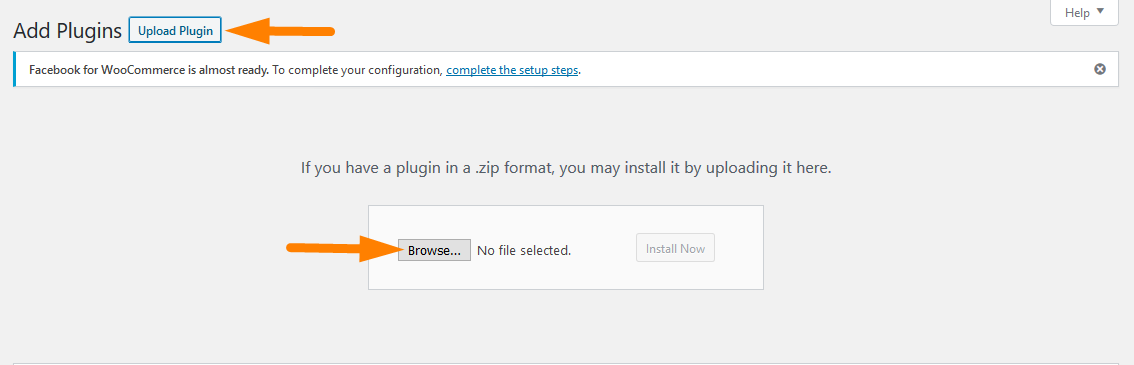
- Then, we are going to install the plugin that we have indicated earlier. If you have downloaded it using the link above, simply navigate to Plugins > Add New. After that, click on Upload Plugin and then Browse for the downloaded file as shown below:
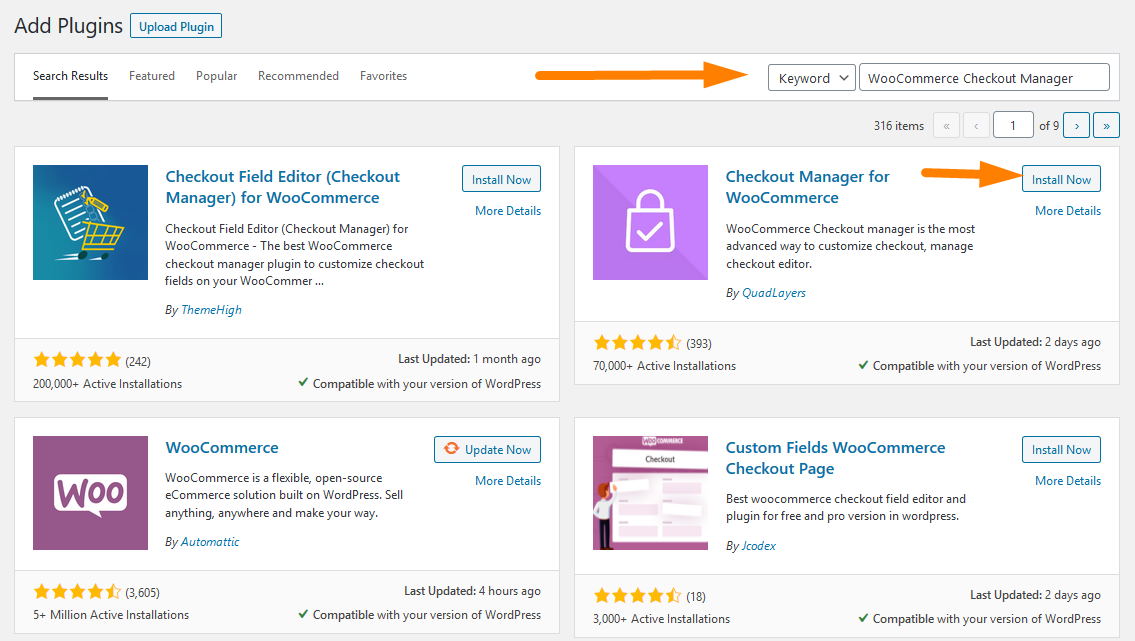
- To download it directly in the Admin Panel, simply navigate to Plugins > Add New. After that, you will need to do a keyword search for the plugin ‘WooCommerce Checkout Manager’. You need to install and activate it as shown below:
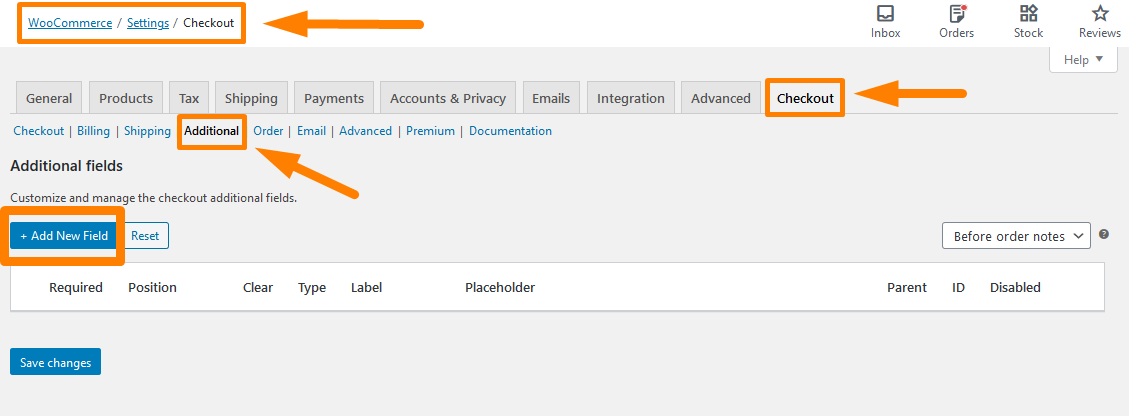
- To create new fields, go to the WordPress Dashboard and click on WooCommerce > Settings. Then, click on the Checkout tab and click on the Additional tab. Click on Add New Field as shown below:
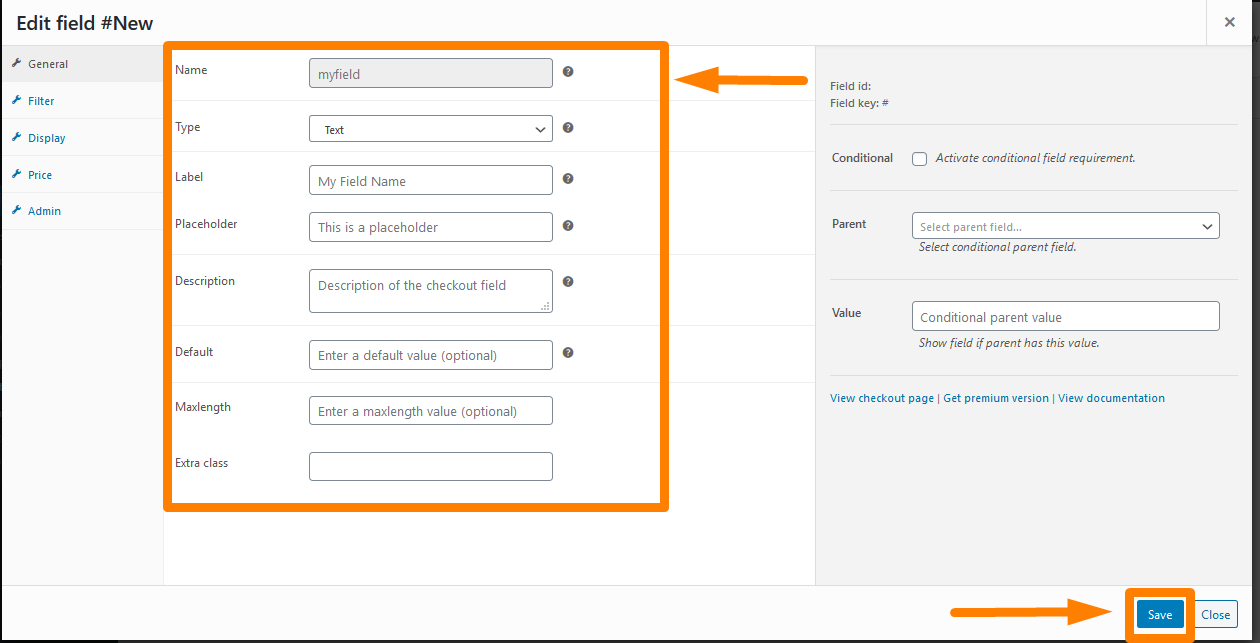
- A new window will appear and you need to add the relevant details. Remember to save all the changes you make:
- To see the outcome refresh the checkout page and you will see the new checkout field:
Conclusion
In this brief tutorial, I showed you how to add a new field to the checkout page. I am sure by now you know how to add an extra field and it is not too hard at all. I have shared two solutions. One involves the use of a PHP code that will add the extra field and the other is with a plugin. The plugin has other additional features that you can look at as well, and it is a solution for the not so tech-savvy. However, you can change the name of the fields depending on your requirements.
Similar Articles
- How to Skip Cart and Redirect to Checkout Page WooCommerce
- How to Integrate Stripe With WooCommerce
- How to Remove Sidebar from Product Page in WooCommerce Themes
- How to Add WooCommerce Payment Icons In the Footer [HTML]
- How to Get Payment Methods in WooCommerce » Code Example
- How to Hide Products Without Price in WooCommerce
- How to Remove the Billing Details from WooCommerce Checkout
- Hide or Remove the Quantity Field from WooCommerce Product Page
- How to Hide the WooCommerce Coupon Code Field
- How to Rename Order Status Messages in WooCommerce
- How to Remove Default Product Sorting WooCommerce
- How to Sort WooCommerce Categories for Better User Experience
- How to Add Product Image WooCommerce Checkout Page
- How to Hide Add to Cart Button in WooCommerce
- How to Hide WooCommerce Product from Search Results
- How to Hide All Products From Shop Page in WooCommerce
- How to Disable Payment Method for Specific Category
- How to Check If Plugin is Active In WordPress [ 3 WAYS ]
- How to Use WooCommerce Product Attributes Step by Step [Complete Guide]
- How to Resize WooCommerce Product Images
- How to Add Categories to WooCommerce Products
- How to Create My Account Page In WooCommerce
- How to Create WooCommerce Admin Notice for Plugin – WooCommerce Development
- How To Quickly Find Your Product ID in WooCommerce
- How to Change Checkout Button Text in WooCommerce [Place Order]
Comments are closed.