 If you have an online store, you must have tried different ways to pursue customers to complete the order transaction. Many customers back out or do not complete the transaction due to the tedious checkout process. This means that you will lose a chunk of users who could have been potential customers.
Therefore, you need to optimize the Checkout page of your store to enhance the customer experience. This is because only a handful of interested customers will make a purchase.
A faster checkout process will lead to effective conversion. The best strategy I can recommend is to remove the cart to directly take your customers to the Checkout page to place the order. This would help you to push your customers to make purchases. Moreover, customers will save time when making an order transaction.
This article will share some effective ways you can use to skip the cart page and redirect them to the Checkout page. For illustration purposes, I will be using the Storefront theme.
There are two ways to do this:
- Code snippet
- WooCommerce default settings
Steps to Remove the Cart Page Using a Code Snippet
Removing the cart using a code snippet is very simple. Here are the steps that you need to follow:
- Log into your WordPress site and access the Dashboard as the admin user.
- From the Dashboard menu, click on Appearance Menu > Theme Editor Menu. When the Theme Editor page is opened, look for the theme functions file to add the function to remove the cart page.
- Add the following code to the php file.
add_filter('add_to_cart_redirect', 'lw_add_to_cart_redirect');

function lw_add_to_cart_redirect() {

 global $woocommerce;

 $lw_redirect_checkout = $woocommerce->cart->get_checkout_url();

 return $lw_redirect_checkout;

}
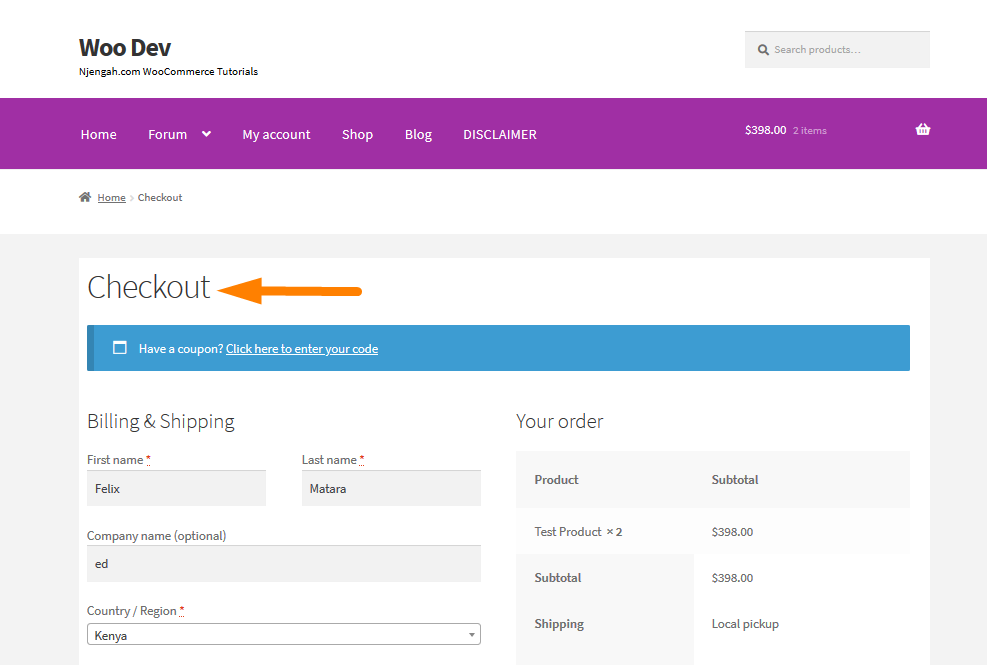
- The users will then be redirected to the checkout page, as shown below:
How the Code Works
The code snippet above will redirect Add-to-Cart action from the shop page and individual product page to the Checkout page.
However, you need to change the Add to Cart button text. To do this, add the following code in the functions.php file:
add_filter( 'woocommerce_product_single_add_to_cart_text', 'lw_cart_btn_text' );

add_filter( 'woocommerce_product_add_to_cart_text', 'lw_cart_btn_text' );

//Changing Add to Cart text to Buy Now!

function lw_cart_btn_text() {

return __( 'Buy Now!', 'woocommerce' );

}
You can change the name to anything you want: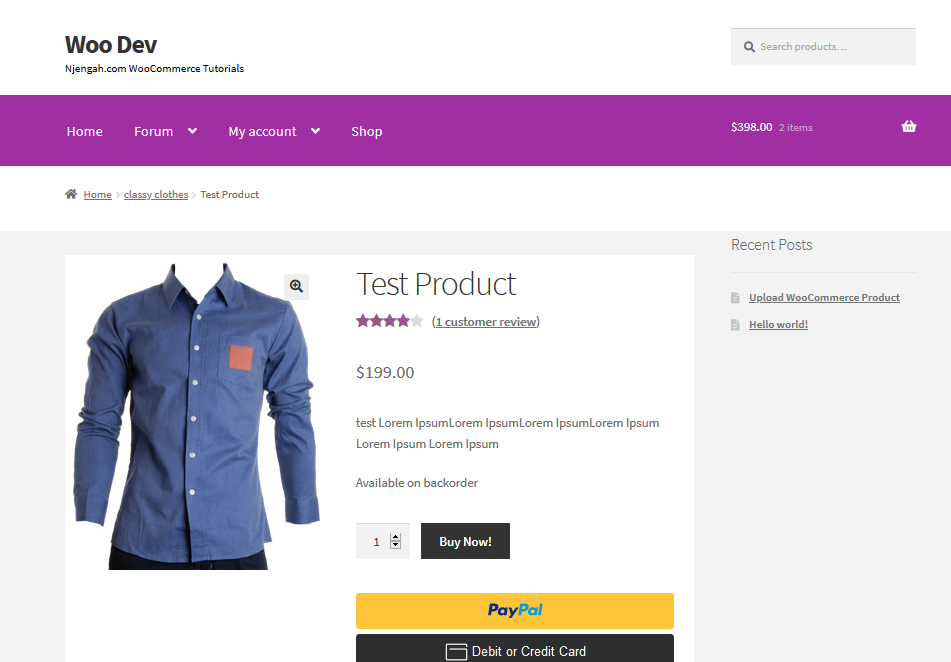
Alternatively, you can use the default WooCommerce settings to skip the cart page. This is the easiest method, and even WordPress beginners will not have a hard time.
Steps to Skip the Cart page using the WooCommerce Default Settings
a) Redirect Cart Page After Successful Addition
Here are the steps that you need to follow:
- Log into your WordPress site and access the Dashboard as the admin user.
- From the Dashboard menu, click on WooCommerce > Products settings. Under the General tab, you need to configure Add to cart behavior settings.
- Tick the first checkbox to redirect to the cart page after successful addition of product(s) as shown below:

- Remember to save the changes you make.
b) Redirecting Cart Page to the Checkout Page
On the WooCommerce Product Settings Page:
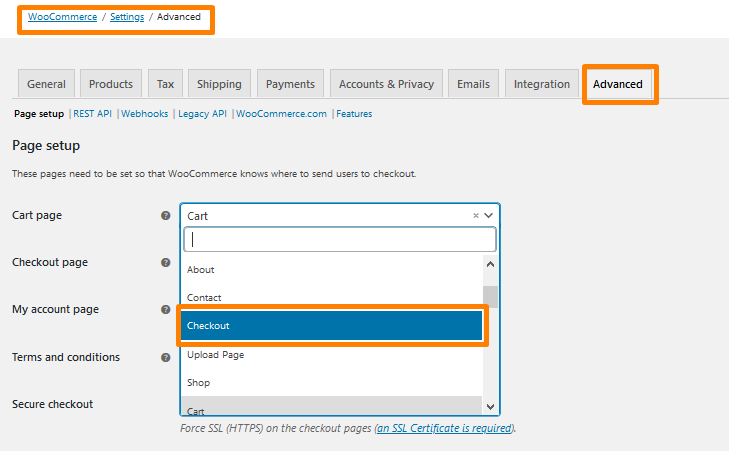
- Click on the Advanced tab and move to the Page setup section.
- For the Cart Page setting, select the Checkout page option from the drop-down list, as shown below:
c) Hiding the Cart Page from the Menu
If you have added the Cart page link in the menu, it will still lead to the Cart page. If you choose to remove it from the menu, follow these steps:
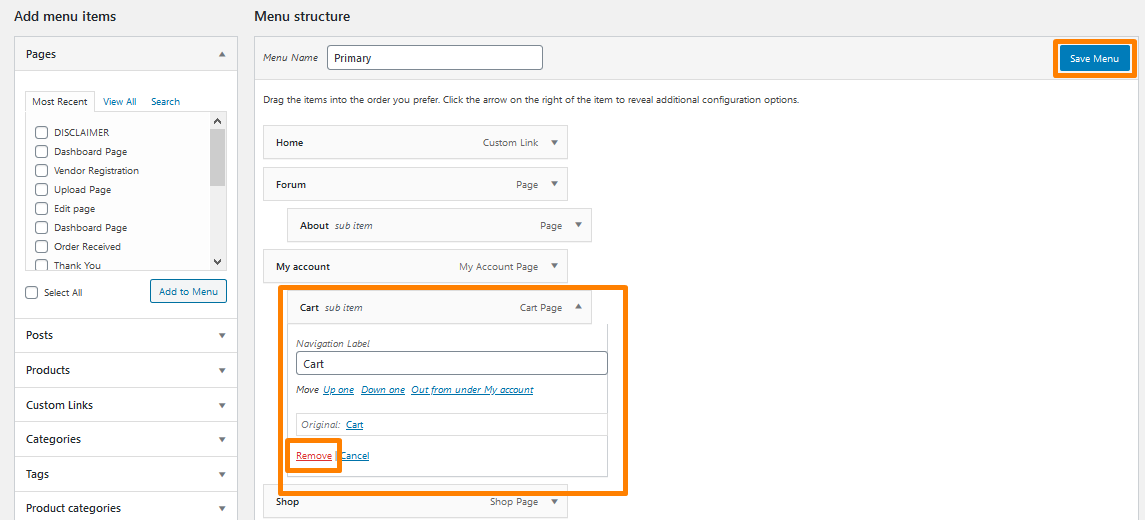
- Go to Appearance > Menu settings.
- Under the Menu Structure section, click on the Cart option and click Remove as shown below:
However, you need to change the add to cart button text. To do this, you need to add the following code snippet in the Themes function (functions.php) file. You can find this file in Appearance > Editor > click on functions.php.
add_filter( 'woocommerce_product_single_add_to_cart_text', 'lw_cart_btn_text' );

add_filter( 'woocommerce_product_add_to_cart_text', 'lw_cart_btn_text' );

//Changing Add to Cart text to Buy Now!

function lw_cart_btn_text() {

return __( 'Buy Now!', 'woocommerce' );

}
This code will replace the default Add to cart text with Buy Now! on the shop page and the individual product page.
Conclusion
In summary, I have shared two solutions to optimize the checkout process in your WooCommerce store. The first solution I have shared is a PHP code snippet, which you need to place in the functions.php file. The second solution involves tweaking the default WooCommerce settings. However, you need to replace the Add to Cart button text with something like Buy Now! If you do not know how to customize your site using the theme’s function.php file, please contact an experienced WordPress developer.
Similar Articles
- How to Change Add to Cart Button Text In WooCommerce Shop Page
- How to Change Proceed To Checkout Text In WooCommerce
- How to Remove Related Products WooCommerce Storefront Theme
- How to Add Categories to WooCommerce Products
- How to Change WooCommerce Payment Gateway Icons
- How to Check If Plugin is Active In WordPress [ 3 WAYS ]
- How to Remove Page Title WooCommerce Storefront Theme
- How to Get Payment Methods in WooCommerce » Code Example
- How to Change Storefront Number of Products Per Row
- How to Hide Category WooCommerce Storefront Theme
- How to Hide Mobile Footer From Storefront WooCommerce
- How to Turn off Next Product Tabs In WooCommerce Storefront
- How to Change Storefront Theme Order of Products
- How to Hide the WooCommerce Coupon Code Field
- How to Change Button Color Storefront Theme
- How to Add Extra Field in WooCommerce Checkout Form
- How to Change Products per Page WooCommerce Storefront Theme
- How to Set Custom Related Products In WooCommerce
- How to Put WooCommerce Cart and Checkout on One Page