 If you want to replace add to cart button with link in WooCommerce, you must understand how the add to cart works since it uses simple URLs with product parameter. You can create WooCommerce add to cart links that work just the same way as the add to cart button. It is simple and straightforward and requires no coding knowledge to replace add to cart button with link.
WooCommerce Add to Cart Links
This post will give you the ultimate guide to add custom ‘Add to Cart’ URLs or links in WooCommerce. If you are looking for a way to create custom WooCommerce Add to Cart links and make them add products to cart or redirect to specific pages. After completing this brief tutorial, you will be in a position to place Add to Cart links on custom landing pages, pricing tables, blog posts, and so on.
However, if you need something extra from WooCommerce, you often find WooCommerce does not give you all that you need, for example, if you want to add custom ‘Add to Cart’ URLs.
If you have ever interacted with WooCommerce, then you know that it is a great free e-commerce solution, which has an incredibly useful set of features.
What stands out is that WooCommerce is developed with extensibility in mind, similar to the modularity of WordPress. Therefore, it is possible to make all the customization that you need, and this is why you can easily customize the Add to Cart button with custom links.
Additionally, I will also introduce you to a free plugin that you can use to achieve this functionality. It will help you to add custom Add to Cart button labels and links.
Replace Add to Cart Button with Link
With all that said, let us get into the most important part of this brief tutorial, where I will share with you some custom links that I have interacted with in the past. I hope that this article will shed some light on this topic.
a) Simple Products Add to Cart URL
To be honest, this is one of the easiest as compared to all of them. I have said that because simple products are quite easy to pass to the cart using a custom URL, as I will show you in a moment. To do this, you need to find the product ID by hovering onto the product title. Follow these simple steps:
Steps to Add Custom Add to Cart URL in Simple Products
- Log into your WordPress site and access the Dashboard as the admin user.
- From the Dashboard menu, click on Products > All Products. This will open all the products that are in your WooCommerce store.
- Hover on the product that you want to add the custom link, to check the product ID as shown below:
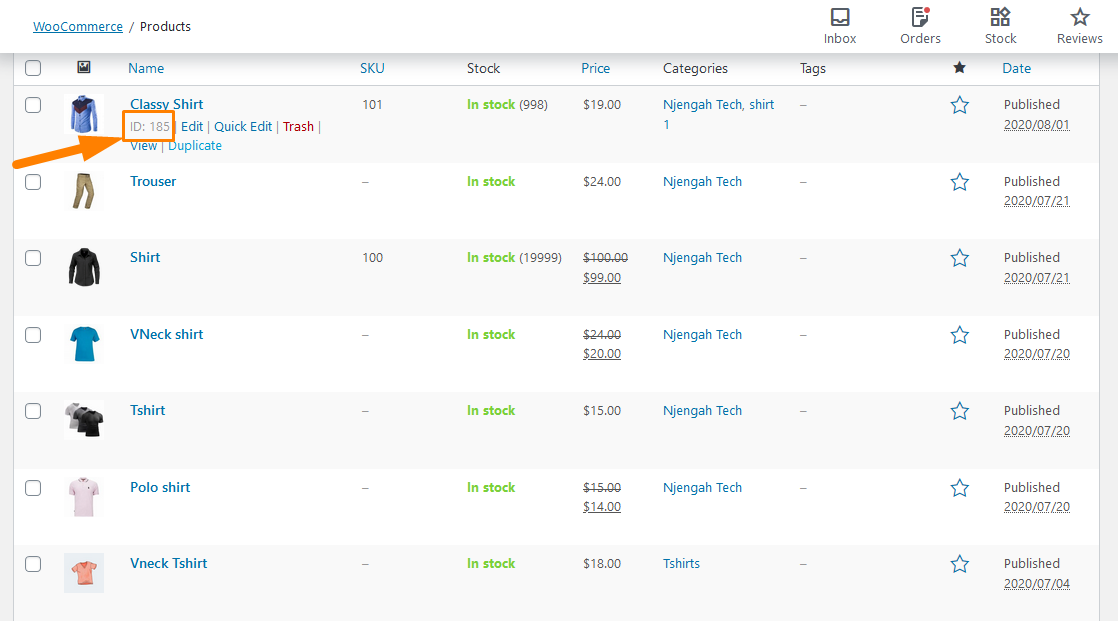
- To add one simple product to cart use this link:
href=”https://yourdomain.com/?add-to-cart=185″
remember to change the domain name in the link, and the button will work out of the box. The product with the ID 185 will be added to the cart.
- To One Simple Product to Cart with Quantity = 3, use this link:
href=”https://yourdomain.com/?add-to-cart=185&quantity=3″
This link implies that the product ID 185 will be added to the cart and the quantity will be 3. It is also worth mentioning that you cannot add two different products to the cart with a URL.
- To Add One Simple Product to Cart and Redirect to Cart Afterwards use this link:
href=”https://yourdomain.com/cart/?add-to-cart=185″
However, you need to remember that if you have changed the cart link, you need to make sure that you change ‘cart’ into ‘basket’. You also need to enable the AJAX to add to cart buttons on archives option under WooCommerce –> Settings –> Products -> General as shown: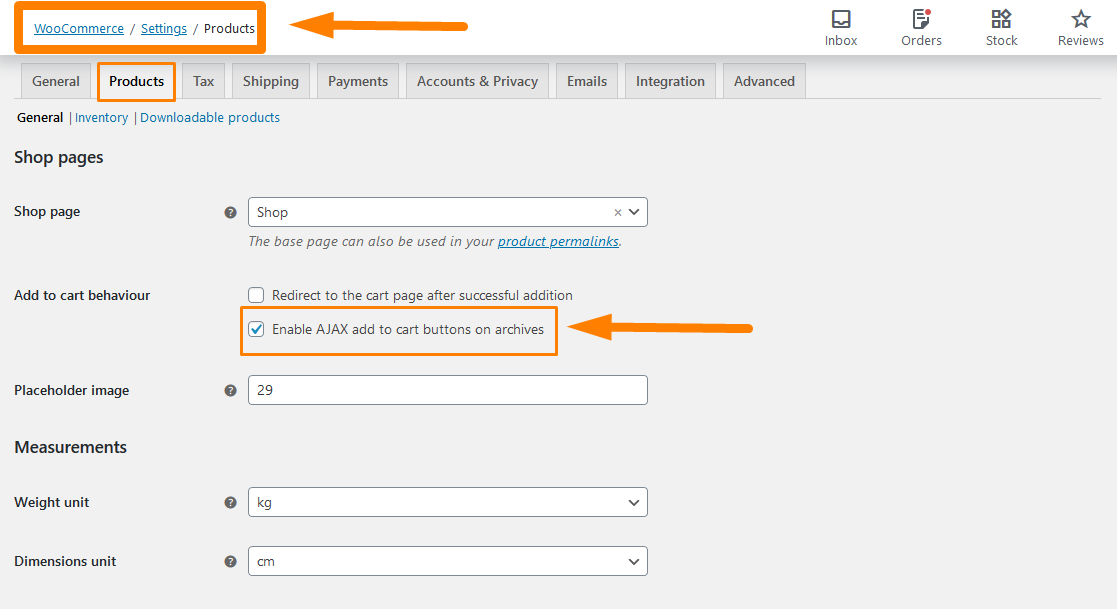
Remember to save the changes you make.
- To Add One Simple Product to Cart and Redirect to Checkout Afterwards use this link:
href=“https://yourdomain.com/checkout/?add-to-cart=185″
However, you need to remember that for this to work, you must enable the AJAX to add to cart buttons on archives option and disable the Redirect to the cart page after successful addition option under WooCommerce –> Settings –> Products -> General as shown below: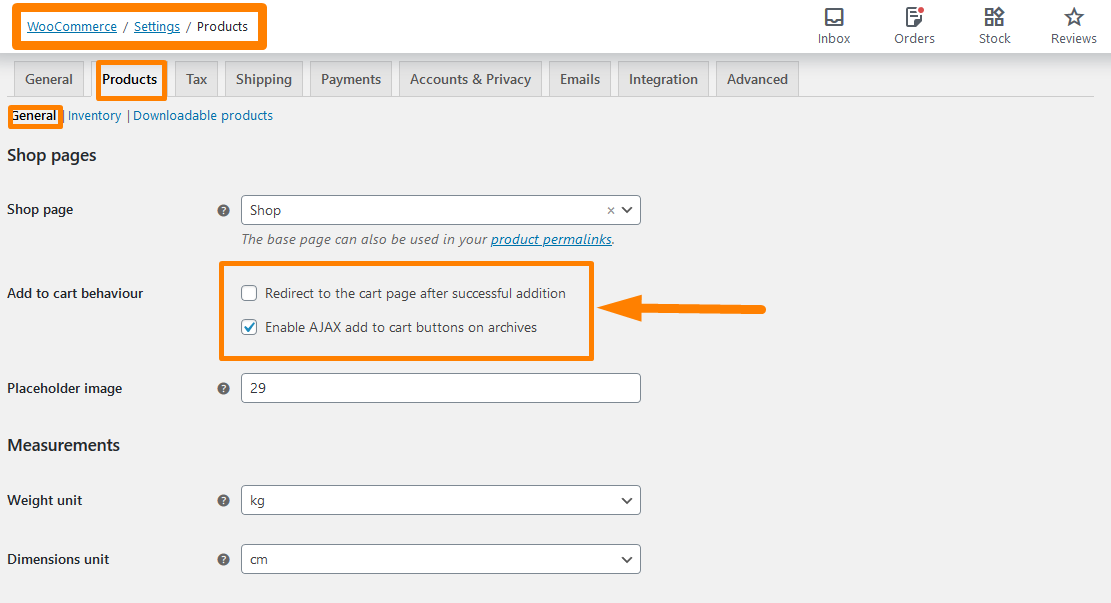
Remember to save the changes you make.
- To Add One Simple Product to Cart & Redirect to Any Page Afterwards use this link:
href=“https://yourdomain.com/your_custom_page/?add-to-cart=185″
However, you need to remember that for this to work, you must enable the AJAX to add to cart buttons on archives option and disable the Redirect to the cart page after successful addition option under WooCommerce –> Settings –> Products -> General as shown above.
b) Adding Variable Products to Cart URL
In the past, variable products were hard to configure, but with the current version of WooCommerce, it is very easy. To add a custom URL all you need is the Variation ID and you can check the steps below to know where you can find it.
Steps to Add Custom Add to Cart URL in Variable Products
- Log into your WordPress site and access the Dashboard as the admin user.
- From the Dashboard menu, click on Products > All Products. This will open all the products that are in your WooCommerce store.
- Hover on the Variable product that you want to add the custom link, to check the product ID.
- Click on Edit and scroll down to product data to find the Variable Product ID as shown below:
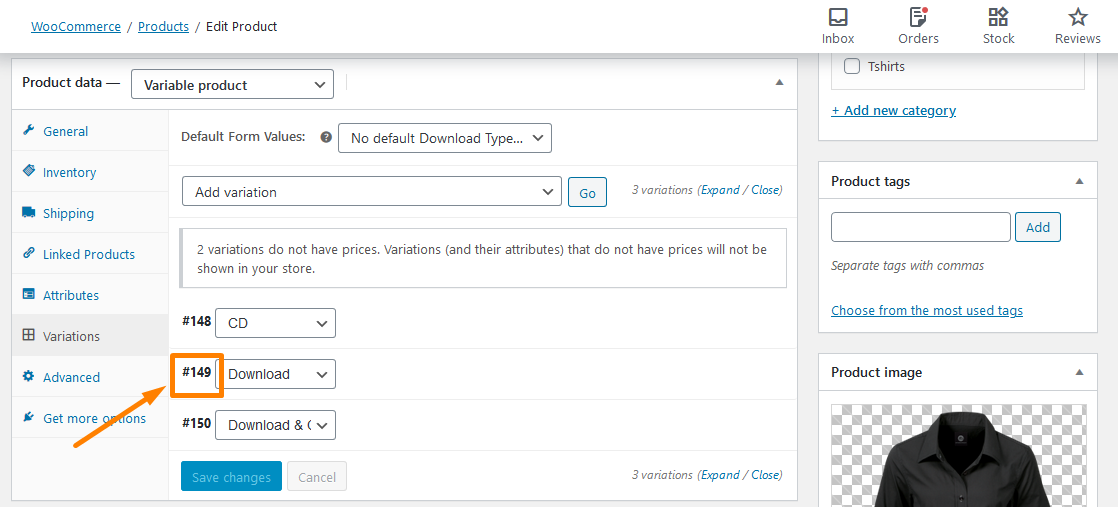
Now that we have the Variation ID, you can then use it to create custom links as shown below.
- To Add One Variable Product to Cart use this link:
href=“https://yourdomain.com/?add-to-cart=149″
Simply add the Variable product ID at the end. It is that simple.
- To Add One Variable Product to Cart with a Quantity of 3, use this link:
href=“https://yourdomain.com/?add-to-cart=149&quantity=3″
- To Add One Variable Product to Cart and Redirect to Cart, use this link:
href=“https://yourdomain.com/cart/?add-to-cart=149″
- To Add One Variable Product to Cart and Redirect to Checkout, use this link:
href=“https://yourdomain.com/checkout/?add-to-cart=149″
- To Add One Variable Product to Cart and Redirect to Any Page, use this link:
href=“https://yourdomain.com/any-page-URL/?add-to-cart=149″
If your WooCommerce store has Grouped Products, you can also add custom links to the Add to Cart button. A grouped product can be defined as a combination of two or more sub-products, and each one can be added with a custom quantity to cart.
Steps to Add Custom URLs to Grouped Products.
Follow these simple steps to add a custom URL to Grouped Products.
- To do this, you need to find the Grouped Product ID the same way as the first and second one.
- Then add the ID to the custom URL as shown below:
href=“https://yourdomain.com/?add-to cart=451&quantity[103]=5&quantity[193]=2″
This means that we are adding Grouped Product ID = 451, and specifically, we are adding 5 times the product ID = 103 and 2 times the product ID=2. You can add a zero to specify the quantity.
Conclusion
I hope that this tutorial helped you to add custom links to the Add to Cart button. I have taught you how to add the custom URLs to Simple Products, Variable Products, and Grouped Products. It is important to remember that you need to add your domain name in the link as well as the correct page URL where necessary. I hope that this post helped you learn more about how the WooCommerce add to cart work and hot you can customize them to fit your needs as custom URLs.
Comments are closed.