 Are you looking for a way to allow customers to attach a file on the checkout page? In this post, I want to guide you on how to set up WooCommerce Upload File on Checkout.
WooCommerce powers a huge percentage of online stores today. This is because it allows you to sell anything, and it is very flexible to customization.
As you will quickly find out from this tutorial, it is very easy to add your own functionality using custom PHP code.
You may want to allow customers to attach a file on the checkout page before they complete the order. It is important to note that WooCommerce does not have this functionality.
WooCommerce Upload File on Checkout
In this brief tutorial, we will show you how you can allow customers in your store to upload a file.
Before you proceed, we recommend creating a child theme. This will ensure that your changes are not lost during an update.
Let us see how you can achieve this.
Steps to Add a Section to Upload Files on the Checkout Page
Here are the simple steps you need to follow:
- Log into your WordPress site and access the Dashboard as the admin user.
- From the Dashboard menu, click on Appearance Menu > Theme Editor Menu. When the Theme Editor page is opened, look for the theme functions file where we will add the function that will allow customers to upload a file on the checkout page.
- Add the following code to the functions.php file:
//For upload image
add_filter( ‘woocommerce_shipping_fields’,
‘njengah_filter_upload_shipping’ );
function njengah_filter_upload_shipping( $address_fields ) {
// $address_fields[‘file_upload’][‘required’] = true;
$address_fields[‘file_upload’] = array(
//’label’ => __(‘Upload your ID’, ‘woocommerce’),
‘required’ => false,
‘class’ => array(‘form-row-wide’),
‘clear’ => true
);
return $address_fields;
}
//Using this function to show Upload field on your checkout page.
function njengah_file_field(){
$uploadFile = "";
$uploadFile .='<div id="upload_CNIC_image">’;
$uploadFile .='<input id="file_upload" name="file_upload"
type="file" multiple="true">’;
$uploadFile .='<span id="">’;
$uploadFile .='</span>’;
$uploadFile .='</div>’;
echo $uploadFile;
}
add_action(‘woocommerce_after_order_notes’,’njengah_file_field’);
[/php]
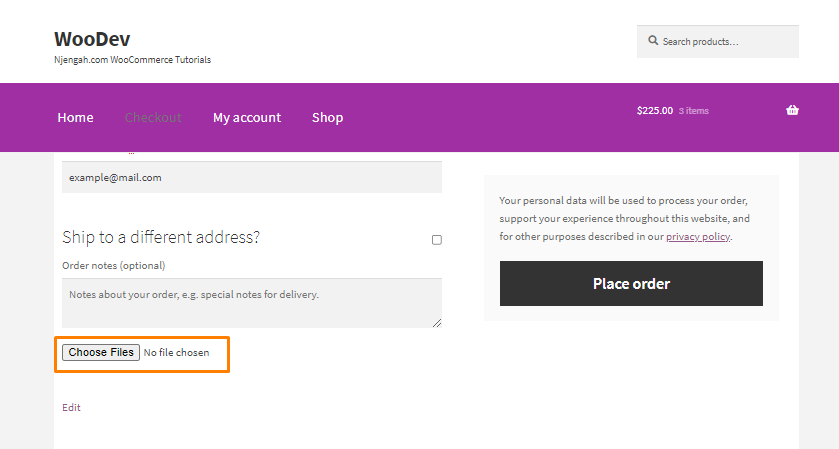
- This is the outcome:
Conclusion
In this post, you have learned how to allow customers to upload a file on the checkout page. You should also take caution when editing the functions.php file. If you make any mistake, an error will be displayed on your site.
Similar Articles
- WooCommerce Redirect After Checkout : Redirect to Custom Thank You Page
- 100+ Tips, Tricks & Snippets Ultimate WooCommerce Hide Guide
- 26 Best WooCommerce Plugins for Customer Feedback
- How to Hide Price When Out of Stock In WooCommerce
- How to Hide WooCommerce Marketing Hub Admin Option
- How to Add WooCommerce Invoice Checkout Page
- How to Change Cart Subtotal WooCommerce
- How to Temporarily Disable Checkout In WooCommerce
- How to Change Shop Page Title In WooCommerce
- How to Create Checkbox Field in WooCommerce Checkout Page
- How to Change WooCommerce Checkout Background Color
- How to Change Shipping Label WooCommerce
- How to Add View Cart Button In WooCommerce
- How To Display Product Attributes In WooCommerce
- How to Add WooCommerce Storefront Banner
- How to Add Local Pickup to WooCommerce
- How to Send Email on Status Change In WooCommerce
- How to Customize WooCommerce Product Pages
- How to Style WooCommerce Checkout Page
- How to Clear Cart on Logout In WooCommerce