
Are you looking for a way to change the background color of forms on the checkout page?
Checkout page optimization is a frequently overlooked area by WooCommerce shop owners.
WooCommerce continues to be popular because it is flexible. You can add your own custom code to modify different sections on your site.
You may want to change the background color on the checkout page. By default, WooCommerce does not have a built-in solution to do this.
You can use a plugin, but we recommend using custom code. This is because they may bloat your site.
Change WooCommerce Checkout Background Color
By the end of this post, you should be able to change the background color of the checkout page forms.
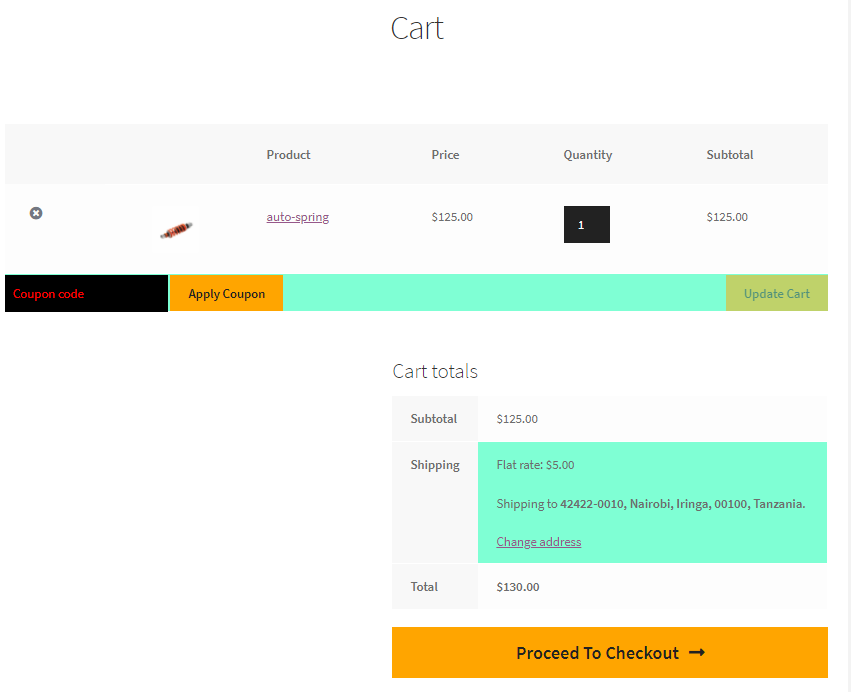
However, it is important to note that your site should include a uniform design. This means that we have to change the background color of the forms on the cart and checkout page.
We will also style the form fields, placeholder text, and all the WooCommerce buttons.
It is also worth mentioning that we have included a code to customize the payment box, coupon field, and drop-downs on the checkout page.
Steps to Change WooCommerce Checkout Background Color
In this section, we will use CSS code to customize the WooCommerce cart, checkout, and account pages to match the rest of your site.
This is how the checkout page is displayed: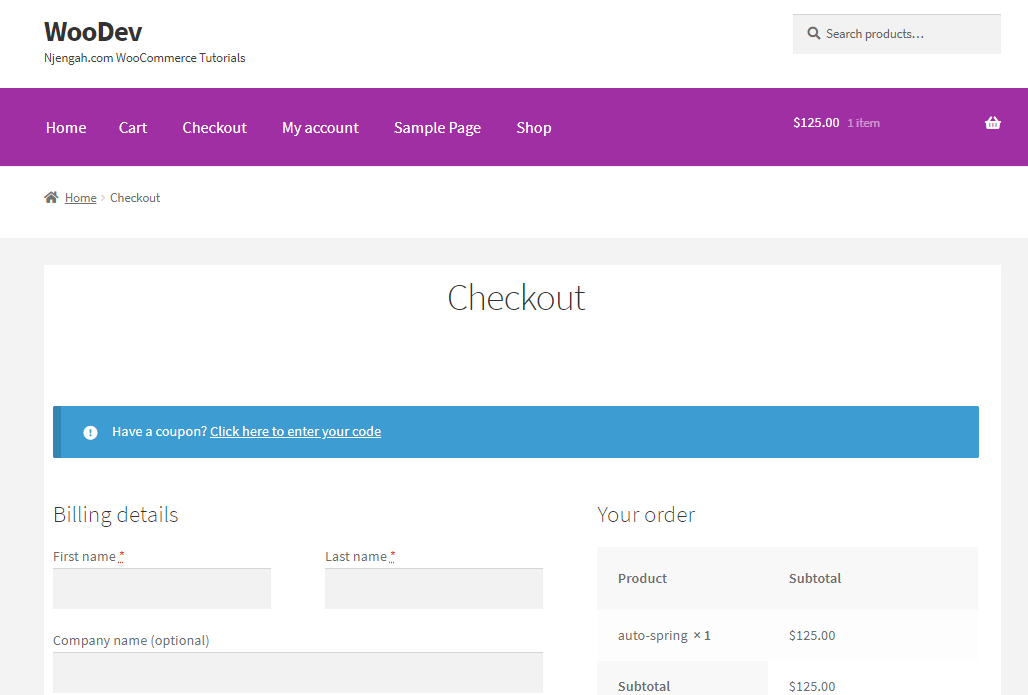
Here are the steps you need to follow:
- Log into your WordPress site and access the Dashboard as the admin user.
- From the Dashboard menu, click on Appearance > Customize.
- This will launch the customization panel on the left side of the screen.
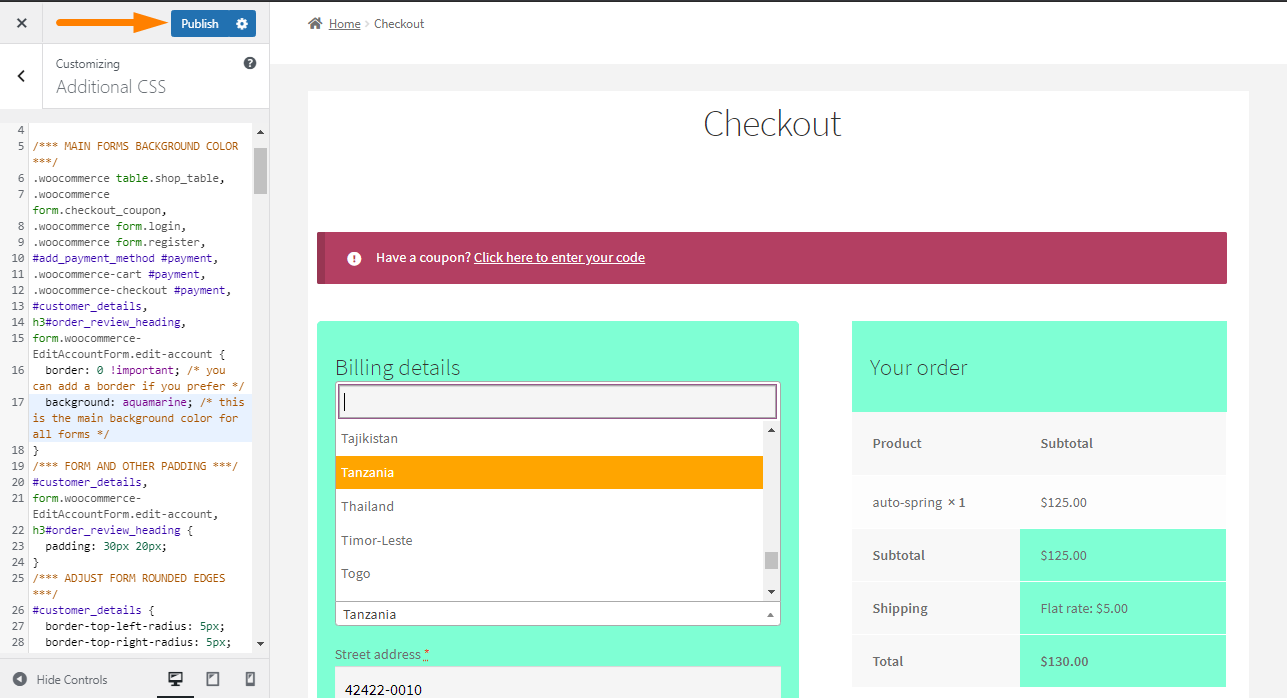
- Click on the Additional CSS link and add the following CSS code:
/*** MAIN FORMS BACKGROUND COLOR ***/

.woocommerce table.shop_table,

.woocommerce form.checkout_coupon,

.woocommerce form.login,

.woocommerce form.register,

#add_payment_method #payment,

.woocommerce-cart #payment,

.woocommerce-checkout #payment,

#customer_details,

h3#order_review_heading,

form.woocommerce-EditAccountForm.edit-account {

            border: 0 !important; /* you can add a border if you prefer */

            background: #f5f5f5; /* this is the main background color for all forms */

}

/*** FORM AND OTHER PADDING ***/

#customer_details,

form.woocommerce-EditAccountForm.edit-account,

h3#order_review_heading {

            padding: 30px 20px;

}

/*** ADJUST FORM ROUNDED EDGES ***/

#customer_details {

            border-top-left-radius: 5px;

            border-top-right-radius: 5px;

}

.woocommerce-checkout-review-order table.shop_table {

            border-top-left-radius: 0;

            border-top-right-radius: 0;

}

/*** FIELDS ON CHECKOUT, CART, ACCOUNT PAGES ***/

.woocommerce-account input,

.woocommerce-checkout input,

#order_comments.input-text {

            background-color: #f5f5f5 !important;

            color: black !important; /* not the placeholder, the text color when typed */

            border: 0; /* optional */

}

/*** COUPON FIELD ONLY ***/

.woocommerce-page #coupon_code.input-text { /* if you want your coupon different from other fields */

            background-color: black !important;

            color: blue !important;

            font-size: 16px !important; /* if you don't want the default giant font on the coupon field */

}

/*** PLACEHOLDER TEXT ON ALL WOO PAGES ***/

.woocommerce-page ::-webkit-input-placeholder {

    color: red !important;

}

.woocommerce-page :-ms-input-placeholder {

    color: red !important;

}

.woocommerce-page ::-moz-placeholder {

    color: red !important;

}

.woocommerce-page :-moz-placeholder { /* this isn't the same as above don't delete */

    color: red !important;

}

/*** THIS COMPENSATES FOR SHIP TO DIFF ADDRESS FIELD NOT ALIGNING ***/

h3#ship-to-different-address {

            margin-top: -3px;

}

/*** ALL WOO BUTTONS ***/

.woocommerce button.button.alt,

.woocommerce-page button.button.alt,

.woocommerce a.button,

.woocommerce-page a.button,

.woocommerce button.button,

.woocommerce-page button.button {

            text-transform: capitalize !important;

            background: #ffa500 !important;

            color: #222 !important;

}

.woocommerce button.button.alt:hover,

.woocommerce-page button.button.alt:hover,

.woocommerce a.button.alt:hover,

.woocommerce-page a.button.alt:hover,

.woocommerce a.button:hover,

.woocommerce-page a.button:hover,

.woocommerce button.button:hover,

.woocommerce-page button.button:hover {

            background: #00adad !important;

            color: #fff !important;

}

/*** PAYMENT BOX ON CHECKOUT ***/

#add_payment_method #payment div.payment_box,

.woocommerce-cart #payment div.payment_box,

.woocommerce-checkout #payment div.payment_box {

            background-color: #15bf86;

            color: #fff;

}

#add_payment_method #payment div.payment_box::before,

.woocommerce-cart #payment div.payment_box::before,

.woocommerce-checkout #payment div.payment_box::before {

            border-bottom-color: #15bf86;

}

#add_payment_method #payment ul.payment_methods,

.woocommerce-cart #payment ul.payment_methods,

.woocommerce-checkout #payment ul.payment_methods {

            border-bottom: 0;

}

/*** BORDERS AND TABLES ***/

.woocommerce form .form-row input.input-text,

.woocommerce form .form-row textarea {

            border: 0;

}

.woocommerce table.shop_table td,

#add_payment_method .cart-collaterals .cart_totals tr td,

#add_payment_method .cart-collaterals .cart_totals tr th,

.woocommerce-cart .cart-collaterals .cart_totals tr td,

.woocommerce-cart .cart-collaterals .cart_totals tr th,

.woocommerce-checkout .cart-collaterals .cart_totals tr td,

.woocommerce-checkout .cart-collaterals .cart_totals tr th,

.woocommerce table.shop_table tbody th,

.woocommerce table.shop_table tfoot td,

.woocommerce table.shop_table tfoot th,

.woocommerce-checkout #main-content .cart-subtotal td {

            border-top: 2px solid #fff;

}

.woocommerce table.shop_table_responsive tr:nth-child(2n) td,

.woocommerce-page table.shop_table_responsive tr:nth-child(2n) td {

            background: transparent;

}

.woocommerce-checkout #content-area table th,

.woocommerce-checkout #content-area table td {

            padding-left: 20px;

}

.woocommerce form .form-row input.input-text,

.woocommerce form .form-row textarea {

            font-size: 18px;

}

/*** EXISTING ACCOUNT / ERROR BOXES BACKGROUND COLOR ***/

.woocommerce-message,

.woocommerce-error,

.woocommerce-info {

            background: #b33f62 !important;

}

/*** ORDER NOTES ON CHECKOUT ***/

.woocommerce-checkout .woocommerce form .form-row textarea {

            height: 150px; /* height of optional notes box */

}

/*** STATE DROPDOWN SELECT COLOR ***/

.select2-container--default .select2-results__option--highlighted[aria-selected],

.select2-container--default .select2-results__option--highlighted[data-selected] {

            background: #ffa500;

}

/*** QUANTITY BOX ***/

.woocommerce #content .quantity input.qty,

.woocommerce .quantity input.qty,

.woocommerce-cart table.cart td.actions .coupon .input-text,

.woocommerce-page #content .quantity input.qty,

.woocommerce-page .quantity input.qty {

            color: #fff !important;

            background: #222 !important;

            height: 46px; /* you may need to change this based on your font size */

}
- If you are using a theme like Divi, click on theme options > custom CSS box to add the code.
- Remember to click on This is the outcome:
Conclusion
It is important to customize the checkout page, as this is the last step before customers make a purchase.
However, your changes should match the design of your site.

Joe is an experienced full-stack web developer with a decade of industry experience in the LAMP & MERN stacks, WordPress, WooCommerce, and JavaScript – (diverse portfolio). He has a passion for creating elegant and user-friendly solutions and thrives in collaborative environments. In his spare time, he enjoys exploring new tech trends, tinkering with new tools, and contributing to open-source projects. You can hire me here for your next project.
Similar Articles
- WooCommerce Redirect After Logout [Ultimate Guide]
- WooCommerce Redirect After Checkout: Redirect to Custom Thank You Page
- How to Edit Billing Details WooCommerce Checkout Page
- How to Set Up Free Shipping with Minimum Spend In WooCommerce
- WooCommerce Mobile Checkout Optimization Quick Guide
- How to Add Currency to WooCommerce [Custom Currency]
- How to Get Order Details After Checkout In WooCommerce
- How to Hide, Change or Remove WooCommerce On Sale Badge
- How to Set Up WooCommerce Checkout Field Placeholder
- How to Change WooCommerce Email Colors
- How to Add Active Navigation Class Based on URL
- How to use do_shortcode in WordPress (PHP)
- How to Add Search to Shop Page In WooCommerce
- How to Create Custom Category Page In WooCommerce
- How to Add Product to Cart Programmatically in WooCommerce
- How to Clear Cart on Logout In WooCommerce
- How to Check if User is Logged In WordPress
- How to Create Coupon In WooCommerce
- How to Get Checkout URL In WooCommerce
- How to Change Currency Symbol In WooCommerce