If you want to add a custom section before the checkout, this post will illustrate how you can add a text or section above the checkout form.
It is important to note that you need some coding skills when implementing this solution. We will guide you through all the steps to ensure you do not break down your website.
The checkout page is one of the most important pages in WooCommerce. This is because it is the page where you get paid. Therefore, it is important to get it just right.
The checkout page configuration is good, but there are some cases where you may need to customize this page to increase the conversion rate.
WooCommerce Before Checkout
It is worth mentioning that there is a bunch of WooCommerce checkout page hooks available. You can add your own functions to the theme you are using to add any functionality on the checkout page.
In this brief tutorial, we will focus on the woocommerce_before_checkout_form, woocommerce_checkout_before_customer_details, woocommerce_before_checkout_billing_form, and woocommerce_before_checkout_shipping_form.
These hooks allow you to add a section or text on top of the checkout page. Let us illustrate how you can use them in your WooCommerce store.
Add Custom Sections Before the Checkout Page
In this section, we will illustrate how to add text before the checkout form, before customer details, before the checkout billing form, and before the checkout shipping form. To add the sections, here are the simple steps you need to follow:
- Log in to your WordPress dashboard as admin.
- From the Dashboard menu, click on Appearance Menu > Theme Editor Menu. When the Theme Editor page is opened, look for the theme functions file where we will add the function to add text before the checkout form. We will be using the woocommerce_before_checkout_form hook.
- Add the following code at the bottom of the functions.php file:
add_action( 'woocommerce_before_checkout_form', 'njengah_checkout_hello', 5 );
/**
* Add "hello" text before the WooCommerce checkout form
*
*/
function njengah_checkout_hello() {
echo '<h2>Hello there! Happy shopping!</h2>';
}
- This is the outcome:

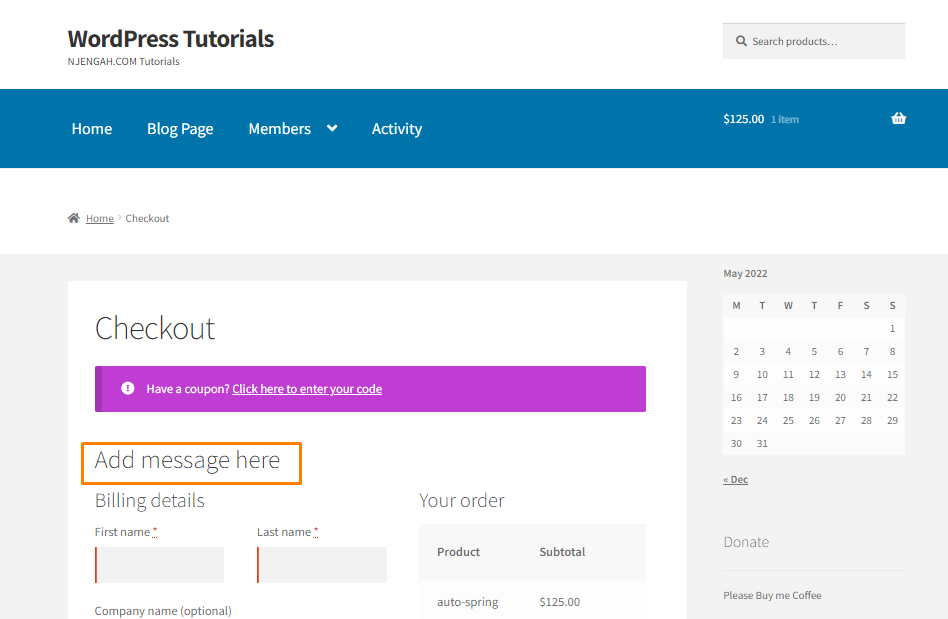
- To add a text or section before the customer details page (woocommerce_checkout_before_customer_details), add the following code in the functions.php file:
add_action( 'woocommerce_checkout_before_customer_details', 'njengah_checkout_before_customer_details', 10 );
function njengah_checkout_before_customer_details(){
echo '<h2>Add message here</h2>';
}
- This is the outcome:
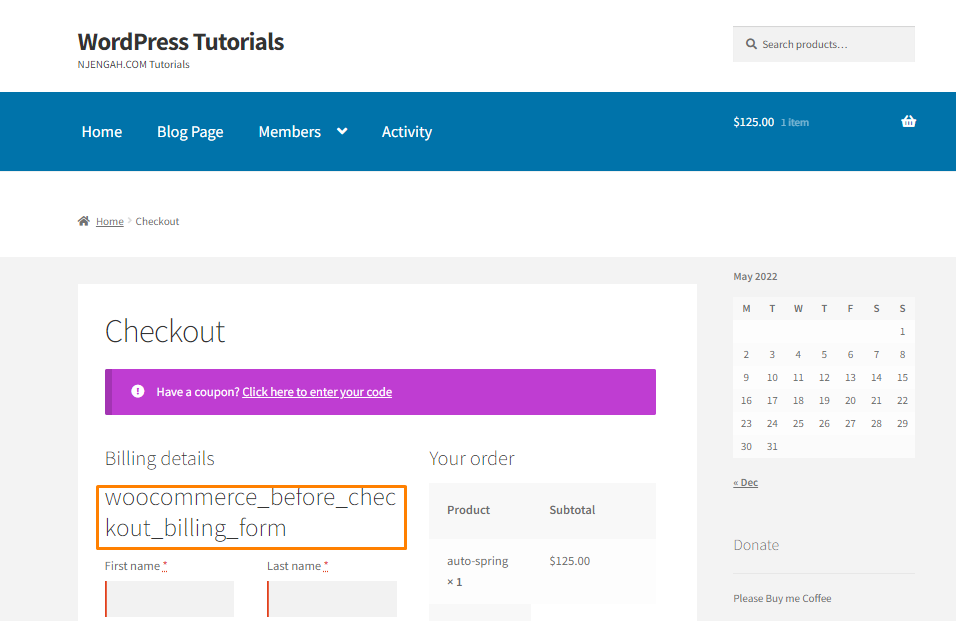
- To add a text or section before the checkout billing form (woocommerce_before_checkout_billing_form), add the following code in the add_action( ‘woocommerce_before_checkout_billing_form’, ‘njengah_before_checkout_billing_form’, 10 );
add_action( 'woocommerce_before_checkout_billing_form', 'njengah_before_checkout_billing_form', 10 );
function njengah_before_checkout_billing_form(){
echo '<h2>woocommerce_before_checkout_billing_form</h2>';
}
- This is the outcome:
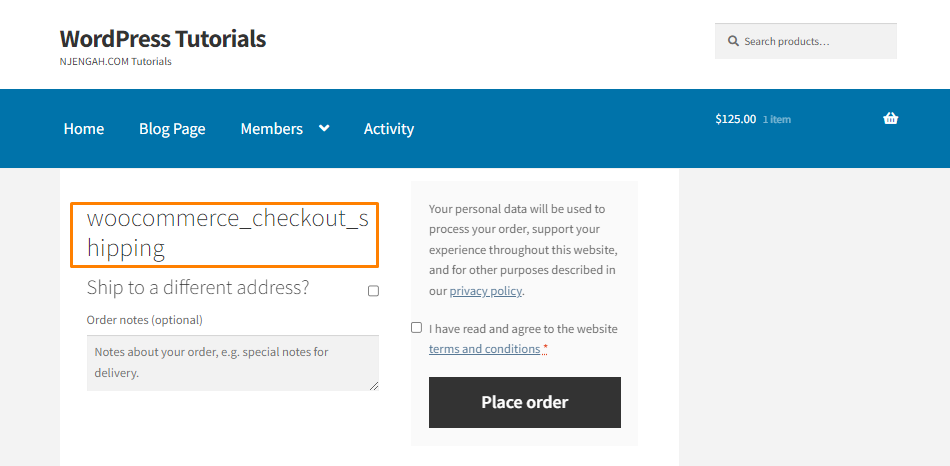
- To add a text or section before the checkout shipping form (woocommerce_before_checkout_shipping_form), add the following code in the functions.php file:
add_action('woocommerce_checkout_shipping', 'njengah_checkout_shipping');
function njengah_checkout_shipping() {
echo '<h2>woocommerce_checkout_shipping</h2>';
}
- This is the outcome:
Conclusion
In today’s brief tutorial, we have illustrated how you can edit the checkout page using woocommerce_before_checkout_form, woocommerce_checkout_before_customer_details, woocommerce_before_checkout_billing_form, and woocommerce_before_checkout_shipping_form hooks.
If this is your first time with hooks, you can copy these scripts and paste them directly into the functions.php file of your Child Theme.
You can now get creative and customize the checkout page to increase conversion rates.
If you have any trouble using the code snippets we have shared, we recommend contacting a qualified WordPress developer.
We hope that this post helped you to customize your checkout page.

Joe is an experienced full-stack web developer with a decade of industry experience in the LAMP & MERN stacks, WordPress, WooCommerce, and JavaScript – (diverse portfolio). He has a passion for creating elegant and user-friendly solutions and thrives in collaborative environments. In his spare time, he enjoys exploring new tech trends, tinkering with new tools, and contributing to open-source projects. You can hire me here for your next project.
Similar Articles
- How to Display Product Categories in WooCommerce
- WooCommerce URL To Add Product To Cart
- WooCommerce Mobile Checkout Optimization Quick Guide
- How to Make Phone Number Required WooCommerce
- How to Get Order meta_data In WooCommerce
- WooCommerce Archive Hooks [Complete Guide]
- WooCommerce Visual Hook Guide Checkout
- How to Export Products In WooCommerce
- How to Change Email Sender In WooCommerce
- How to Get Product ID In WordPress
- How to Add WooCommerce Checkout Email Validation
- How to Redirect User If Not Logged in WordPress » Page Redirect
- How to Fix Checkout Is Not Available Whilst Your Cart Is Empty WooCommerce
- How to Get Last Order by User Id WooCommerce
- How to Change SKU Text WooCommerce
- How to Change Out Of Stock Text in WooCommerce
- How to Attach PDF Invoice to Email WooCommerce
- How to Add Text after Price in WooCommerce » Add Price Suffix
- How to Access WooCommerce Database