 Are you searching for a quick and easy way to show WooCommerce pricing based on country? In today’s tutorial, we will share a simple and effective solution to achieve this functionality. You do not need any coding skills because we will be using a plugin.
WooCommerce offers you nearly everything you need to start selling. However, there are times you may need to add an important functionality. In our case, we need to change the price of the product based on the geographical location.
Why Change Price by Country WooCommerce
There are many reasons why you may take this approach of adjusting the prices. One of the main reasons is so that you can sell products to many countries without worrying about the currency conversion rates. In addition, this will definitely improve the user experience in your online store.
It is worth mentioning that price calculation by currency rate enables for a smoother running of the entire market. It means that you are open for business in different countries. You will be able to accept numerous currencies if you are prepared to ship to these places.
This will lead to additional sales coming your way. This is because many people can reach your market.
WooCommerce Different Prices For Different Countries
In today’s post, we will show you how you can use the Price Based on Country for WooCommerce plugin to configure and sell several currencies to the same product. It works on both physical and digital products.
This plugin has a geo-location feature that allows you to offer multiple currencies in WooCommerce.
Let us get right into it.
Steps to Add Different Prices For Different Countries
Here are the simple steps you need to follow:
- Log into your WordPress site and access the Dashboard as the admin user.
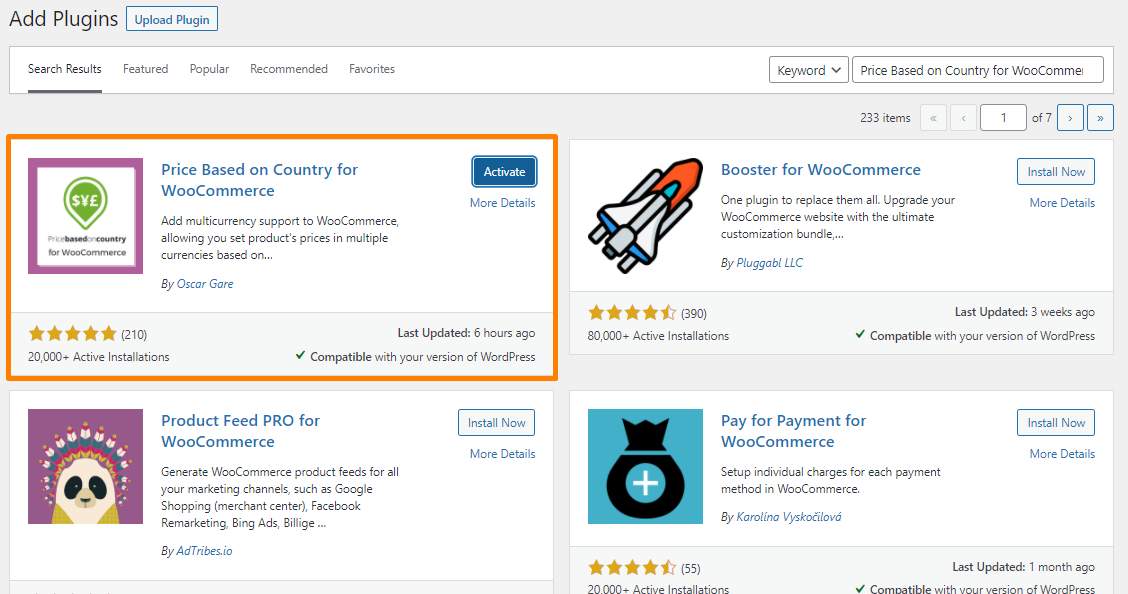
- Then, we are going to install the plugin that we have indicated earlier. To download it directly in the Admin Panel, simply navigate to Plugins > Add New. After that, you will need to do a keyword search for the plugin ‘Price Based on Country for WooCommerce’. You need to install and activate it as shown below:
- The next step is to navigate to WooCommerce > Settings. You will see the “Zone Pricing” tab with two main links.
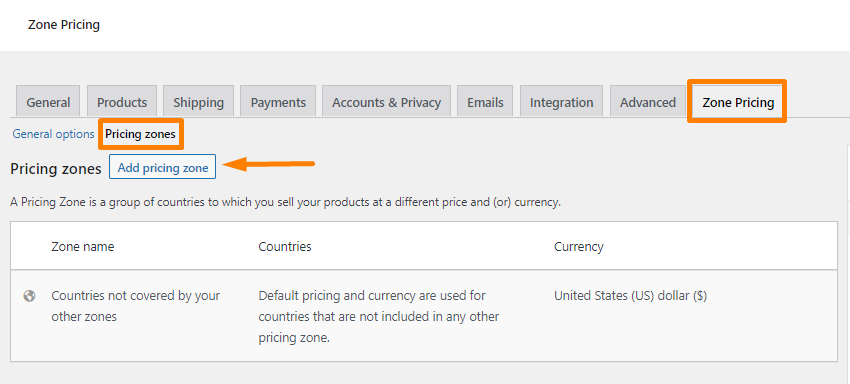
- Click on Pricing Zones. This is where you will add the different prizing ones you have.

- Add the name of your zone and select the name of the countries.
- Select the currency.
- The next step is to mention the exchange rate manually. If you upgrade to the premium version, it will be done automatically.
- Remember to save your changes.
Conclusion
That’s all you need to do to add a price zone successfully. You will now be able to accept different currencies based on the location of the customer.
If you want additional features, you can always upgrade to the pro version. This plugin makes the process of selling products around the globe very easy. It will help you boost your sales significantly.
We hope that this post helped you solve the problem.
Similar Articles
- How to Setup WooCommerce Storefront Mega Menu
- How to Connect Printful To WooCommerce
- What is the Best Payment Gateway for WooCommerce
- How to Add Wishlist In WooCommerce
- How to Add WooCommerce Registration Email Verification
- WooCommerce vs Magento: Which Is the Best E-Commerce Platform?
- Top 30+ Best WordPress Form Plugins » Best WordPress Form Plugin
- What is the Difference Between WordPress and WooCommerce Explained
- How to Hide Price When Out of Stock In WooCommerce
- How to Migrate from Shopify to WooCommerce
- How to Access WooCommerce Database
- How Many Products Can WooCommerce Handle?
- How to Set Up WooCommerce Product Price Per Kg
- How to Duplicate a Product in WooCommerce
- How to Add Price to Attribute In WooCommerce
- How to Add WooCommerce Products to Facebook Shop
- How to Set Up WooCommerce Buy One Get One