
If you want to change Proceed to Checkout text in the WooCommerce cart page, you can do so by creating a function that changes the default text to your custom text.
In this post, I will show you how to change proceed to checkout text with a practical example and share the code that is ready for you to use.
The Proceed to Checkout text is located on the WooCommerce cart page and appears after the totals as shown in this image: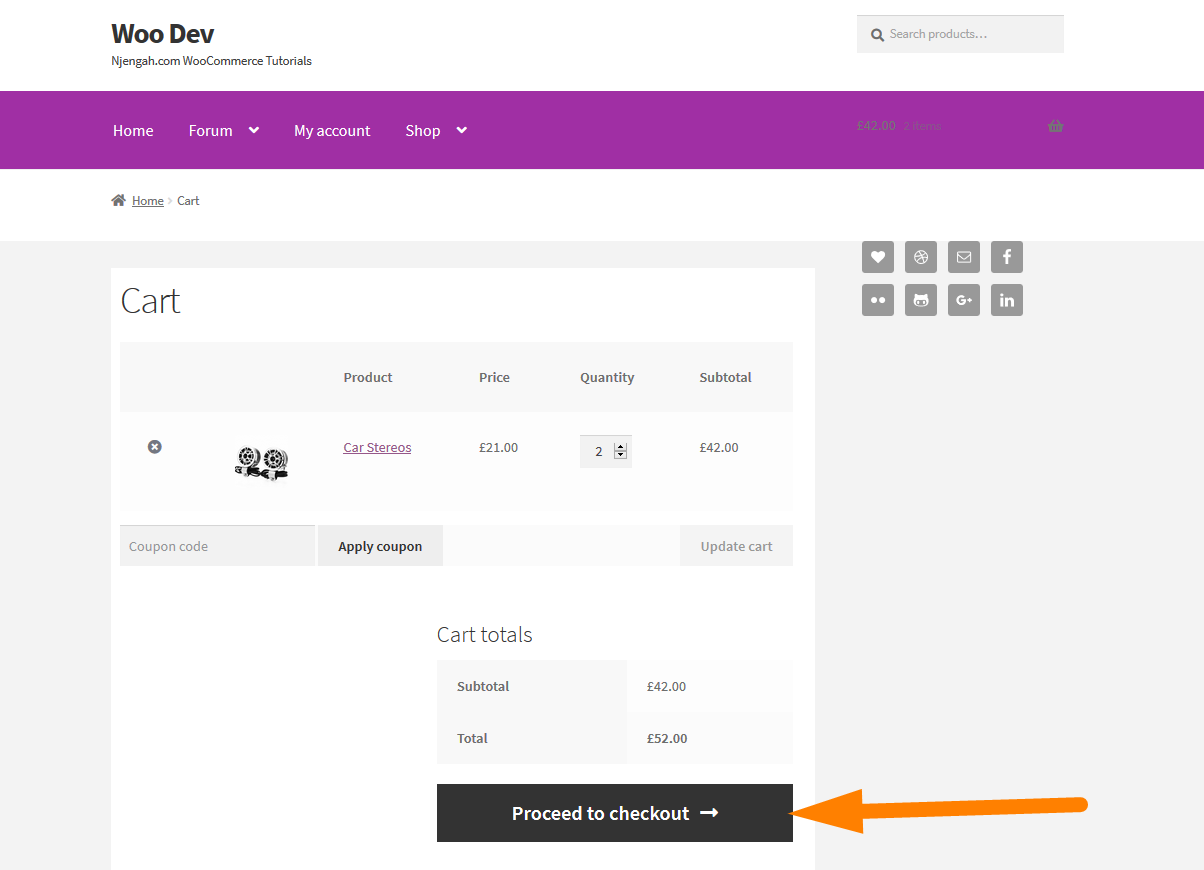
This button function is to redirect the cart page to the checkout page after you have verified that the contents of the cart are OK.
You probably want to change this Proceed to Checkout text to custom text like ‘Go to Secure Checkout’.
Steps to Change Proceed To Checkout Text In WooCommerce
To change this text you need to follow the following steps:
- Log into your WordPress site and access the dashboard as the admin user. If you have no idea how to log in to your WordPress site, there is a detailed guide here.
- From the dashboard menu, click on the Appearance Menu > Theme Editor Menu. When the theme editor page is opened look for the theme functions file that has the extension functions.php. Open this functions file where we will add the function that will change proceed to checkout text to something like ‘Go to Secure Checkout’.
- Add the following code to the functions.php and change the text ‘Go to Secure Checkout’ in the code to the custom code that you want to display on the Proceed to Cart Checkout button.
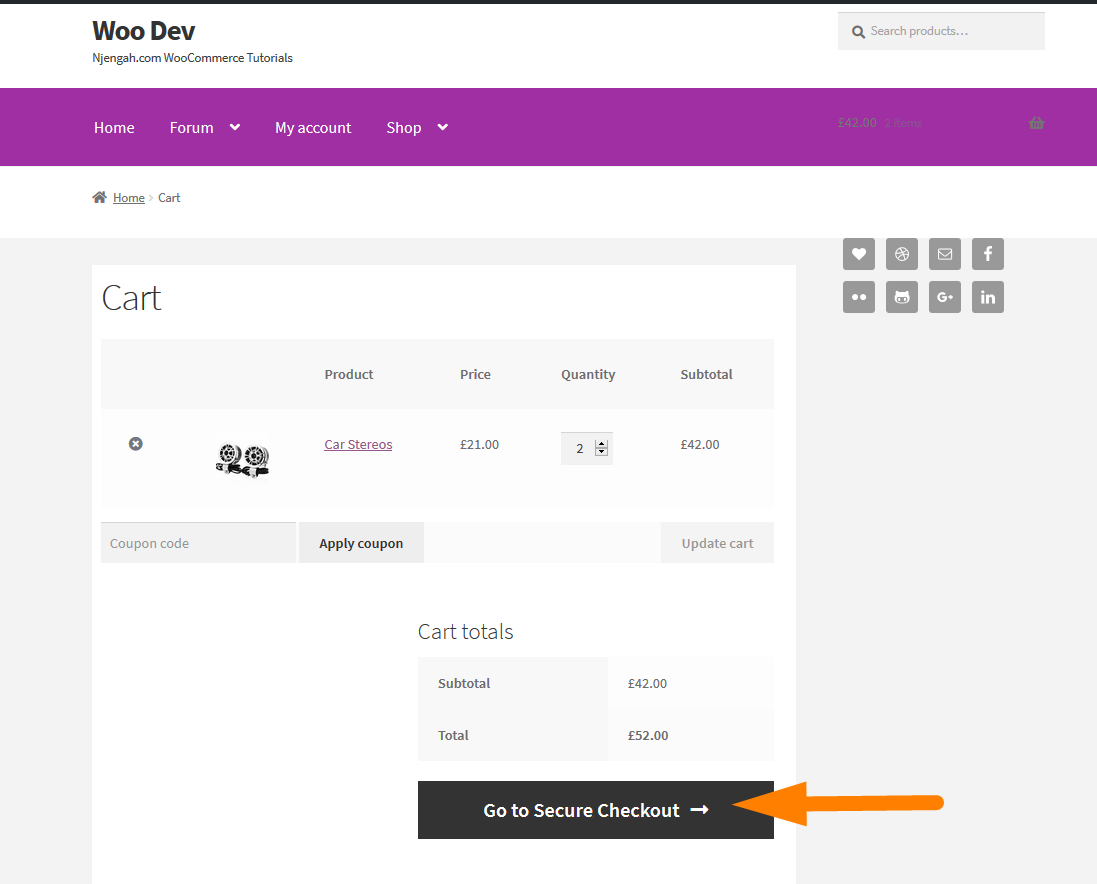
/** * Change Proceed To Checkout Text in WooCommerce * Add this code in your active theme functions.php file **/ function woocommerce_button_proceed_to_checkout() { $new_checkout_url = WC()->cart->get_checkout_url(); ?> <a href="<?php echo $new_checkout_url; ?>" class="checkout-button button alt wc-forward"> <?php _e( 'Go to Secure Checkout', 'woocommerce' ); ?></a> <?php } - Save the changes on the functions.php file and visit the cart page on your WooCommerce site to see if the proceed to checkout text has changed to your custom text as shown in the image below :
How to Code Works
This code is basically a function added to your WordPress theme that will not work when you change to another WordPress theme. You may have to add the same code snippet to the other WooCommerce theme when you switch themes.
The first step in the code is to get the WooCommerce checkout URL and saves it in a variable in this line of code :
$new_checkout_url = WC()->cart->get_checkout_url();
The second step is to display the URL with a href tag and we display the text in the href as our custom text in the brackets and with the WooCommerce text-domain that helps in translating WooCommerce strings :
 <a href="<?php echo $new_checkout_url; ?>" class="checkout-button button alt wc-forward">

   <?php _e( 'Go to Secure Checkout', 'woocommerce' ); ?>

</a>
As you can see in the code we are using the URL variable in the Ahref attribute value to use the actual checkout URL.
This code does not require a filter since it overrides the default Proceed to Checkout text when we add it to the functions.php file on the active WooCommerce theme.
Conclusion
In this post, we have highlighted the way to change proceed to checkout text in the WooCommerce cart page and also shared the code that you should add to your functions.php file. Finally, you should not forget to change the text in the code to correspond to your preferred text.

Joe is an experienced full-stack web developer with a decade of industry experience in the LAMP & MERN stacks, WordPress, WooCommerce, and JavaScript – (diverse portfolio). He has a passion for creating elegant and user-friendly solutions and thrives in collaborative environments. In his spare time, he enjoys exploring new tech trends, tinkering with new tools, and contributing to open-source projects. You can hire me here for your next project.
Similar Articles
- How to Add Content Before or After the_content & In Custom Post Types
- How to Change PayPal Icon On WooCommerce Checkout Page
- How to Create Custom Query Pagination In WordPress With an Example
- How to Add Text after Price in WooCommerce » Add Price Suffix
- How to Change Product Price Programmatically in WooCommerce
- How to Add Active Navigation Class Based on URL
- WooCommerce Redirect After Checkout: How to Automatically Redirect to a Custom Page After Checkout
- How to Register a Sidebar in WordPress Theme » Step by Step [ Header Widget Example ]
- How to Change Add to Cart Button Text On WooCommerce Shop Page
- How to Remove the Billing Details from WooCommerce Checkout
- How to Change In-Stock Text in WooCommerce
- How to Redirect a WordPress Page Without Plugins?
- How to Change Out Of Stock Text in WooCommerce
- How to Remove Has Been Added to Your Cart Message WooCommerce
- How to Change the WooCommerce ‘Added to Cart’ Notice
- How to Display Error Messages in WordPress: Debug WordPress Errors Quickly & Easily
- How to Set Featured Products In WooCommerce
- How to Add a Sidebar to WordPress » Ultimate Step-by-Step Guide
Comments are closed.