 Do you want to add an XML to your WordPress website? Then read on, as this post will share two simple ways of adding an XML sitemap in WordPress. In addition, we will discuss why you need an XML sitemap for your site.
The main aim of an XM sitemap is to help search engines navigate through your website easily. It gives search engines like Google the structure of your site in a machine-readable format. In addition, it tells search engines which links are more important in your website.
It is important to note that some websites have HTML sitemaps. However, the overall usage of sitemaps has evolved over the years. Today, they are published in an XML format.
It is worth mentioning that sitemaps will not boost your search engine rankings. They only help to allow search engines to crawl your website. This means that your content will show on search result pages.
How to Add Sitemap XML in WordPress
Let us look at how you can add one.
Summary Steps
- Why Do You Need an XML Sitemap?
- Creating an XML Sitemap in WordPress without a Plugin
- Creating an XML Sitemap in WordPress using Yoast SEO
Why Do You Need an XML Sitemap?
An XML sitemap is important for your site because they allow search engines to crawl your website. This is extremely important for SEO.
As mentioned earlier, adding a sitemap does not affect search rankings. However, the sitemap provides you a way to let search engines know about a page that is not indexed.
If you run a blog or a new website that does not have any backlinks, it is highly recommended that you add a sitemap. Popular search engines like Google and Bing allow you to submit a sitemap of a new website.
Let us look at the simple steps you need to follow:
Creating an XML Sitemap in WordPress without a Plugin
This is the easiest method to create an XML sitemap. However, it is basic and limited in terms of features. This is because you cannot easily control what to add or remove from your XML sitemaps.
It is worth mentioning that WordPress released a basic XML sitemap feature in WordPress 5.5. This means that the XML sitemap can be automatically created, even without installing a plugin.
All you need to do is simply add wp-sitemap.xml at the end of your domain name, and WordPress will show you the default XML sitemap.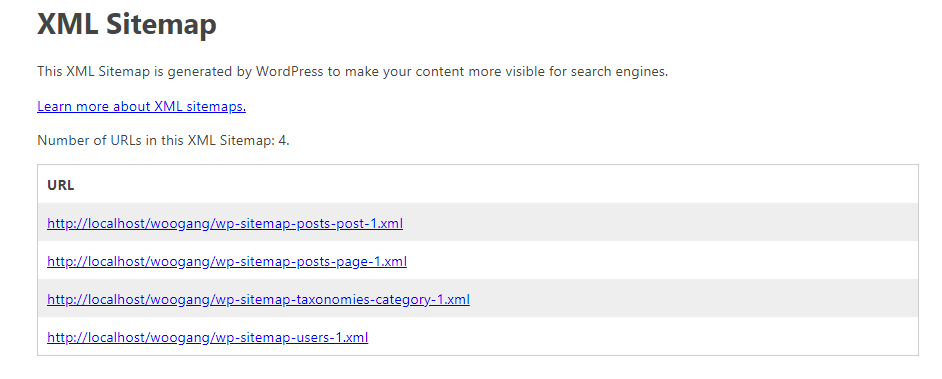
This feature was added to make sure that new WordPress websites do not miss out on the SEO benefits of having an XML sitemap.
If you want to control what to add or remove from your XML sitemaps, we recommend installing a plugin.
Creating an XML Sitemap in WordPress using Yoast SEO
Yoast SEO automatically adds turns on XML sitemaps for your website. However, you need to install and activate the plugin.
Once you have installed and activated the plugin, go to SEO > General page and switch to the ‘Features’ tab.
The next step is to scroll down to the ‘XML Sitemap’ option and turn it on.
Once you are done, click on the save changes button. You can verify that Yoast SEO has created an XML Sitemap by clicking the question mark icon shown in the screenshot below: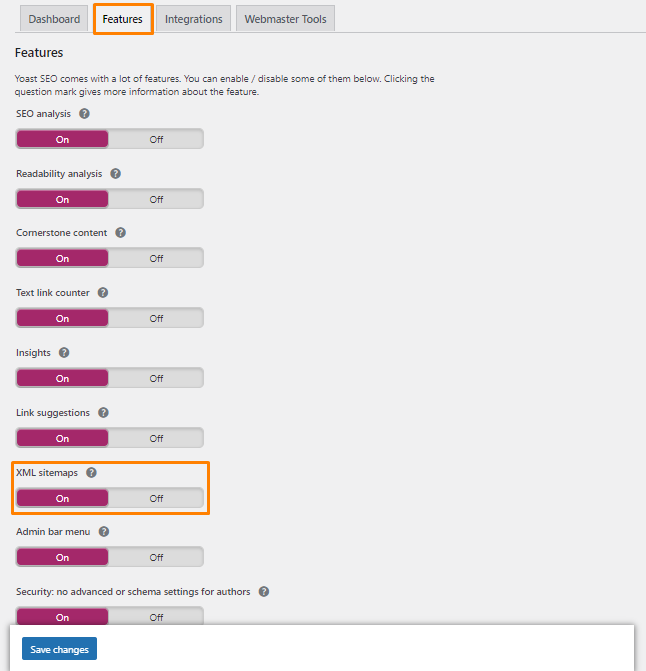
To view the sitemap generated, click on the ‘See the XML Sitemap’ link.
Alternatively, you can find your XML sitemap by simply adding sitemap_index.xml at the end of your website address.
Wrapping Up
In summary, we have shared how you can add a sitemap in WordPress. As mentioned earlier, the XML sitemap does not improve your search rankings. It helps the search engines find content on your site and display them in SERPs.
We hope that this post helped you to learn more about XML sitemaps.
Similar Articles
- How to Hide WooCommerce Product from Search Results
- How to Set WooCommerce Different Sidebar For Each Category
- How to Add Custom Background For WooCommerce
- How to Add WordPress Customizer Setting WooCommerce
- How to Use WooCommerce to Set Up Online Store
- How To Use Genesis Framework With WordPress
- 15 Best Website Builder ( Reviews & Comparison )
- How to Add Blog Posts to Pages in WordPress
- How to Create Popups in WordPress Without Installing a Plugin
- How To Add MailChimp Popup To WordPress
- How To Add Custom CSS To WordPress Page
- How to Fix Yoast SEO Title not Working – Fixing Duplicate Title Tags
- How to Hide Prices From Google In WooCommerce
- List of 30+ Overall Best WordPress SEO Plugins For Higher Ranking
- 30+ Best WordPress Schema Plugins for Better On-Page SEO
- How to Add WooCommerce Storefront Sitemap