Do you want to set up an online store today? Today, I will share a detailed guide that will help you to create an online store using WordPress and WooCommerce.
This is a step-by-step guide on how to use WooCommerce to set up an online store. It details step by step how to set up WooCommerce, how to install WooCommerce, and answered the question – how does WooCommerce work?
Building an online store can be very hard, especially when you do not have any technical experience.
However, I have helped many hundreds of users start their online stores. This is why I decided to create the most comprehensive guide to help beginners.
It is important to note that you can expand your existing brick-and-mortar store by creating an online store. This will help you to increase your current business income.
A recent study by Optinmonster indicated that more than two-thirds of the world’s population shop online.
This number will continue to grow in the future. WordPress powers more than 40% of websites online, and most of them are eCommerce stores.
How to Use WooCommerce | How to Set Up WooCommerce
WordPress was initially created as a blogging platform. However, you can install WooCommerce to transform any WordPress site into an eCommerce site. WooCommerce integrates seamlessly with WordPress to offer you all the features, capabilities, payment methods, and many more.
By the end of this step-by-step guide, you will be able to build your online store with WordPress. As you will quickly find out, building an eCommerce store on WordPress and WooCommerce is not complicated.
Requirements of Setting up an Online Store
As mentioned earlier, many people shop online today. This means that it is an excellent time to start an online business.
If you have a computer and some internet connection, you will be able to get started within a matter of minutes. As you will quickly find out, you do not need any special skills to achieve this.
Here are the main things you need to consider before you start:
- Domain name – This is a website name that visitor type into their browser to access your online store. It would be best if you keep your domain name as close to your brand name. It should be short and memorable.
- Web Hosting – It is where your website is stored on the internet. The best hosting will make your online store accessible to the world with 99% uptime. This is why you need to choose the best web host that will accommodate your store.
- Time – You will need some undivided attention to set up your online store.
If you are a fast learner, you can be able to build one within 30 minutes. But, first. First, let us check the benefits of setting up a store.
Benefits of Setting up an Online Store
There are many advantages of setting up an online store today. Here are some of them:
- If you create an online store using WooCommerce, you will get total control over what you sell. This means that you can create custom selling scenarios like offering services. You can also accept secure payments for the services or products.
- WordPress and WooCommerce are very flexible for customization. You are allowed to modify the code to fit your requirements. You can also extend the core functionality using themes, plugins, or extensions.
- It will help you avoid paying the commission charged by marketplaces for every transaction made. However, it is important to note that PayPal charges a very small transaction fee, but you have free alternative payment methods. They are check payments, bank transfers, and cash on delivery.
- It will help you to expand your existing brick-and-mortar store to gain more revenue. It is worth mentioning that your loyal customers will contribute to the largest chunk of your income because of repeat purchases.
- It helps you to avoid price wars in marketplaces. It is worth mentioning that marketplaces have sellers who are promoting similar products. To attract customers, most of them cut down their prices. You can avoid this by creating your own store.
- You can be able to collect customer data to make data-driven decisions. You can also collect emails, which are crucial for marketing campaigns.
Pick A Niche
Before we start, you need to decide what to sell in your store. Landing the best online store idea will depend on your experience, preferences, and knowledge about a niche.
We recommend getting into an area you are already knowledgeable about to make it easy for you. You should start with your interests and passions. This will put you a step ahead of your competition.
Once you have identified your niche, you need to do some research. You can use many quality online tools for researching your niche ideas like Google Trends, Google Shopping Insights, Keyword Planner, or KWFinder. They will give you a list of suggestions related to other businesses that already exist on the market today.
Businesses that exist should be considered as opportunities to learn about products and the techniques they use. Analyzing these techniques will help you build your store accordingly.
Now that you know the benefits and have selected your niche, let us look at the steps you need to follow to set up your online store.
Step 1: Setting Up the Online Store Platform
An online store platform allows your business to sell products and services online. It will help you manage sales, marketing, and other important tasks.
It is worth mentioning that the cost of setting up an eCommerce store will depend on the infrastructure, design, and functionality. Infrastructure is things like servers, e-commerce software, and other tools.
It is important to choose the right platform when creating your online store. However, there are many platforms to choose from, and this might overwhelm you. We have already figured out this for you, but we recommend using WordPress + WooCommerce, or Shopify.
Shopify is a hassle-free eCommerce solution that allows you to sell services or products online. However, it is a premium solution, and the pricing starts at $29 / month, which might be a little expensive. You also have limited payment options unless you pay additional fees (2.9% + 30 cents per transaction).
If you have a high budget, you can upgrade to the Shopify plan for $79 or the Advanced Shopify plan for $299 per month.
This is why WordPress and WooCommerce is a popular choices because the payment processing fees will be steep if you have many users.
WooCommerce is an open-source eCommerce plugin that allows you to leverage the most powerful content management system (CMS) to create an online store. This is the platform we will be using for this guide.
As mentioned earlier, you must have a domain name, web hosting, and an SSL certificate. A domain name will set you back $14.99 / year, web hosting $7.99 / month, and an SSL certificate around $69.99 / year.
For a startup business, this is very expensive. However, Bluehost provides seamless integration with auto-installation software. This makes it very easy for beginners and is very cheap.
To purchase a domain + hosting + SSL, open Bluehost and click on the Start Your Store button.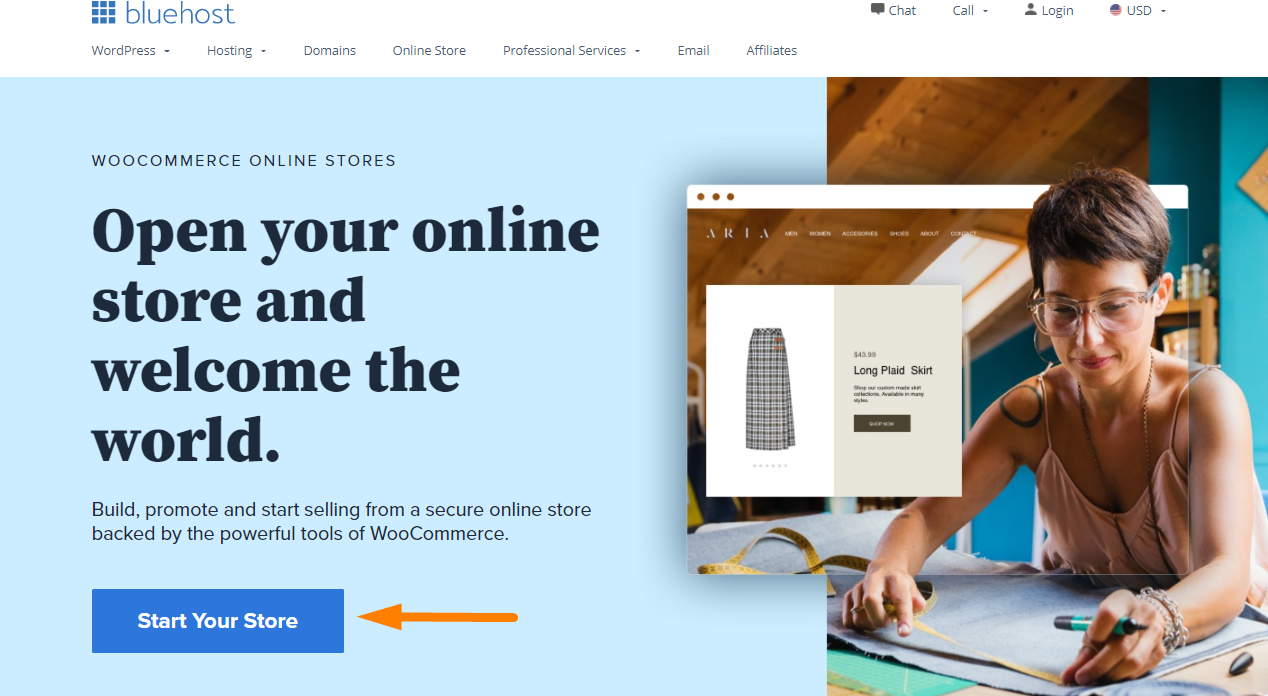
On the next screen, you are required to select the plan you need. After that, you need to enter the domain name for your website. You can also create a new domain.
The last step is to finalize your purchase by entering your account information. They will include optional extras in the package information, but they are not necessary. It is up to you to decide whether you need them or not.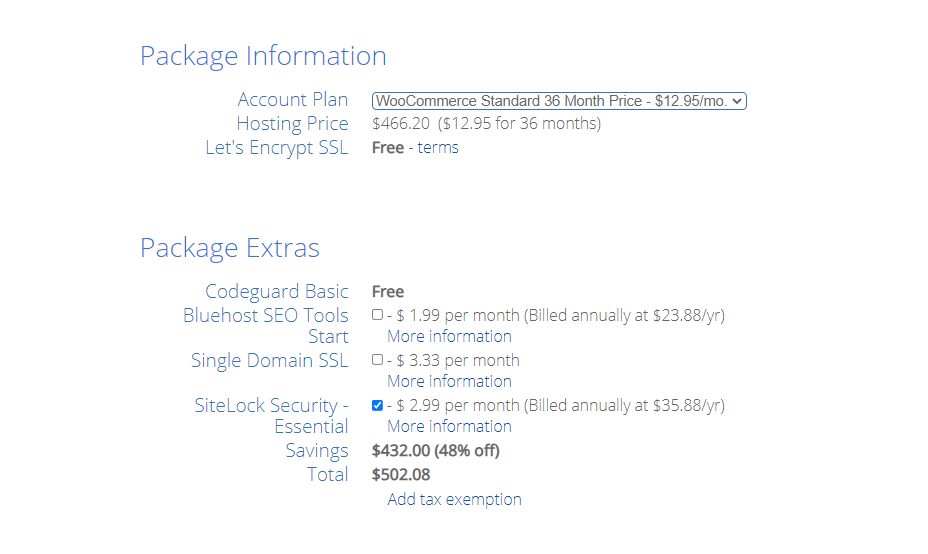
Once you have completed adding your information, click on submit. The web hosting company will send the control panel details via email. A control panel is a useful tool for managing everything about your site.
Once you log in, you will see a popup informing you that WordPress with WooCommerce has been pre-installed. The first thing you will see is a ‘Log in to your site’ button. If you click on it, you will be redirected to your WordPress site’s dashboard.
You have not successfully finished setting up the hosting and domain name. Bluehost includes free SSL. This means that you do not have to purchase it separately.
The next step is to set up WordPress.
Step 2: Setting Up WordPress
After you log in to WordPress, you will see a welcome message. The message will ask you if you want to set up a business or personal website.
Next, click on the ‘I don’t need help’ link to close the setup wizard and open the WordPress admin dashboard. Do not worry because I will walk you through the steps you need to follow.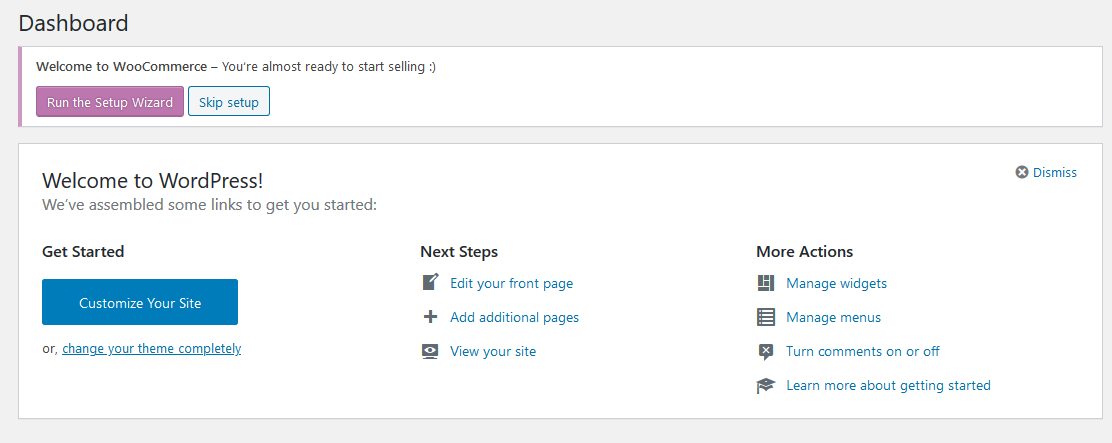
Navigate to Settings > General to set up your WordPress site title and description.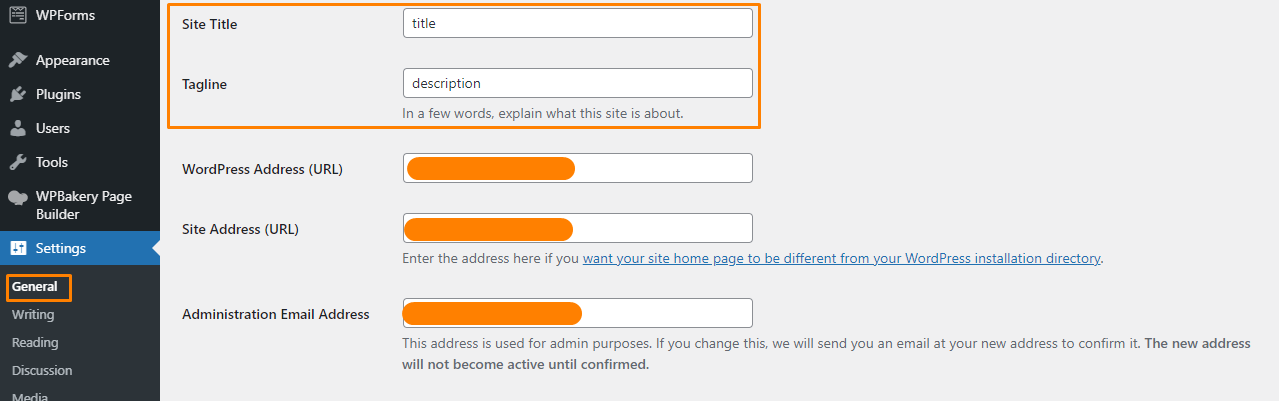
The next step would be to set up HTTPS to Use SSL. As mentioned earlier, Bluehost offers free SSL. It is important to note that the SSL certificate is pre-installed for your domain name.
On the Settings > General page, you need to change your WordPress Address and Site Address to use HTTPS instead of HTTP.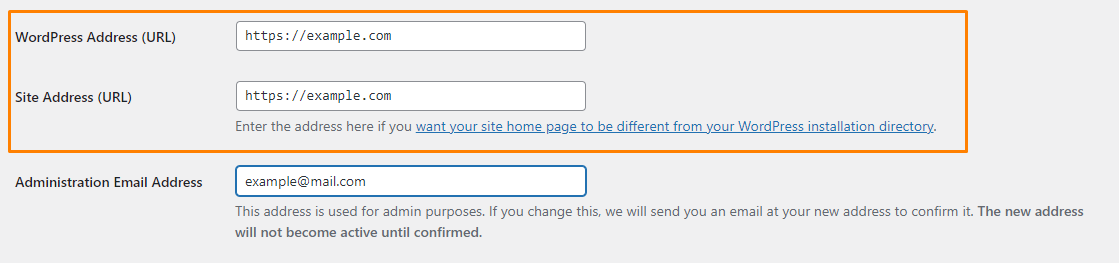
Remember to scroll down to the bottom and click on the save changes. Now, your basic WordPress setup is complete.
Step 3: Setting up Your WooCommerce Store
The next step is to set up payments, currency, and shipping information. This will allow you to start selling products.
Let’s go through these steps together.
On the dashboard page, click on the ‘Run setup wizard‘ button in the ‘Welcome to WooCommerce’ notification.
This will launch the WooCommerce setup wizard. Let the installation wizard be your guide.
Click on the ‘Yes Please’ button to get started. This will take you to the next step, where you need to enter the store details.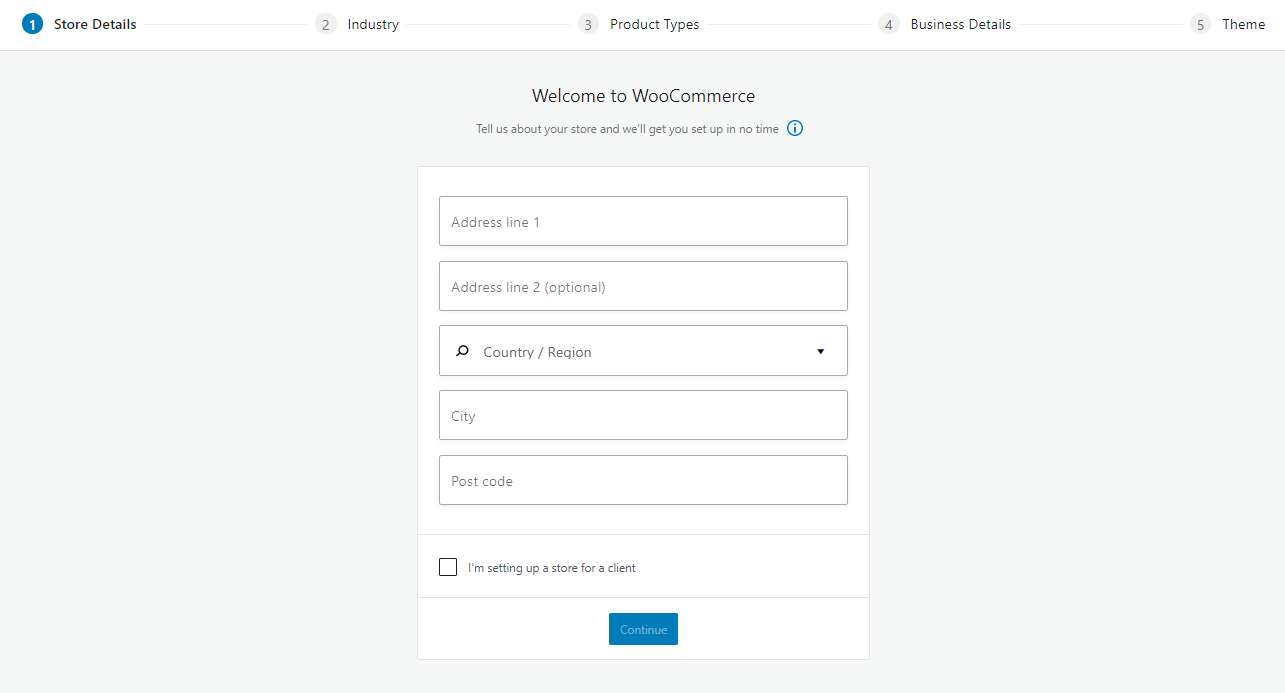
Once you are done, click the ‘Continue’ button.
After that, you have to pick out the industry in which your store will operate. Again, you are provided with several options to choose from.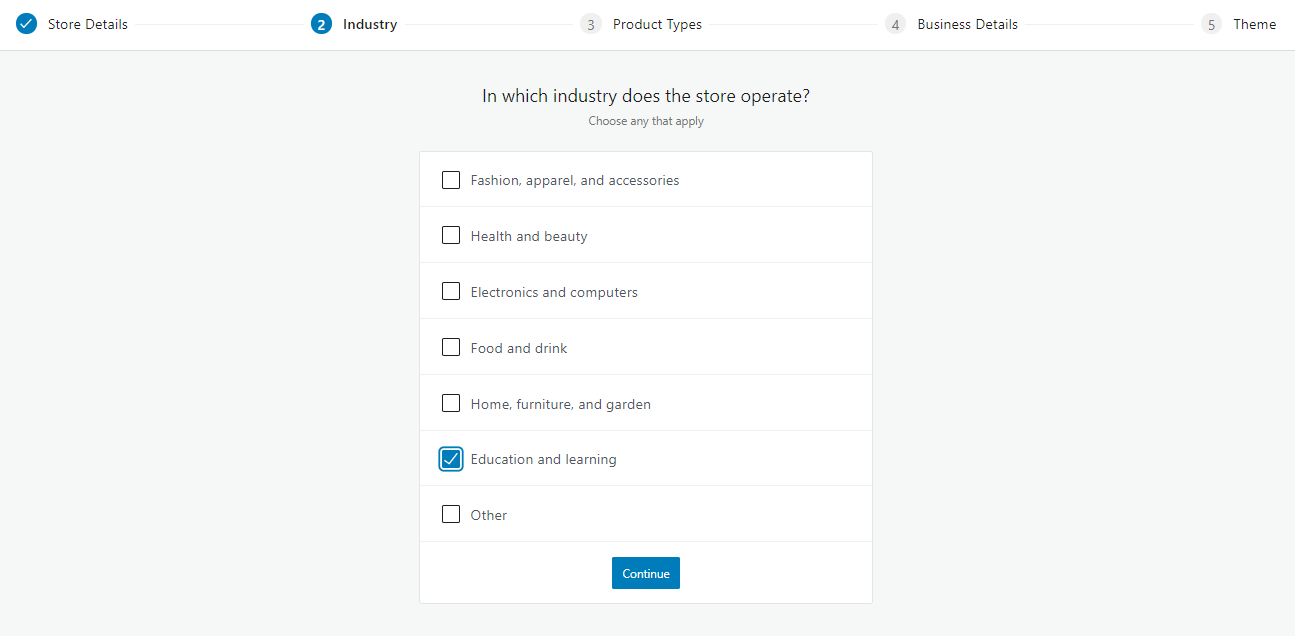
Once you are done, click the ‘Continue’ button.
The next step is to choose what kind of products you are going to sell. You are also provided with several options, as shown below: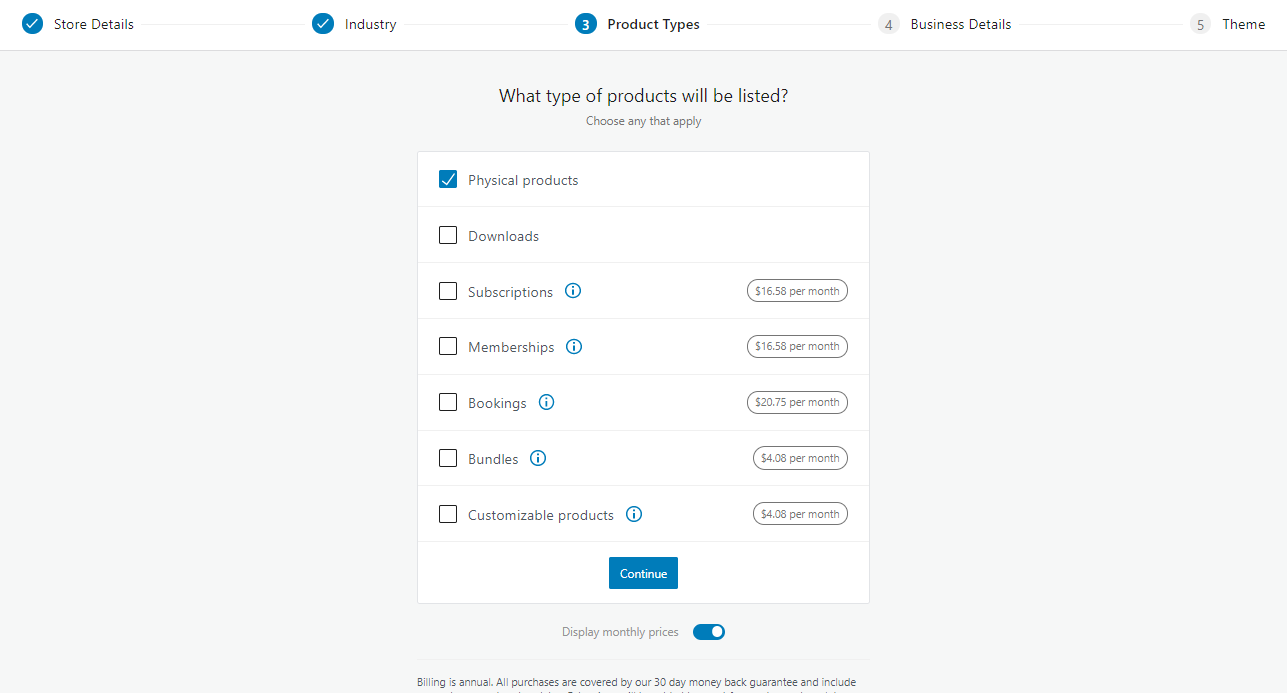
Click the ‘Continue’ button once you are done.
After that, you need to provide some business details. You are required to select the number of products you want to sell and if you are selling elsewhere.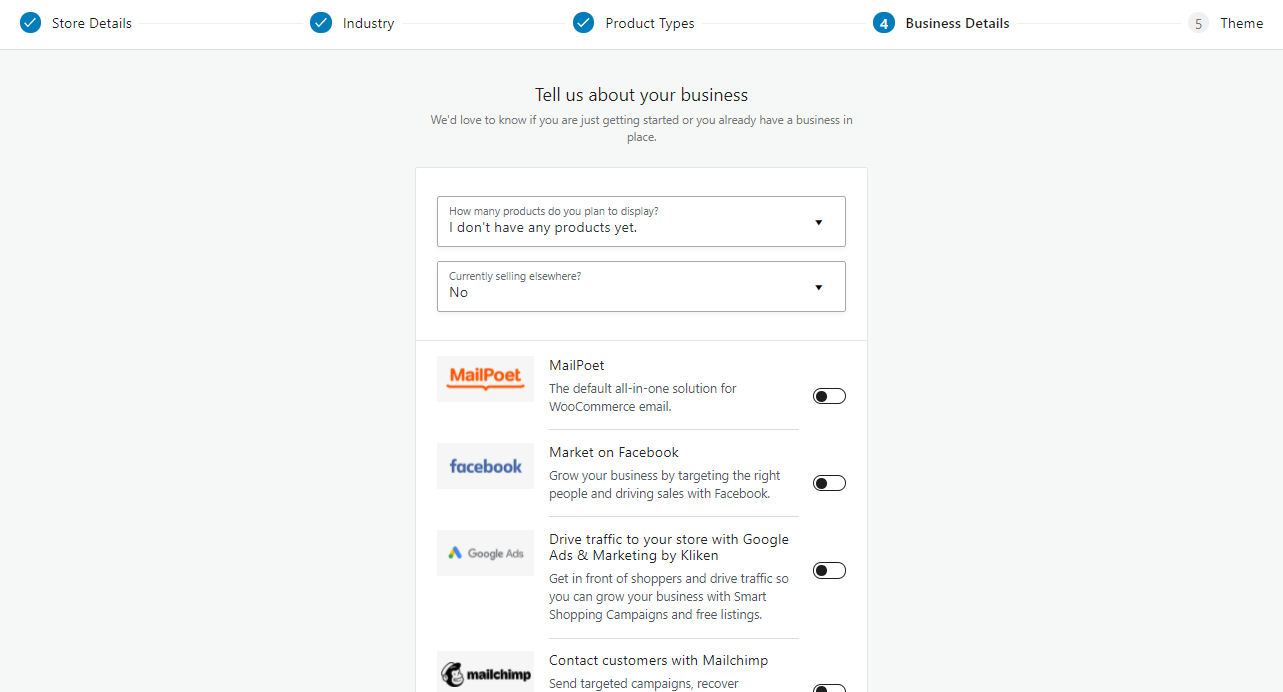
You are also provided with some free extensions offered by WooCommerce. These extensions are beneficial. They will help you drive traffic to your store.
Once you have picked the ones you want, click on the ‘Continue’ button.
The last step in the wizard is to select a WordPress theme. However, we recommend using a WooCommerce-optimized theme. This is because they come with pre-set styles that will make it easier to integrate seamlessly with your site.
Alternatively, there are many free and paid themes you can use
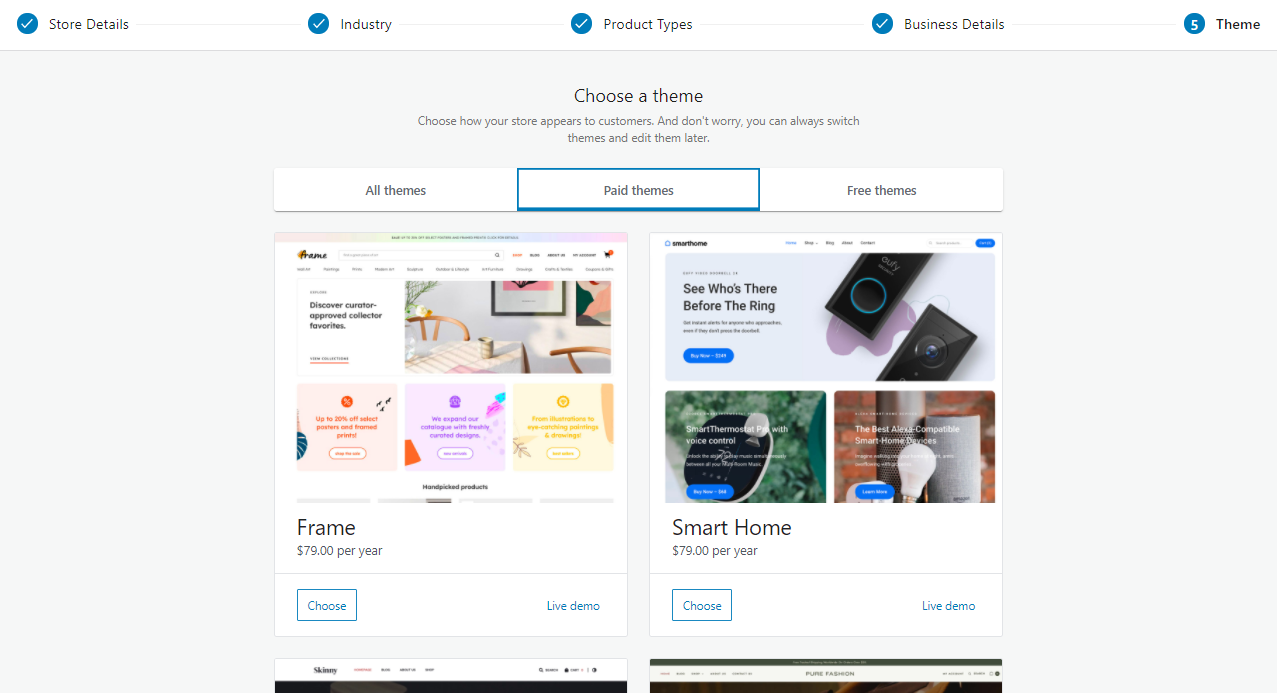
You can also stick with your current theme if it is WooCommerce-optimized. For example, you need to choose a food theme because it will control how your WordPress site will look.
Once you are done with the setup, you can enhance your store by installing Jetpack and WooCommerce Shipping & Tax.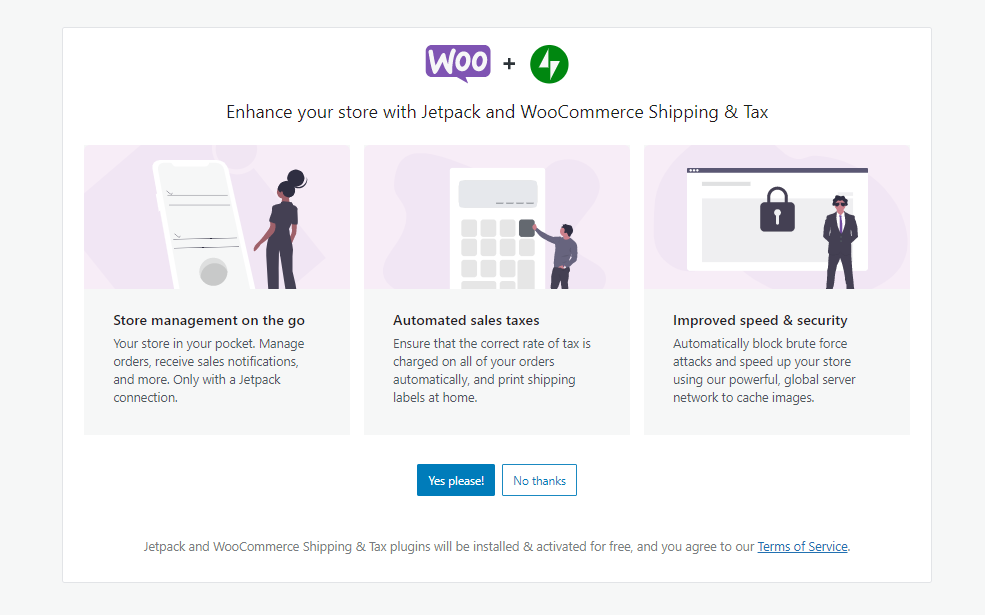
You will be redirected to the WooCommerce dashboard after the plugins have been installed.
The first thing you need to do is choose a payment method for your online store by clicking on ‘Choose payment methods: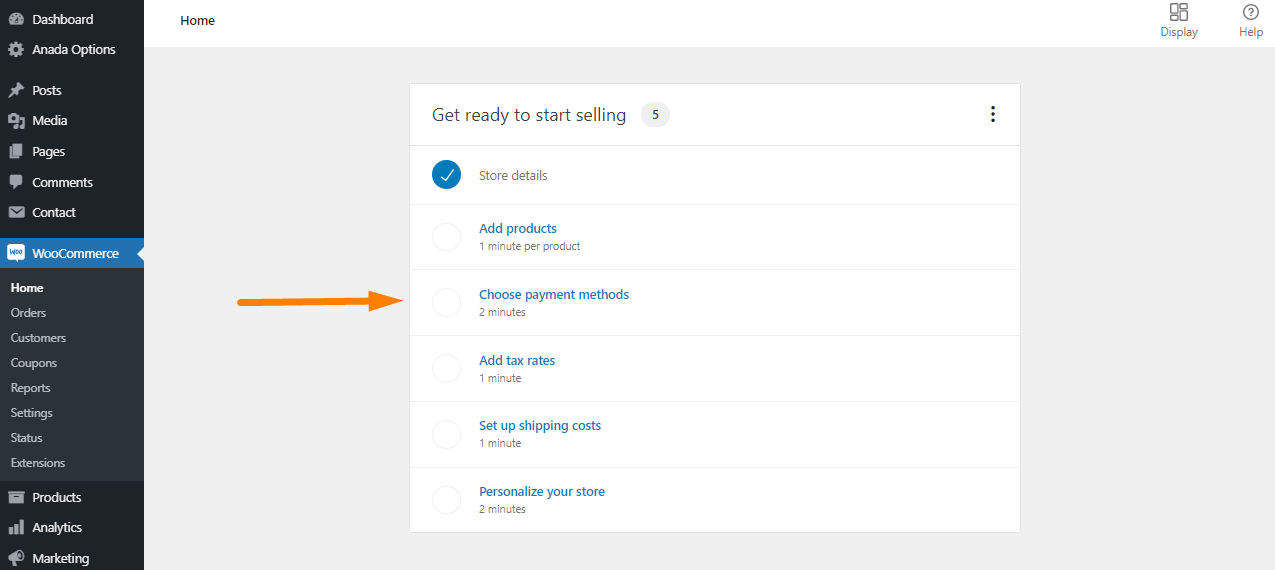
By default, WooCommerce allows you to accept PayPal payments, cash on delivery, and direct bank transfers.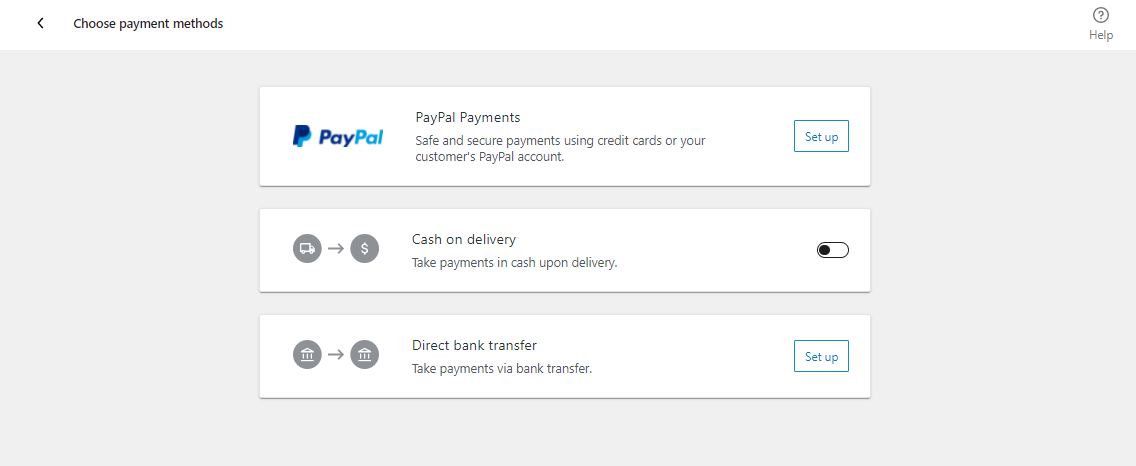
However, it is important to note that there are other payment methods available for WooCommerce. You can install them via third-party plugins like Stripe.
It is worth mentioning that Stripe allows your customers to enter their credit card details without leaving the checkout page on your site.
It is very easy to set up. All you need to do is follow the setup wizard on the WooCommerce screen.
The next step is to enter the shipping and tax information. WooCommerce allows you to sell both digital downloads and physical goods. They require shipping.
If you add taxes, WooCommerce will help you calculate and add taxes to your prices.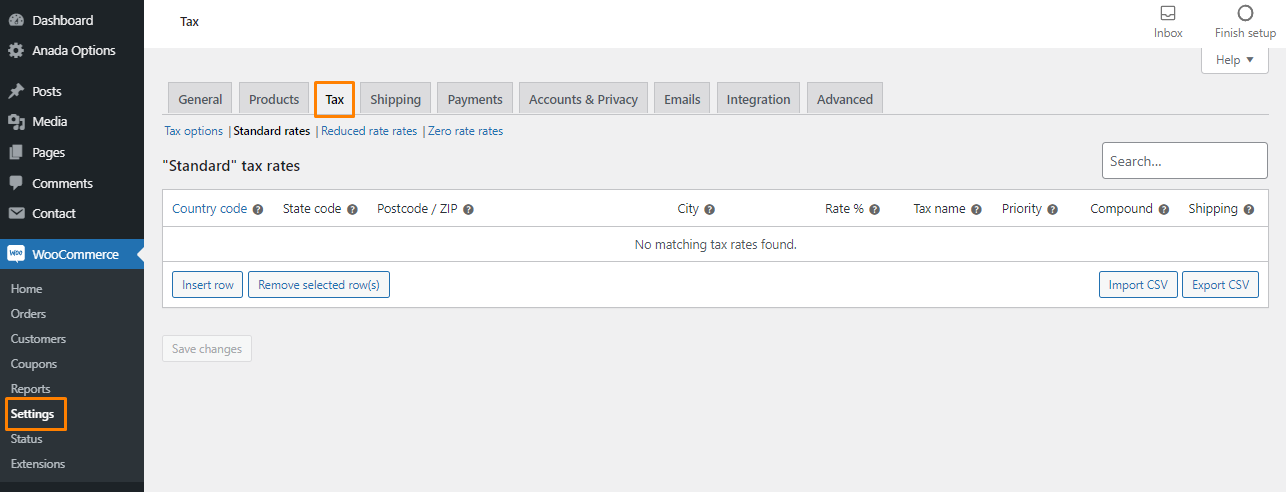
Now, WooCommerce is all setup, and all you need to do is add products.
Step 4: Adding Products to WooCommerce
It is very easy to add products to your online store. All you need to do is click on Products > Add new. This is where you will configure everything about the product.
The first thing you need to do is enter the product’s name in the title section. Then you need to add a long description. It should explain the features and benefits of the product to the customer.
It would be best if you made sure that the points are clear. If you do not know how to write a good description, you can look for a template to use.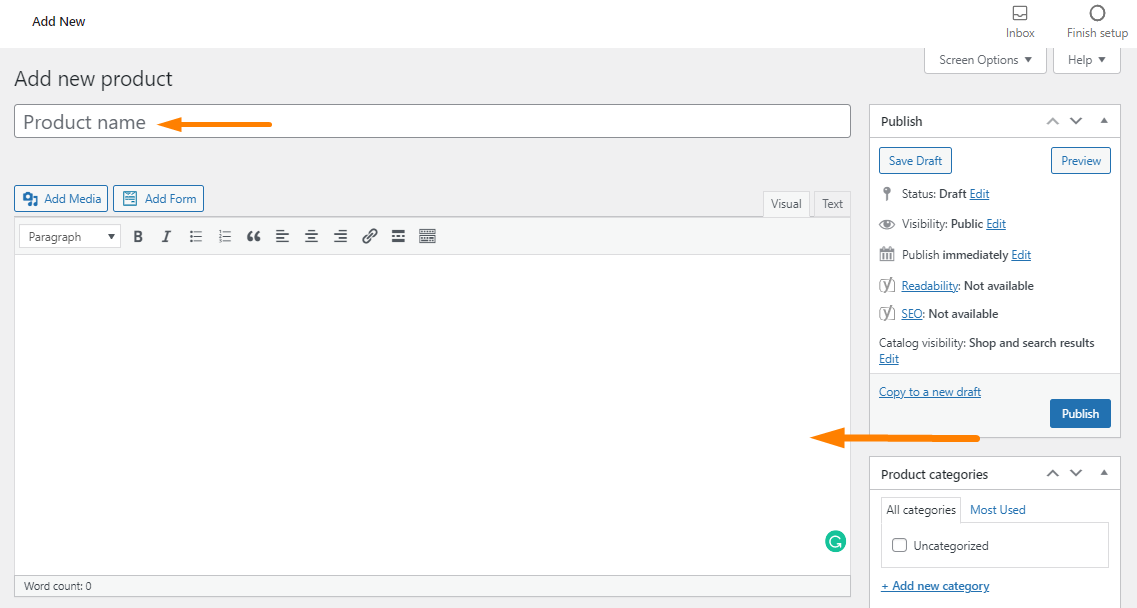
You can take it a step further and add organic keywords in your description to attract free traffic to your store. This will increase the revenue you collect.
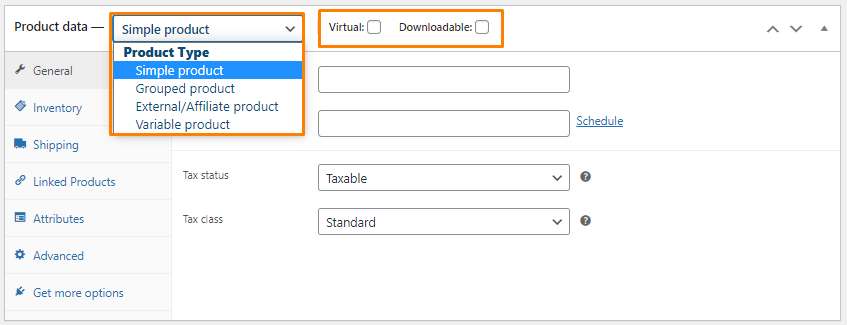
When you scroll down, you will notice that there is a Product Databox. Here, you need to choose the product type. Here are the different product types supported by WooCommerce:
- Simple product – This is the default product type. The products that are not grouped or have variations
- Grouped products – They are combined with simple products and are often purchased together as one.
- External or Affiliate product – If you want to run an affiliate or drop shipping option, you should use this product type. You will be allowed to add an external page link to the Add to Cart.
- Variable Product – If you want to sell products with multiple variations like sizes and colors, you should use this option.
You are also provided with two more options to modify the product types:
- Virtual – This option is for selling a digital product. They do not require any shipping.
- Downloadable – This option is for products with a downloadable file.
 After adding the product types and modifying them, you need to provide related information like pricing, inventory, shipping, linked products, and attributes. The product data box is very easy to fill.
You can also provide a short description below the product data box. This will be helpful to users when they are viewing multiple products on a single product page. However, we recommend making it very short, as it will improve your store’s SEO.
Lastly, you need to add some relevant information using the options in the right-hand column. For example, you can add product categories, product tags, product images, and product galleries.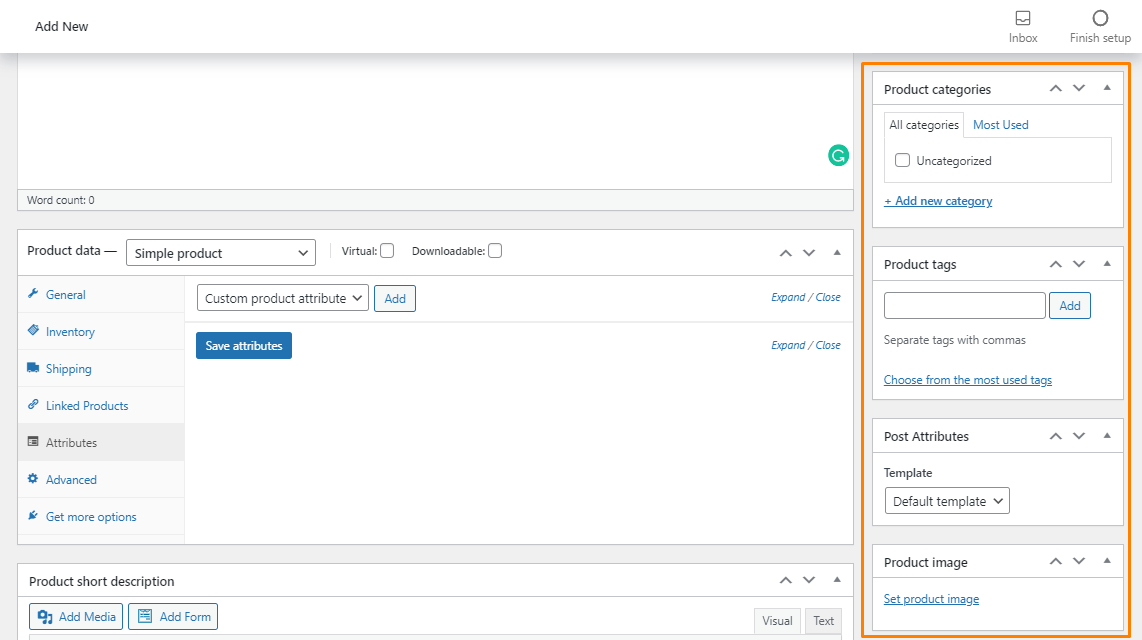
Product categories and tags are very useful for organizing products. You should also add images with a high resolution.
Once you are satisfied with all the details you have added, click on Publish. The product will be displayed on the shop page, and customers will be able to buy it.
Repeat the same process when adding new products.
Step 6: Extending the Functionality of Your Store Using Plugins
Now that you can sell products online, you might want to add other usual elements like gallery sliders, custom redirects, or contact forms. You can achieve this by using plugins.
Plugins allow you to add new features to your site. There are thousands of plugins available for WordPress on the market today.
The first thing you need to optimize is the WooCommerce checkout. The best plugin for this is the WooCommerce Redirect After Checkout (WRAC) plugin.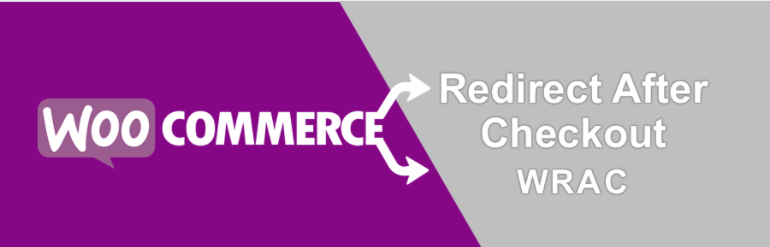
WRAC lets you redirect users to a custom thank you page after checkout. This will help to improve the customer experience in your WooCommerce store.
It is specifically designed for beginners who are not developers or programmers. This means that you do not need any technical assistance to use this plugin.
Alternatively, you can redirect them to an external URL and display order details on the thank you page by switching a button. You can also allow users to create the same redirects based on the product instead of the global redirect.
For failed orders, you can also add a custom redirect page or external URL.
It is worth mentioning that WRAC integrates seamlessly with WooCommerce and is very easy to set up. Additionally, WRAC will save time because it offers you the flexibility for customizing WooCommerce checkout.
Here is a summary of what the plugin has to offer:
- Redirects based on Categories
- Redirect based on Purchase History
- Redirect based on Order Subtotal
- Redirect based on Payment Method
- Redirect based on User Role
- Redirect based on Coupon
- Redirect based on the Shipping Method
- Redirect Actions & Time Option
The license for this plugin starts at $49, and you can check out the demo, and you can learn more about this plugin here.
Alongside WRAC, Here are some of the other plugins we recommend for online stores:
- Yoast for SEO – This is a handy plugin that will help you improve your search engine rankings. It is the best chance of securing a spot on page one. This is because it offers you the option to make small changes on your site to help search engines understand your content better to display them on search engine results. Alternatively, you can upgrade to the premium version that will offer you more features like custom redirects.
- Securi – It is important to add a security plugin for your site. This is because online stores deal with card payments and sensitive customer data. You can use a free plugin, but premium plugins will offer you the best features. The pricing starts at $199 per year.
- Site Reviews – This plugin allows visitors to submit reviews for products. It is very easy to use and allows you to use shortcodes and widgets to display the best reviews. It integrates seamlessly with WooCommerce and has many add-ons for adding forms, custom filters, and image reviews.
Conclusion
By now, you should be able to create an online store and extend the core functionality using a plugin.
As you have seen, you do not need coding skills to achieve this. All you need is a domain name and web hosting. It would be best if you used Bluehost because it offers you an SSL Certificate for free.
WooCommerce makes it easy to create and manage payments, products, and deliveries. I hope that this tutorial helped you to learn how to build an online store.
Similar Articles
- How to Migrate from Shopify to WooCommerce
- How To Set Up Shipping Classes in WooCommerce
- How to Hide Out-of-Stock Products in WooCommerce
- How To Edit WooCommerce Checkout Page
- How to Create One Product WooCommerce Storefront Store
- How to Set Up WooCommerce Terms and Conditions Checkout
- How to Set WooCommerce Different Sidebar For Each Category
- How to Add Amazon Affiliate Products to WooCommerce
- How to Speed Up WooCommerce Website
- How to Add Custom Background For WooCommerce
- What is the Best Payment Gateway for WooCommerce
- How to Add Star Rating To WooCommerce Product
- How Many Products Can WooCommerce Handle?
- How to Add WooCommerce Shopping Cart Icon, In Menu
- How to Connect Printful To WooCommerce
- How to Backup WooCommerce Database
- How to Add CAPTCHA WooCommerce Login
- How to Add Subcategories WooCommerce
- How to Add Custom Product Fields WooCommerce
- How to Add Extra Options With Custom Price WooCommerce