 Are you looking for a way to add PayPal Express Checkout to your WooCommerce store? In this post I want to show you how to add PayPal Express checkout to WooCommerce step by step.
PayPal is one of the most widely accepted forms of payment in many online stores. This mode of payment is available in many countries, making it one of the best payment options you should have in your store.
This means that there will be a better chance for conversion. This is because there is a better chance for your customers to purchase. After all, most of them already have an existing PayPal account.
It is important to include PayPal Express Checkout in your store, as it simplifies the checkout process. This is because shoppers do not need to enter billing and shipping addresses. They do not need to enter any transactional details.
It is also free to set up PayPal express. You only need to pay a small amount as you start receiving orders and accept payments.
How to Add PayPal Express Checkout to WooCommerce
In this brief tutorial, we will show you how you can integrate PayPal Express Checkout into your store. We will be using the free plugin offered by WooCommerce to do this. It populates customer’s PayPal account information in the checkout fields.
This in turn helps in a faster and hassle-free checkout.
Let us get right into it.
Steps to Add PayPal Express Checkout to WooCommerce
In this section, we will show you how you can download PayPal Express Checkout by WooCommerce. It seamlessly integrates with your store to accept payments from customers’ PayPal account as well as major credit and debit cards.
It has more than 800,000 installations, and it is the most reviewed in the WordPress repository.
As you will quickly find out, it is a simple and straightforward setup and configuration. Here are the simple steps you need to follow:
- Log into your WordPress site and access the Dashboard as the admin user.
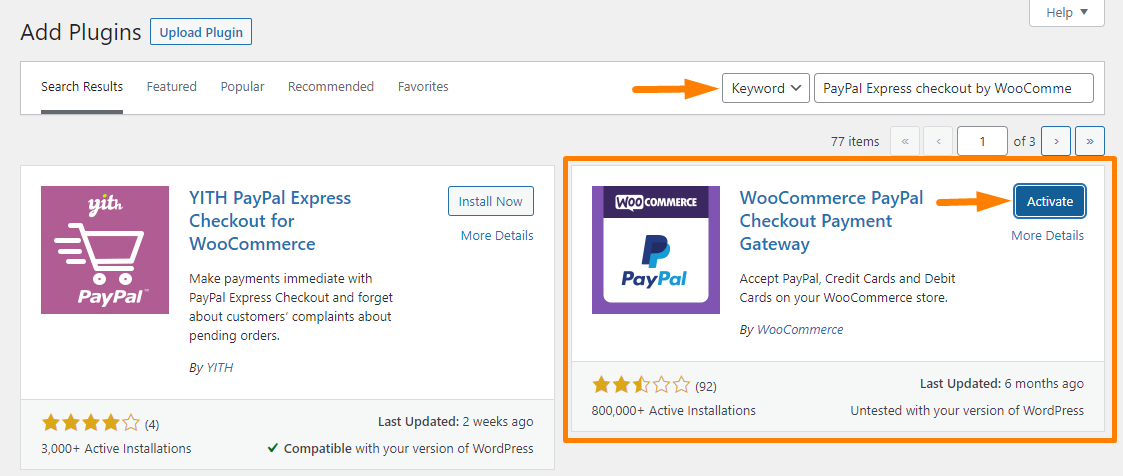
- To download it directly in the Admin Panel, simply navigate to Plugins > Add New. After that, you will need to do a keyword search for the plugin ‘PayPal Express Checkout by WooCommerce’. You need to install and activate it as shown below:
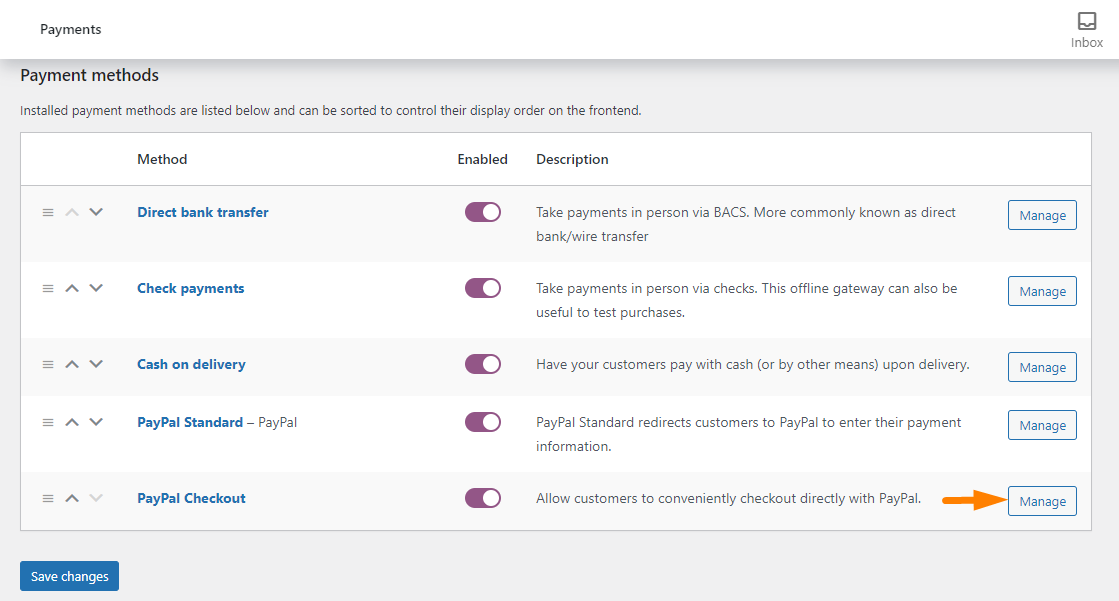
- Once the plugin is installed, it is time to configure the settings by heading over to WooCommerce > Settings > Payments.
- Click on Manage on the PayPal Checkout option:
- This will open the PayPal Checkout settings page, where you can configure several aspects of your checkout here. The aspects include brand name, logo, checkout button size, page style, etc. You can check out the documentation here. You can:
- Enable PayPal Express Checkout
- Set the testing environment with PayPal Sandbox credentials
- Enable PayPal Mark
- Paste in your Live API username
- Paste in your Live API password
- Paste in your Live API Signature
- Select either Sale or Authorize
- Review additional options
- Once all the fields are configured according to your requirements, click on the Save Changes
Conclusion
In this tutorial, you have learned how to install and set up PayPal Express Checkout in your WooCommerce store. It is important to add the Sandbox or Live account details for this to work.
If you do not have an account, we recommend opening a business account.
This payment option will enable payment without leaving your website for a variety of devices used by customers. It will also improve the customer experience and conversion rate.
Similar Articles
- WooCommerce Redirect After Checkout : Redirect to Custom Thank You Page
- 100+ Tips, Tricks & Snippets Ultimate WooCommerce Hide Guide
- How to Set Up WooCommerce Buy One Get One
- How to Select All Except Last Child In CSS » CSS Not Last Child Example
- How to Change Email Template in WooCommerce
- How to Change Shipping Label WooCommerce
- How to Change Coupon Code Placeholder WooCommerce
- How to Add View Cart Button In WooCommerce
- How to Export Products In WooCommerce
- How to Duplicate a Product in WooCommerce
- How to Import Products WooCommerce
- How to Change Shop Page Title In WooCommerce
- How to Disable Downloadable Products WooCommerce
- How to Add Google Analytics to WooCommerce
- How to Set Up WooCommerce Upload File on Checkout
- How to Add Local Pickup to WooCommerce
- How to Create WooCommerce Custom Shop Page
- How to Translate WooCommerce Checkout Page