 WooCommerce and the Storefront theme integrate seamlessly to offer you an online shop that you can use to sell products to customers. However, how can you add products in your WooCommerce store? Nevertheless, it is very easy to add products and even if you have not used WordPress before, this post focuses on helping you.
In this post, I will give you a step-by-step guide on how to add your first WooCommerce product and properly configure every little product detail.
WooCommerce Storefront Add Product
Installing WooCommerce is a breeze ad once you have gone through the WooCommerce setup wizard, you are ready to add products in WooCommerce to start selling to your customers.
Here are the simple steps that you need to follow:
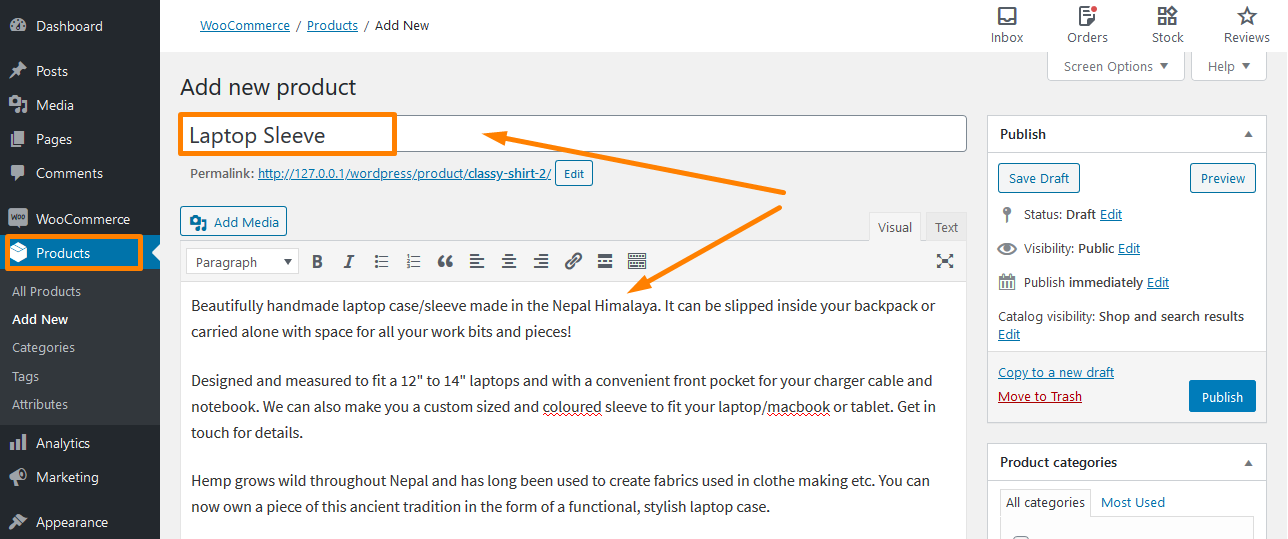
Log into your WordPress site and access the Dashboard as the admin user. From the Dashboard menu, click on Products > Add new. After that, the WordPress editor that you are familiar with launches but with some new additions. You now need to configure everything concerning the product.
1. Add the product title and description
You need to enter the name in the title section. After that, you need to add a long description to explain the advantages of a product. Additionally, you can use bullet points or numbers to improve the readability of this section. If you are not sure what to write, you can look for a product description template.
Moreover, when writing the title and description you can go a step further, by using organic keywords. This will optimize your site and this can be a lead generation magnet. However, if you want to use semantic keywords on the product page, add it in the long description.
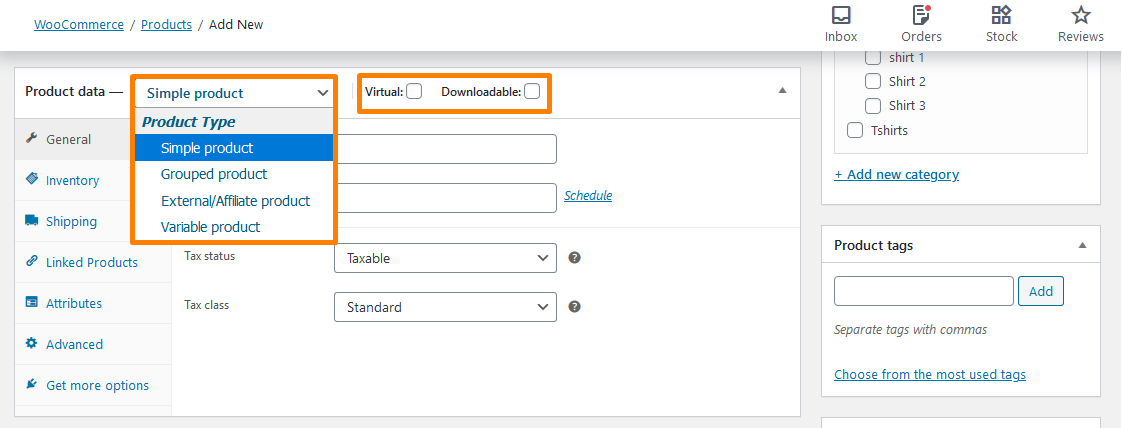
2. Choose the Product Type
This depends on what you are selling. By default, WooCommerce allows you to use different product types, which you can choose from. It offers you four core product types, which include:
- Simple product. This is the default and it is common in most WooCommerce stores. For instance, one-size-fits dresses can be considered as a simple product.
- Grouped product. It is a product, which comes as a set or in simple terms combined simple products.
- External/Affiliate product. This option is for those who are running an affiliate store, or you have a drop shipping online store. They can use this option to link the “Add to Cart” button to an external page.
- Variable Product. If your store deals with products that offer multiple variations like colors and sizes, you can use this option. For example, you can allow your customers to choose between Small, Medium, or Large.
Additionally, you get two additional options to modify the four core product types:
- If you are selling an online digital product that does not require a shipment, then this option will provide an ultimate solution for you.
- If the downloadable file is associated with the product, you can enable this option.
It is very easy to add the product data using the dropdown and checkboxes in the Product data box. It appears just below the WordPress editor where you added the product description as shown in the screenshot below:
However, for this brief tutorial, I will use a simple product. Nevertheless, the process is generally the same for other product types with a few additional options.
3. Fill out the product data meta box
After selecting the product type, you need to fill the rest of the details in the Product data box. You can use the tabs on the left to navigate between different sections when adding the details.
General tab
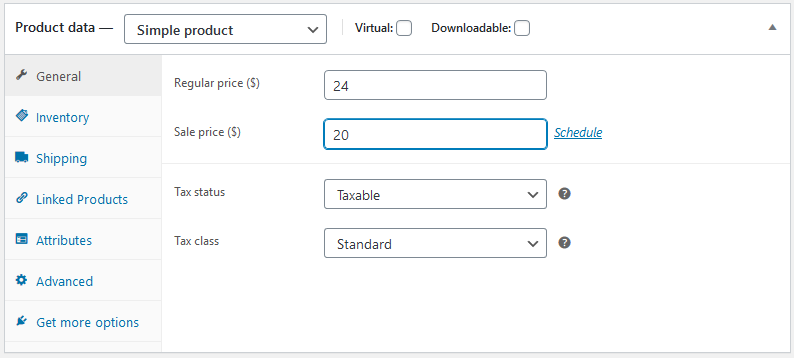 Here, you should enter the price for regular and sale. The sale price can be used when you are running a discount campaign. Shoppers will always see the regular price. Moreover, you can add the Tax Status and if the product is taxable, then select the tax class.
Inventory tab
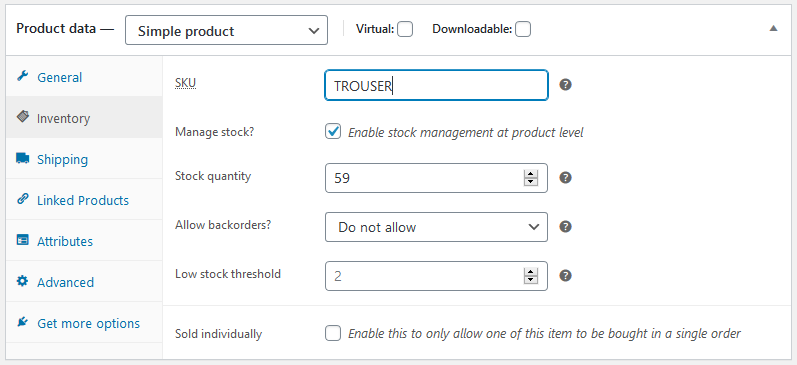 This tab helps you to effectively manage stock. Moreover, the SKU, stock status, and other options are there. You can enable the tock management option by going to WooCommerce > Settings > Products > Inventory.
Additionally, you can use the WooCommerce Product SKU Generator plugin to generate automatic SKU or you can assign them manually. This is used to keep the products distinctive and simplifies inventory management.
Moreover, you can check the option saying “stock management on product level” the WooCommerce stock management system will automatically show the product. Here to can:
- Enter the stock quantity, which will auto-update.
- Allow back orders if the product will be available soon.
- Add the stock threshold, which will notify you when the product’s stock goes below the threshold.
Shipping tab
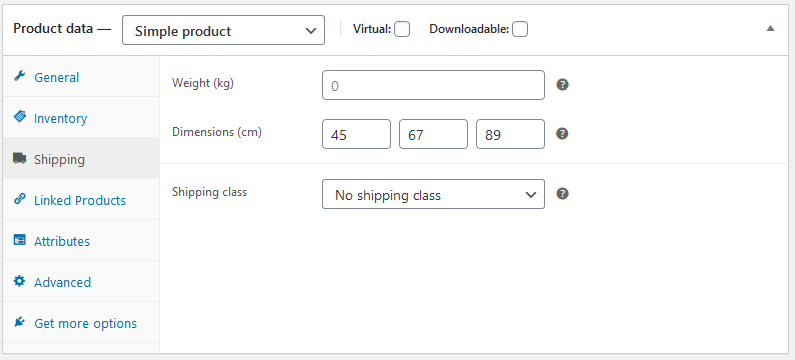 In this tab, you can control the important details about a physical product for shipping. You can enter the weight and the dimensions of the product. Moreover, there is an option called the shipping class where products are grouped based on weight limits.
Linked products tab
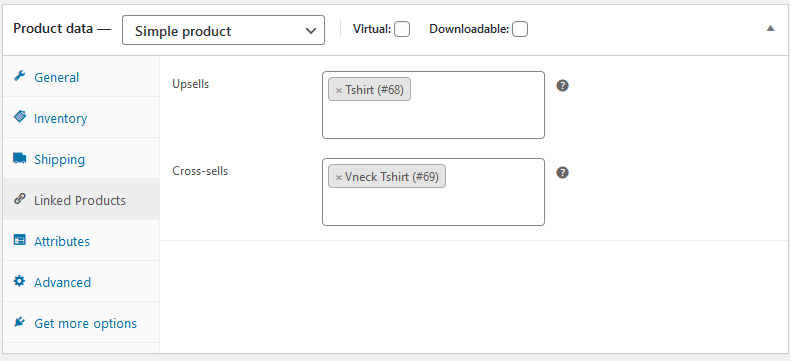 Linked products help you to improve the revenue of your store through upsells and cross-sells. A cross-sell is when you link similar products on the product page that your customers might like.
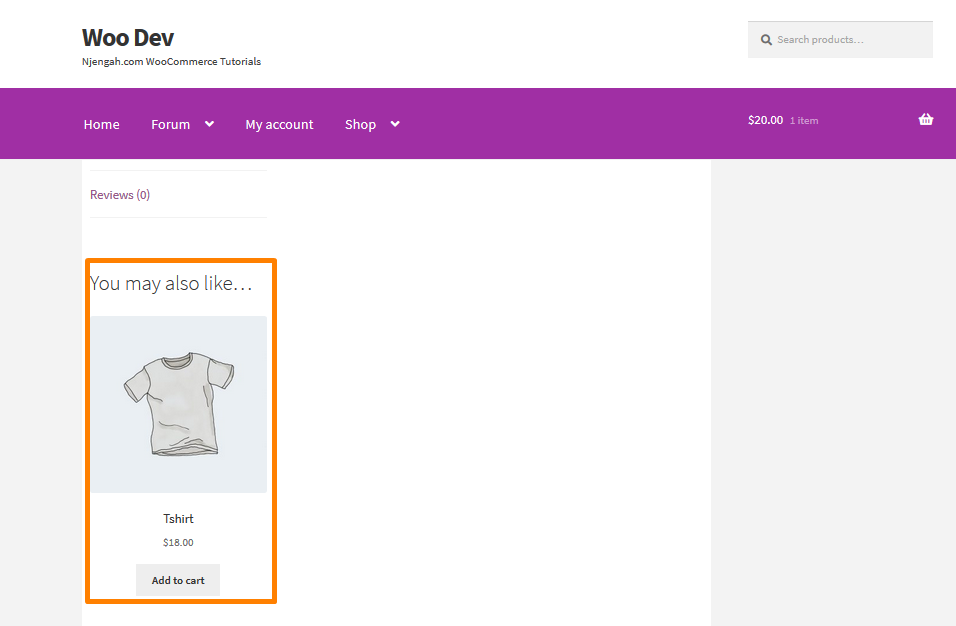
Additionally, you can recommend a more expensive product with better features to add value to the product through an upsell.
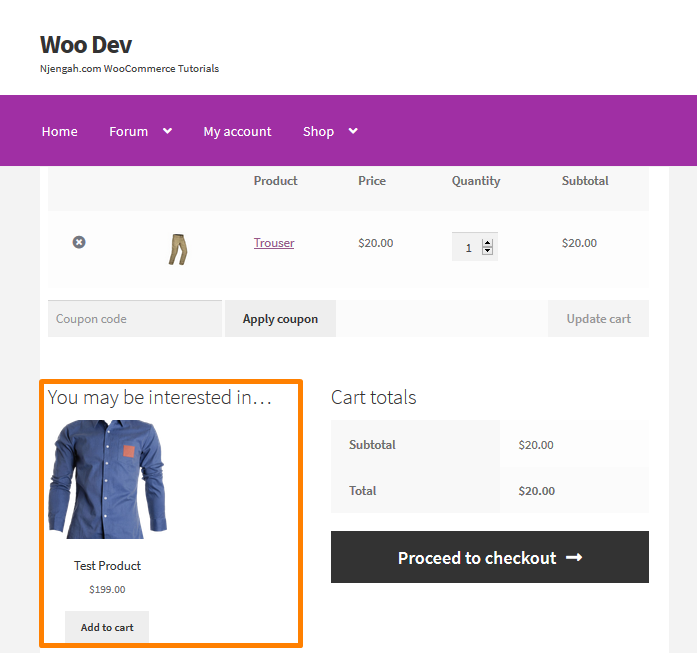
Moreover, you can add upsells on the checkout page.
Attributes tab
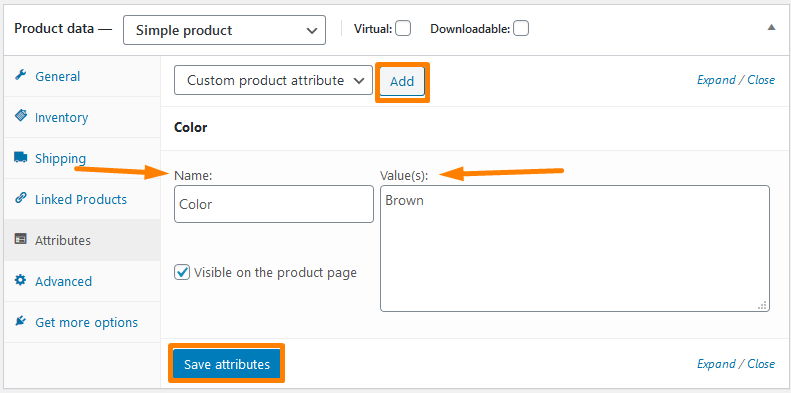 This tab will help you with things like color options, sizes, and so many more. This depends on the number of attributes your product will have. It is also worth mentioning that variations and attributes go hand in hand with each other.
Advanced tab
 In this section, you can add a purchase note that appears after a customer places an order in your store. Additionally, you can select the custom ordering position for the item and check the box to enable customer reviews.
4. Writing a Short Description
Once you are done with the product data section, you can scroll down to the Product short description box.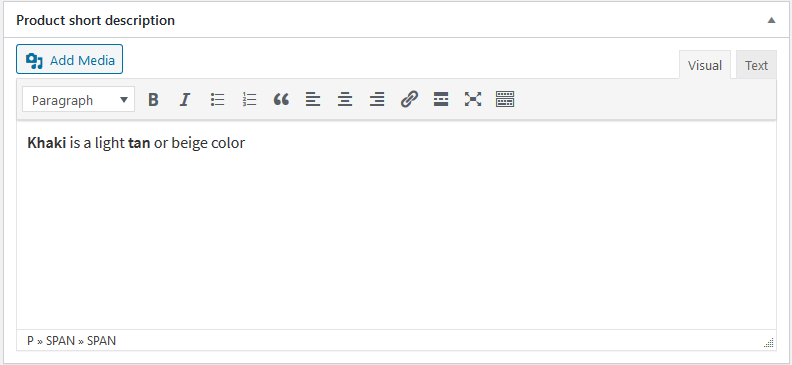
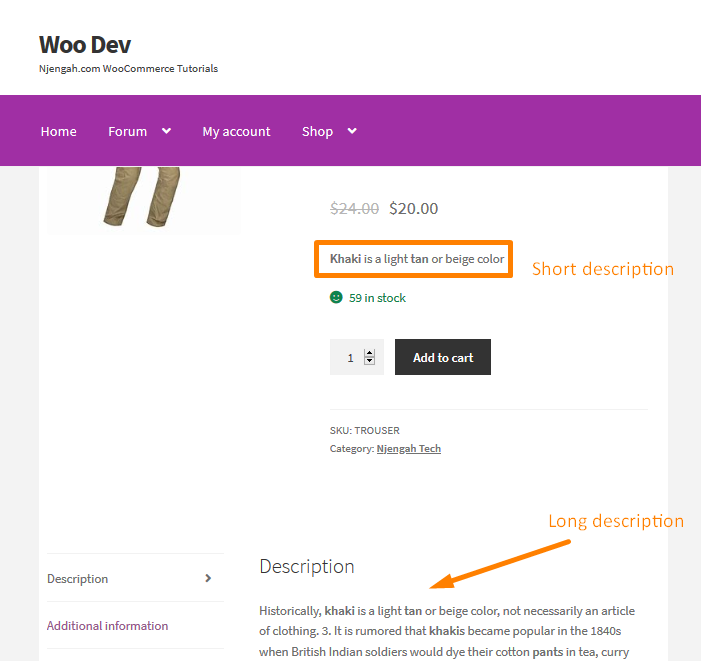
This short description appears at a prominent spot on your single product page and the long description will appear further down.
It is highly recommended that you only add 2-3 sentences in the short description. This is because the search engines pick up the short story more often, which in turn is essential for your store’s SEO.
5. Final touches
Now your product page is almost ready, provided that you have followed the simple steps that I have shared. However, before you publish your product, you should add the following, using the sidebar on the right:
- Product categories and tags – These help you organize the products in your store. Moreover, your shoppers will also be able to use categories and tags on the front-end of your store to find products. This will make it easier for them to navigate through your products. However, you should be careful and try to make them logical and useful for your target customers.
- Product image – This is where you can add the main image of the product and it will be the largest image on the single product page. This image will also appear on the catalog page.
- Product gallery – In this section, you can add extra images that appear in the gallery on the single product page.
6. Publish the Product
After checking that you have added the correct details of a product, you can click on Publish to make your product live, just like you would publish a blog post. You can use this template for the next product by using the copy to a new draft link below the publish box on the right sidebar.
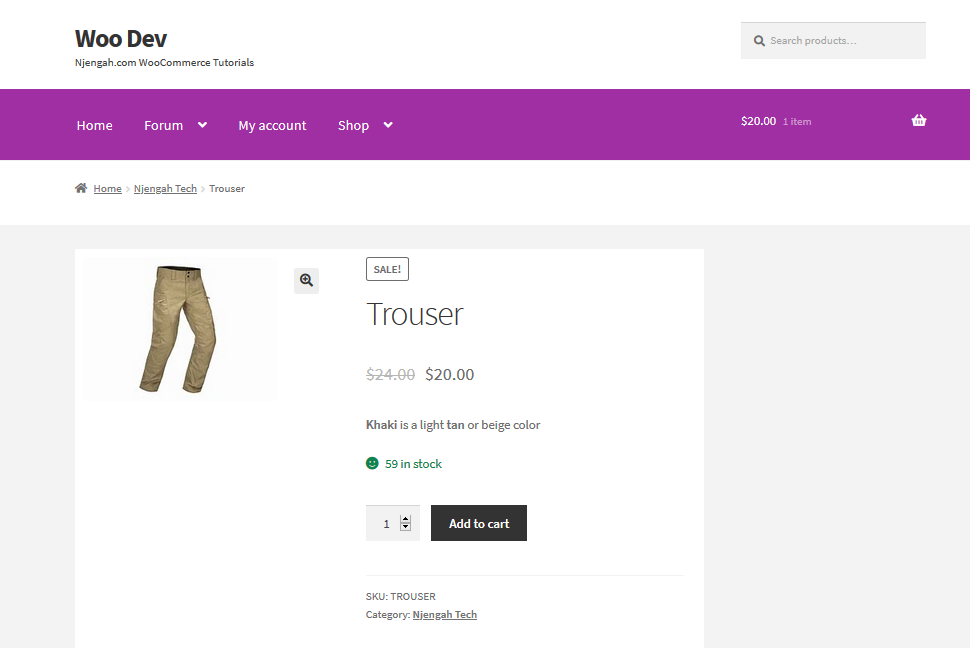
Here is an example of a published product:
Wrapping it up
Now that you have added all your products, you are on your way to launching your store. In this post, I have shared 6 steps that you need to follow for you to add a product in your online store. I have used the Storefront theme for this tutorial.
Moreover, you need to know the correct details and description of all your products as search engines pick up the short story more often, which in turn is essential for your store’s SEO. This in turn will bring a lot of revenue and people will trust your store.
Similar Articles
- WooCommerce Storefront Theme Homepage Customization [Ultimate Guide]
- How to Hide All Products From Shop Page in WooCommerce
- How to Hide WooCommerce Product from Search Results
- How to Set Featured Products In WooCommerce
- How to Change Add to Cart Text WooCommerce Guide with Examples
- How to Add Woocommerce Custom Text Field on Product Page
- How to Change Proceed To Checkout Text In WooCommerce
- How to WooCommerce Redirect After Checkout : Redirect to Custom Thank You Page
- Remove Category from Product Page WooCommerce In 2 Easy Options
- How to Remove Zoom Effect on WooCommerce Product Image
- What is WooCommerce Storefront Theme ? [Answered]
- How to Change In Stock Text in WooCommerce
- How to Add Woocommerce Product from Frontend
- How to Add Description after Price in WooCommerce
- How to Count Items Added to Cart WooCommerce Cart Count Code
- How to Hide Add to Cart Button in WooCommerce
- How to Add Custom Shipping Method in WooCommerce
Comments are closed.