WooCommerce default add-to-cart text is one of the most common changes needed by most WooCommerce users since the eCommerce plugin is used across all industries.
The customization needed by WooCommerce shop owners or service providers is a custom message on the call-to-action button instead of the 'add to cart' default text.
For example, a tour booking website will require the add-to-cart text to be ‘ Book Tour’ or ‘Book Holiday
WooCommerce Customization
Several WooCommerce changes are needed to make it a completely custom eCommerce solution.
Previously, we discussed how to change the return to shop link, how to redirect after checkout in WooCommerce, how to log out without a confirmation message, and how to redirect WooCommerce users after successful logging among several other WooCommerce customization needs.
If you are looking for an easy and quick way to change add-to-cart text in WooCommerce, this tutorial will quickly show you a step-by-step guide.
To save time I would like to outline the 3 steps for you to quickly skim through:
Step by Step WooCommerce Change Text Add to Cart
- Locate theme functions file – Locate your theme
function.phpfile (this theme file is located in the active theme main folder)wp-content/themes/your-theme/functions.php. Alternatively, this code can be bundled in a custom plugin and it will still work. It’s important to also remember to back up your WordPress theme before you begin making any changes. You can use FTP or the web hosting Cpanel to locate this file in your active theme. - Add a filter with new text – In this
functions.phpthe file you will add a filter hook that checks for the ‘add to cart’ text and replaces it with the content you place in the callback function. You can replace this with text like ‘Book Vacation’ for a holiday website or ‘Buy Music Track’ for a music website and so on. - Target both single & archive buttons – After adding the code to the file you can now update and the change of text will be seen in the add to cart buttons. You must add the filter for both the add-to-cart buttons on the single and archive page. Now, let me illustrate and explain these steps in detail with a practical example and share with you the code to change add to cart text.
How to Change Add to Cart Text WooCommerce in Details
As mentioned in the summary above we can change the add-to-cart text for both the single product and the archive pages using the filters as you will see in the code below. We can also add more functionality or logic to target a specific product, group of products, or type of product.
Single Product Woocommerce Change Text add to cart

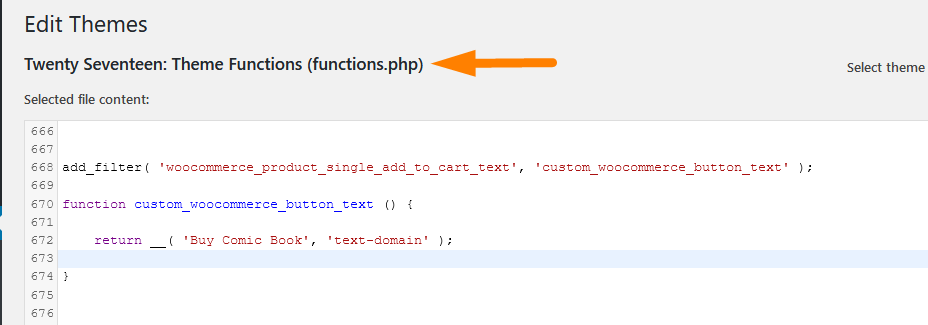
Let us start with changing the add-to-cart text on the single product page as shown in the image above.
Then open your functions.php file and add the following code to change the button text as shown in the image above:
add_filter( 'woocommerce_product_single_add_to_cart_text', 'custom_woocommerce_button_text' );

function custom_woocommerce_button_text () {

return __( 'Buy Comic Book', 'text-domain' );

}
In this example, I am using the default WordPress theme Twenty Seventeen and I have added the code to the functions.php file as shown below:
You can also add the code to a plugin you are building or you can add it to another other theme and the results will be the same.
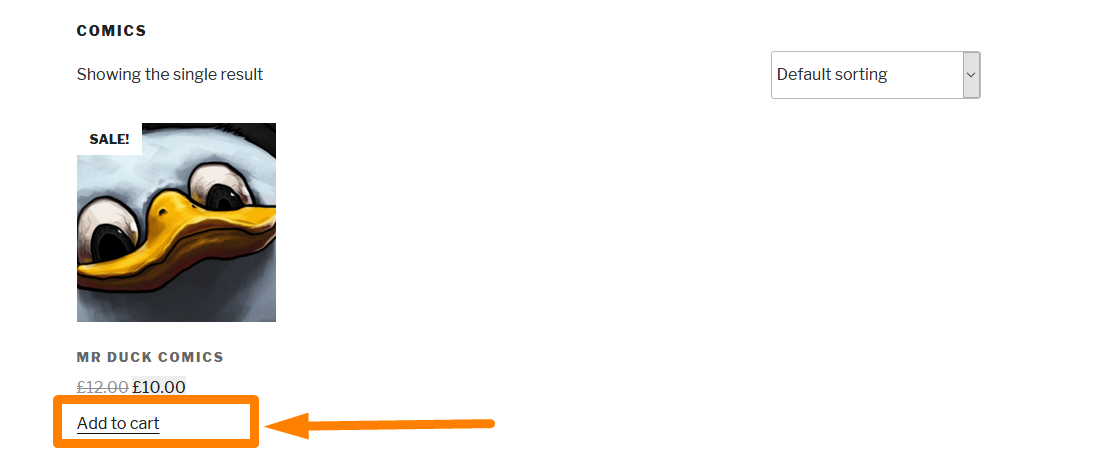
After adding and updating this code you should see the changes in the front end as shown below :

How WooCommerce Change text add to Cart it Code Works
add_filter( 'woocommerce_product_single_add_to_cart_text', 'custom_woocommerce_button_text' );
The first line of code is the filter hook that we are adding to filter all the content that is published on the product page.
This filter searches for the add-to-cart button text using the first parameter woocommerce_product_single_add_to_cart_text.
The second parameter is a callback function that returns the new text that we want to use instead of the default add to the cart button text.
You can change this text to any text that you prefer and update the changes to see it live on all buttons on the single page.
Archives Woocommerce Change Text add to cart
After successfully changing the WooCommerce add-to-cart text in the single product, you will see that the changes do not apply to the product archive page as shown in the image below :
Now we need to add another filter to search for this text in the archive page and change it to the corresponding new add-to-cart text.
So we should add the new filter for the archives using the code below :
add_filter('woocommerce_product_add_to_cart_text','custom_woocommerce_archives_text');
This is another filter like the previous one that uses the first parameter to check for the add-to-cart text.
These changes to the text are returned in the callback function as shown in the complete code below :
add_filter( 'woocommerce_product_add_to_cart_text', 'custom_woocommerce_archives_text' );

function custom_woocommerce_archives_button_text(){

return __( 'Buy Comic Book', 'text-domain' );

}
You can also use one callback function since they are doing the same job instead of having two; one for the single product and another for archives.
In this case, you will have the two filter hooks and one callback function as shown in the code below :
//single product and general archives filters

add_filter( 'woocommerce_product_single_add_to_cart_text', 'custom_woocommerce_button_text' );
add_filter( 'woocommerce_product_add_to_cart_text', 'custom_woocommerce_button_text' );

//callback function

function custom_woocommerce_button_text(){

return __( 'Buy Comic Book', 'text-domain' );

}
Conclusion
We have covered all the details on how to change the WooCommerce add-to-cart button and link text.
I am sure you can easily add these code snippets and get the changes you need.
I hope that these WooCommerce tutorials are useful.
You can share your feedback with me or if you need a WordPress WooCommerce developer, please let me know

Joe is an experienced full-stack web developer with a decade of industry experience in the LAMP & MERN stacks, WordPress, WooCommerce, and JavaScript – (diverse portfolio). He has a passion for creating elegant and user-friendly solutions and thrives in collaborative environments. In his spare time, he enjoys exploring new tech trends, tinkering with new tools, and contributing to open-source projects. You can hire me here for your next project.
Similar Articles
- How to Delete a Page In WordPress
- How to Remove Cart Page WooCommerce Storefront Theme
- How to Fix Checkout Is Not Available Whilst Your Cart Is Empty WooCommerce
- How to Set Up WooCommerce Cart and Checkout on the Same Page
- How to Disable Link on Product Image WooCommerce
- How To Display Product Variations In WooCommerce
- How to Change Active Theme WordPress from Database
- How to Change WooCommerce Colors [ Complete Guide ]
- How to Get Product Image src WooCommerce
- How to Change View Cart Button Text WooCommerce
- How to Fix WooCommerce Add to Cart Not Working After Update
- How to Update Cart Button Color In WooCommerce
- How to Change Return to Shop Link in Woocommerce
- How to Use WooCommerce as Catalog Only
- How to Add Text Before the Price in WooCommerce » Add Text Before Price
- How to Redirect Users after Successful Login in WordPress without Using a Plugin
- How to Change WordPress Site URL from Database
Comments are closed.