 If you are familiar with WooCommerce, you know that it is a great free e-commerce solution, with an incredibly useful set of features. What stands out is that WooCommerce is developed with extendibility in mind, similar to the modularity of WordPress.
However, if you need something extra from WooCommerce, you often find WooCommerce does not give you all that you need, for example, if you want to add a custom shipping method. Nevertheless, do not worry as in this brief tutorial, you will learn how to create a simple shipping method for WooCommerce, which will calculate the cost of shipping.
Additionally, you will learn how to add some restrictions to our plugin so that the shipping method is available for some countries.
Custom Shipping Rules for the Shipping Methods
In this section, we will create custom shipping rules for the shipping methods that we are going to use to create the code. We will define how the shipping method will calculate the cost and where it can ship. This means that the cost will be determined by the weight and zone we need to ship to.
For this example, we will ship to the USA, Canada, Germany, United Kingdom, Italy, Spain, and Kenya. Kenya will be our Zone 0 for $10, Italy Zone 1 for $30, Spain Zone 2 for $50, United Kingdom Zone 2 for $50, USA, and Canada Zone 3 for $70.
For the weight, we will price them as follows: 0 – 10kgs for free, 11 – 30kgs for $5, 31-50kgs for $10, and 51-100kgs for $20.
You might be ready to start coding, but not just yet! First, you need to learn about the WooCommerce Shipping API. When you want to create a custom shipping method, you need to extend the class from the WooCommerce abstract class WC_Shipping_Method. It has some defined attributes, which are:
$id: ID (slug, keyword) of our shipping which is required.$number: This is an Integer ID.$method_title: The name of our shipping shown in the admin.$method_description: A short description of our shipping shown in admin (Optional).$enabled: String Boolean, “yes” or “no”, that gives the information if our shipping is enabled and if it can be used or not.$title: It is used to display our shipping name on our site.$availability: This defines if the shipping is available or not.$countries: An array of countries this method is enabled for. The default value is an empty array.$tax_status: The default value is taxable. If an item is taxable, then tax will be charged.$fee: The default value is 0$minimum_fee: The minimum fee for the method and the default value is null.$has_settings: This defines if this method has any settings. The default value is true.$supports: An array containing features this method supports. The default value is an empty array.$rates: An array of rates and this must be populated to register shipping costs. The default value is an empty array.
The defined methods in the WC_Shipping_Method are:
is_taxable(): This returns whether or not we need to calculate tax on top of the shipping rate.add_rate( $args = array() ): This pushes a shipping rate defined in the parameter $args into the attribute $rates.has_settings(): This returns the value of the attribute $has_settings.is_available(): This returns if the shipping is available and if there are countries set in the attribute $countries and the attribute $availability is set to values including, specific or excluding, it will return true or false if the country is available for shipping.get_title(): This returns the title of this shipping.get_fee( $fee, $total ): This returns the fee value for this shipping based on the parsed $fee and $total.supports( $feature ): This returns if this shipping method is supporting a feature or not.
Because the class WC_Shipping_Method extends the class WC_Settings_API, there are more attributes and methods, which I will not explain here for simplicity purposes.
Also, other methods need to be defined so that the shipping can get or set settings and calculate the actual cost of the shipping. These methods listed here:
init(): This creates the form fields and settings. However, it can be named differently, as long as we use the methods inside it and call it in the __constructor method.calculate_shipping( $package ): This method is used to calculate the cost for this shipping and package is an array with the products to ship.
I would like to put some focus on the calculate_shipping method. For our example, we will use this method and add it to the add_rate method. This method will accept an array with several options like:
id: This is the ID of the rate.label: This is the label for the rate.cost: The amount of shipping.taxes: It accepts an array of taxes or nothing so the tax is calculated by WooCommerce. If you do not want it to accept tax, it can accept false.calc_tax: This accepts per_order or per_item. If you use per_item, an array of costs will need to be provided.
We will use a WordPress filter to get the array that adds our shipping method in the array of the registered method by passing the name of our class, using a WordPress filter that is defined inside the WooCommerce plugin. The filter is called woocommerce_shipping_methods.
With that on the table, let us now get into the coding section of this brief tutorial so that you can understand the whole concept in the PHP snippets that I am going to share.
a) Steps to Create the New Shipping Class
In this section, we will create our shipping method as a new plugin that extends WooCommerce.
- First, you need to open the wp-content > plugins and create a new folder. For this, I will be using the name njengah -shipping
- Then, you need to create a file with the same name njengah –shipping.php
- In this file add the following code:
<?php

/**
* Plugin Name: Njengah Shipping
* Plugin URI: https://njengah.com/plugins/
* Description:
* Version: 1.0.0
* Author: Joe Njenga
* Author URI: https://njengah.com
s
*/

if ( ! defined( 'WPINC' ) ) {

die;

}
/*
* Check if WooCommerce is active
*/
if ( in_array( 'woocommerce/woocommerce.php', apply_filters( 'active_plugins', get_option( 'active_plugins' ) ) ) ) {

function njengahplus_shipping_method() {

if ( ! class_exists( 'NjengahPlus_Shipping_Method' ) ) {

class NjengahPlus_Shipping_Method extends WC_Shipping_Method {

/**

* Constructor for your shipping class

*

* @access public

* @return void

*/

public function __construct() {

$this->id                 = 'njengahplus';

$this->method_title       = __( 'NjengahPlus Shipping', 'njengahplus' );

$this->method_description = __( 'Custom Shipping Method for NjengahPlus', 'njengahplus' );

$this->init();

$this->enabled = isset( $this->settings['enabled'] ) ? $this->settings['enabled'] : 'yes';

$this->title = isset( $this->settings['title'] ) ? $this->settings['title'] : __( 'NjengahShipping', 'njengahplus' );

}

/**
* Init your settings
*
* @access public

* @return void

*/

function init() {

// Load the settings API

$this->init_form_fields();

$this->init_settings();

// Save settings in admin if you have any defined

add_action( 'woocommerce_update_options_shipping_' . $this->id, array( $this, 'process_admin_options' ) );

}


/**

* Define settings field for this shipping

* @return void

*/

function init_form_fields() {

// We will add our settings here

}

/**
* This function is used to calculate the shipping cost. Within this function, we can check for weights, dimensions, and other parameters.
*
* @access public
* @param mixed $package
 @return void
*/

public function calculate_shipping( $package ) {


// We will add the cost, rate, and logics in here

}

}

}

}


add_action( 'woocommerce_shipping_init', 'njengahplus_shipping_method' );

function add_njengahplus_shipping_method( $methods ) {

$methods[] = 'NjengahPlus_Shipping_Method';
return $methods;
}

add_filter( 'woocommerce_shipping_methods', 'add_njengahplus_shipping_method' );

}
How it Works
- We first check whether the constant WPINC is defined. If it is not defined, then it means that someone is trying to access this file directly or from a location, that is not WordPress.
- Then we need to check if WooCommerce is active. Here we are checking whether the woocommerce.php is in the array of active plugins that are saved in the database under the option active_plugins.
- woocommerce_shipping_init is the main action for WooCommerce Shipping which includes all the shipping classes before they get instantiated. Using this action will make sure that our shipping method will be included after WooCommerce has been initialized and in the right place for WooCommerce to use it.
- The __construct method sets some general attributes and some of them can be easily overwritten after the settings are loaded from the database in the method init.
- The other methods are left empty because we will define them later in the tutorial.
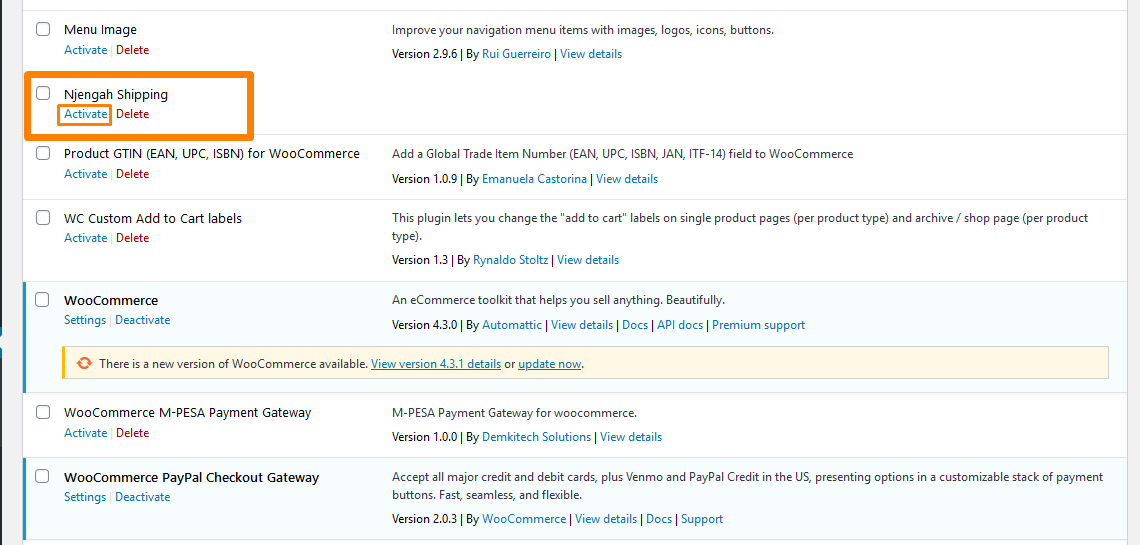
Then you need to head to activate the plugin using the steps shown below:
- Log into your WordPress site and access the Dashboard as the admin user.
- From the Dashboard menu, click on Plugins and activate Njengah shipping as shown below:
- After activating the plugin head over to WooCommerce > Settings. Click on the WooCommerce Tab then click on NjengahPlus shipping. You should be able to see this:

b) Setting the Country Availability
The shipping method we created is available only in the previously determined list of countries.
- Add this in the method __construct:
<?php

//...

$this->method_description = __( 'Custom Shipping Method for NjengahPlus', 'njengahplus' );

// Availability & Countries

$this->availability = 'including';

$this->countries = array(

'US', // Unites States of America

'CA', // Canada

'DE', // Germany

'GB', // United Kingdom

'IT', // Italy

'ES', // Spain

'HR' // Kenya

);

$this->init();

//...
How the Code Works
The availability attribute is set to ‘including’ so that this shipping is only available for the countries in the countries attribute.
WooCommerce will check if the shipping country is included in the attribute countries.
Creating the Settings
You need to simply copy this code and populate our method init_form_fields:
<?php


function init_form_fields() {

$this->form_fields = array(

'enabled' => array(

'title' => __( 'Enable', 'njengahplus' ),

'type' => 'checkbox',

'description' => __( 'Enable this shipping.', 'njengahplus' ),

'default' => 'yes'

),


'title' => array(

'title' => __( 'Title', 'njengahplus' ),

'type' => 'text',

'description' => __( 'Title to be display on site', 'njengahplus' ),

'default' => __( 'NjengahPlus Shipping', 'njengahplus' )

),


);


}
To check the outcome, follow these steps:
- Log into your WordPress site and access the Dashboard as the admin userFrom the Dashboard menu, click on WooCommerce > Settings
- Click on the Shipping tab and click on NjengahPlus Shipping as shown below:
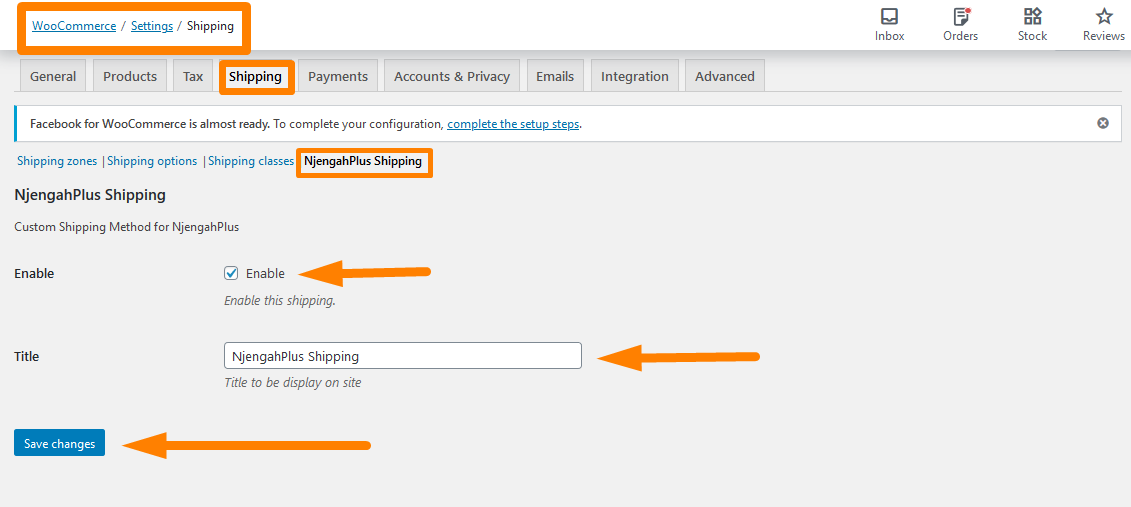
- Enable the checkbox and save the changes.
We can set the shipping method to ship up to 100 kg. Then we will allow that to be edited in the settings if that rule changes soon. After setting this, the settings code will look like this:
<?php


function init_form_fields() {

$this->form_fields = array(

'enabled' => array(

'title' => __( 'Enable', 'njengahplus' ),

'type' => 'checkbox',

'description' => __( 'Enable this shipping.', 'njengahplus' ),

'default' => 'yes'

),


'title' => array(

'title' => __( 'Title', 'njengahplus' ),

'type' => 'text',

'description' => __( 'Title to be display on site', 'njengahplus' ),

'default' => __( 'NjengahPlus Shipping', 'njengahplus' )

),


'weight' => array(

'title' => __( 'Weight (kg)', 'njengahplus' ),

'type' => 'number',

'description' => __( 'Maximum allowed weight', 'njengahplus' ),

'default' => 100

),


);

}
In the code above, we have now set the maximum weight under the settings. Here is the Outcome: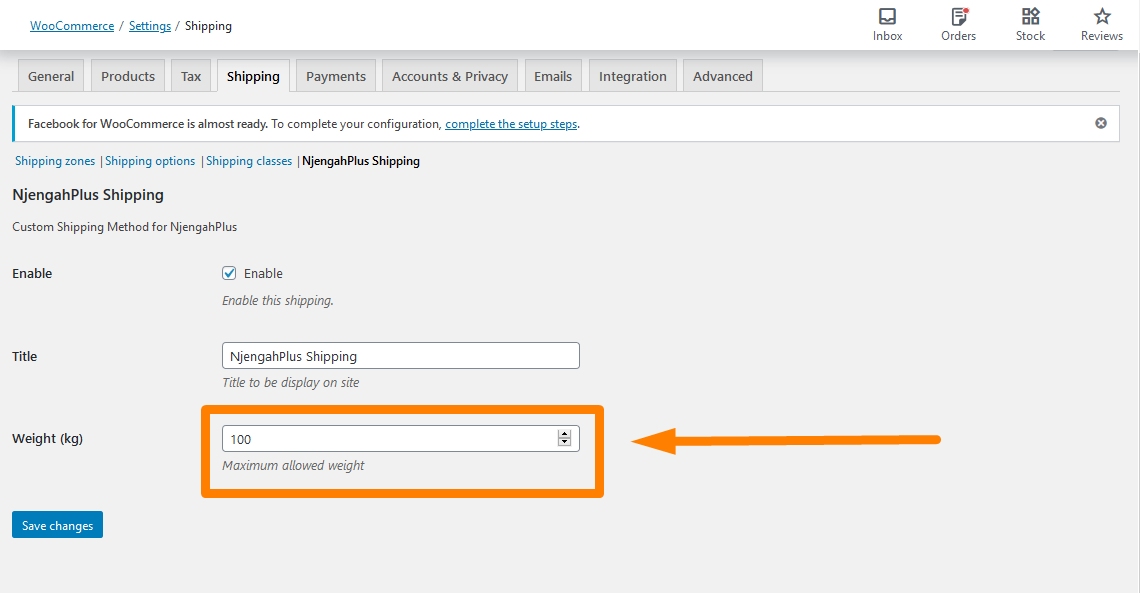
c) Calculating the Shipping Cost
To calculate the shipping cost, we will update the method calculate_shipping one step at a time so that you can understand each step.
- First, we need to get the cost by weight. To do this, simply add this code to the method calculate_shipping:
<?php

//...

public function calculate_shipping( $package ) {


$weight = 0;

$cost = 0;

$country = $package["destination"]["country"];

foreach ( $package['contents'] as $item_id => $values )

{

$_product = $values['data'];

$weight = $weight + $_product->get_weight() * $values['quantity'];

}

$weight = wc_get_weight( $weight, 'kg' );

if( $weight <= 10 ) {

$cost = 0;

} elseif( $weight <= 30 ) {

$cost = 5;


} elseif( $weight <= 50 ) {


$cost = 10;


} else {

$cost = 20;

}

}
- From the above code, we have the cost based on the weight of the cart, we have to calculate the cost for the selected shipping country. To do this add this code:
<?php


public function calculate_shipping( $package ) {


$countryZones = array(

'HR' => 0,

'US' => 3,

'GB' => 2,

'CA' => 3,

'ES' => 2,

'DE' => 1,

'IT' => 1

);


$zonePrices = array(

0 => 10,

1 => 30,

2 => 50,

3 => 70

);


$zoneFromCountry = $countryZones[ $country ];

$priceFromZone = $zonePrices[ $zoneFromCountry ];


$cost += $priceFromZone;

}
- We have calculated the cost by the total weight, and we have also added the cost by the shipping country. The last step is to add this code to register the rate.
How the Code Works
In the first snippet in this section, we have defined a few starting variables: $weight, $cost, and $country. To get the total, we are getting the total weight by iterating the cart and adding the weight for each product in the cart to the variable $weight.
After having the total weight, we are using the function wc_get_weight to convert the weight into kilograms since this is the unit, which our shipping method has set the limit. Then the last thing was to set the limit to 100kg.
In the second snippet, the array $countryZones holds the zones for each country and the second array $zonePrices holds the prices for each zone.
This will be the outcome for Italy Zone 1: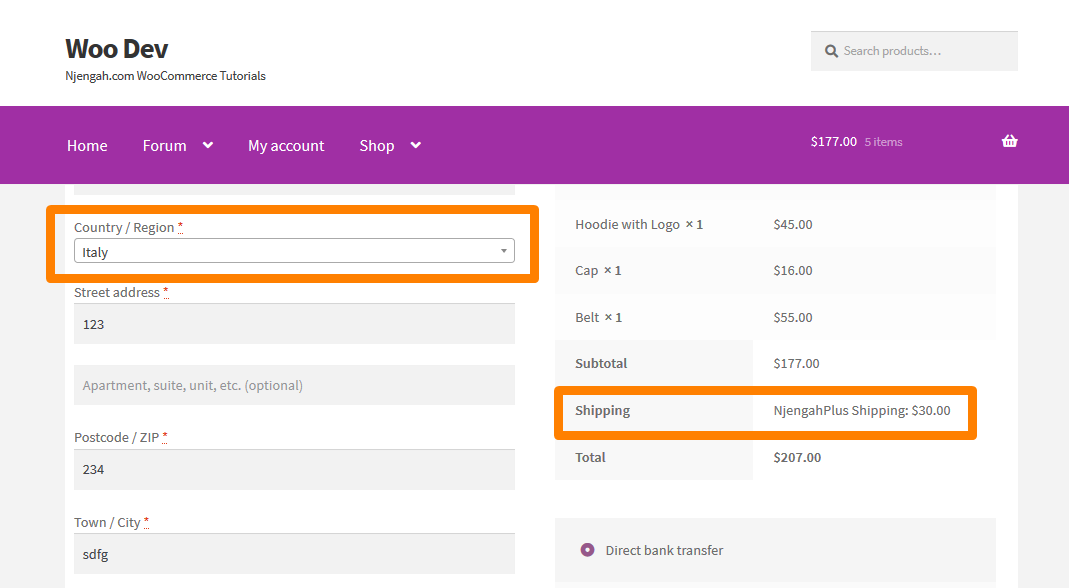
This will be the outcome for Spain Zone 2: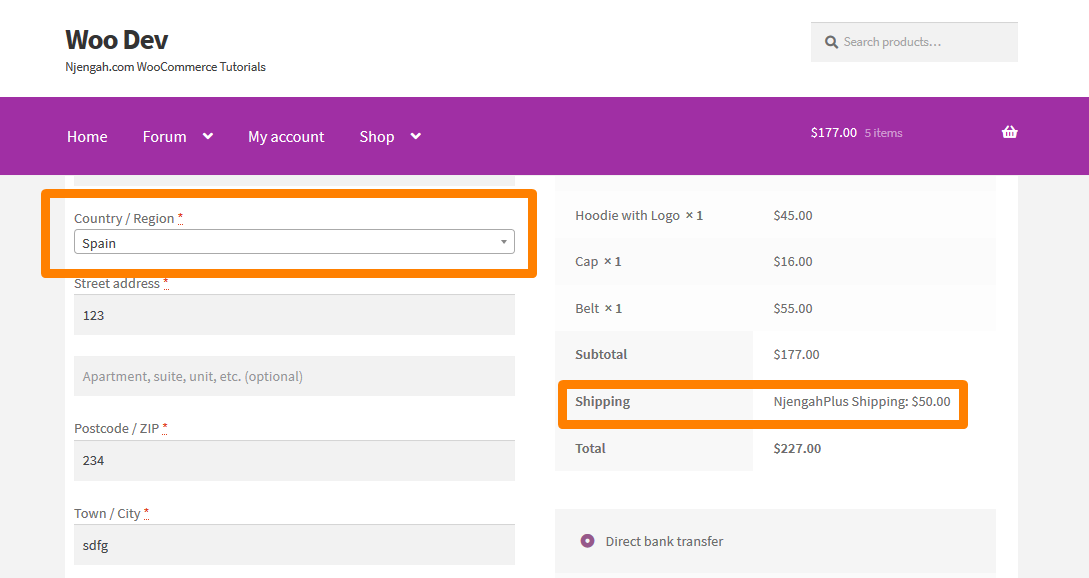
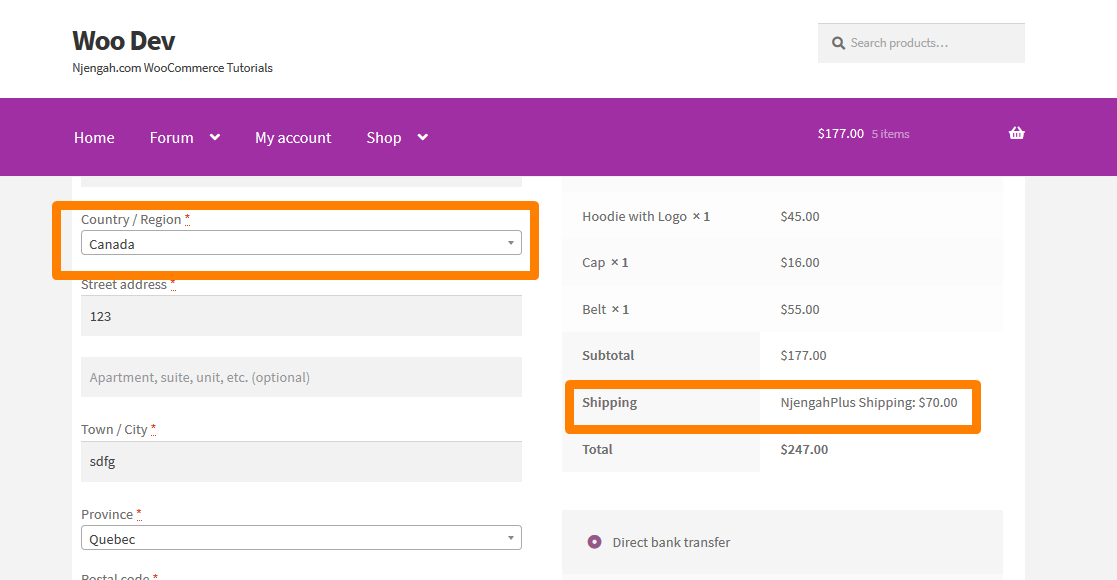
This will be the outcome for Canada Zone:
If you have had a hard time implementing this code, here is the full code:
<?php


public function calculate_shipping( $package ) {

$weight = 0;

$cost = 0;

$country = $package["destination"]["country"];

foreach ( $package['contents'] as $item_id => $values )

{

$_product = $values['data'];

$weight = $weight + $_product->get_weight() * $values['quantity'];

}
$weight = wc_get_weight( $weight, 'kg' );

if( $weight <= 10 ) {

$cost = 0;

} elseif( $weight <= 30 ) {

$cost = 5;

} elseif( $weight <= 50 ) {

$cost = 10;

} else {

$cost = 20;

}

$countryZones = array(

'HR' => 0,

'US' => 3,

'GB' => 2,

'CA' => 3,

'ES' => 2,

'DE' => 1,

'IT' => 1

);


$zonePrices = array(

0 => 10,

1 => 30,

2 => 50,

3 => 70

);


$zoneFromCountry = $countryZones[ $country ];

$priceFromZone = $zonePrices[ $zoneFromCountry ];

$cost += $priceFromZone;

$rate = array(

'id' => $this->id,

'label' => $this->title,

'cost' => $cost

);

$this->add_rate( $rate );

}
Conclusion
In this post, we created a custom plugin to add a custom shipping method in WooCommerce. Additionally, I have shared with you the WooCommerce Shipping API that enables you to create your shipping method with simple steps. Also, limitations and availability can be set inside the shipping method when calculating the availability or the cost of the shipping method. However, they can be set outside the shipping method using WooCommerce actions. I hope that this tutorial provided a solution for adding a custom shipping method in WooCommerce.

Joe is an experienced full-stack web developer with a decade of industry experience in the LAMP & MERN stacks, WordPress, WooCommerce, and JavaScript – (diverse portfolio). He has a passion for creating elegant and user-friendly solutions and thrives in collaborative environments. In his spare time, he enjoys exploring new tech trends, tinkering with new tools, and contributing to open-source projects. You can hire me here for your next project.
Similar Articles
- How to Add GTIN Numbers On Products In WooCommerce
- How to Remove Has Been Added to Your Cart Message WooCommerce
- How to Add a Trust or Secure Logo on WooCommerce Checkout Page
- WooCommerce Logout without Confirmation : How to Remove “Are you sure you want to log out?”
- How to Redirect a WordPress Page Without Plugins?
- How to Add Product Image WooCommerce Checkout Page
- How to Set Featured Products In WooCommerce
- How to Hide the WooCommerce Coupon Code Field
- How to Display WooCommerce Products By Category
- How to Hide All Products From Shop Page in WooCommerce
- How to Sort WooCommerce Categories for Better User Experience
- How to Sell Digital Products With WooCommerce
- How to Change the WooCommerce ‘Added to Cart’ Notice
- How to Disable Payment Method for Specific Category
- 30+ Best WooCommerce Plugins for Your Store (Most are FREE)
- How to Rename Order Status Messages in WooCommerce
- 23 Best WooCommerce Plugins for Checkout Page Customization
- How to Remove Default Product Sorting WooCommerce
- How to Check If Plugin is Active In WordPress [ 3 WAYS ]
Comments are closed.