 Looking for a way to set featured products in WooCommerce? This article will help you understand how you can set featured products in just under a minute. It is super simple to do and even a WordPress beginner will be able to do this. This is because the WooCommerce has some built-in functionality to help you easily add featured products on your site.
Why Set Featured Products in WooCommerce Store ?
Setting featured products on your WooCommerce site is a great way to showcase your best selling or popular products from your store. This will help you to promote specific items on your website, and your customers will be able to easily spot these products.
Moreover, once you set up these products, you can easily display them throughout your website with a shortcode or with a widget. This is a great feature that many WooCommerce store owners don’t know about. This article will help you learn how to set them and display them.
Adding a Featured Product
This is very easy, as you only need to mark the products that you need to be featured.
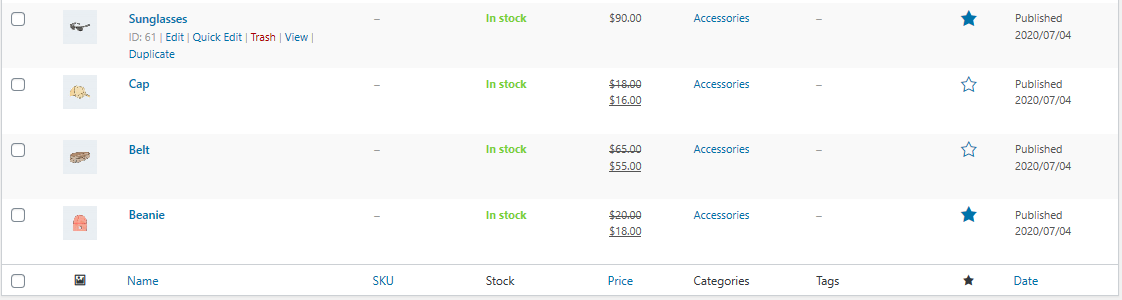
- To do this, simply navigate your products page and find the products that you want to be featured.
- After that, click on the star to make that product a featured product as shown in the picture below:
After setting up all the featured products, WooCommerce will allow you to show all of the featured products using a simple shortcode, that you can add anywhere on your site.
Additionally, you can change the page and columns to fit your needs. The following is an example of a shortcode that is generated after adding the products:
[featured_products per_page=”10” columns=”2”]
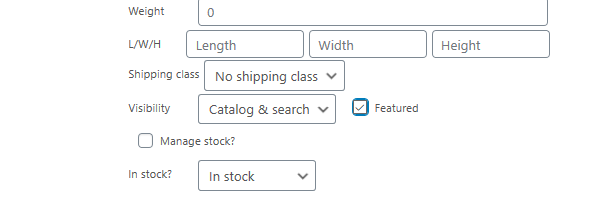
Moreover, there is also a second way that you can use to do this. First of all, you need to hover over the product title and click on the Quick Edit option. This will open up a new menu that has many options you need to click on the features button as shown below:
Adding Featured Items in Bulk
If you are familiar with WooCommerce, the bulk edit option comes in handy when you need to do the same thing for multiple parameters. For example, in our case, you may have many products, and adding each one as a featured product would be a hard and tedious task.
Therefore, you need to check out all the products you would like to feature. This checkbox is located next to the product image thumbnail.
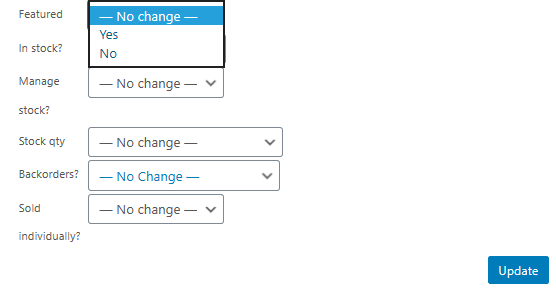
After that, you need to select edit under bulk actions. Then click on apply. This will bring an editor that has many options. Select ‘Yes’ from the drop-down menu with the word featured, and then click on the update button as shown in the picture below:
Display the Featured Products
It is very easy to display these products using the shortcode provided within posts or pages. For example, the following shortcode will display 8 of your featured products in a grid, with four columns and two rows, with the most recent appearing the first.
[featured_products per_page=”8″ columns=”4″ orderby=”date” order=”desc”]
You can also use other parameters in the shortcode like ‘orderby’ and ‘order’. If you like these shortcode, you can also see other useful WooCommerce shortcodes that help you to customize your store without writing code.
Conclusion
To set featured products in WooCommerce you simply need to go to All Products page that can be accessed from the main WordPress dashboard menu. When you are on this page, you can pick the products to be featured by clicking on the star icon on the featured column.
Similar Articles
- How to Display Category Name in WordPress Using a Practical Example
- How to Change PayPal Icon On WooCommerce Checkout Page
- Remove Hash # from WordPress URLs with Simple Trick
- How to Upload Theme to WordPress Step by Step Guide
- How to Remove Sidebar from WordPress Page or Hide WordPress Sidebar
- How to Get Current Product Category Name in WooCommerce
- How to Change the WooCommerce ‘Added to Cart’ Notice
- How to Use WordPress Shortcodes in Pages or Posts with Example
- How to Add Text after Price in WooCommerce » Add Price Suffix
- How Remove Sidebar from Product Page in WooCommerce Themes
- How to Add Remove Icon to WooCommerce Checkout Page
- How to Display Stock Availability Text in WooCommerce » In Stock & Out
- How Add Text Before the Price in WooCommerce » Add Text Before Price
- How to Get Order ID In Woocommerce
- How to Change Product Price Programmatically in WooCommerce
- How to Move Description Under Image in WooCommerce
- How to Set a Featured Image in WordPress Gutenberg & Classic Editor
- How to Change Out Of Stock Text in WooCommerce
- How to Redirect to Cart after Login in WooCommerce
- How to Skip Cart and Redirect to Checkout Page WooCommerce
Comments are closed.