 Do you want to add wishlist in WooCommerce? It is important to note that WooCommerce does not have a Wishlist functionality. It allows users to mark certain products, adding them to a list for future reference.
Popular stores like Amazon allow online shoppers to create multiple wishlists.
How to Add Wishlist in WooCommerce
In this tutorial, we will create a wishlist functionality for WooCommerce. We will use AJAX, WordPress REST API, and SVG graphics.
By the end of the post, you will be able to create a wishlist plugin.
Let us see how you can achieve this.
Creating a Wishlist Plugin
First, we need to create the plugin structure.
Create a folder with the name “wishlist” and a PHP file with the same name.
After that, add the following snippet to the PHP file:
[php]/*
Plugin Name: Woocommerce wishlist
Description: Ajax wishlist for WooCommerce
Author: Njengah
Version: 1.0
*/
if ( ! defined( ‘ABSPATH’ ) ) {
exit; // Exit if accessed directly
}
[/php]
Adding the Structure
Now it is time to add the functions. Here is what we are going to do:
- Add wishlist toggle to products in loop and single pages using WooCommerce hooks
- Create wishlist table shortcode to hold the products added to the wishlist
- Create wishlist custom option in the user profile
It is important to note that all the plugin code will go inside the init action for the plugin.
Before we start, we need to make sure that the WooCommerce plugin is active. After the plugin details add the following code:
[php]add_action(‘init’,’plugin_init’);
function plugin_init(){
if (class_exists("Woocommerce")) {
// Plugin code starts here
}
}
[/php]
The next step is to enqueue our plugin scripts and styles by adding the following code to the main plugin file:
[php] function wishlist_plugin_scripts_styles(){wp_enqueue_style( ‘wishlist-style’, plugins_url(‘/css/style.css’, __FILE__ ), array(), ‘1.0.0’ );
wp_enqueue_script( ‘wishlist-main’, plugins_url(‘/js/main.js’, __FILE__ ), array(‘jquery’), ”, true);
wp_localize_script(
‘main’,
‘opt’,
array(
‘ajaxUrl’ => admin_url(‘admin-ajax.php’),
‘ajaxPost’ => admin_url(‘admin-post.php’),
‘restUrl’ => rest_url(‘wp/v2/product’),
‘shopName’ => sanitize_title_with_dashes(sanitize_title_with_dashes(get_bloginfo(‘name’))),
‘inWishlist’ => esc_html__("Already in wishlist","text-domain"),
‘removeWishlist’ => esc_html__("Remove from wishlist","text-domain"),
‘buttonText’ => esc_html__("Details","text-domain"),
‘error’ => esc_html__("Something went wrong, could not add to wishlist","text-domain"),
‘noWishlist’ => esc_html__("No wishlist found","text-domain"),
)
);
}
add_action( ‘wp_enqueue_scripts’, ‘wishlist_plugin_scripts_styles’ );
[/php]
In this section of code, we enqueue the main style.css file and the main.js file for the plugin. We have also passed some parameters to the main.js file to work with:
- ajaxUrl
- ajaxPost
- restUrl
- shopName
After adding the code, create a css, and js folder and put the corresponding files inside those folders: style.css in the css folder and main.js in the js folder.
Hook the Wishlist Toggle
To hook the Wishlist Toggle, add the following code inside the init action:
[php]// Add wishlist to product
add_action(‘woocommerce_before_shop_loop_item_title’,’wishlist_toggle’,15);
add_action(‘woocommerce_single_product_summary’,’wishlist_toggle’,25);
function wishlist_toggle(){
global $product;
echo ‘<span class="wishlist-title">’.esc_attr__("Add to wishlist","text-domain").'</span><a class="wishlist-toggle" data-product="’.esc_attr($product->get_id()).’" href="#" title="’.esc_attr__("Add to wishlist","text-domain").’">’.file_get_contents(plugins_url( ‘images/icon.svg’, __FILE__ )).'</a>’;
}
[/php]
The code above adds a wishlist toggle to each product in the loop and to each single product layout. We have used the woocommerce_before_shop_loop_item_title and woocommerce_single_product_summary hooks.
Add SVG Icons
The next step is to Add SVG Icons.
Create an images folder in the plugin folder and put the following icon.svg in it:
[php]<svg viewBox="0 0 471.701 471.701">
<path class="heart" d="M433.601,67.001c-24.7-24.7-57.4-38.2-92.3-38.2s-67.7,13.6-92.4,38.3l-12.9,12.9l-13.1-13.1
c-24.7-24.7-57.6-38.4-92.5-38.4c-34.8,0-67.6,13.6-92.2,38.2c-24.7,24.7-38.3,57.5-38.2,92.4c0,34.9,13.7,67.6,38.4,92.3
l187.8,187.8c2.6,2.6,6.1,4,9.5,4c3.4,0,6.9-1.3,9.5-3.9l188.2-187.5c24.7-24.7,38.3-57.5,38.3-92.4
C471.801,124.501,458.301,91.701,433.601,67.001z M414.401,232.701l-178.7,178l-178.3-178.3c-19.6-19.6-30.4-45.6-30.4-73.3
s10.7-53.7,30.3-73.2c19.5-19.5,45.5-30.3,73.1-30.3c27.7,0,53.8,10.8,73.4,30.4l22.6,22.6c5.3,5.3,13.8,5.3,19.1,0l22.4-22.4
c19.6-19.6,45.7-30.4,73.3-30.4c27.6,0,53.6,10.8,73.2,30.3c19.6,19.6,30.3,45.6,30.3,73.3
C444.801,187.101,434.001,213.101,414.401,232.701z"/>
<g class="loading">
<path d="M409.6,0c-9.426,0-17.067,7.641-17.067,17.067v62.344C304.667-5.656,164.478-3.386,79.411,84.479
c-40.09,41.409-62.455,96.818-62.344,154.454c0,9.426,7.641,17.067,17.067,17.067S51.2,248.359,51.2,238.933
c0.021-103.682,84.088-187.717,187.771-187.696c52.657,0.01,102.888,22.135,138.442,60.976l-75.605,25.207
c-8.954,2.979-13.799,12.652-10.82,21.606s12.652,13.799,21.606,10.82l102.4-34.133c6.99-2.328,11.697-8.88,11.674-16.247v-102.4
C426.667,7.641,419.026,0,409.6,0z"/>
<path d="M443.733,221.867c-9.426,0-17.067,7.641-17.067,17.067c-0.021,103.682-84.088,187.717-187.771,187.696
c-52.657-0.01-102.888-22.135-138.442-60.976l75.605-25.207c8.954-2.979,13.799-12.652,10.82-21.606
c-2.979-8.954-12.652-13.799-21.606-10.82l-102.4,34.133c-6.99,2.328-11.697,8.88-11.674,16.247v102.4
c0,9.426,7.641,17.067,17.067,17.067s17.067-7.641,17.067-17.067v-62.345c87.866,85.067,228.056,82.798,313.122-5.068
c40.09-41.409,62.455-96.818,62.344-154.454C460.8,229.508,453.159,221.867,443.733,221.867z"/>
</g>
<g class="check">
<path d="M238.933,0C106.974,0,0,106.974,0,238.933s106.974,238.933,238.933,238.933s238.933-106.974,238.933-238.933
C477.726,107.033,370.834,0.141,238.933,0z M238.933,443.733c-113.108,0-204.8-91.692-204.8-204.8s91.692-204.8,204.8-204.8
s204.8,91.692,204.8,204.8C443.611,351.991,351.991,443.611,238.933,443.733z"/>
<path d="M370.046,141.534c-6.614-6.388-17.099-6.388-23.712,0v0L187.733,300.134l-56.201-56.201
c-6.548-6.78-17.353-6.967-24.132-0.419c-6.78,6.548-6.967,17.353-0.419,24.132c0.137,0.142,0.277,0.282,0.419,0.419
l68.267,68.267c6.664,6.663,17.468,6.663,24.132,0l170.667-170.667C377.014,158.886,376.826,148.082,370.046,141.534z"/>
</g>
</svg>
[/php]
The SVG animation has three states:
- Default: the heart path
- Process: loading group (g tag)
- End: check group (g tag)
To style the icons, open the style.css file and paste the following code:
[php].wishlist-toggle {
display: block;
position: absolute;
top: 16px;
left: 16px;
z-index: 5;
width: 24px;
height: 24px;
outline: none;
border:none;
}
.wishlist-title {
display: none;
}
.entry-summary .wishlist-toggle {
position: relative;
top: 0;
left: 0;
display: inline-block;
vertical-align: middle;
margin-bottom: 8px;
}
.entry-summary .wishlist-title {
display: inline-block;
vertical-align: middle;
margin-right: 8px;
margin-bottom: 8px;
}
.wishlist-toggle:focus {
outline: none;
border:none;
}
.wishlist-toggle svg {
fill:#bdbdbd;
transition: all 200ms ease-out;
}
.wishlist-toggle:hover svg,
.wishlist-toggle.active svg {
fill:#000000;
}
.wishlist-toggle svg .loading,
.wishlist-toggle svg .check {
opacity: 0;
}
.wishlist-toggle.active svg .check {
opacity: 1;
}
.wishlist-toggle.active svg .heart {
opacity: 0;
}
.wishlist-toggle.loading svg .loading,
.wishlist-table.loading:before {
animation:loading 500ms 0ms infinite normal linear;
transform-origin: center;
opacity: 1;
}
.wishlist-toggle.loading svg .heart {
opacity:0;
}
@keyframes loading {
from {transform: rotate(0deg);}
to {transform: rotate(360deg);}
}
[/php]
We have shown the heart path of our SVG. When the user clicks on it, we will hide the heart path and show the loading path.
After loading, we will show the checkmark indicating that the product was successfully added to the wishlist.
Create Wishlist Table Shortcode
Now we need to create the Wishlist table shortcode. You can add this shortcode to any page, and the wishlist items will appear inside it.
We will do this by adding the following code in the init plugin action:
[php] // Wishlist table shortcodeadd_shortcode(‘wishlist’, ‘wishlist’);
function wishlist( $atts, $content = null ) {
extract(shortcode_atts(array(), $atts));
return ‘<table class="wishlist-table loading">
<tr>
<th><!– Left for image –></th>
<th>’.esc_html__("Name","text-domain").'</th>
<th>’.esc_html__("Price","text-domain").'</th>
<th>’.esc_html__("Stock","text-domain").'</th>
<th><!– Left for button –></th>
</tr>
</table>’;
}
[/php]
After that, we have to create a Wishlist Page.
From the dashboard, create a page called “Wishlist” and put the [wishlist] shortcode inside it.
If you open the wishlist page, you will see an empty table.
The next step is to style the wishlist items. To achieve this, open the style.css and add the following code:
[php] .wishlist-table {width:100%;
position: relative;
}
.wishlist-table.loading:after {
display: block;
width: 100%;
height: 100%;
position: absolute;
top: 0;
left: 0;
content: "";
background: #ffffff;
opacity: 0.5;
z-index: 5;
}
.wishlist-table.loading:before {
display: block;
width: 24px;
height: 24px;
position: absolute;
top: 50%;
left: 50%;
margin-top:-12px;
margin-left:-12px;
content: "";
background-image: url(‘../images/loading.svg’);
background-repeat: no-repeat;
background-size: 100%;
z-index: 6;
}
.wishlist-table td {
position: relative;
}
.wishlist-table a.details {
padding:4px 16px;
background: #000000;
color: #ffffff;
text-align: center;
border:none !important
}
.wishlist-table a.wishlist-remove {
display: block;
width: 24px;
height: 24px;
position: absolute;
top: 50%;
left: 50%;
margin-top:-12px;
margin-left:-12px;
background-image: url(‘../images/remove.svg’);
background-repeat: no-repeat;
background-size: 100%;
z-index: 6;
border:none;
opacity:0;
}
.wishlist-table td:hover > a.wishlist-remove {
opacity:1;
}
[/php]
Then, add the loading.svg image to the images folder:
[php] <svg xmlns="http://www.w3.org/2000/svg" xmlns:xlink="http://www.w3.org/1999/xlink" viewBox="0 0 471.701 471.701"><path d="M409.6,0c-9.426,0-17.067,7.641-17.067,17.067v62.344C304.667-5.656,164.478-3.386,79.411,84.479
c-40.09,41.409-62.455,96.818-62.344,154.454c0,9.426,7.641,17.067,17.067,17.067S51.2,248.359,51.2,238.933
c0.021-103.682,84.088-187.717,187.771-187.696c52.657,0.01,102.888,22.135,138.442,60.976l-75.605,25.207
c-8.954,2.979-13.799,12.652-10.82,21.606s12.652,13.799,21.606,10.82l102.4-34.133c6.99-2.328,11.697-8.88,11.674-16.247v-102.4
C426.667,7.641,419.026,0,409.6,0z"/>
<path d="M443.733,221.867c-9.426,0-17.067,7.641-17.067,17.067c-0.021,103.682-84.088,187.717-187.771,187.696
c-52.657-0.01-102.888-22.135-138.442-60.976l75.605-25.207c8.954-2.979,13.799-12.652,10.82-21.606
c-2.979-8.954-12.652-13.799-21.606-10.82l-102.4,34.133c-6.99,2.328-11.697,8.88-11.674,16.247v102.4
c0,9.426,7.641,17.067,17.067,17.067s17.067-7.641,17.067-17.067v-62.345c87.866,85.067,228.056,82.798,313.122-5.068
c40.09-41.409,62.455-96.818,62.344-154.454C460.8,229.508,453.159,221.867,443.733,221.867z"/>
</svg>
[/php]
Wishlist Custom Option in the User Profile
Add the following code to the init action:
[php] // Wishlist option in the user profileadd_action( ‘show_user_profile’, ‘wishlist_user_profile_field’ );
add_action( ‘edit_user_profile’, ‘wishlist_user_profile_field’ );
function wishlist_user_profile_field( $user ) { ?>
<table class="form-table wishlist-data">
<tr>
<th><?php echo esc_attr__("Wishlist","text-domain"); ?></th>
<td>
<input type="text" name="wishlist" id="wishlist" value="<?php echo esc_attr( get_the_author_meta( ‘wishlist’, $user->ID ) ); ?>" class="regular-text" />
</td>
</tr>
</table>
<?php }
add_action( ‘personal_options_update’, ‘save_wishlist_user_profile_field’ );
add_action( ‘edit_user_profile_update’, ‘save_wishlist_user_profile_field’ );
function save_wishlist_user_profile_field( $user_id ) {
if ( !current_user_can( ‘edit_user’, $user_id ) ) {
return false;
}
update_user_meta( $user_id, ‘wishlist’, $_POST[‘wishlist’] );
}
[/php]
Power It
Now that we have added the important sections, we are ready to turn it on.
Open the main.js file and put the following code in it:
[php] (function($){"use strict";
})(jQuery);
[/php]
The next step is to gather the required data and create some variables:
[php] var shopName = opt.shopName+’-wishlist’,inWishlist = opt.inWishlist,
restUrl = opt.restUrl,
wishlist = new Array,
ls = sessionStorage.getItem(shopName),
loggedIn = ($(‘body’).hasClass(‘logged-in’)) ? true : false,
userData = ”;
[/php]
If User is Logged-in:
- Fetch current user data with AJAX
- If success update the wishlist
- Highlight the wishlist items
- Remove the session/local storage
- If fail show error message in the console for the developer
// Fetch current user data
$.ajax({
type: ‘POST’,
url: opt.ajaxUrl,
data: {
‘action’ : ‘fetch_user_data’,
‘dataType’: ‘json’
},
success:function(data) {
userData = JSON.parse(data);
if (typeof(userData[‘wishlist’]) != ‘undefined’ && userData[‘wishlist’] != null && userData[‘wishlist’] != "") {
var userWishlist = userData[‘wishlist’];
userWishlist = userWishlist.split(‘,’);
if (wishlist.length) {
wishlist = wishlist.concat(userWishlist);
$.ajax({
type: ‘POST’,
url:opt.ajaxPost,
data:{
action:’user_wishlist_update’,
user_id :userData[‘user_id’],
wishlist :wishlist.join(‘,’),
}
});
} else {
wishlist = userWishlist;
}
wishlist = wishlist.unique();
highlightWishlist(wishlist,inWishlist);
sessionStorage.removeItem(shopName);
} else {
if (typeof(ls) != ‘undefined’ && ls != null) {
ls = ls.split(‘,’);
ls = ls.unique();
wishlist = ls;
}
$.ajax({
type: ‘POST’,
url:opt.ajaxPost,
data:{
action:’user_wishlist_update’,
user_id :userData[‘user_id’],
wishlist :wishlist.join(‘,’),
}
})
.done(function(response) {
highlightWishlist(wishlist,inWishlist);
sessionStorage.removeItem(shopName);
});
}
},
error: function(){
console.log(‘No user data returned’);
}
});
}
[/php]
If User is Guest we fetch the wishlist from the session/local storage
[php] else {if (typeof(ls) != ‘undefined’ && ls != null) {
ls = ls.split(‘,’);
ls = ls.unique();
wishlist = ls;
}
}
[/php]
Now we have double-AJAX and some helper functions.
The first AJAX request gets the user id and the user wishlist data from WordPress. You can achieve this with a custom AJAX action added to the plugin code file:
[php] // Get current user datafunction fetch_user_data() {
if (is_user_logged_in()){
$current_user = wp_get_current_user();
$current_user_wishlist = get_user_meta( $current_user->ID, ‘wishlist’,true);
echo json_encode(array(‘user_id’ => $current_user->ID,’wishlist’ => $current_user_wishlist));
}
die();
}
add_action( ‘wp_ajax_fetch_user_data’, ‘fetch_user_data’ );
add_action( ‘wp_ajax_nopriv_fetch_user_data’, ‘fetch_user_data’ );
[/php]
The next AJAX request updates the user wishlist if there were already wishlist items from session/local storage:
[php] ffunction update_wishlist_ajax(){if (isset($_POST["user_id"]) && !empty($_POST["user_id"])) {
$user_id = $_POST["user_id"];
$user_obj = get_user_by(‘id’, $user_id);
if (!is_wp_error($user_obj) && is_object($user_obj)) {
update_user_meta( $user_id, ‘wishlist’, $_POST["wishlist"]);
}
}
die();
}
add_action(‘admin_post_nopriv_user_wishlist_update’, ‘update_wishlist_ajax’);
add_action(‘admin_post_user_wishlist_update’, ‘update_wishlist_ajax’);
[/php]
Helper Functions
Before going to the events part let us learn more about our helper functions
[php] Array.prototype.unique = function() {return this.filter(function (value, index, self) {
return self.indexOf(value) === index;
});
}
function isInArray(value, array) {return array.indexOf(value) > -1;}
function onWishlistComplete(target, title){
setTimeout(function(){
target
.removeClass(‘loading’)
.addClass(‘active’)
.attr(‘title’,title);
},800);
}
function highlightWishlist(wishlist,title){
$(‘.wishlist-toggle’).each(function(){
var $this = $(this);
var currentProduct = $this.data(‘product’);
currentProduct = currentProduct.toString();
if (isInArray(currentProduct,wishlist)) {
$this.addClass(‘active’).attr(‘title’,title);
}
});
}
[/php]
The first helper function makes the array unique, by removing duplicates.
On the other hand, the second one checks if the given value is present in the given array.
The last function executes when an item is added to the wishlist and the last one shows items that are in the wishlist.
Add Toggle
The next step is to add a click event to the wishlist toggle to power the actual functionality.
If you go to the shop page, refresh the browser, and click on any wishlist toggle you will see it is working!
[php] $(‘.wishlist-toggle’).each(function(){var $this = $(this);
var currentProduct = $this.data(‘product’);
currentProduct = currentProduct.toString();
if (!loggedIn && isInArray(currentProduct,wishlist)) {
$this.addClass(‘active’).attr(‘title’,inWishlist);
}
$(this).on(‘click’,function(e){
e.preventDefault();
if (!$this.hasClass(‘active’) && !$this.hasClass(‘loading’)) {
$this.addClass(‘loading’);
wishlist.push(currentProduct);
wishlist = wishlist.unique();
if (loggedIn) {
// get user ID
if (userData[‘user_id’]) {
$.ajax({
type: ‘POST’,
url:opt.ajaxPost,
data:{
action:’user_wishlist_update’,
user_id :userData[‘user_id’],
wishlist :wishlist.join(‘,’),
}
})
.done(function(response) {
onWishlistComplete($this, inWishlist);
})
.fail(function(data) {
alert(opt.error);
});
}
} else {
sessionStorage.setItem(shopName, wishlist.toString());
onWishlistComplete($this, inWishlist);
}
}
});
});
[/php]
List Items in Wishlist Table
Add the following code into main.js at the very bottom of our wrapper function:
[php] setTimeout(function(){if (wishlist.length) {
restUrl += ‘?include=’+wishlist.join(‘,’);
restUrl += ‘&per_page=’+wishlist.length;
$.ajax({
dataType: ‘json’,
url:restUrl
})
.done(function(response){
$(‘.wishlist-table’).each(function(){
var $this = $(this);
$.each(response,function(index,object){
$this.append(‘<tr data-product="’+object.id+’"><td><a class="wishlist-remove" href="#" title="’+opt.removeWishlist+’"></a>’+object.image+'</td><td>’+object.title["rendered"]+'</td><td>’+object.price+'</td><td>’+object.stock+'</td><td><a class="details" href="’+object.link+’">’+opt.buttonText+'</a></td></tr>’);
});
});
})
.fail(function(response){
alert(opt.noWishlist);
})
.always(function(response){
$(‘.wishlist-table’).each(function(){
$(this).removeClass(‘loading’);
});
});
} else {
$(‘.wishlist-table’).each(function(){
$(this).removeClass(‘loading’);
});
}
},1000);
[/php]
Here we have two options for the REST API:
- using the WordPress REST API
- using the WooCommerce REST API.
Go to the main plugin file and at the very bottom add the following code:
[php] // Extend REST APIfunction rest_register_fields(){
register_rest_field(‘product’,
‘price’,
array(
‘get_callback’ => ‘rest_price’,
‘update_callback’ => null,
‘schema’ => null
)
);
register_rest_field(‘product’,
‘stock’,
array(
‘get_callback’ => ‘rest_stock’,
‘update_callback’ => null,
‘schema’ => null
)
);
register_rest_field(‘product’,
‘image’,
array(
‘get_callback’ => ‘rest_img’,
‘update_callback’ => null,
‘schema’ => null
)
);
}
add_action(‘rest_api_init’,’rest_register_fields’);
function rest_price($object,$field_name,$request){
global $product;
$id = $product->get_id();
if ($id == $object[‘id’]) {
return $product->get_price();
}
}
function rest_stock($object,$field_name,$request){
global $product;
$id = $product->get_id();
if ($id == $object[‘id’]) {
return $product->get_stock_status();
}
}
function rest_img($object,$field_name,$request){
global $product;
$id = $product->get_id();
if ($id == $object[‘id’]) {
return $product->get_image();
}
}
function maximum_api_filter($query_params) {
$query_params[‘per_page’]["maximum"]=100;
return $query_params;
}
add_filter(‘rest_product_collection_params’, ‘maximum_api_filter’);
[/php]
Removing Items From Wishlist
Add the following code at the very bottom of the wrapper function in the main.js file:
[php] $(document).on(‘click’, ‘.wishlist-remove’, function(){var $this = $(this);
$this.closest(‘table’).addClass(‘loading’);
wishlist = [];
$this.closest(‘table’).find(‘tr’).each(function(){
if ($(this).data(‘product’) != $this.closest(‘tr’).data(‘product’)) {
wishlist.push($(this).data(‘product’));
if (loggedIn) {
// get user ID
if (userData[‘user_id’]) {
$.ajax({
type: ‘POST’,
url:opt.ajaxPost,
data:{
action:’user_wishlist_update’,
user_id :userData[‘user_id’],
wishlist :wishlist.join(‘,’),
}
})
.done(function(response) {
$this.closest(‘table’).removeClass(‘loading’);
$this.closest(‘tr’).remove();
})
.fail(function(data) {
alert(opt.error);
});
}
} else {
sessionStorage.setItem(shopName, wishlist.toString());
setTimeout(function(){
$this.closest(‘table’).removeClass(‘loading’);
$this.closest(‘tr’).remove();
},500);
}
}
});
});
[/php]
This is the outcome: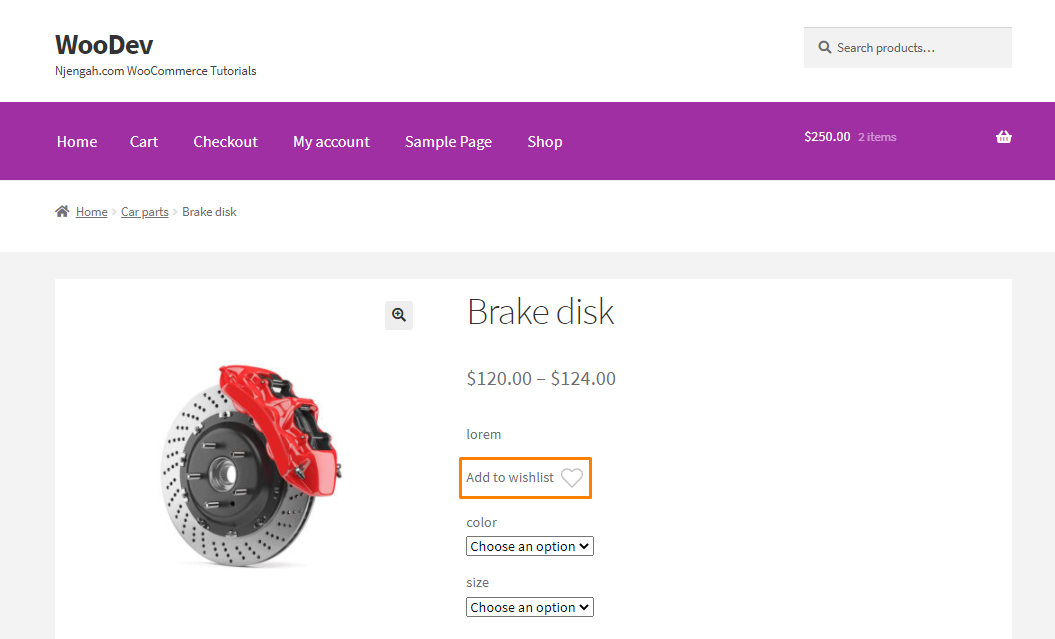
Conclusion
In this tutorial, we have created a custom plugin to add Wishlist in WooCommerce. We hope that this post helped you to add wishlist functionality to your store.
Similar Articles
- WooCommerce Redirect After Logout [Ultimate Guide]
- WooCommerce Redirect After Checkout : Redirect to Custom Thank You Page
- Complete Guide to Using WordPress Custom Hooks do_action & apply_filters With Example
- How to Fix Uncaught TypeError: wp.template is not a function
- How to Redirect User If Not Logged in WordPress » Page Redirect
- How to Add Search Box on Top of Page Storefront Theme
- How to Get Current Product Category Name in WooCommerce
- How to Hide Tax Label In WooCommerce
- How to Check if User is Logged In WordPress
- How to Create Product Programmatically WooCommerce
- How to Get Product Description & Display WooCommerce