 Do you need to add categories to WooCommerce Products in your store? This article will give you a detailed step-by-step guide on how you can add categories in your WooCommerce store. WooCommerce allows you to display either product, categories on the shop page, or subcategories on the category pages on your archive pages.
WooCommerce Product Categories
Normally, many WooCommerce users select the third option, products, and categories, or subcategories. If you do this, it means that visitors can either select products right from the home page or refine their search by clicking through to a product category archive.
Additionally, product categories help you to keep your store organized if you have a variety of products. For example, if you are selling belts and t-shirts, they should not be in the same category.
This implies that your store will always be organized and your customers will easily find products that fall into a certain group in your store.
These taxonomies help you to have a well-organized product catalog that customers will enjoy using to find products, proving to be a very valuable asset in your store.
Steps to Add Categories to WooCommerce Products
First of all, you need to have thought out how you will probably categorize and tag your products. This will help you to speed up the product creation time, meaning that you will find additional time to do other important things in your online store.
It will only take you minutes to set up categories to WooCommerce products using the following detailed steps:
- Log into your WordPress site and access the Dashboard as the admin user.
- From the Dashboard menu, click on Products > Add New when you are adding a new product. However, if it is an existing product go to Products > Edit. When creating new products, or edit existing ones, you can select or add new product categories from the individual product page. This has been highlighted in the image below:

- After selecting the categories that you need, click on Update so that you can save all the changes that you have made on the products.
Additionally, there is a second way to do this. Just follow these simple steps and you will be able to add categories on WooCommerce Products in just minutes:
- Log into your WordPress site and access the Dashboard as the admin user.
- From the Dashboard menu, click on Products > Categories. This will bring a window that has added product categories when you next add or edit a product. You can add any category details that you need as shown in the image below:
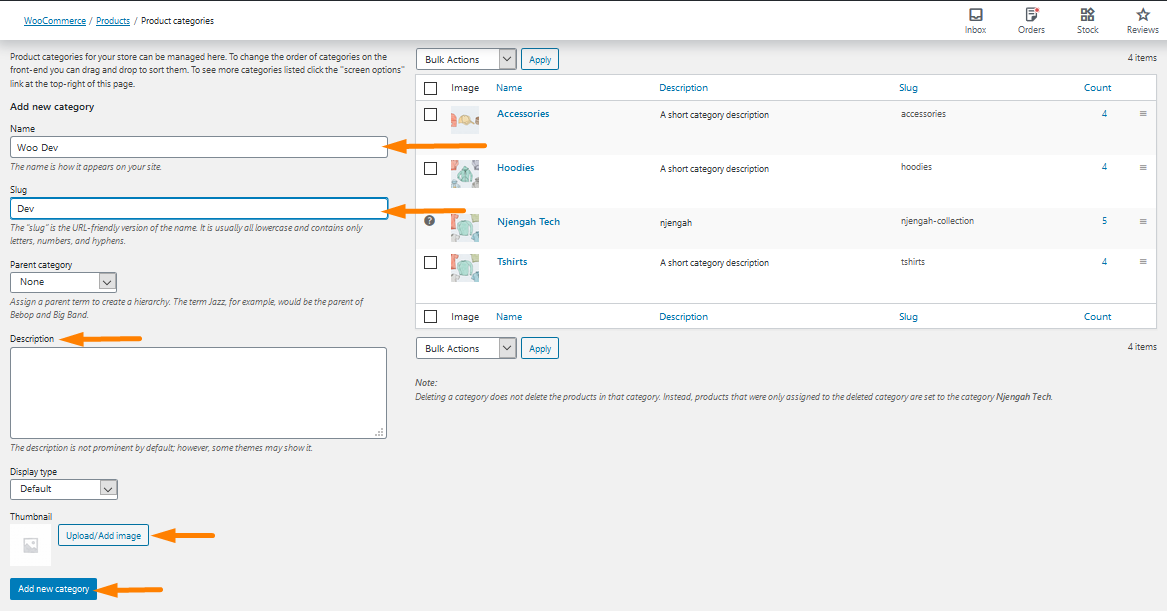
- Be sure to Add New Category and save all your changes for the product categories to appear. From the above screenshot, you can see that you can even have nested category groups and this can help your customers to easily find products as they are browsing through your store.
Conclusion
In this post, we have highlighted how you can add categories to WooCommerce Products using two different ways. They are very easy to understand and implement as no coding skills are needed. Additionally, the main aim of this post was to shed some light on the importance of having categories on your WooCommerce Products. They help users in your store to have a granulated search, helping them to easily find products.
Similar Articles
- How to Remove Built with Storefront & Woocommerce Footer Link with 4 Simple Options
- How to Find WordPress Category ID in 3 Easy & Quick Options
- How to Change Return to Shop Link in Woocommerce
- How to Skip Cart and Redirect to Checkout Page WooCommerce
- How to Remove Related Products in WooCommerce in 3 Easy Options
- How to Hide All Products From Shop Page in WooCommerce
- How to Get Order ID In Woocommerce
- How to Hide the WooCommerce Coupon Code Field
- Best WooCommerce Plugins for Your Store (Most are FREE)
- How to Hide a Product in WooCommerce or Hide Products by Category or Roles
- How to Rename Order Status Messages in WooCommerce
- Hide or Remove the Quantity Field from WooCommerce Product Page
- How to Add GTIN Numbers On Products In WooCommerce
- How to Sort WooCommerce Categories for Better User Experience
- How to Display WooCommerce Products By Category
- How to Set Featured Products In WooCommerce
- Remove Category from Product Page WooCommerce In 2 Easy Options
- How to Replace Add to Cart Button With Link WooCommerce
- How to Add Description after Price in WooCommerce
- How to Remove Default Product Sorting WooCommerce
Comments are closed.