
WooCommerce can work wonders, but it can be equally painful to make changes if you are not a WordPress developer.
Chances are you want to change the page layout, or you are wondering how to change the link color in your WooCommerce store.
Change Link Color Storefront Theme
In this tutorial, I will share with you how you can change the link color in the Storefront theme. However, before we begin, we will take a detour and check out how to specify CSS colors. CSS statements are in the format [property] : [value].
The property that allows you to change the CSS link color is “color”. After we put “color:” down, the next thing is to set the value. Preset keywords like green and red are recognized.
Alternatively, you can also specify “RGB” (Red, Green, and Blue) colors in CSS. The most common way used to specify color is a hexadecimal value.
With that said, let us look at how you can change the link color in the Storefront theme.
Steps to Change the Link Color in the Storefront Theme
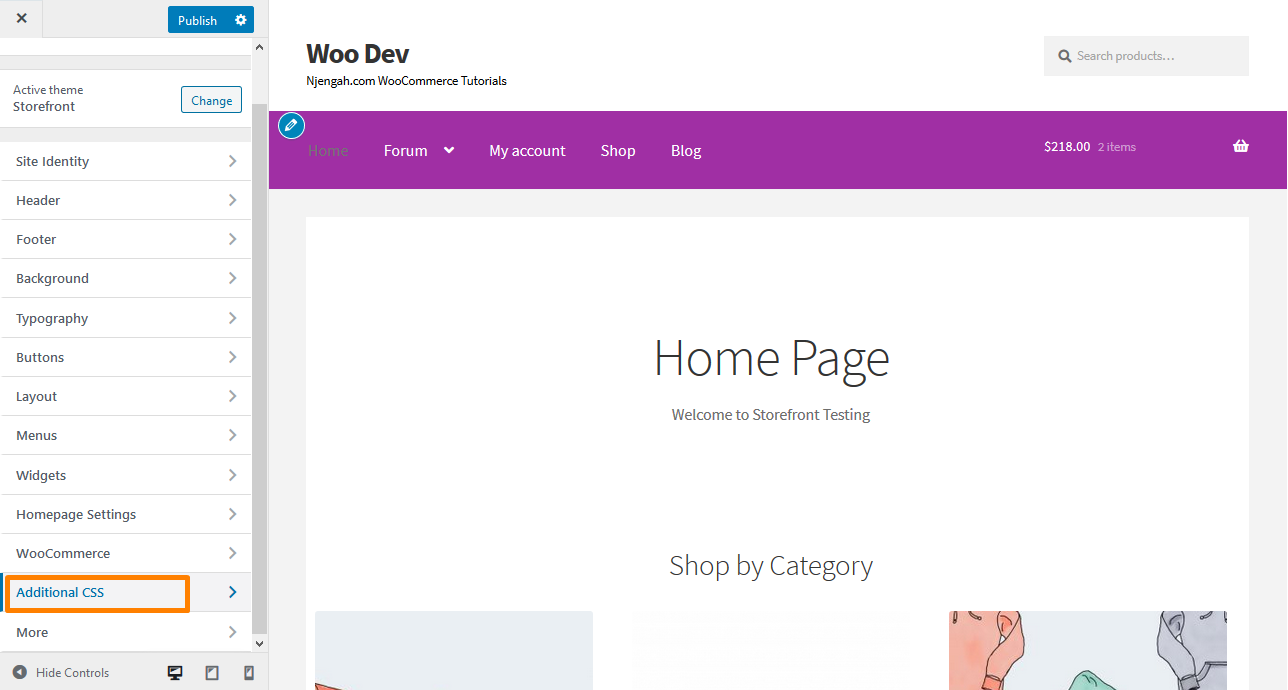
- Log into your WordPress site and access the Dashboard as the admin user.
- From the Dashboard menu, click on Appearance Menu > Customize.
- On the bottom left, you should see a link that says “Additional CSS”. Click that.
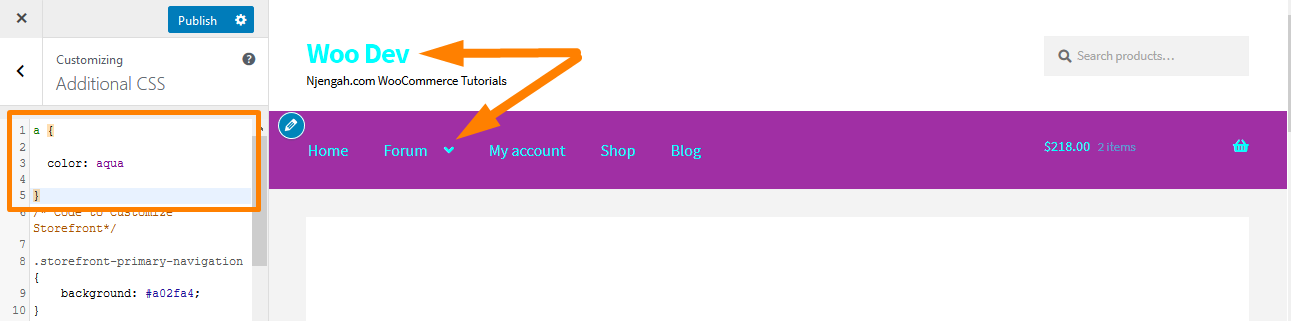
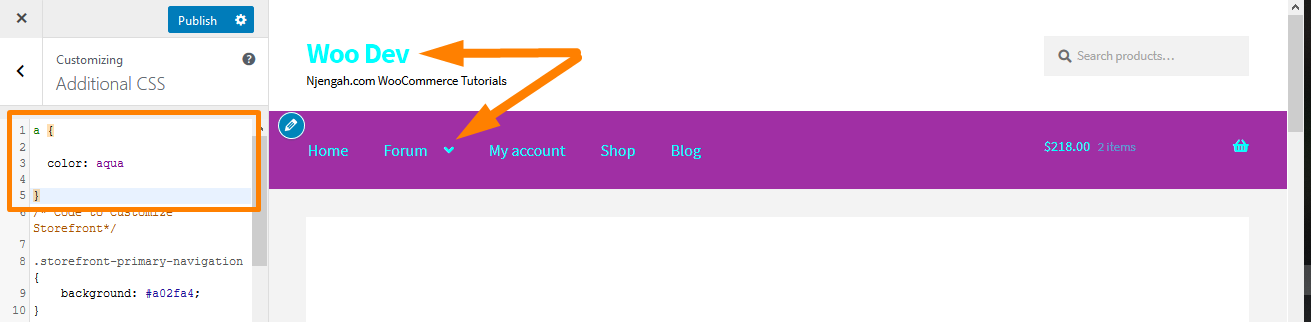
- Add the following code in the box that comes up. However, you should make sure you do not delete existing CSS!
a {

 color: aqua

}
- This will be the outcome:
Alternatively, you can use some shortcuts that may help you in the future. You can use hex to define the color. For example:
a  {

color: #808080

}
How it Works
The “a” stands for “anchor”. In the example, I am defining a rule for all “anchors”. Copying and pasting the code will change the link color, but that does not address other situations. It just sets the default link color.
However, you can also change the link hover color in WordPress and the text color to custom hex values, as shown below:
a:hover {

color: aqua

}
This is the outcome: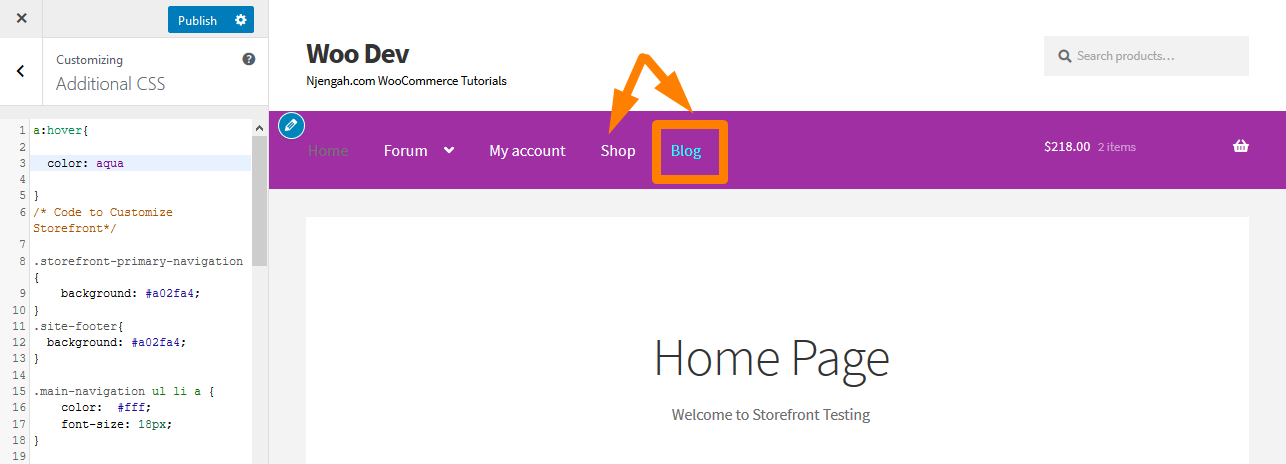
Moreover, you can change the color of links that a user has already visited. This can be achieved using:
a: visited {

color: aqua

}
This code will change the link color to aqua after a user has visited that link on your store.
The Importance of!Important
Over the years, CSS experts have debated whether to get rid of them! important flag. The reason behind this is that it is often misused. This method performs a complete override of any conflicting styles.
For example, if you have copied and pasted code with internal CSS and has no effect, you can add this method.
However, the recommended way to fix this is to go into the HTML and add some divs and spans where applicable. After that, add that div or span to your style sheet. Most developers will understand this. However, if you are a beginner, you need to learn how to change your store’s link color using the “!important” trick. It can save you hours of troubleshooting.
For example:
a {

color: aqua !important

}
Conclusion
In summary, I have shared how you can change the link color in your WooCommerce store. For illustration purposes, I have used the Storefront theme. Additionally, I have shared how you can change the link’s color on hover or when a user has visited that page.
Moreover, I have highlighted the different pseudo-classes you can use in CSS. In the last section, you have seen the importance of the !important method. You can use it if the CSS rule does not have any effect.

Joe is an experienced full-stack web developer with a decade of industry experience in the LAMP & MERN stacks, WordPress, WooCommerce, and JavaScript – (diverse portfolio). He has a passion for creating elegant and user-friendly solutions and thrives in collaborative environments. In his spare time, he enjoys exploring new tech trends, tinkering with new tools, and contributing to open-source projects. You can hire me here for your next project.
Similar Articles
- How to Add a Trust or Secure Logo on WooCommerce Checkout Page
- How to Display All Products Purchased by User – Purchase History
- How to Remove Proudly Powered by WordPress Footer Link
- How to Remove Bullets from Unordered List in WordPress
- How to Redirect to Cart after Login in WooCommerce
- How to Change Menu Color WooCommerce Storefront
- How to Remove Related Products WooCommerce Storefront Theme
- How to Get Registered Sidebars WordPress with Foreach Loop
- How to Remove Footer Storefront Theme WooCommerce
- How to Add Text Before the Price in WooCommerce » Add Text Before Price
- How to Redirect User If Not Logged in WordPress » Page Redirect
- How to Redirect a WordPress Page Without Plugins?
- How to Add Storefront Theme Header Background Image
- How to Count Items Added to Cart WooCommerce Cart Count Code
- How to Fix Uncaught TypeError: wp. template is not a function
- How to Create Number Pagination in WordPress Without Using Plugin
- How to Change WooCommerce Storefront Logo Size
- How to Change the WooCommerce ‘Added to Cart’ Notice
- How to Set Up Homepage in WooCommerce Storefront
- How to Change Main Menu Font Size Storefront Theme