 As a WooCommerce developer, there is often need to create admin notices when you are creating a theme or WooCommerce plugin. The WooCommerce admin notice can be to warn users about an update, to inform them about a process or to give a reminder on something important.
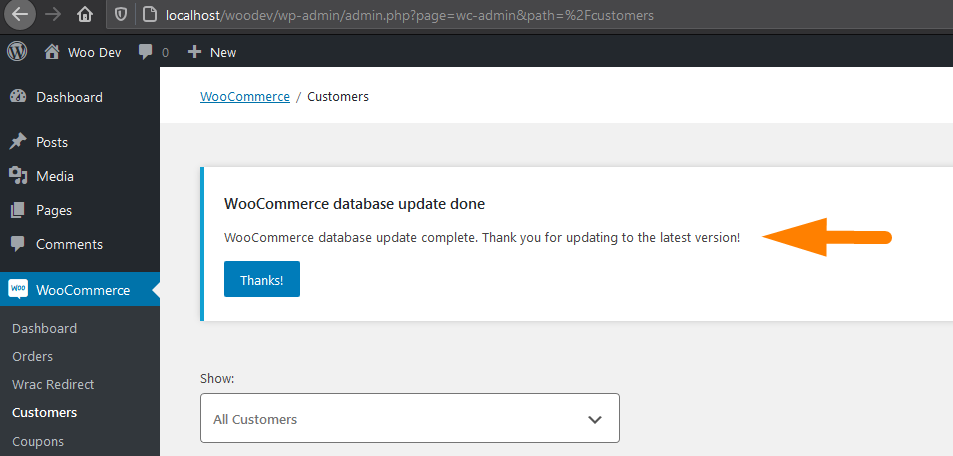
WooCommerce Admin Notice Example
Generally, a WordPress admin notice can vary and have different color codes and they will appear at the top of an admin page as seen in the image below of a WooCommerce admin notice.
An each of the admin notices is just a div that is styled with a white background, and the notice text is output and the left border has different color of different notices as shown below.
The five different types are notices colors include grey, red, green, orange and blue. Given the class names, the red ones are used to display errors, green for success messages, orange for warnings and blue for informative notices and grey is for default notices.
The general WordPress admin notices can be as illustrated on the image below with the respective code :
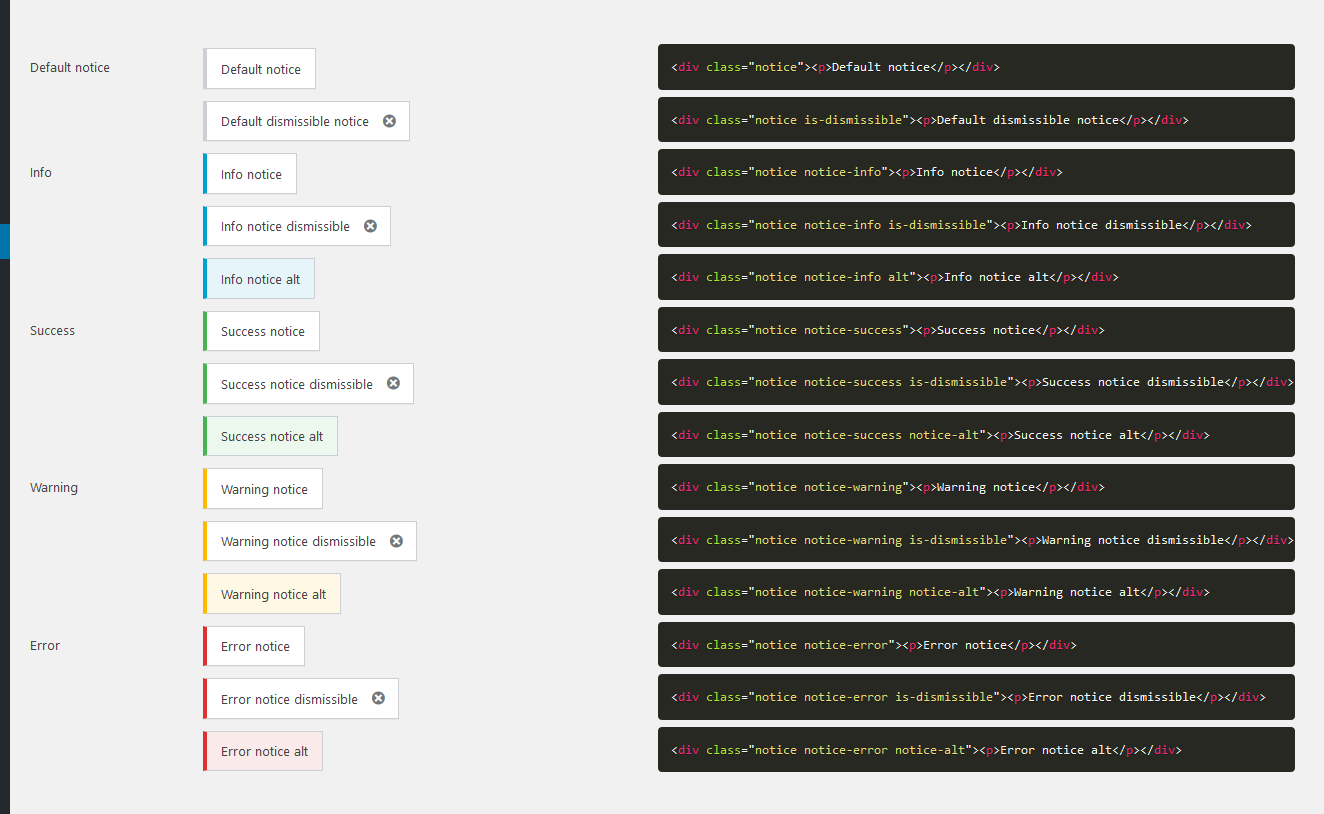 If you would like to copy the code the following is the code snippet for each of these admin WordPress admin notices.
<div class="notice"><p>Default notice</p></div>

<div class="notice is-dismissible"><p>Default dismissible notice</p></div>

<div class="notice notice-info"><p>Info notice</p></div>

<div class="notice notice-info is-dismissible"><p>Info notice dismissible</p></div>

<div class="notice notice-info alt"><p>Info notice alt</p></div>

<div class="notice notice-success"><p>Success notice</p></div>

<div class="notice notice-success is-dismissible"><p>Success notice dismissible</p></div>

<div class="notice notice-success notice-alt"><p>Success notice alt</p></div>

<div class="notice notice-warning"><p>Warning notice</p></div>

<div class="notice notice-warning is-dismissible"><p>Warning notice dismissible</p></div>

<div class="notice notice-warning notice-alt"><p>Warning notice alt</p></div>

<div class="notice notice-error"><p>Error notice</p></div>

<div class="notice notice-error"><p>Error notice</p></div>

<div class="notice notice-error is-dismissible"><p>Error notice dismissible</p></div>

<div class="notice notice-error notice-alt"><p>Error notice alt</p></div>
As you can see on the code above the difference in the notice are the classes assigned for each type of WordPress admin notice. The following is a list of the four most commonly used WooCommerce admin notice classes :
- Error notice:
notice-errorclass - Success notice:
notice-successclass - Informative notice:
notice-infoclass - Warning notice:
notice-warningclass
Creating WooCommerce Or WordPress Admin Notice
To create the admin notice you need to use an action hook that hooks on the admin_notices event . The notice div and the content should be added to the callback function of the action hook.
You can use this admin notice hook in your plugin to let the users get notified of important updates, information or warnings.
WordPress Error Notice Example
The following is an example of an error notice :
<?php
add_action( 'admin_notices', 'njengah_error_notice' );

function njengah_error_notice() {
       ?>
       <div class="notice notice-error">
          <p><?php _e( 'Error notice example.', 'text-domain' );?></p>
       </div>
       <?php
}
?>
WordPress Info Notice Example
The following is an example of an info notice :
<?php
add_action( 'admin_notices', 'njengah_info_notice' );

function njengah_info_notice() {
       ?>
       <div class="notice notice-info">
            <p><?php _e( 'Info notice example', 'text-domain' ); ?></p>
       </div>
       <?php
 }
Above are two practical examples of how you can create an admin notice for your WordPress or WooCommerce plugin.
You can change the notice classes to fit the type of notice you want to create. You can as well wrap the action hook in an if statement so that you display the notice conditionally as in the example below.
Display WordPress Admin Notice Conditionally
<?php
if( ! empty( get_option( 'njengah_update_status' ) ) ) {
    add_action( 'admin_notices', 'njengah_update_notice' );
}

function njengah_update_notice() {
?>
    <div class="notice notice-success">
        <p><?php _e( 'The update was completed successfully!', 'text-domain' ); ?></p>
    </div>
<?php
}
?>
Conclusion
In this post, we have outlined how you can create an admin notice in WordPress and WooCommerce plugin development. You need to understand the various WordPress admin notice classes and add the message in an action hook that hooks on the admin_notices hook. That’s all on how to create WooCommerce admin notice.

Joe is an experienced full-stack web developer with a decade of industry experience in the LAMP & MERN stacks, WordPress, WooCommerce, and JavaScript – (diverse portfolio). He has a passion for creating elegant and user-friendly solutions and thrives in collaborative environments. In his spare time, he enjoys exploring new tech trends, tinkering with new tools, and contributing to open-source projects. You can hire me here for your next project.
Similar Articles
- How to Get Current User Role in WordPress & Display Roles
- How to Reset WordPress Password from PHPMyAdmin
- How to Remove Built with Storefront & Woocommerce Footer Link with 4 Simple Options
- How to Redirect User If Not Logged in WordPress » Page Redirect
- How to Fix WordPress Admin Dashboard Is Not Displaying Properly & CSS Not Loading
- How to Display Category Name in WordPress Using a Practical Example
- How to Display WooCommerce Products By Category
- How to Stop WordPress Contact Form 7 Spam Without Plugin
- How to Access WordPress Admin Dashboard or Login to your WordPress Dashboard
- How to Set Featured Products In WooCommerce
- How to Check if User is Logged In in WordPress
- How to Get Post ID by Slug in WordPress With a Practical Example
- How to Remove or Disable Reviews In WooCommerce
- How to Hide the WordPress Admin Bar Programmatically Without Plugin
- How to Remove WordPress Admin Menu Items Programmatically Without Plugin
- How to Get Logged In User Information in WordPress
- WooCommerce Redirect after Checkout : How to Automatically Redirect to a Custom Page After Checkout
- How to Move Description Under Image in WooCommerce
- How to Get Order ID In Woocommerce
- How to Check if User is Logged In in WordPress
Comments are closed.