 The checkout process in any online store is the most important in the buyer journey. This is because it is the last chance that you get to convince shoppers to make a purchase. Additionally, it is worth mentioning that many shopping carts are abandoned when users change their minds in the last step.
Storefront Customize Checkout Page
Factors like shipping costs and payment options are the leading cause of cart abandonment. However, the checkout page also plays a huge role. If the checkout form is too complicated or takes long to complete, customers might purchase it elsewhere. Additionally, I recommend removing checkout fields that are asking for sensitive information.
The best way to optimize the checkout form is to have the fields that are required. They should be based on your business need and the target audience.
This post will walk you through how to customize the checkout page to meet your target audience and business needs.
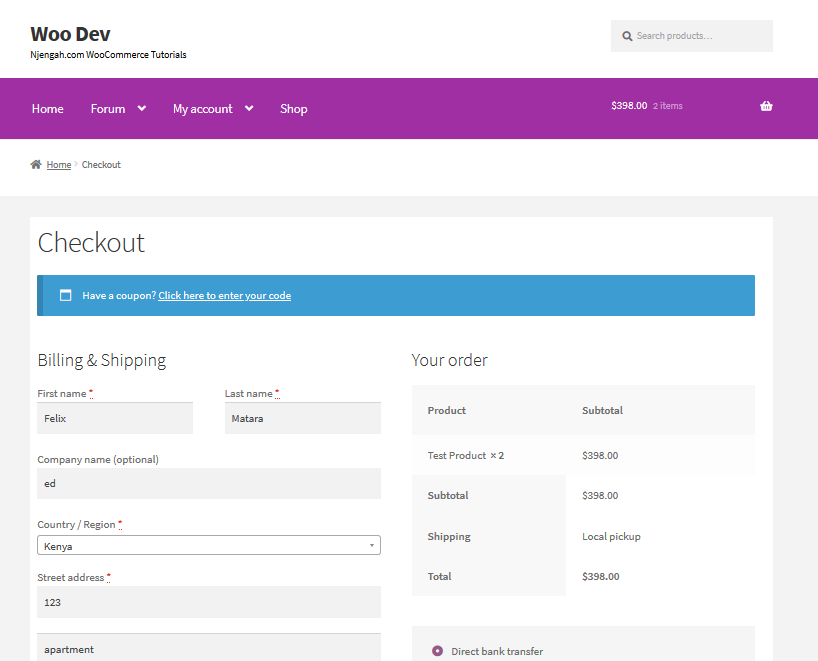
Customizing the Checkout Fields
The checkout page asks customers for:
- Billing details
- First name
- Last name
- Company name
- Country
- Address
- Town/City
- District
- Postcode/ZIP
- Phone
- Email address
- Order notes
The best way to customize the checkout fields is by using code snippets. To see all of the classes and selectors, use your browser’s inspector on your website to find the exact element you want to customize.
<body class="woocommerce-checkout">

<div class="woocommerce">

<form class="woocommerce-checkout">

<div id="customer_details" class="col2-set">

<div class="woocommerce-billing-fields">

<p class="form-row">

<div class="woocommerce-shipping-fields">

<p class="form-row">

<div class="woocommerce-additional-fields">

<div id="order_review" class="woocommerce-checkout-review-order">

<table class="woocommerce-checkout-review-order-table">

<div id="payment">

<ul class="wc_payment_methods payment_methods methods">

<div class="form-row place-order">
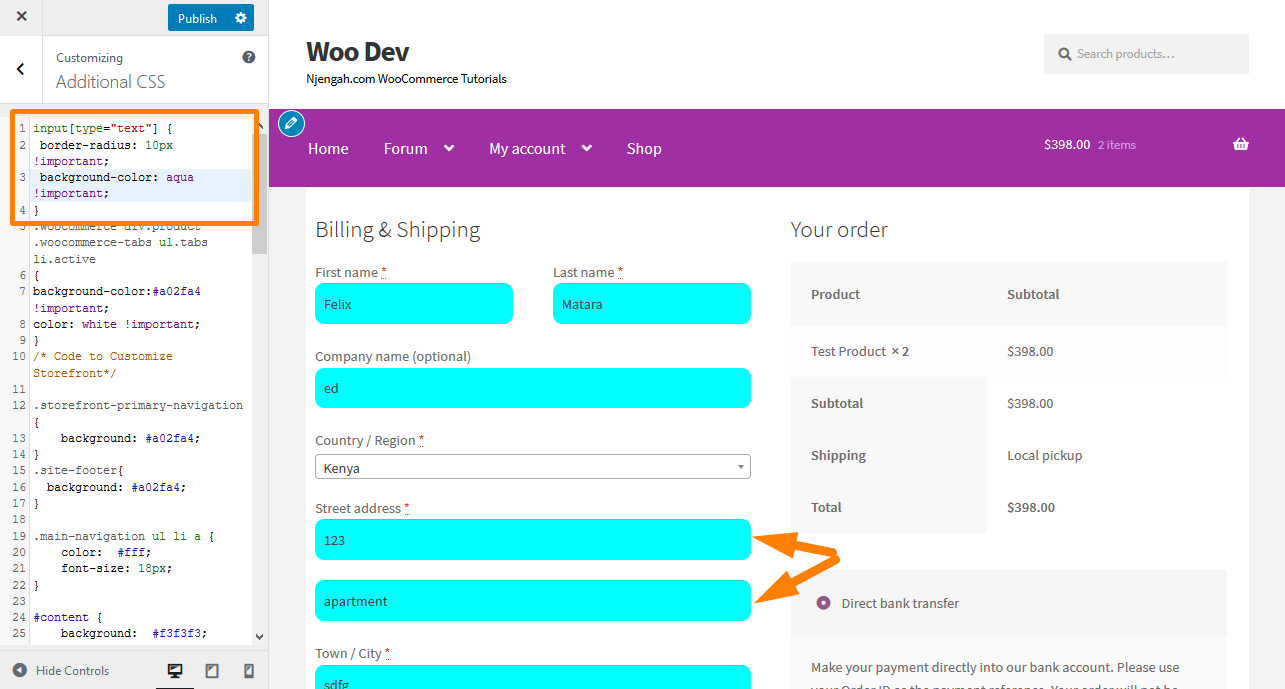
Steps to Change the Background Color and Layout of the Text Input Boxes and Give Them Rounded Corners
Here are the simple steps you need to follow:
- Log into your WordPress site and access the Dashboard as the admin user.
- From the Dashboard menu, click on Appearance Menu > Customize.
- Navigate down to Additional CSS in the left sidebar that appears.
- Add the CSS
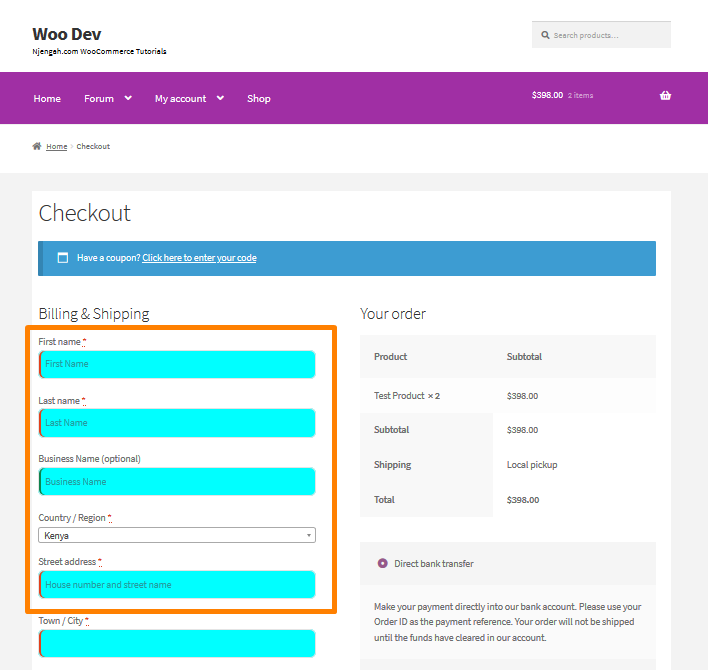
input[type="text"] {

border-radius: 10px !important;

background-color: aqua !important;

}
- This is the outcome:
- To change the layout of the fields, add the following CSS code:
/****************CHECKOUT***************/

.woocommerce form .form-row {

width: 100% !important;

}

.woocommerce-checkout #payment div.payment_box input.input-text, .woocommerce-checkout #payment div.payment_box textarea {

width: 100% !important;

padding: 8px;

}

.woocommerce #payment .form-row select, .woocommerce-page #payment .form-row select {

width: 100%;

height: 30px;

}

.woocommerce .col2-set .col-1, .woocommerce-page .col2-set .col-1,.woocommerce .col2-set .col-2, .woocommerce-page .col2-set .col-2 {

float: left;

width: 100%;

}

.custom-checkout h3 {

background-color: #165f1c;  /****CHANGE TO COLOR YOU WANT TO USE FOR TITLE BACKGROUND ****/

width: 45%;

text-align: center;

padding: 10px;

border-radius: 5px;

margin-top: 50px;

color: #FFF;

float: right;

}

.woocommerce form .form-row input.input-text, .woocommerce form .form-row textarea {

padding: .6180469716em;

background-color: #f2f2f2;

color: #43454b;

outline: 0;

border: 0;

-webkit-appearance: none;

border-radius: 2px;

box-sizing: border-box;

font-weight: 400;

border:solid 2px #e4e4e4;

}

#wc_checkout_add_ons {

width: 45%;

float: right;

text-align: center;

}

@media screen and (min-width: 980px) {

.woocommerce-shipping-fields h3, .woocommerce-billing-fields h3 {width:100%;}

.woocommerce .col2-set, .woocommerce-page .col2-set {

width: 45%;

float: left;

}

.woocommerce-checkout-review-order{

width: 45%;

float: right;

}

}

@media screen and (max-width: 979px) {

.custom-checkout h3 {

width: 100%;

}

}
- This is the outcome:

Steps to Remove a Checkout Field
Here are the steps that you need to follow:
- Log into your WordPress site and access the Dashboard as the admin user.
- From the Dashboard menu, click on Appearance Menu > Theme Editor Menu. When the Theme Editor page is opened, look for the theme functions file to remove the checkout field.
- Add the following code to the php file. However, pasting the entire code will remove all fields from the checkout page, so be sure to include only the fields you want to remove.
/**

Remove all possible fields

**/

function wc_remove_checkout_fields( $fields ) {

// Billing fields

unset( $fields['billing']['billing_company'] );

unset( $fields['billing']['billing_email'] );

unset( $fields['billing']['billing_phone'] );

unset( $fields['billing']['billing_state'] );

unset( $fields['billing']['billing_first_name'] );

unset( $fields['billing']['billing_last_name'] );

unset( $fields['billing']['billing_address_1'] );

unset( $fields['billing']['billing_address_2'] );

unset( $fields['billing']['billing_city'] );

unset( $fields['billing']['billing_postcode'] );
// Shipping fields

unset( $fields['shipping']['shipping_company'] );

unset( $fields['shipping']['shipping_phone'] );

unset( $fields['shipping']['shipping_state'] );

unset( $fields['shipping']['shipping_first_name'] );

unset( $fields['shipping']['shipping_last_name'] );

unset( $fields['shipping']['shipping_address_1'] );

unset( $fields['shipping']['shipping_address_2'] );

unset( $fields['shipping']['shipping_city'] );

unset( $fields['shipping']['shipping_postcode'] );

// Order fields

unset( $fields['order']['order_comments'] );

return $fields;

}

add_filter( 'woocommerce_checkout_fields', 'wc_remove_checkout_fields' );
It is worth mentioning that the country field is required. If you remove this field, customers’ orders cannot be completed. This is because you will get an error saying, “Please enter an address to continue.”
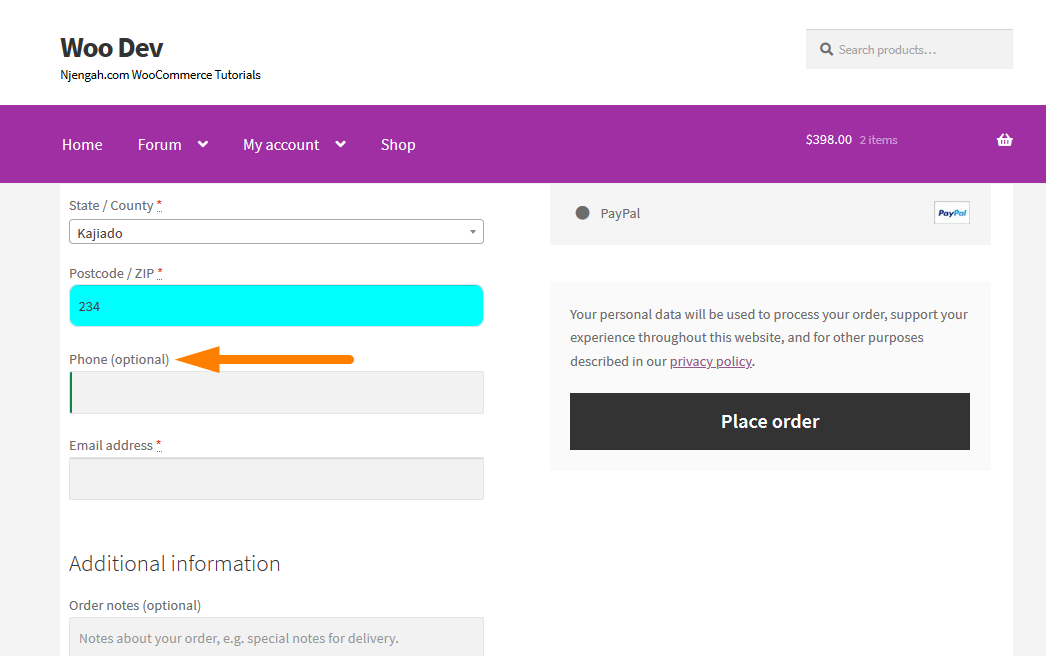
Steps to Make a Required Field Not Required
In this example, I will edit the Billing Phone field. Here are the steps that you need to follow:
- Log into your WordPress site and access the Dashboard as the admin user.
- From the Dashboard menu, click on Appearance Menu > Theme Editor Menu. When the Theme Editor page is opened, look for the theme functions file to make a required field not required.
- Add the following code to the function.php file
add_filter( 'woocommerce_billing_fields', 'wc_unrequire_wc_phone_field');

function wc_unrequire_wc_phone_field( $fields ) {

$fields['billing_phone']['required'] = false;

return $fields;

}
- This is the outcome:
Steps to Change Input Field Labels and Placeholders
Here are the simple steps you need to follow:
- Log into your WordPress site and access the Dashboard as the admin user.
- From the Dashboard menu, click on Appearance Menu > Theme Editor Menu. When the Theme Editor page is opened, look for the theme functions file to change input field labels and placeholders.
- Add the following code to the php file
add_filter('woocommerce_checkout_fields', 'custom_override_checkout_fields');

function custom_override_checkout_fields($fields)

{

unset($fields['billing']['billing_address_2']);

$fields['billing']['billing_company']['placeholder'] = 'Business Name';

$fields['billing']['billing_company']['label'] = 'Business Name';

$fields['billing']['billing_first_name']['placeholder'] = 'First Name';

$fields['shipping']['shipping_first_name']['placeholder'] = 'First Name';

$fields['shipping']['shipping_last_name']['placeholder'] = 'Last Name';

$fields['shipping']['shipping_company']['placeholder'] = 'Company Name';

$fields['billing']['billing_last_name']['placeholder'] = 'Last Name';

$fields['billing']['billing_email']['placeholder'] = 'Email Address ';

$fields['billing']['billing_phone']['placeholder'] = 'Phone ';

return $fields;

}
- This will be the outcome:
Conclusion
In summary, I have shared how you can customize the checkout fields on the checkout page. Optimizing this page is important, as it is the last chance you get to convince the shoppers to make a purchase.
Additionally, you need to collect the information you need based on the business need and the target audience. This will help you to reduce cart abandonment and improve sales in your store significantly.
However, if you cannot modify the code snippets I have shared, please hire a developer so that you do not breakdown your site.
Similar Articles
- How to Add Extra Field in WooCommerce Checkout Form
- How to Hide WooCommerce Product from Search Results
- How to Sell Digital Products With WooCommerce
- How to Add GTIN Numbers On Products In WooCommerce
- How to Add Custom Order Status in WooCommerce
- Hide or Remove the Quantity Field from WooCommerce Product Page
- How to Hide Category WooCommerce Storefront Theme
- How to Disable Payment Method for Specific Category
- How to Hide Mobile Footer From Storefront WooCommerce
- How to Change Button Color Storefront Theme
- How to Change Storefront Number of Products Per Row
- How to Turn off Next Product Tabs In WooCommerce Storefront
- How to Remove Related Products WooCommerce Storefront Theme
- WooCommerce Logout PHP Snippet to Create Logout Button
- How to Change Products per Page WooCommerce Storefront Theme
- How to Add WooCommerce Payment Icons In the Footer [HTML]
- How to Remove Cart from Storefront Theme Header
- How to Change Storefront Theme Order of Products
- How to Change Font Size WooCommerce Storefront Theme
- How to Rename Order Status Messages in WooCommerce