 Are you looking for a way to add a custom add to cart button on any page?The Add to Cart button is very important in any online store. When a customer clicks on this button, the product is added to the cart.
It directly leads to sales and revenues.
Therefore, if you want to create a page that will include products for sale, it is important to add a custom Add to Cart button.
It is important to note that WooCommerce provides you with many customization options available at different levels, like WordPress.
How to Add Custom Add to Cart Button In WooCommerce
In this post, we will customize the Add to Cart button and add it to any template page. It is worth mentioning that you need some coding skills before you proceed.
However, if you are not comfortable with handling code, read on as we have tried our best to explain each step.
Let us look at how you can achieve this:
Steps to Add Custom Add to Cart Button in WooCommerce
Before we start, here is the code snippet that will add the button to any template page.
[php] <?php/* Template Name: Customize Add To Cart*/
get_header(); ?>
<div id="primary" class="content-area">
<main id="main" class="site-main" role="main">
<ul class="products">
<?php
$args = array(
‘post_type’ => ‘product’,
‘posts_per_page’ => 12,
);
$loop = new WP_Query( $args );
if ($loop->have_posts()) {
while ($loop->have_posts()) : $loop->the_post();
?>
<div id="product-image1">
<a href="<?php echo esc_url( get_permalink( $product->get_id() ) ); ?>"
title="<?php echo esc_attr( $product->get_title() ); ?>">
<?php echo $product->get_image(); ?>
</a>
</div>
<div id="product-description-container">
<ul>
<a href="<?php echo esc_url( get_permalink( $product->get_id() ) ); ?>"
title="<?php echo esc_attr( $product->get_title() ); ?>">
<li><h4><?php echo $product->get_title(); ?></h4></li>
</a>
<li><?php echo apply_filters( ‘woocommerce_short_description’, $post->post_excerpt )?></li>
<li><h2><?php echo $product->get_price_html(); ?> </h2></li>
<?php
echo apply_filters(
‘woocommerce_loop_add_to_cart_link’,
sprintf(
‘<a href="%s" rel="nofollow" data-product_id="%s" data-product_sku="%s" class="button %s product_type_%s">%s</a>’,
esc_url( $product->add_to_cart_url() ),
esc_attr( $product->get_id() ),
esc_attr( $product->get_sku() ),
$product->is_purchasable() ? ‘add_to_cart_button’ : ”,
esc_attr( $product->product_type ),
esc_html( $product->add_to_cart_text() )
),
$product
);?>
</ul>
</div> <?php endwhile;
} else {
echo __( ‘ o products found’ );
}
wp_reset_postdata();
?>
</ul>
<!–/.products–> </main>
<!– #main –>
</div><!– #primary –> <?php
do_action( ‘storefront_sidebar’ );
get_footer();
[/php]
How it Works
This code is very easy to understand.
The ‘post_type’ => ‘product’ is the default WooCommerce custom post type.
- ‘posts_per_page’ => 12 sets the maximum number of posts that can be displayed on a page.
- apply_filters( ‘woocommerce_short_description’, $post->post_excerpt ) displays the cart’s page URL and the items in the cart
- esc_attr( $product->get_id() ) gets the product ID
- esc_attr( $product->get_sku() ) gets the SKU for the product
Here are the steps you need to follow:
- Log into your WordPress site and access the Dashboard as the admin user.
- From the Dashboard menu, click on Appearance Menu > Theme Editor Menu. When the Theme Editor page is opened, look for the theme functions file where we will add the function that will add a custom add to cart button.
- Add the following code to the php file:
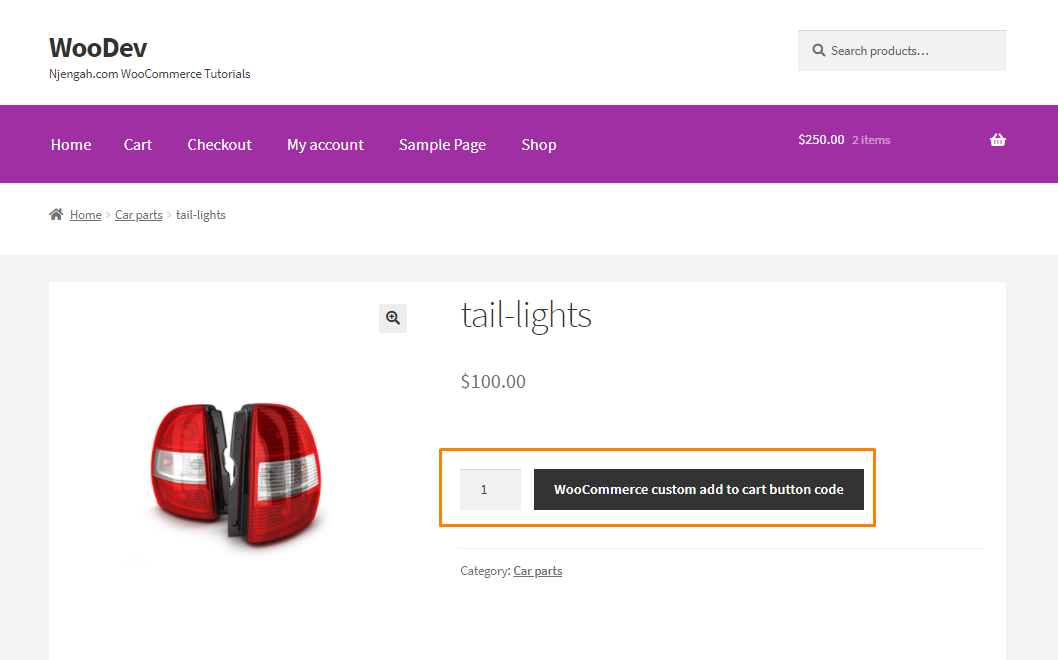
function njengah_add_to_cart_button_woocommerce() {
return __(‘Custom add to cart button code’, ‘woocommerce’);
}
[/php]
- This is the outcome:
Conclusion
By now, you should be able to add a custom add to cart button. A custom button is important because it adds value to the user experience.
Since we are editing the page using custom code, we recommend creating a child theme. This will ensure that you changes are not lost during an update.
Similar Articles
- 100+ Tips, Tricks & Snippets Ultimate WooCommerce Hide Guide
- WooCommerce Redirect After Logout [Ultimate Guide]
- WooCommerce Redirect After Checkout : Redirect to Custom Thank You Page
- How to Add Search to Shop Page In WooCommerce
- How to Hide Product Image on Cart Page WooCommerce
- How to Send Email on Status Change In WooCommerce
- How to Add Fields in WooCommerce Registration Form
- How to Hide Shop In WooCommerce
- How to Get Current Product Category Name in WooCommerce
- Top 30+ Best WordPress Form Plugins » Best WordPress Form Plugin
- How to Change Checkout Endpoints WooCommerce
- How to Keep WooCommerce Description Tab Open by Default
- How to Create Custom Category Page In WooCommerce
- How to Clear Cart on Logout In WooCommerce
- How to Customize WooCommerce Product Pages
- How to Add Currency to WooCommerce [Custom Currency]
- How to Check if User is Logged In WordPress
- How to Create Custom Order Received Page WooCommerce
- How to Add Product to Cart Programmatically in WooCommerce
- 5+ Useful Ways to Limit WordPress Excerpt Length Like a Pro