 Do you want to add a custom checkout field to email in your WooCommerce store?
WooCommerce is a powerful eCommerce plugin for WordPress that is flexible to customization.
In this post, you will see how you can dynamically customize additional fields such as removing the billing address, adding/editing custom checkout fields, and saving these custom fields to the database. Additionally, I will show you how you could add these custom fields to order emails.
Remove Additional Information from Custom Checkout Fields
The first step is to add a custom PHP code snippet in your theme’s function.php file to remove the address fields from the billing screen:
function woocommerce_remove_additional_information_checkout($fields){

    unset( $fields["billing_first_name"] );

    unset( $fields["billing_last_name"] );

    return $fields;

}

add_filter( 'woocommerce_billing_fields', 'woocommerce_remove_additional_information_checkout' );
This is the outcome:
The following code snippets will add a custom field to the checkout page, save the data to the order meta, and display the order meta in the orders admin. I received several queries about the process of adding multiple fields. To help address the issue, we will add a code snippet to add two fields.
Add Custom Checkout Field to Email WooCommerce
The code snippets should be added to your theme’s functions.php file. I recommend using a child theme so that your changes are not lost during an upgrade.
1. Add WooCommerce Custom Checkout Field
Add the following code in the functions.php file to add a custom WooCommerce checkout field:
function njengah_custom_checkout_fields($fields){

$fields['njengah_extra_fields'] = array(

'njengah_text_field' => array(

'type' => 'text',

'required'      => true,

'label' => __( 'Input Text Field' )

),

'njengah_dropdown' => array(

'type' => 'select',

'options' => array( 'first' => __( 'First Option' ), 'second' => __( 'Second Option' ), 'third' => __( 'Third Option' ) ),

'required'      => true,

'label' => __( 'Dropdown field' )

)

);

return $fields;

}

add_filter( 'woocommerce_checkout_fields', 'njengah_custom_checkout_fields' );

function njengah_extra_checkout_fields(){

$checkout = WC()->checkout(); ?>

<div class="extra-fields">

<h3><?php _e( 'Additional Fields' ); ?></h3>

<?php

foreach ( $checkout->checkout_fields['njengah_extra_fields'] as $key => $field ) : ?>

<?php woocommerce_form_field( $key, $field, $checkout->get_value( $key ) ); ?>

<?php endforeach; ?>

</div>

<?php }

add_action( 'woocommerce_checkout_after_customer_details' ,'njengah_extra_checkout_fields' );
This is the outcome:
2. Save the Data of Custom Checkout WooCommerce Fields
Add the following code in the functions.php file to save the data of custom checkout WooCommerce fields.
function njengah_save_extra_checkout_fields( $order_id, $posted ){

// don't forget appropriate sanitization if you are using a different field type

if( isset( $posted['njengah_text_field'] ) ) {

update_post_meta( $order_id, '_njengah_text_field', sanitize_text_field( $posted['njengah_text_field'] ) );

}

if( isset( $posted['njengah_dropdown'] ) && in_array( $posted['njengah_dropdown'], array( 'first', 'second', 'third' ) ) ) {

update_post_meta( $order_id, '_njengah_dropdown', $posted['njengah_dropdown'] );

}

}

add_action( 'woocommerce_checkout_update_order_meta', 'njengah_save_extra_checkout_fields', 10, 2 );
3. Display the Data of WooCommerce Custom Fields to User
Add the following code in the functions.php file to display the data of WooCommerce custom fields to user.
function njengah_display_order_data( $order_id ){  ?>

<h2><?php _e( 'Extra Information' ); ?></h2>

<table class="shop_table shop_table_responsive additional_info">

<tbody>

<tr>

<th><?php _e( 'Input Text Field:' ); ?></th>

<td><?php echo get_post_meta( $order_id, '_njengah_text_field', true ); ?></td>

</tr>

<tr>

<th><?php _e( 'Drop Down Field:' ); ?></th>

<td><?php echo get_post_meta( $order_id, '_njengah_dropdown', true ); ?></td>

</tr>

</tbody>

</table>

<?php }

add_action( 'woocommerce_thankyou', 'njengah_display_order_data', 20 );

add_action( 'woocommerce_view_order', 'njengah_display_order_data', 20 );
This is the outcome: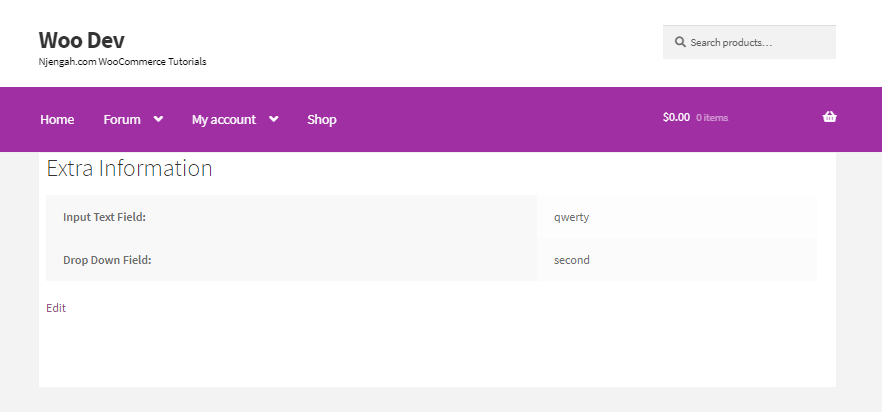
4. Display WooCommerce Admin Custom Order Fields
This code snippet will function as the shipping and billing address data and reveal inputs when the user clicks the little pencil icon.
function njengah_display_order_data_in_admin( $order ){  ?>

<div class="order_data_column">

<h4><?php _e( 'Additional Information', 'woocommerce' ); ?><a href="#" class="edit_address"><?php _e( 'Edit', 'woocommerce' ); ?></a></h4>

<div class="address">

<?php

echo '<p><strong>' . __( 'Text Field' ) . ':</strong>' . get_post_meta( $order->id, '_njengah_text_field', true ) . '</p>';

echo '<p><strong>' . __( 'Dropdown' ) . ':</strong>' . get_post_meta( $order->id, '_njengah_dropdown', true ) . '</p>'; ?>

</div>

<div class="edit_address">

<?php woocommerce_wp_text_input( array( 'id' => '_njengah_text_field', 'label' => __( 'Some field' ), 'wrapper_class' => '_billing_company_field' ) ); ?>

<?php woocommerce_wp_text_input( array( 'id' => '_njengah_dropdown', 'label' => __( 'Another field' ), 'wrapper_class' => '_billing_company_field' ) ); ?>

</div>

</div>

<?php }

add_action( 'woocommerce_admin_order_data_after_order_details', 'njengah_display_order_data_in_admin' );


function njengah_save_extra_details( $post_id, $post ){

update_post_meta( $post_id, '_njengah_text_field', wc_clean( $_POST[ '_njengah_text_field' ] ) );

update_post_meta( $post_id, '_njengah_dropdown', wc_clean( $_POST[ '_njengah_dropdown' ] ) );

}

add_action( 'woocommerce_process_shop_order_meta', 'njengah_save_extra_details', 45, 2 );
This is the outcome:
5. Add WooCommerce Custom Fields to Order Emails
Add the following code in the functions.php file to add WooCommerce custom fields to order emails. If you wish to customize the output in the emails, you can add some text to any of the hooks available in the email templates.
function njengah_email_order_meta_fields( $fields, $sent_to_admin, $order ) {

$fields['instagram'] = array(

'label' => __( 'Some field' ),

'value' => get_post_meta( $order->id, '_njengah_text_field', true ),

);

$fields['licence'] = array(

'label' => __( 'Another field' ),

'value' => get_post_meta( $order->id, '_njengah_dropdown', true ),

);

return $fields;

}

add_filter('woocommerce_email_order_meta_fields', 'njengah_email_order_meta_fields', 10, 3 );

function njengah_show_email_order_meta( $order, $sent_to_admin, $plain_text ) {

$njengah_text_field = get_post_meta( $order->id, '_njengah_text_field', true );

$njengah_dropdown = get_post_meta( $order->id, '_njengah_dropdown', true );

if( $plain_text ){

echo 'The value for some field is ' . $njengah_text_field . ' while the value of another field is ' . $njengah_dropdown;

} else {

echo '<p>The value for <strong>input text field</strong> is ' . $njengah_text_field. ' while the value of <strong>drop down</strong> is ' . $njengah_dropdown . '</p>';

}

}

add_action('woocommerce_email_customer_details', 'njengah_show_email_order_meta', 30, 3 );
Conclusion
In summary, I have illustrated how you could add, edit, and save custom fields to the WooCommerce checkout page. Additionally, I have edited the email templates to add the information from the emails’ custom fields. If you need to customize the checkout page further, you can use a checkout customizer plugin.
Similar Articles
- How to Add Woocommerce Custom Text Field on Product Page
- How to Create Custom Widget Area in WordPress Step by Step
- How to Move Primary Menu Storefront WooCommerce
- How to Hide Shipping Rates if Free Shipping Available WooCommerce
- How to Hide Quantity In Stock In WooCommerce
- How to Hide SKU, Category, Tags Meta Product Page WooCommerce
- How to Hide Update Cart Button WooCommerce Cart Page
- How to Hide Product Description Heading WooCommerce
- How to Hide Any Tab My Account Page WooCommerce
- How to Change WooCommerce Checkout Error Messages