 WordPress database allows users to create, delete and update content on WordPress sites on the fly.
The WordPress database seems like a farfetched topic for WordPress beginners, but it is essential to understand how the WordPress MySQL database works.
Every WordPress user needs to understand the WordPress database’s role in managing content on a WordPress site.
I want to share all the information you need to know about the WordPress database in this post.
I will show you all the tricks and tips to manage WordPress databases using the free tools available like PhpMyAdmin and Command-line interface (CLI) tools to access and manage WordPress databases.
This post will be your ‘go-to guide’ for anything on the WordPress database.
I have researched and put together the best collection of WordPress database tricks and tips I have learned in years of WordPress development.
This guide will be the only WordPress database guide you will need to take you from beginner to professional level!
Suppose you are looking for an in-depth and easy-to-understand WordPress database tutorial.
In that case, this guide should take you from a novice to an advanced WordPress database user, even without prior knowledge of managing a WordPress database.
My objective is to help you understand how WordPress works, particularly the WordPress database, and how you can easily create, update, delete, secure, and manage data from the WordPress MySQL database perspective.
So let us get started with the basics.
What is a WordPress Database?
A database is software that stores all the data submitted by an application.
The WordPress database stores all the WordPress website data that includes posts, pages, users, passwords, URLs, and much more.

Example Explanation: The best way to understand the WordPress database is to think of your PC hard drive or a thumb drive used to store your music, books, and all other data formats.
When you want to listen to music or read an eBook stored in the thumb drive, you can plug in it on your PC and access the data.
In this case, the hard drive stored the eBook or the music file in the respective formats, and you can use an eBook reader such as a PDF viewer to access the ebook or access the music track using a music player.
In the case of a WordPress site, you use any web browser such as Mozilla Firefox or Chrome to access the site data stored in the WordPress database.

So the WordPress database is a software that is located on your web host that can connect to WordPress software and store all the data published on your website.
The data can be retrieved and viewed from the web browser.
The data can be in different formats, including written content, pdf, videos, and any other form.
Why do we need a WordPress Database?
The WordPress database allows you as the site owner to dynamically and efficiently update the content published on your website without editing the code on the website page.
The database facilitates the creation of a dynamic website as opposed to a static site.
The ability to create, delete, read, and update web content without any technical knowledge of programming languages makes it easier for everyone to create a WordPress site.
The best way to understand why we need a WordPress database is to revisit a brief history of web development and, in particular, WordPress’s role in creating data-driven dynamic websites.
WordPress Database History
Back in the day, websites were created as static HTML / CSS pages, which means they did not have a database.
This creates a problem for non-technical users since updating the website pages required technical knowledge.
To make it easier for everyone to update their website without the help of a web developer, we needed an innovative way to allow users to have an interface they can create, delete, and update their website pages.
Content Management Systems
The only way to achieve this was to create a data storage system linked to the website and allow management with ease.
This problem gave rise to the innovation of Content Management Systems.
A content management system is simply software that allows users to create, update, delete and manage data without having technical knowledge.
Initially, there were several content management systems, but WordPress has proved to be the most reliable and has grown wildly over the years.
WordPress MySQL Database
![]()
WordPress creators used a free – open-source database (MySQL) when creating WordPress as an ideal open-source content management system.
This allowed users and developers familiar with MySQL to embrace WordPress as a good content management system for several applications.
Today, the default WordPress database is MySQL.
However, it is possible to use WordPress with other database systems like PostgreSQL and MongoDB, as I will share other advanced WordPress database tutorials.
WordPress as a Content Management System
When WordPress was created, it was a blogging Content Management System, but the industry quickly adopted it as the ideal content management system for creating websites.
I remember this point in history since WordPress was growing rapidly, especially the free themes and plugins.
These free themes allowed users to adopt WordPress for a variety of users.
I remember some of my friends who were hardcore developers always viewed WordPress as just blogging software.
Today, most developers embrace WordPress as the go-to tool for creating any website.
From my historical observation, WordPress won the content management system ‘arms race’!
The development of marketplaces for themes, and premium plugins like ThemeForest gave reaffirmed the use of WordPress as the content management system of choice.
Enough of the history of WordPress now. Let us now focus on how the WordPress database works.
If you are interested in learning more about WordPress history, you can learn more from this WordPress history post.
WordPress Database Location: Where is WordPress Database Stored or Located?
WordPress database is located on your web hosting server and can be accessed via the web host Control Panel or any other MySQL database management tools.
Access to the WordPress database is possible through tools like PhpMyAdmin on your web host.
You can also access the database through the command line terminal for those users with higher access privileges determined by the type of web hosting you are using.
In a nutshell, let me illustrate this with four examples:
Digital Ocean Cloud Hosting WordPress Database Location
You can access the database directly if you are on a cloud server like DigitalOcean or VPS hosting.
The shared web hosting does not allow you to access the server resources directly.
For users on DigitalOcean, you can access the database through the console as shown in the image below:
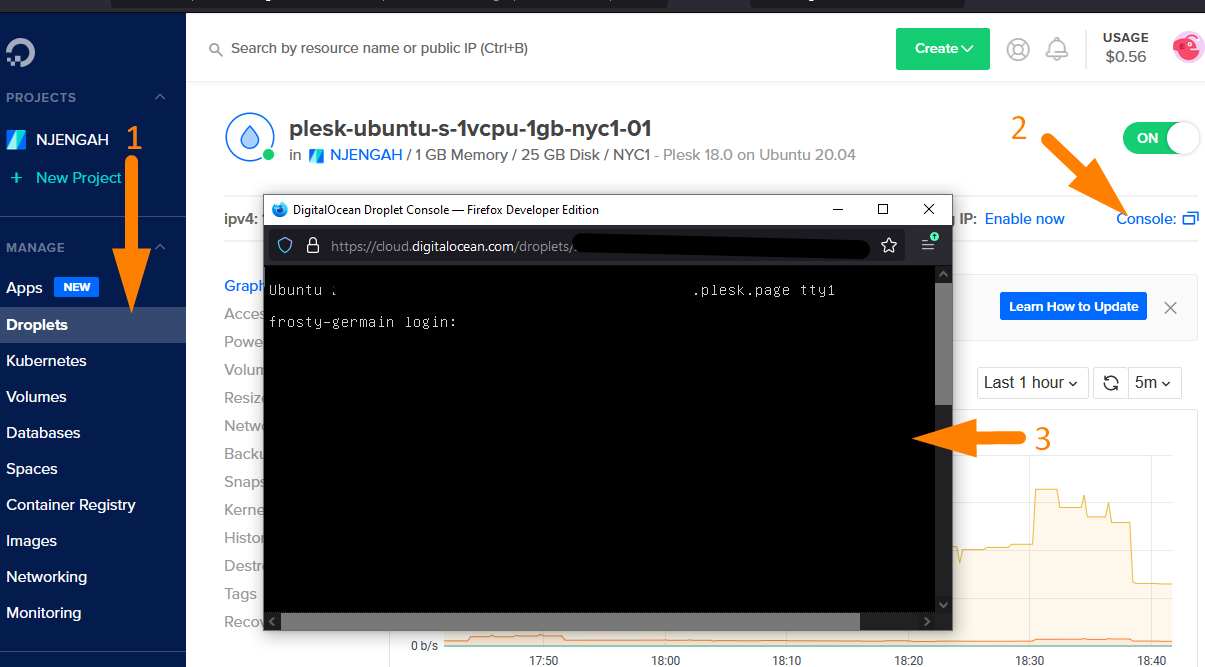 You can also install a tool like Plesk to help manage the WordPress database if you are not comfortable using the SSH terminal.
Plesk is free for three domains on DigitalOcean, and it is intuitive and easy to use for database management and setting up WordPress sites.
Bluehost WordPress Database Location
Shared web hosting is an excellent option for starters.
I have tried and tested Bluehost web hosting on most of my projects, and I always recommend them highly.
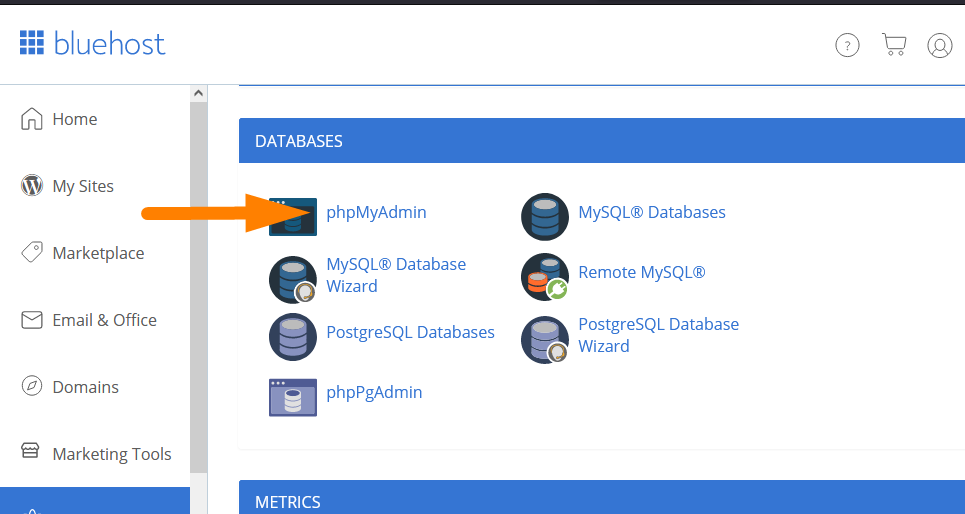
For most users on shared hosting, you can access the database using tools provided on the hosting control panel like the PhpMyAdmin on Bluehost shared hosting.
Bluehost provides users with PhpMyAdmin and MySQL Database management wizard as shown in the image below:
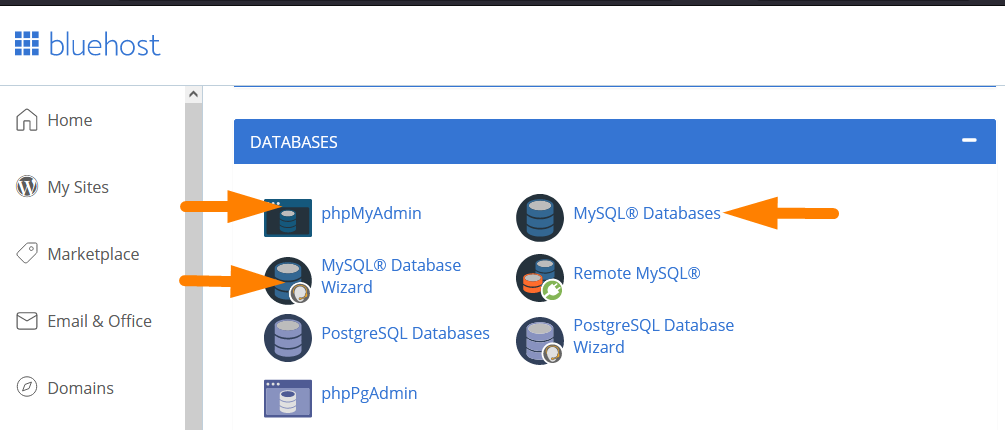
The PhpMyAdmin does not have the create database menu.
The easiest way to create the WordPress database is through the MySQL database wizard.
You can also create a user and grant them global privileges using the MySQL database wizard on Bluehost shared hosting.
Hostgator WordPress Database Location
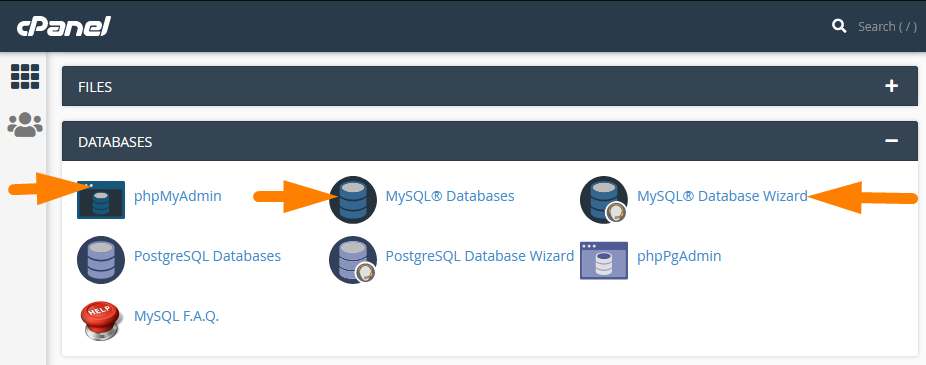
Other web hosting providers like Hostgator, another good shared web host, provide users with a Wizard to create and manage WordPress databases, as you can see in the image below:
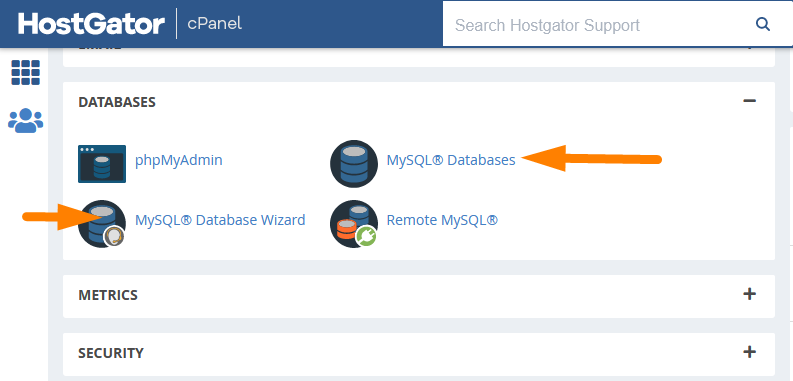
Hostgator shared hosting also provides you with PhpMyAdmin, the most efficient and easy-to-learn tool to manage WordPress databases.
Namecheap Shared Hosting WordPress Database Location
Namecheap shared hosting is another relatively above-average shared hosting option that provides users with the PhpMyAdmin panel to manage WordPress databases, as you can see on the image below:
They also provide users with the MySQL database wizard to create a WordPress MySQL database, create database users, and grant privileges to database users.
Localhost WordPress Database Location
When you are developing WordPress on a localhost environment, you need to access the database constantly. The location of the WordPress database on the localhost may vary depending on the localhost environment you are using.
Most localhost LAMP servers come with PhpMyAdmin which you can use to create and manage the WordPress database on localhost.
You can access the PhpMyAdmin on your localhost by adding ‘phpmyadmin’ at the end of the localhost URL.
This step will give you access to the PhpMyAdmin on your localhost, where you can manage your localhost WordPress databases.
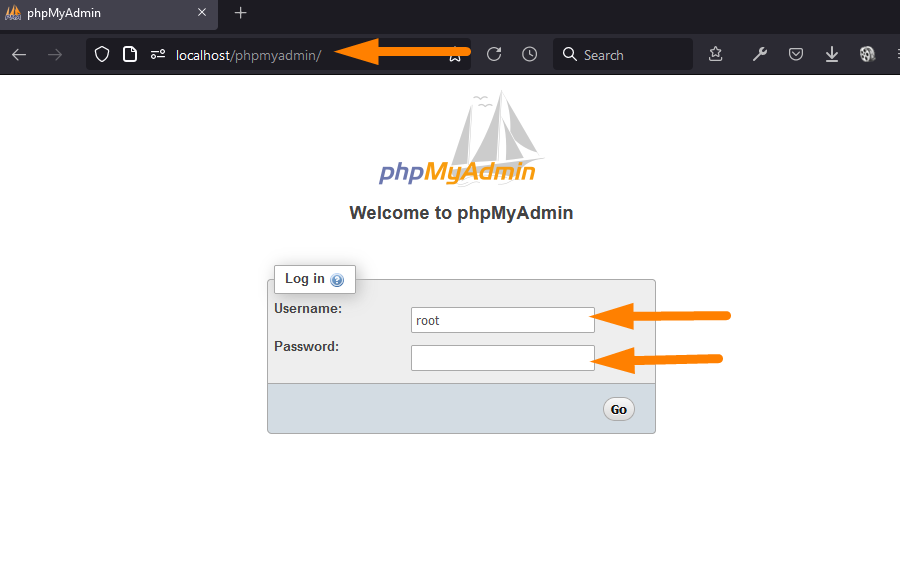 For my case, I use XAMMP and Laragon as my local host servers, and you can access the PhpMyAdmin as shown in the image above. Most other localhost environments such a WAMP, MAMP will work the same way.
By default, to login into the PhpMyAdmin on localhost, you should use the ‘root’ username, and the password should be blank, as shown on the image above.
Now we can locate the WordPress database on both the remote servers as well as the localhost. In the next section, let us look at how the WordPress database works.
How Does WordPress Database Work?
WordPress database is a relational database that stored the data in tables. WordPress data stored in the database tables can be retrieved by the WordPress application using the various WordPress functions.
For example, when a user visits a page on your WordPress site, the data is pulled from the wp_posts table, where all the pages and other posts are stored.
This may sound like a very complicated process for beginners, but you will understand how it works under the hood as you get used to WordPress.
This process of requesting the database for a page, post, or a custom post type is called querying, and in most WordPress development, you will often hear this term – query used in several tutorials.
This means a block of code that instructs the currently connected WordPress database to respond with data from a specific table.
Using the example of a page, in this context, the query to the database will return the data from a specific page that has been requested by the act of the client (user) visiting the page. The following is a simple illustration:
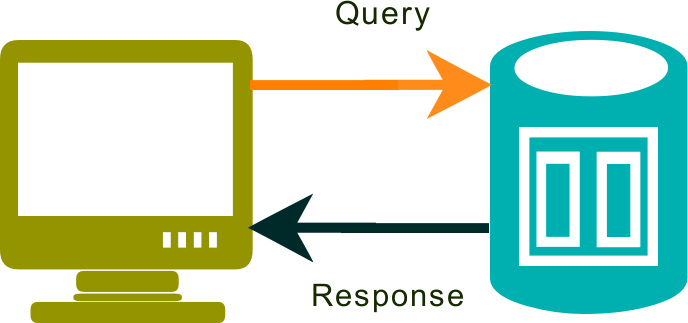
For every page, post, or any post type displayed on your website, a query gets the data from the respective WordPress database table to be displayed on the page.
To understand how this works, you will need to learn how to use the WordPress database management tools.
These MySQL database management tools will help you access the WordPress database. Let us look at the list of all the tools you can access and view the WordPress database.
WordPress Database Tools | WordPress Database Viewer
Before we look into the WordPress database, it helps you begin by looking at the various tools you can use you connect to the WordPress database. You can use several database management tools with WordPress databases.
The following is the list of the most common database access tools, but PhpMyAdmin remains the most popular tool for WordPress database management.
- PhpMyAdmin
- SQLyog
- HeidiSQL
- CLI Command Line Terminal
- dB Forge Studio for MySQL
- MySQL Workbench
- Toad Edge for MySQL
- Navicat for MySQL
- Sequel Pro
In practice, PhpMyAdmin is the most popular WordPress database management tool, but I often use SQLyog and HeidiSQL to access and manage WordPress databases.
Outlining the use of each of these tools to access the WordPress database goes beyond the scope of this guide.
I will share how to use each of these tools to access and manage the WordPress database on other posts. In most cases, you will be using PhpMyAdmin to access and manage the WordPress database.
It helps to briefly introduce the common tips and tricks of using PhpMyAdmin on both localhost and remote web hosting environments.
PhpMyAdmin WordPress Database Getting Started
You have seen in the section above; I highlighted that PhpMyAdmin is the most commonly used tool to access WordPress databases. Let me mention a few things you need to know about PhpMyAdmin before you can get started.
What is phpMyAdmin?
PhpMyAdmin is a software written in PHP and lets you manage MySQL databases through the web browsers for both localhost and web hosting environments.
It comes with an easy-to-use interface, and you can run MySQL commands on it to execute most SQL commands like create a database, delete and update the database.
PhpMyAdmin supports nearly all the database operations of the two most common databases – MySQL and MariaDB, which are also the most commonly used WordPress databases.
On PhpMyAdmin, you can create a WordPress database, create users, add user privileges, and export or import WordPress databases. It makes PhpMyAdmin the most helpful tool for WordPress database management.
How Do You Access PhpMyAdmin?
You can access PhpMyAdmin on either your web host or the local host for WordPress development. To access the localhost, you should add ‘phpmyadmin’ at the end of the localhost URL, and you will be prompted to log into PhpMyAdmin on your localhost.
You can access the PhpMyAdmin panel from the Control Panel under the database section on the web hosting. The web hosting user interface may vary from one host to another, but there will always be a section to manage the databases.
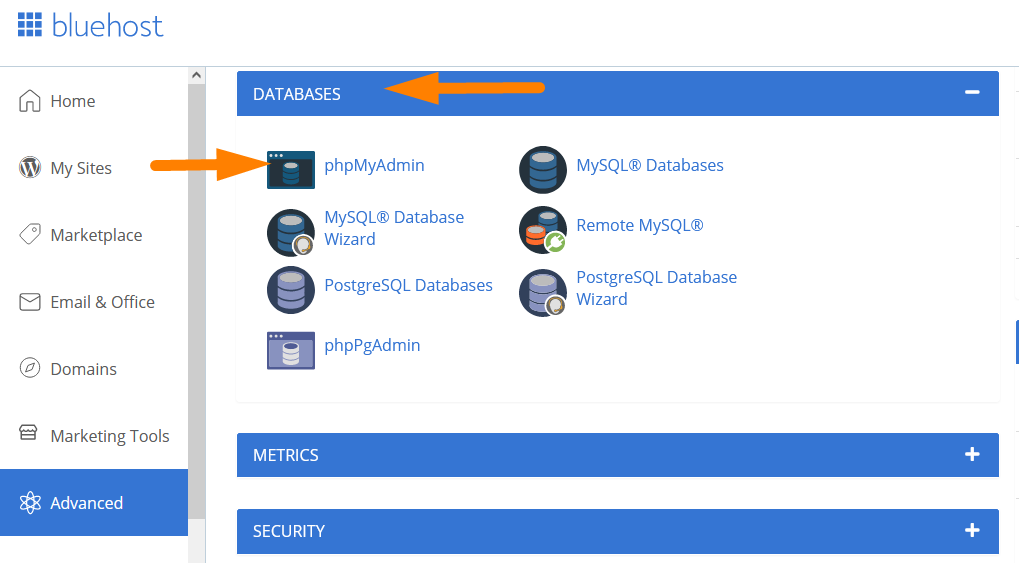
For example, for Bluehost web hosting, you can see the location of the PhpMyAdmin icon under the database section.
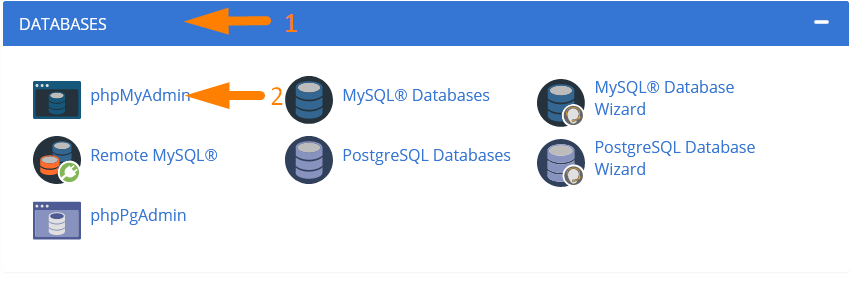
You click on the icon, and you will be redirected to the PhpMyAdmin panel, where you can start WordPress database management as shown in the image below:
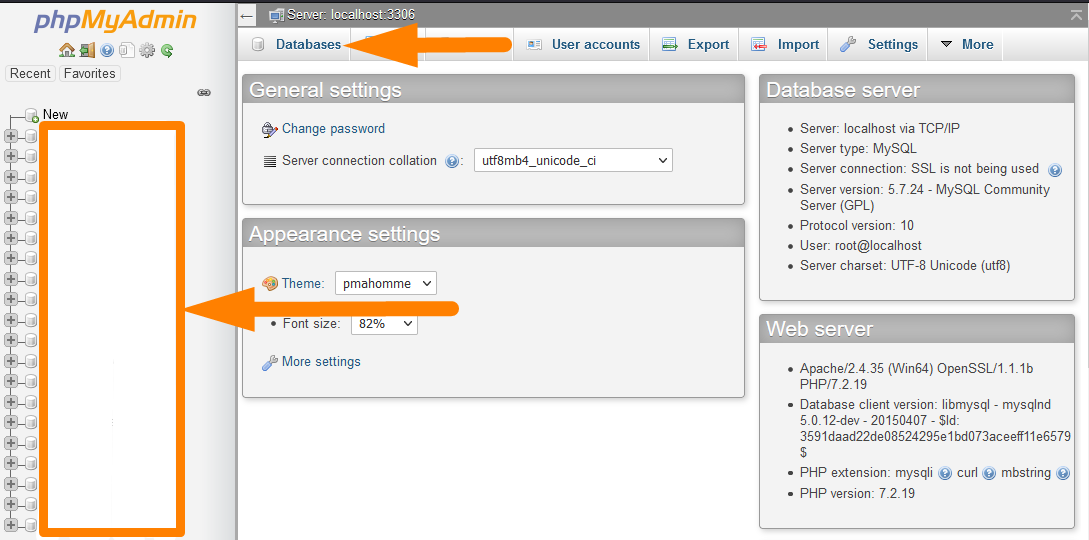
As you can see in the image above, the PhpMyAdmin lists all the WordPress databases on the left.
The database tables for each of the databases you select on the right side when you open a specific database will see in the next image below.
To manage each database, you need to click on the database name on the left and then select the database table you need on the corresponding right side, as shown on the image below:
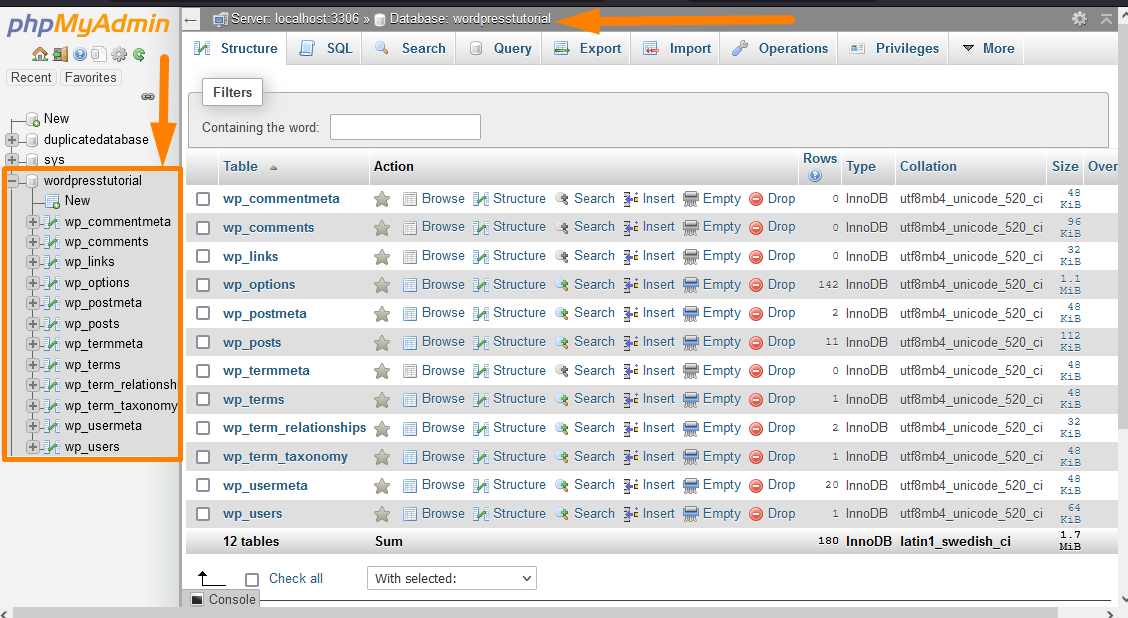
WordPress database is organized into tables that contain data of different types. To efficiently manage data on the WordPress database, you need to understand the role of each of these database tables.
Since we have talked about WordPress database tables, it helps to understand the WordPress database’s anatomy.
The WordPress database structure is technically referred to as WordPress database schema, a relational databases technology term.
WordPress Database Schema: Understanding WordPress Database Tables
First, it’s important to understand that the term Database Schema means the organization of the data in the database. In the WordPress context, the WordPress database schema consists of several tables created during the WordPress installation.
Understanding the WordPress database schema is necessary to become a good WordPress developer since you know where each data is stored.
For general WordPress beginners or users, the database structure is a complex subject that should not worry you since most of the database connections and queries are taken care of by WordPress core, plugins, and themes.
WordPress Database Scheme Illustration
The following is an elaborate illustration of the WordPress database schema that shows the various WordPress database tables and their relations.
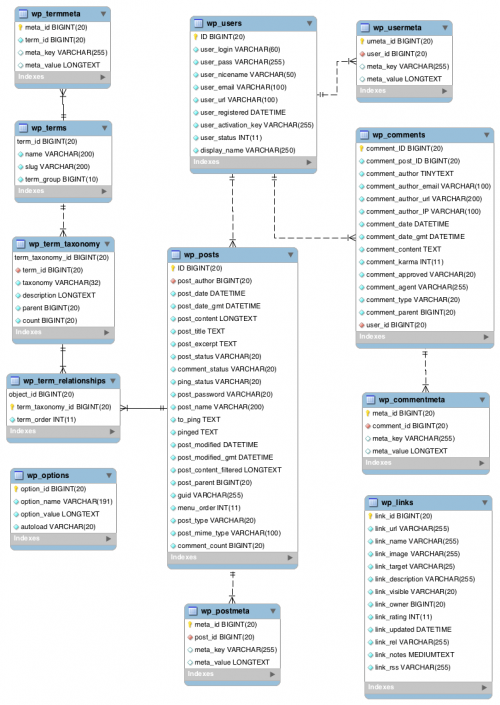
You can learn more about the database schema from the WordPress database documentation.
WordPress Database Tables
The wordPress installation creates 12 default database tables designed to store various data types in a WordPress site.
You can also create additional database tables on the WordPress database using a plugin or a php function.
WordPress Database Prefix
As you will see, all the database tables have a prefix wp_ that is also seen when you are installing WordPress, and you are requested to choose a database prefix as shown on the image below:
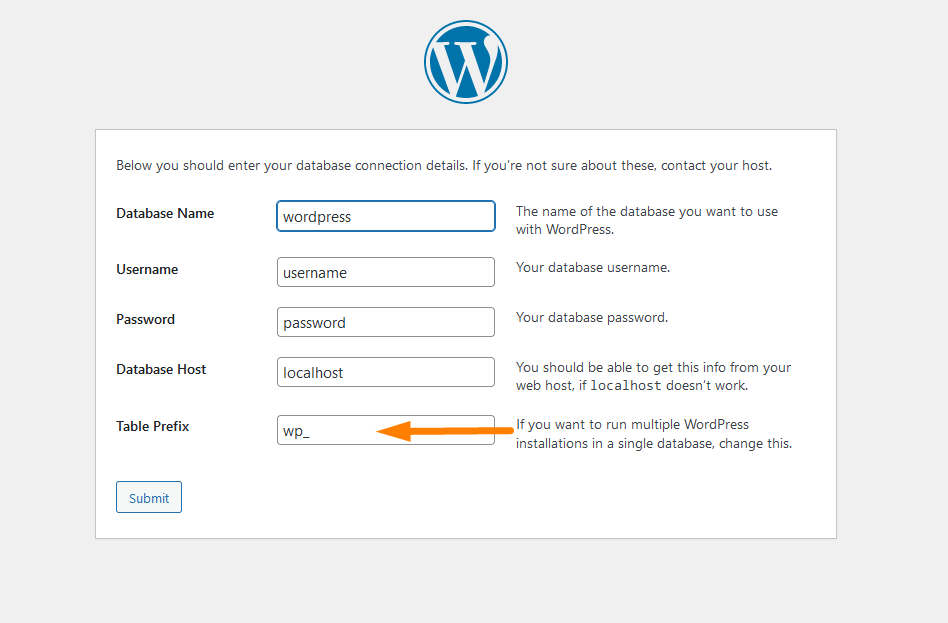
This is the default WordPress prefix but can be changed to a custom prefix to improve the WordPress database security.
Now let us look at the default database tables and learn the data stored on each of these tables.
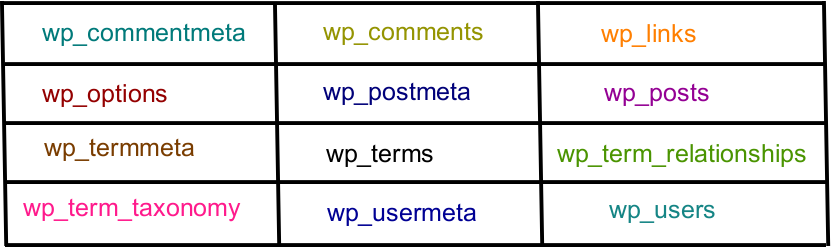
The following are the default database tables that you should see in any standard WordPress installation. The database tables are easy to understand since they are named according to the data stored.
12 Default WordPress Database Tables
#1) wp_commentmeta: This is the first table on the database that stores the meta-data for the comments on your WordPress site. This table has the following fields. meta_id, comment_id, meta_key, and meta_value.
The best example of the meta-data stored on this WordPress data table is the comment status that you update on the WordPress backend. The following is the image of the wp_commentmeta data table:
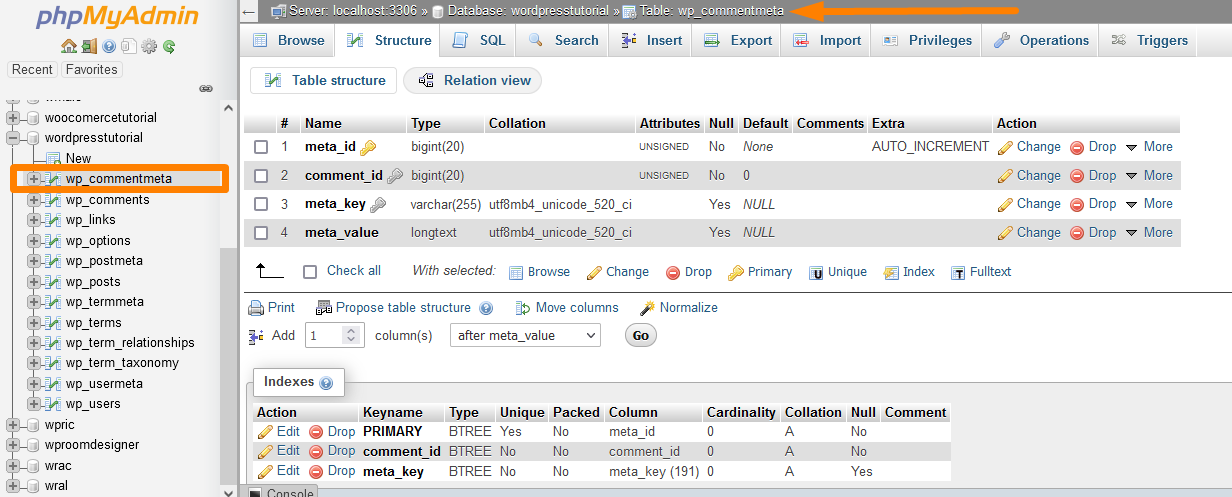
Every time a comment is submitted on your WordPress site when you update the status such as approved, pending, or trash, this comment metadata is stored on this wp_commentmeta WordPress database table.
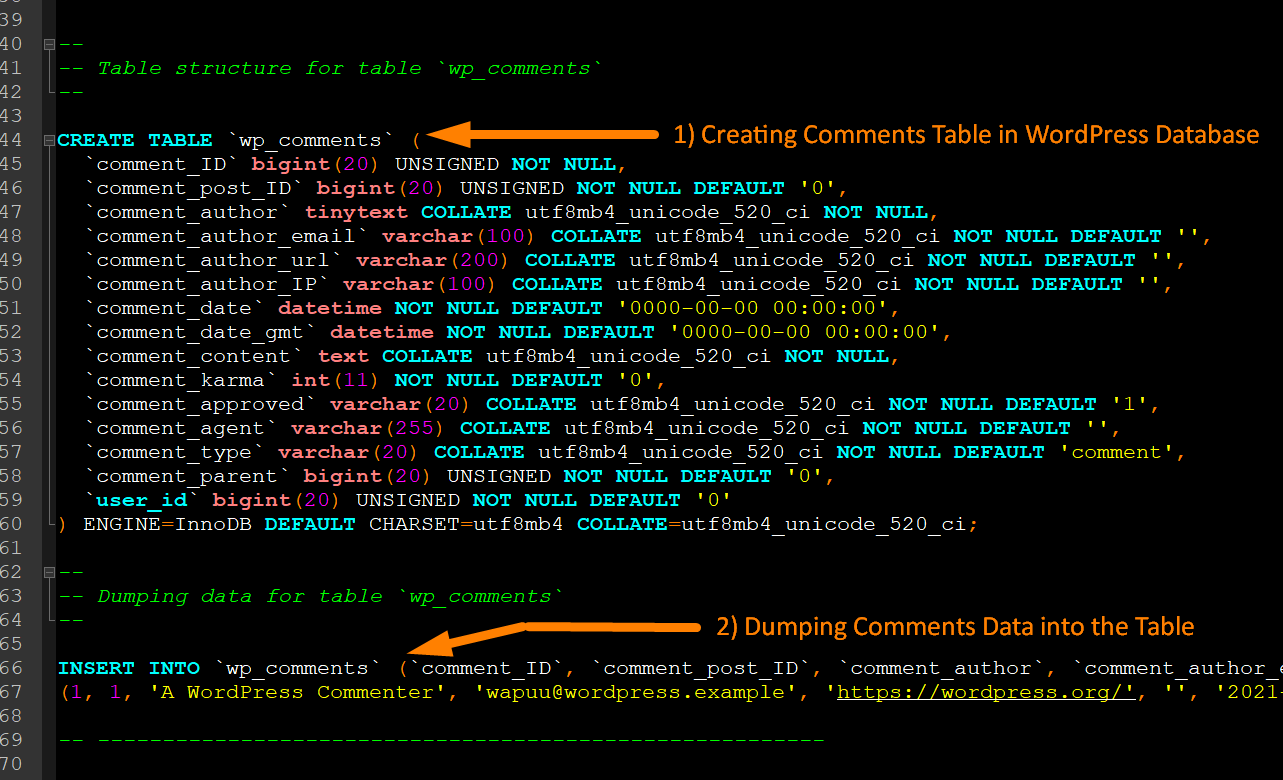
#2) wp_comments: This is the second table on the WordPress database that stores WordPress comments. It has all the comment author name, author URL, author email, comment content, and much more, as shown on the image below: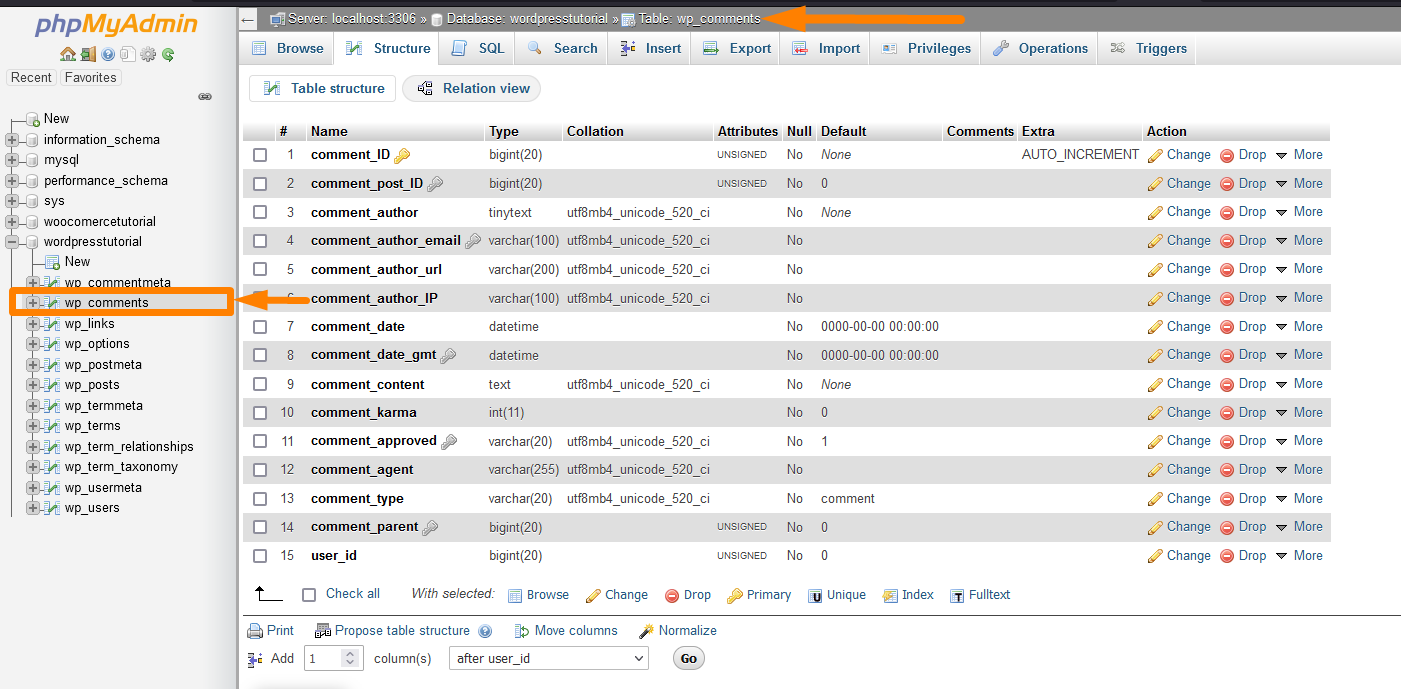
You can edit comments added to your blog on this database table.
#3) wp_links: This is the third table on the WordPress database that stores WordPress links, and you can use it to edit blogrolls created WordPress versions as well as WordPress plugins. The following is the image of the wp_links WordPress database table.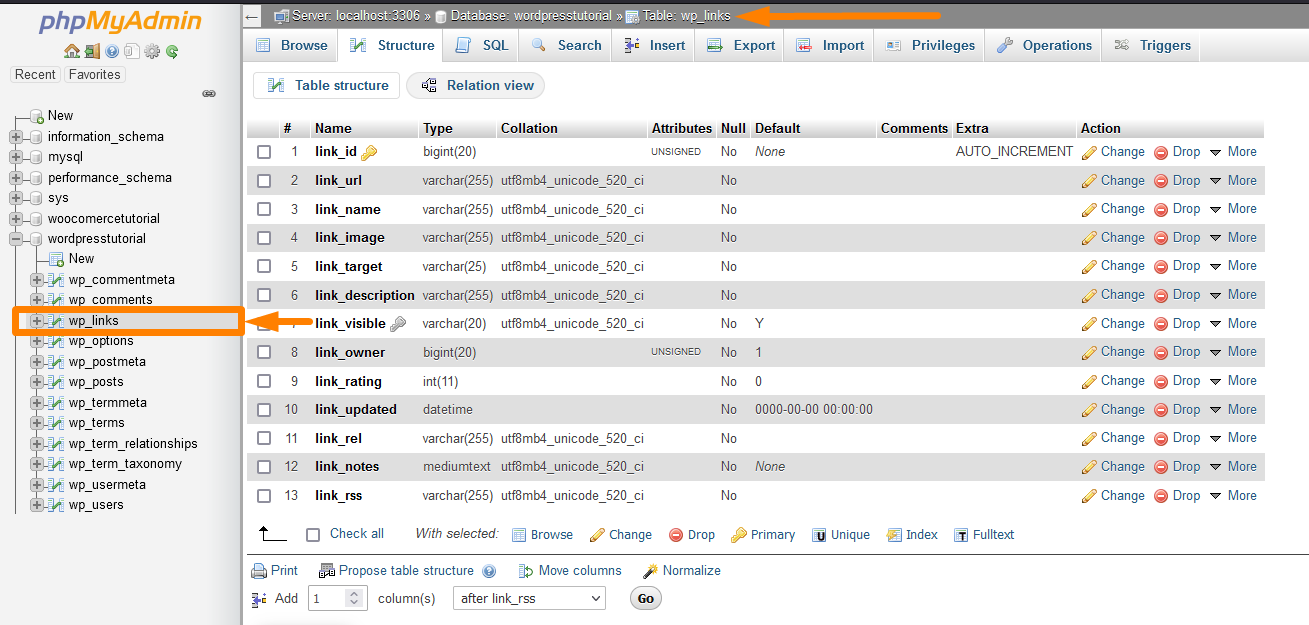
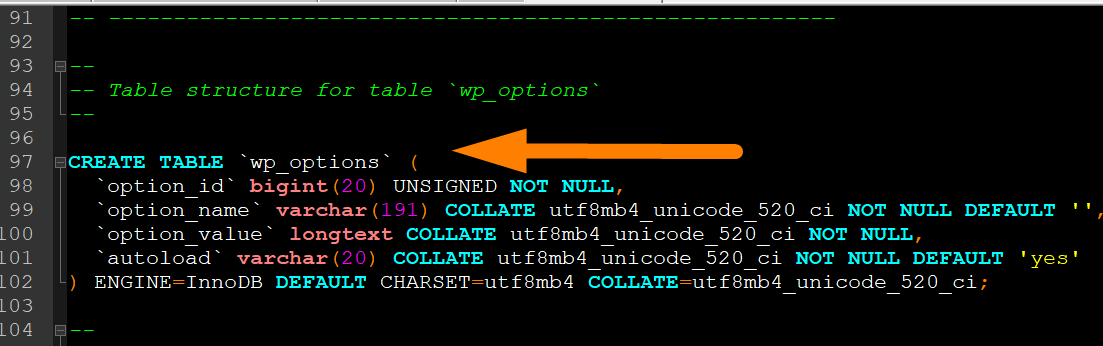
#4) wp_options: This is the fourth table on the database that stores WordPress settings options that include all the backend settings such as the site URL, admin email, default category, posts per page, time format, etc.
The options table is fundamental in plugin development since most plugins’ settings are stored on this table.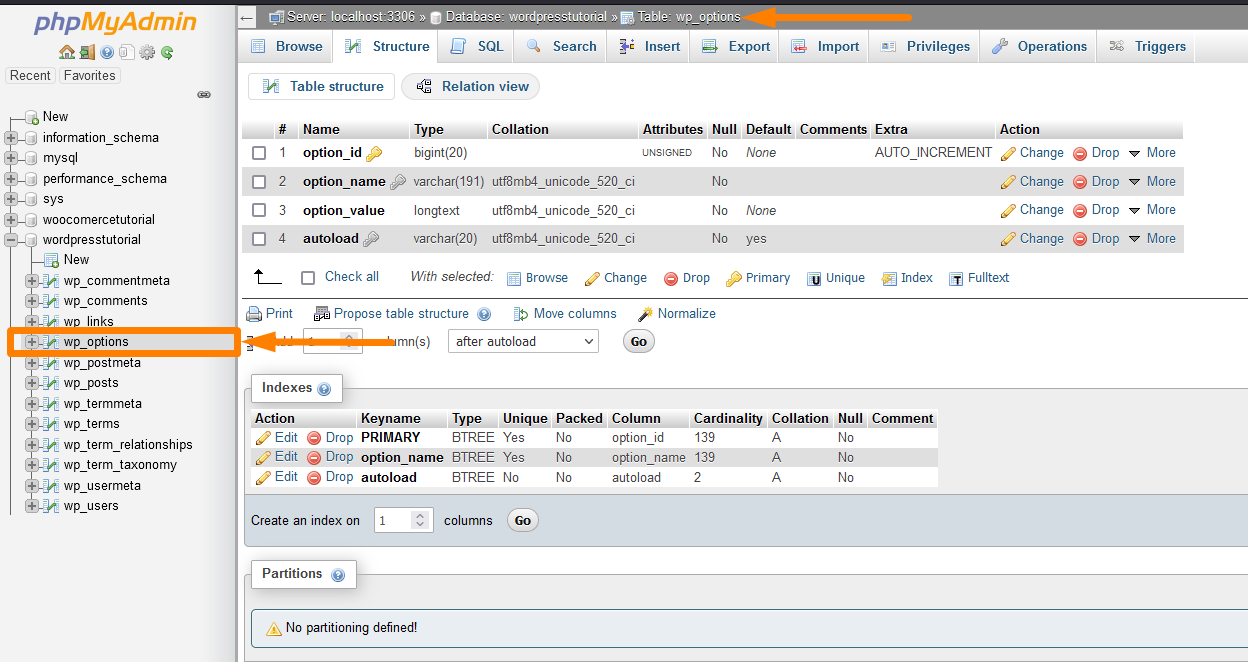
In most cases, when you create plugin custom options, they are stored on this table, and you retrieve them from this table.
#5) wp_postmeta: This is the fifth table on the database that stores WordPress settings metadata of the WordPress posts, pages, and custom post types.
A quick example of post metadata custom fields that are added by plugins like the Advanced Custom Fields. There is also another default post meta that can be accessed using the WordPress get_post_meta function.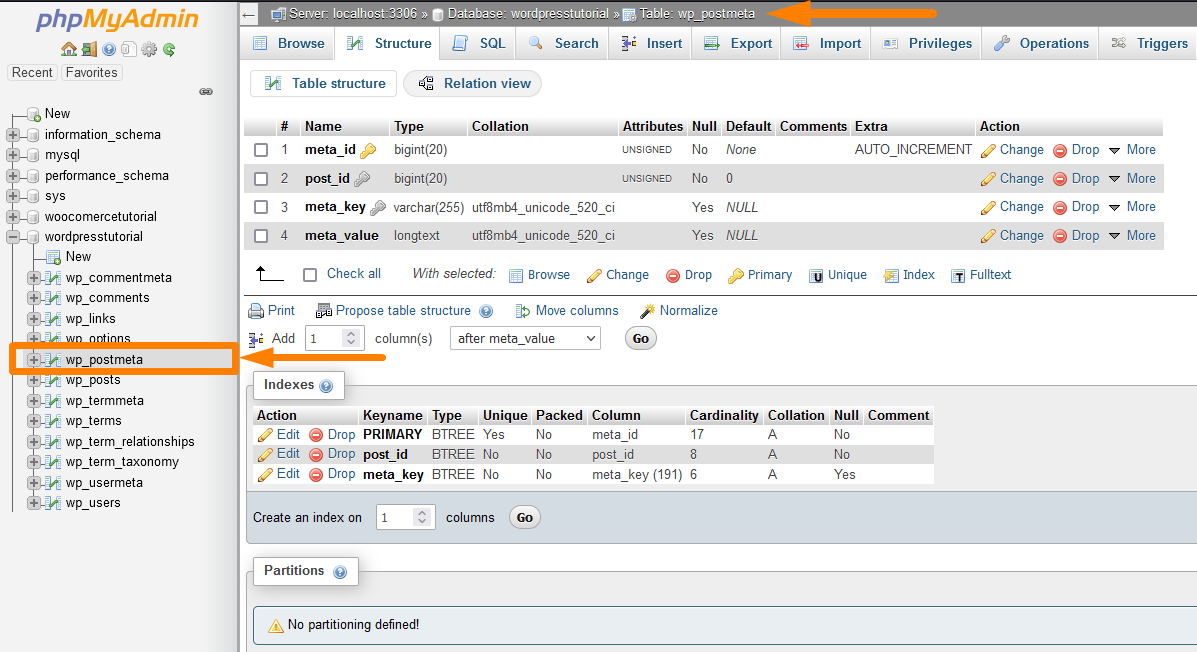
When you add post metadata using a plugin, the data is stored in this wp_postmeta database table.
#6) wp_posts: This is the sixth table on the database that stores WordPress all posts that includes all your posts, pages, revisions, and custom post types.
This is an important table that allows you to edit and update the existing content on your sites, such as posts and pages. The following is the structure of the wp_posts database table: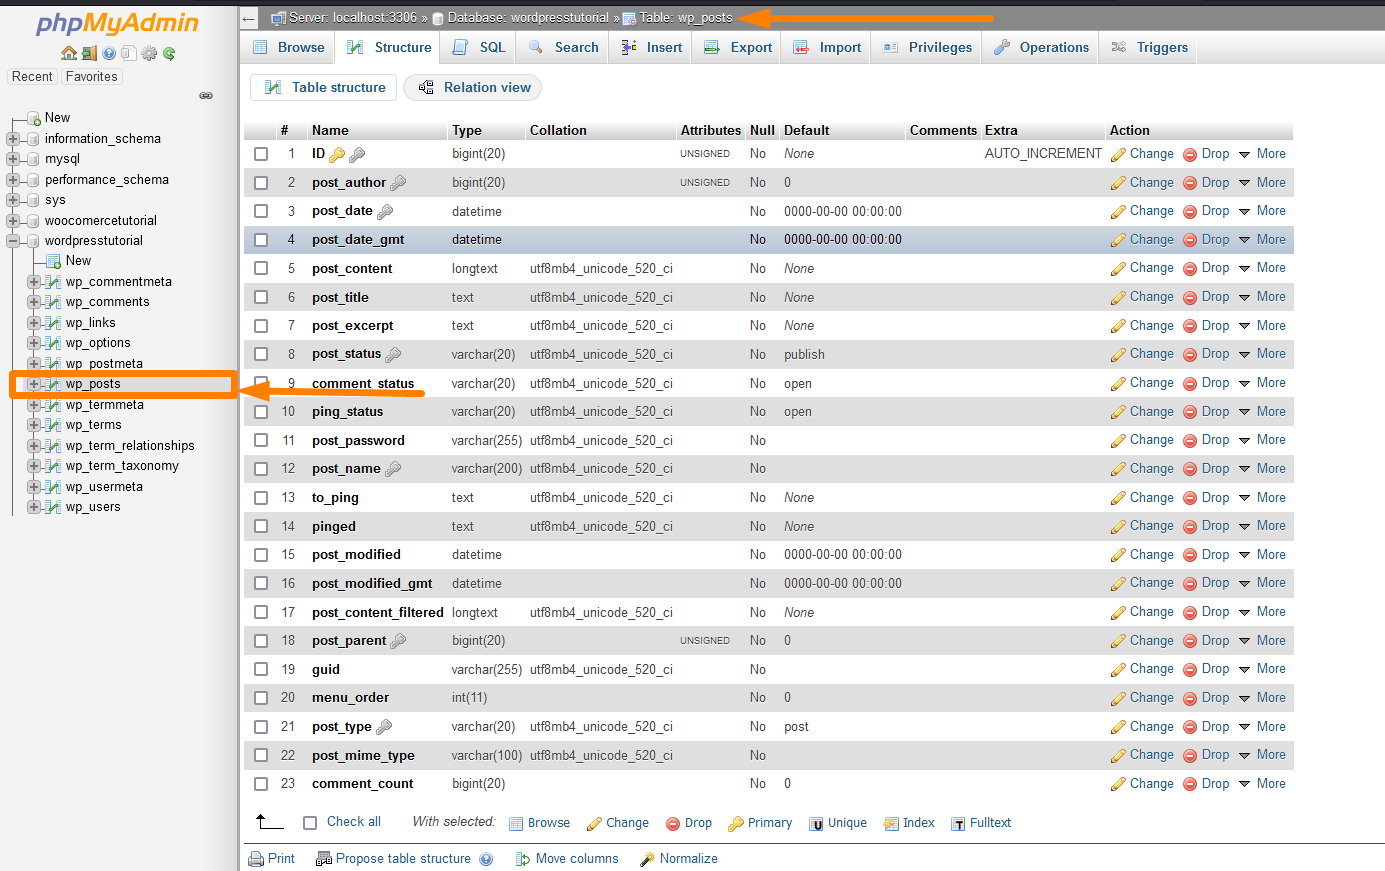
#7) wp_termmeta: This is the seventh table on the database that stores WordPress custom metadata for terms under their custom taxonomies.
A good use case is to store the WooCommerce metadata for product attributes and categories. The following is the structure of the wp_termmeta database table: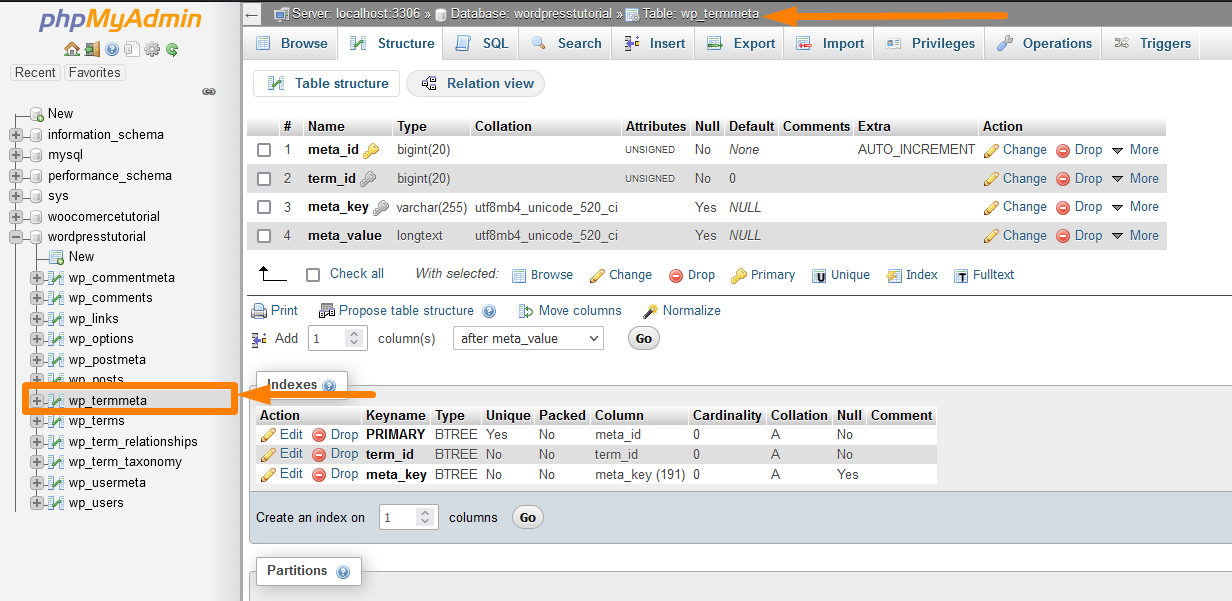
#8) wp_terms: This is the eighth table on the database that stores WordPress terms. It has a taxonomy system that lets you organize your WordPress site content.
Single taxonomy items are referred to as terms. This database table is important when you are managing categories and tags.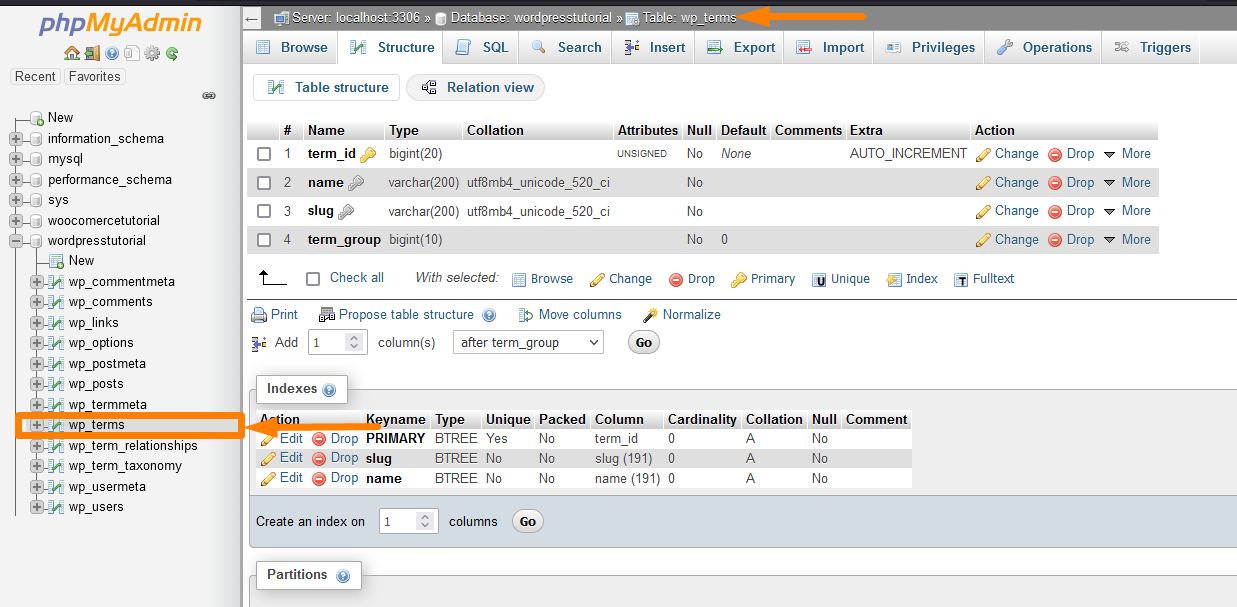
#9) wp_term_relationships: This is the ninth table on the database that manages relationship WordPress post types with terms in the wp_terms table.
It simply helps WordPress to match a specific post with the corresponding tag. For example, a post with the respective category and tag.
The following is the structure of the wp_term_relationships database table: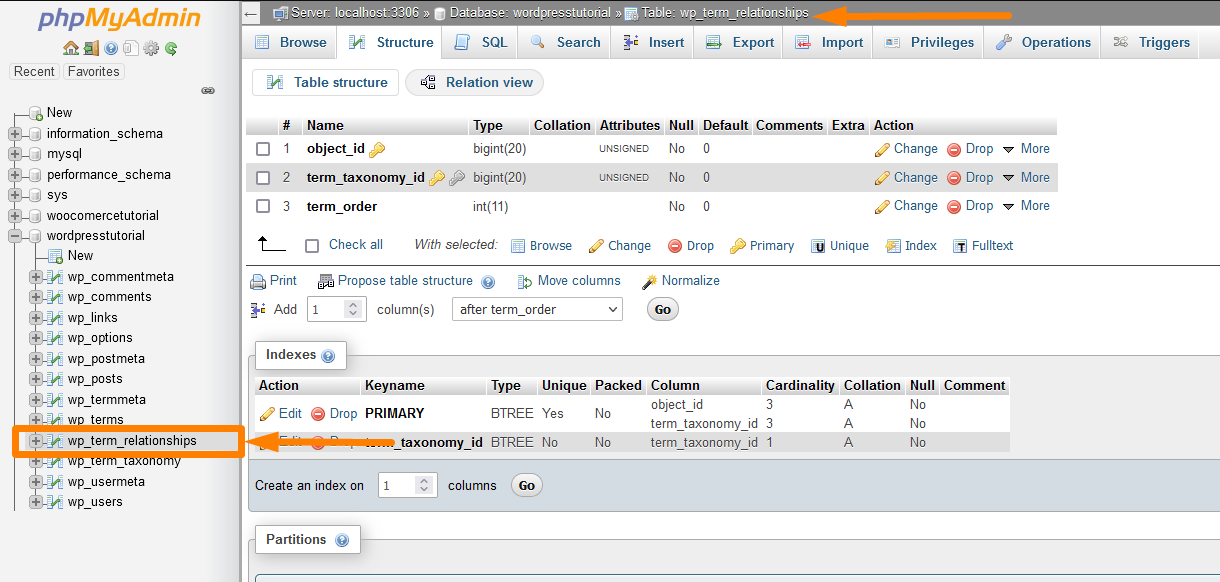
#10) wp_term_taxonomy: This is the tenth table on the WordPress database that defines taxonomies for terms defined in the wp_terms table.
This table helps to sort out the terms and determine which term is a category and a tag. The following is the structure of this database table: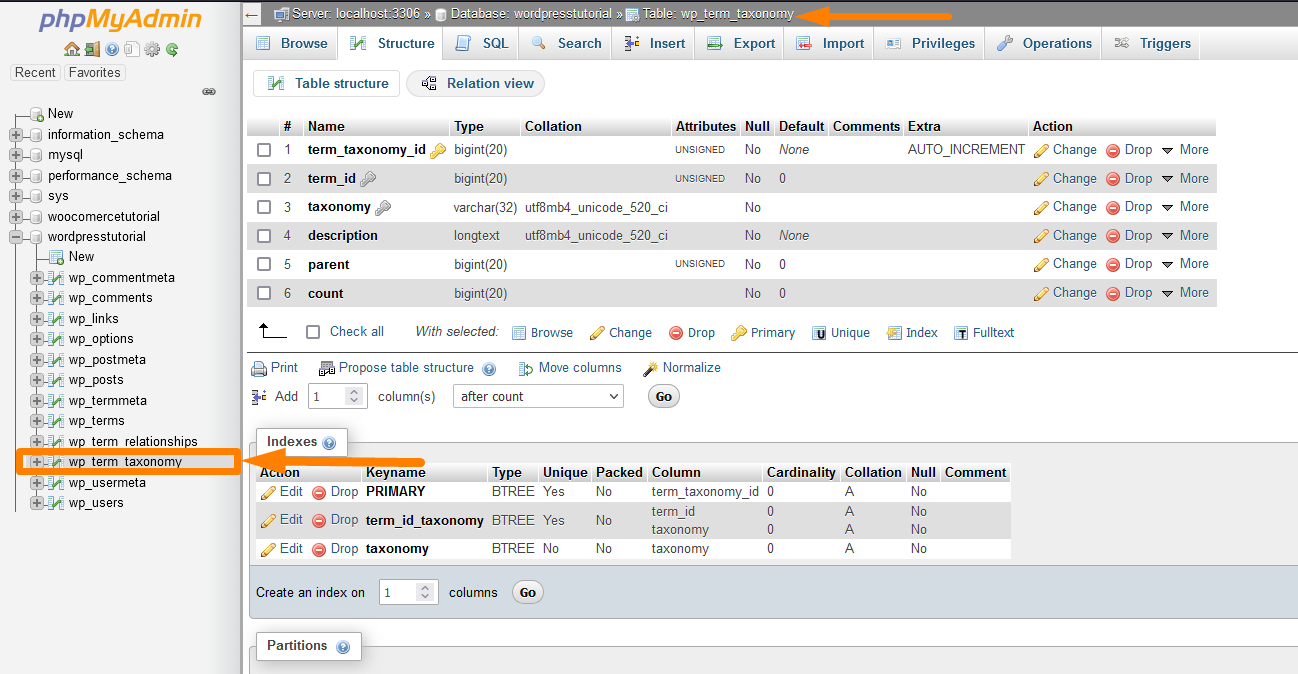
#11) wp_usermeta: This is the eleventh table on the database that stores the user metadata for all the registered users on the WordPress site.
You can also use this table to store user meta-information using custom plugin functions. The following is the structure of the wp_usermeta WordPress database table: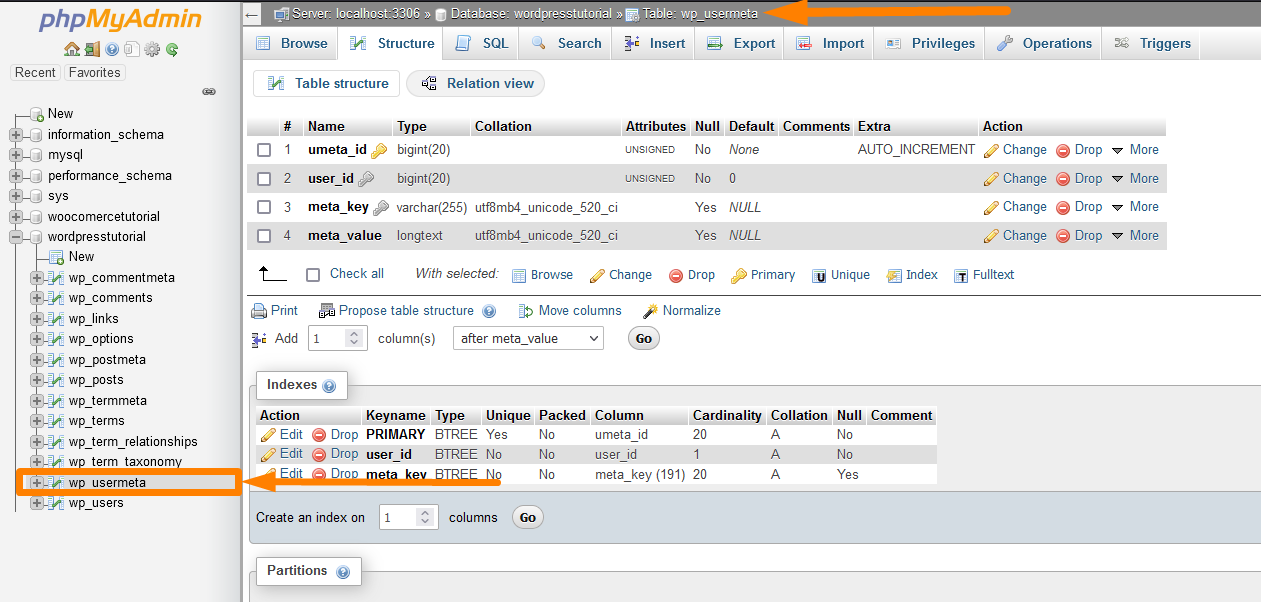
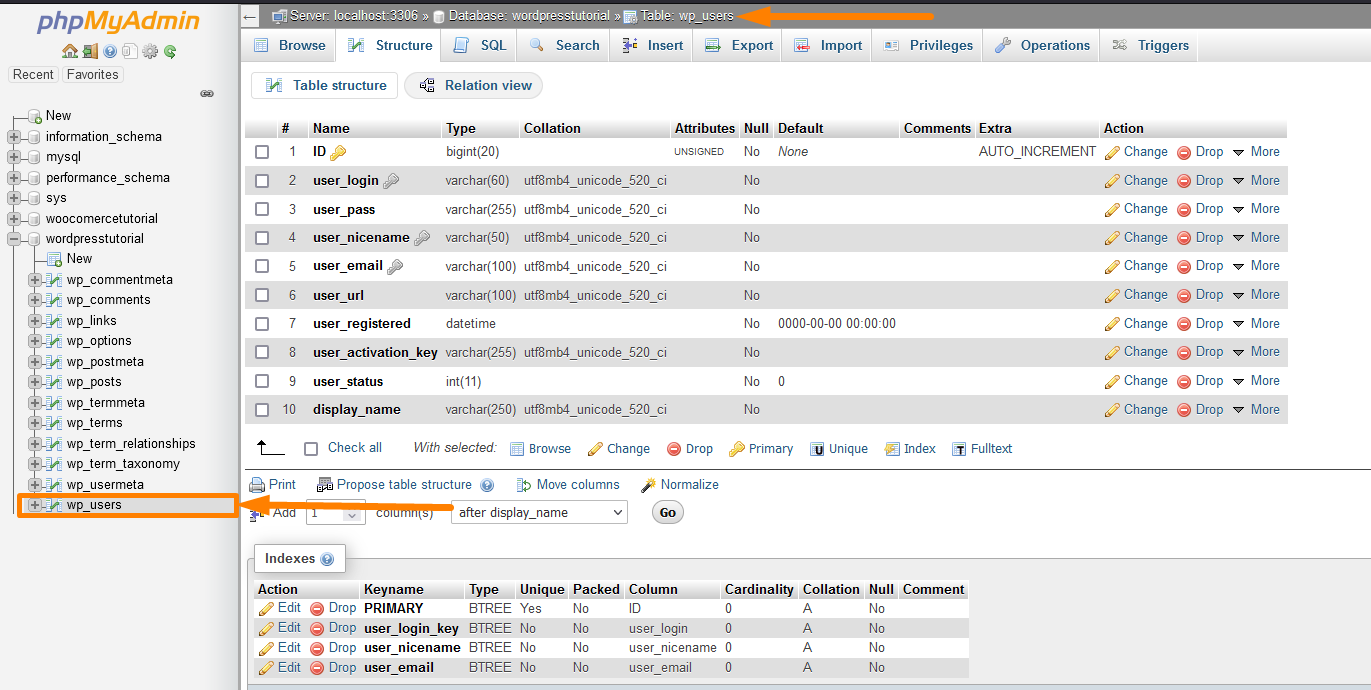
#12) wp_users: This is the twelve table on the database that stores user information such as the username, password, user email, and display name.
You can use this table to edit the WordPress user information, such as changing the password or creating a new admin user. The following is the structure of the wp_users database table. The following is the structure of this database table:
We can now comfortably move to the next section to learn how to create a WordPress database and manage the data and users.
Managing WordPress Database PhpMyAdmin
The best way to manage the WordPress database is through the PhpMyAdmin Panel available on most web hosting environments and localhost.
In this guide, I want to use PhpMyAdmin to demonstrate how to manage data on a WordPress database. Let us get started with creating a WordPress database.
WordPress Create Database
It is important to understand that you need to create the WordPress database during WordPress installation to connect the database to WordPress. There are three important steps when installing WordPress, and they include:
- Create MSQL Database
- Connect Database to WordPress
- Set up your site configuration
These steps come in that order, and they work across all WordPress installation processes irrespective of how you install WordPress.
Create WordPress Database: PhpMyAdmin Create Database Link
To create WordPress on PhpMyAdmin, click on create database icon as shown in the image below and enter the database name.
Create WordPress Database: PhpMyAdmin SQL Command
PhpMyAdmin comes with a console to run MySQL commands and can also be used to create the WordPress database by running the create MySQL database command as shown below:

CREATE DATABASE databasename;
You should just copy this command into the PhpMyAdmin console and click the run button. The database will be automatically created with the assigned name in the create database command.
There are several ways you can create a WordPress database, like using the command line terminal, but in this article, we will focus on PhpMyAdmin.
After creating a WordPress database, you can install WordPress, and when WordPress is installed successfully, all the database tables will be visible on the WordPress database.
WordPress Add Database Table
You may want to add a table to the WordPress database to store your custom data. This is a common requirement for custom WordPress sites or custom WordPress plugins with unique database table structures that may not work well with the default WordPress database tables.
Add WordPress Database Table: PhpMyAdmin New Menu
It is possible to add a database table to the WordPress database using the PhpMyAdmin.
You should click the ‘New ‘menu under the respective database to open the page to add the database table details as shown in the image below:
Add WordPress Database Table: PhpMyAdmin SQL Query
You can also run the command to create the database table on the SQL console on PhpMyAdmin, and the table will be created automatically.
The following is the SQL create table command that can be used to create or add a table to the WordPress database.
CREATE TABLE table_name (
    column1 datatype,
    column2 datatype,
    column3 datatype,
   ....
);
WordPress Add Database User
When you create a WordPress database, you need to create a user (virtual) who connects the database to WordPress. This user needs to have a username and a password to connect WordPress to the database successfully.
This logic comes from PHP / MySQL database connection that includes a function that opens a database connection from the PHP script and requires the database name, username, and password.
Create WordPress Database User: PhpMyAdmin Privileges Menu > Add User Account Link
On PhpMyAdmin, you can create a new user for the database under the Privileges menu and use the Add user account link. When you click on this link, it opens a new page to add the user details.
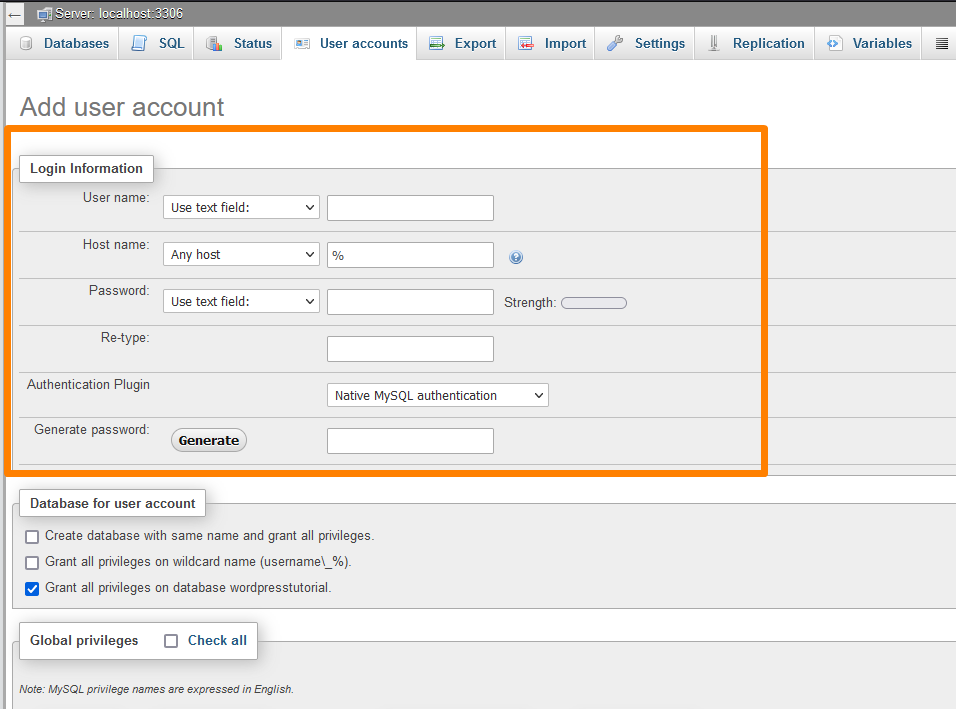
You should add the database user name used in the WordPress database connection; the hostname should be local since it’s relative to the hosting environment.
You should also create the password and save it safely since you will require it along with the username and the database name to connect to WordPress during installation.
WordPress Database User Grant Privileges
When you create a WordPress user for installation purposes, you need to allow the user to have all the privileges since this is a requirement for WordPress’s successful installation.
PhpMyAdmin gives you an easy way to add Global privileges to the WordPress database user.
Under the same section where you create the WordPress user, you can click on the check all option as shown on the image below to grant all the privileges:
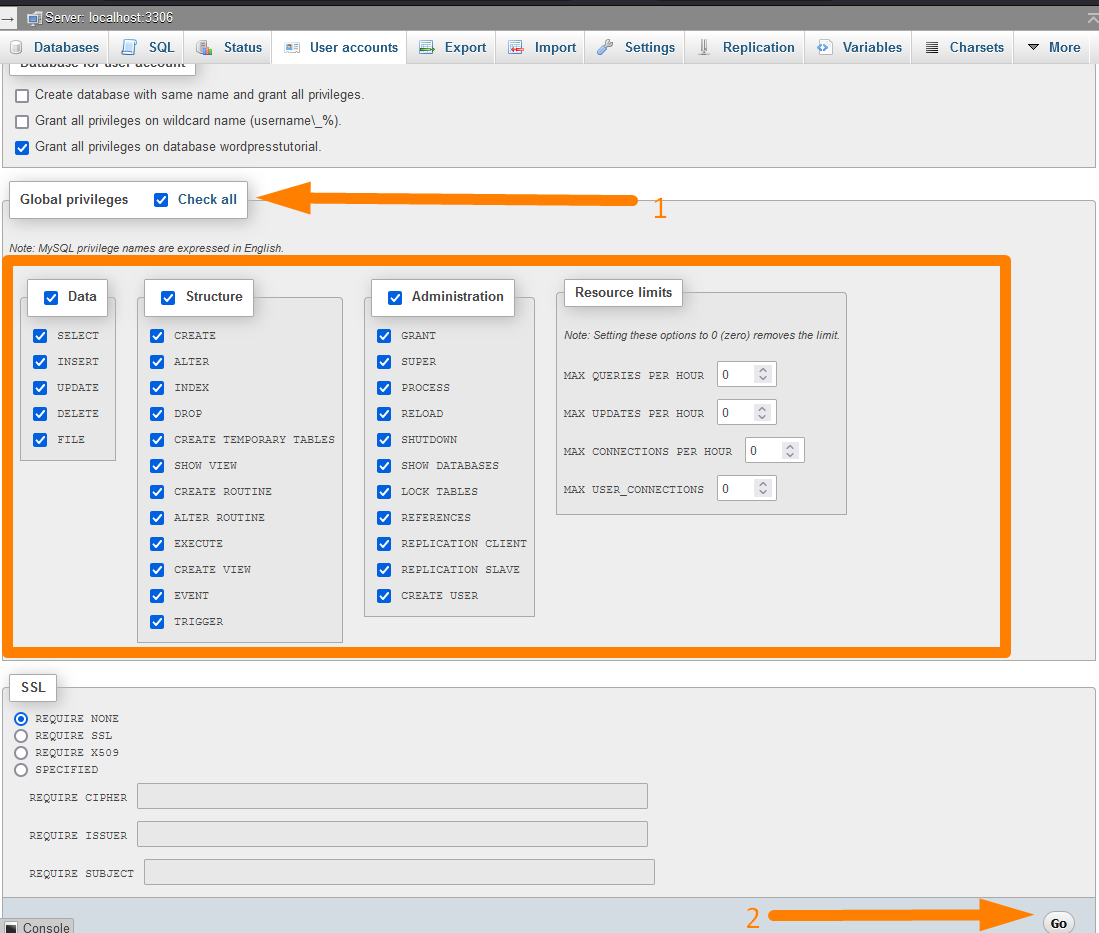
When you assign the database user, click on the Go button to grant them all the privileges, and you are now ready to start the WordPress connection to the database.
How to Connect WordPress to Database?
After creating the WordPress database user, it’s time to connect the MySQL database to WordPress. To connect WordPress to the MySQL database, you need the database name, username, and password.
You should now run the WordPress installation wizard, and you will see the step to add the database details as shown in the image below: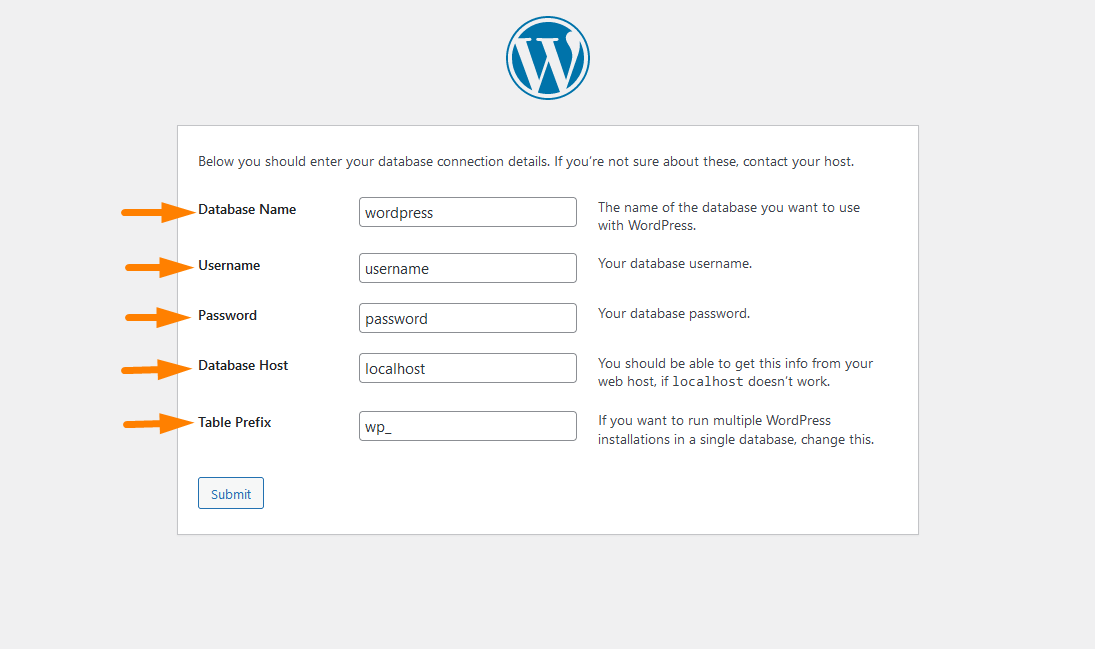
You can change the database prefix during the installation before you connect WordPress to the database.
When WordPress installation is complete, you should see the details of the database connection in the wp-config.php file as shown below:
/** The name of the database for WordPress */

define('DB_NAME', 'database-name' );

/** MySQL database username */

define('DB_USER', 'username' );

/** MySQL database password */

define('DB_PASSWORD', 'password' );

/** MySQL hostname */

define('DB_HOST', 'localhost' );
If you are looking for more details on connecting WordPress to MySQL database, I wrote a step-by-step guide here – Connect WordPress to MySQL Database step by step.
How to Login to WordPress Database or Connect to WordPress Database
You can log in to the WordPress database; for web hosting access, you should use the Control Panel to access the MySQL database management tool.
For most other MySQL WordPress database management tools for you to connect to the WordPress database, you need to have the following database details:
- The database username
- The database password
- The server hostname or IP address
- The LOCAL IP address that you will use to connect to the remote server
Connect to WordPress Database Via CPanel – PhpMyAdmin
If you want to access the WordPress database on your web hosting, you should log in to the CPanel and look for the database section.
Under the database section on your web host CPanel, you should see the database connection tool, and the most common tool is the PhpMyAdmin.
The PhpMyAdmin is available in most shared hosting environments such as Hostgator Shared Hosting, A2 Shared Hosting, Hostinger Shared Hosting, Bluehost Shared Hosting, and more.
As you can see in the image below, you can easily log in to the WordPress database on the CPanel using the CPanel PhpMyAdmin panel.
You can edit, delete and update the data on the WordPress database using the PhpMyAdmin panel, which will reflect on your website.
It is possible to change the admin password or reset the WordPress password via PhpMyAdmin on your web hosting CPanel.
Localhost WordPress Database Connection via PhpMyAdmin
To connect to the WordPress database on localhost via PhpMyAdmin is rather a straightforward process. You simply need to ensure your localhost environment is running and, in particular, MySQL is running.
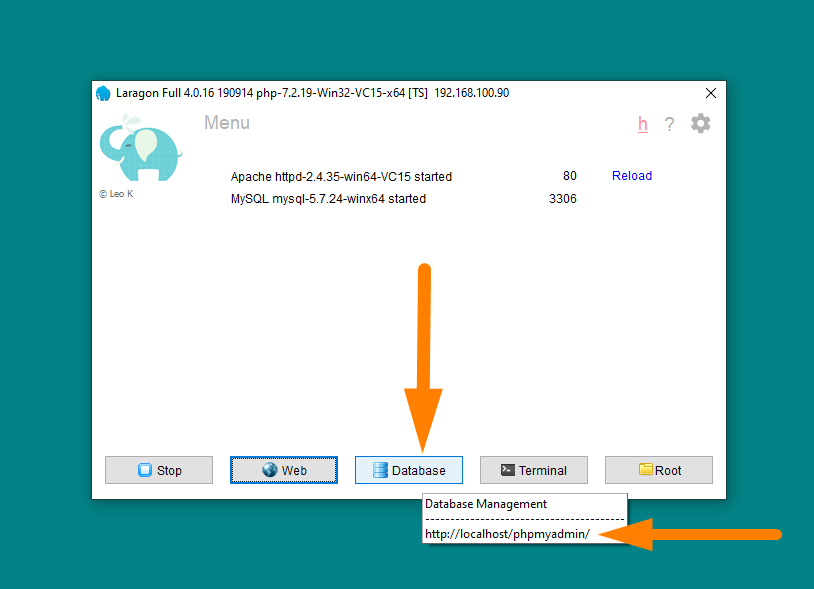
When MySQL runs on localhost, you can now access the PhpMyAdmin localhost by adding the phrase ‘phpmyadmin’ at the end of the localhost URL: http://localhost/phpmyadmin/.
Alternatively, the localhost environment may offer a button to access the PhpMyAdmin from the settings page, as is the case with the Laragon localhost server.
Once you are on this URL of the localhost PhpMyAdmin, you should see the login screen, the password should be left empty in most cases, and the username is in most cases. ‘root’

Click on the login button, and you should successfully log in to PhpMyAdmin on the localhost and start managing your WordPress database on localhost.
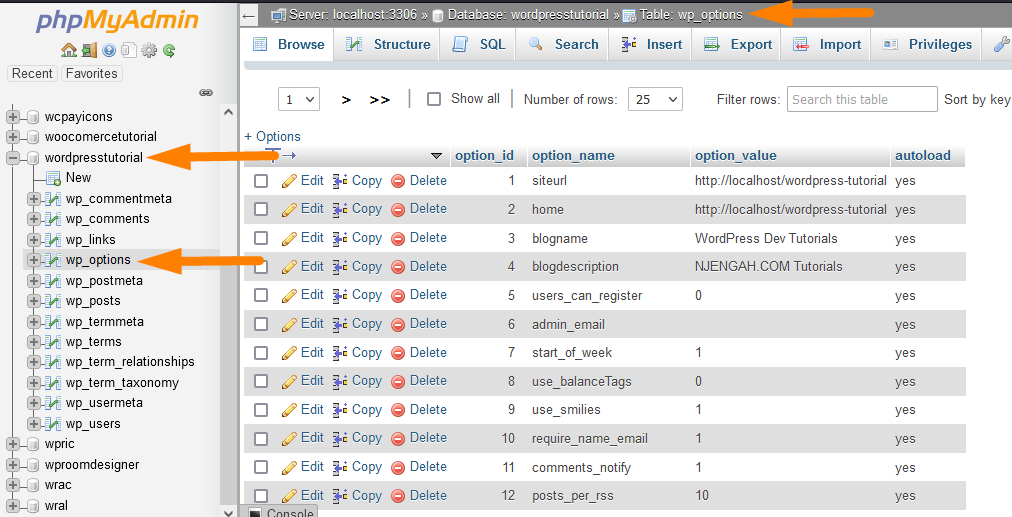
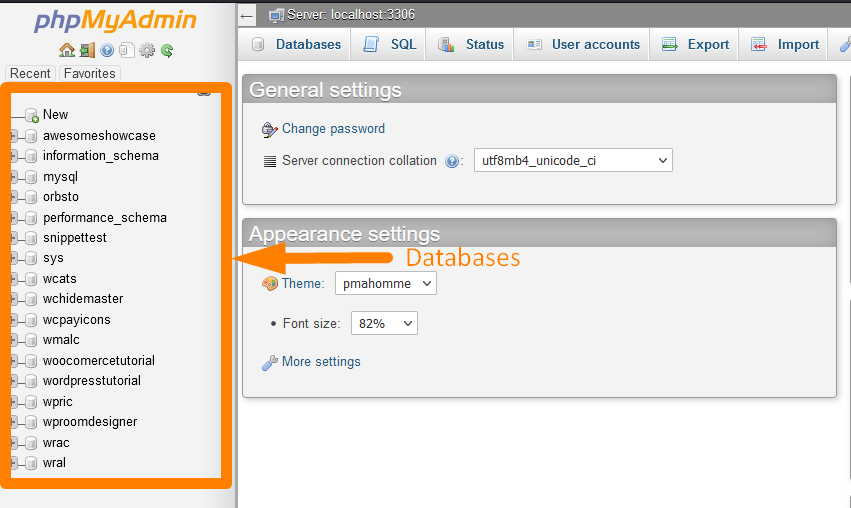
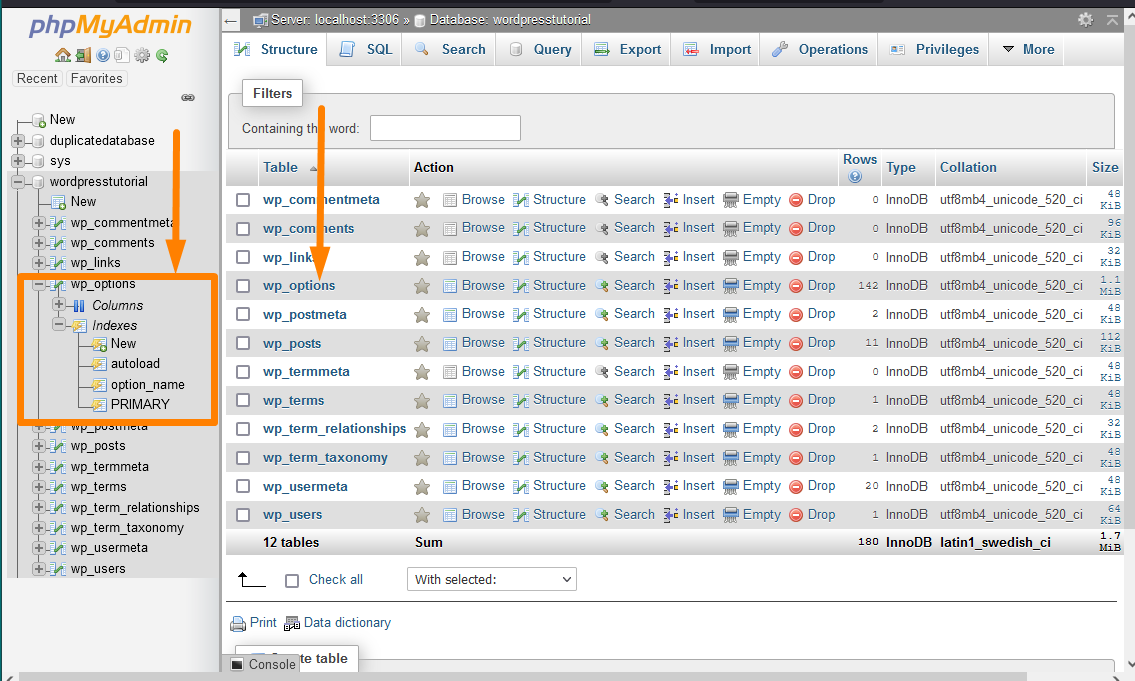
When you are logged into PhpMyAdmin localhost, you see all the databases that exist on that server. You can pick the database you want to manage from the left menu.
For example, I have selected the ‘wordpresstutorial’ database and opened the wp_options table where you can change the general sites settings as shown on the image below:
Now let us focus on other ways you can connect to the database and other useful tools that work like PhpMyAdmin, and you can use them on your PC to connect to a remote MySQL WordPress database on any server.
WordPress Database Connection via SQLyog and HeidiSQL
You can use other MySQL tools to connect to the WordPress database, as I listed in the section above. You can use tools such as HeidiSQL and SQLyog to connect to both localhost and remote WordPress database.
In the next section, let me illustrate how you use either of these MySQL tools to connect to the WordPress database. The best way to illustrate this database connection using these tools is through the localhost environment.
For remote WordPress database connection, you can change the localhost details with the respective details of your web hosting server.
WordPress Database Connection via SQLyog
First, you need to download and install SQLyog on your PC to connect to the WordPress database.
When you have installed and opened the SQLyog on the first screen, you will see the dialog box to add the WordPress database details.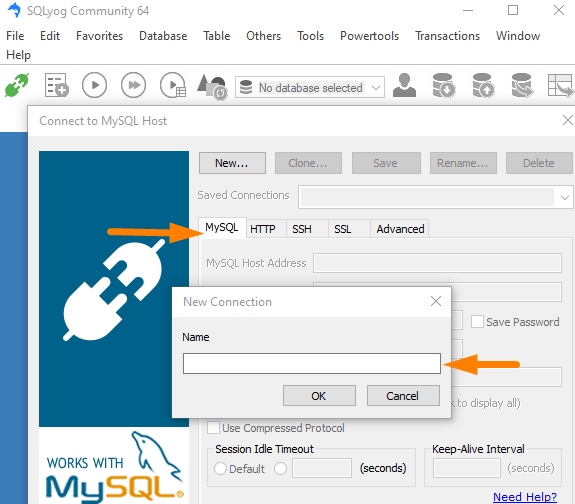
In the localhost environment, you need to put the host address as localhost or 127.0.0.1. The username should be root, the password should be empty, and the port is mostly 3306.

You should add the database name as shown on the image above the database(s) field so that you can connect to a specific WordPress database.
In this example, I have added the WordPress database name as ‘wordpresstutorial.’
You also need to ensure your localhost MySQL database is running in this case, I am using the Laragon localhost environment on Windows 10, and the MySQL is running on port 3306 as shown below: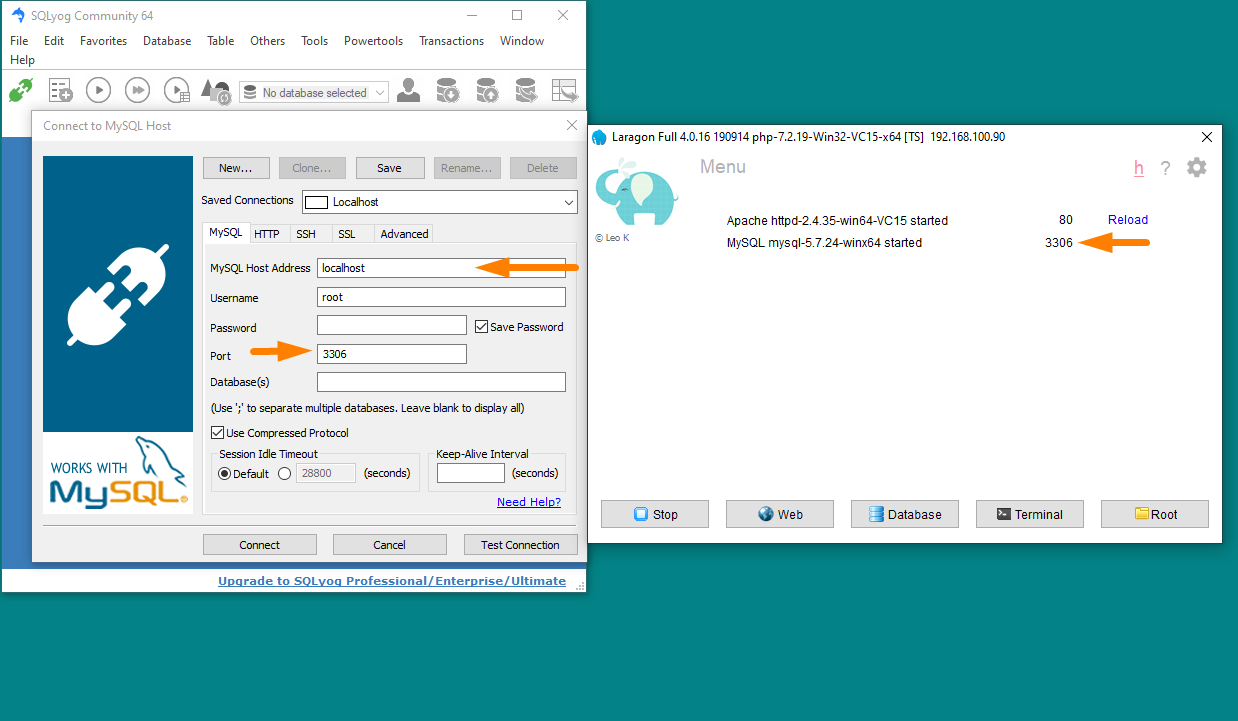
When you are successfully logged into the WordPress database via SQLyog, you should see the database and the respective WordPress database tables as shown in the image below.
You open a specific WordPress database table to read, create and update data.
For example, in the screenshot below, I have opened the wp_options WordPress database table. On this WordPress database table, I can change the site URL and other general site settings.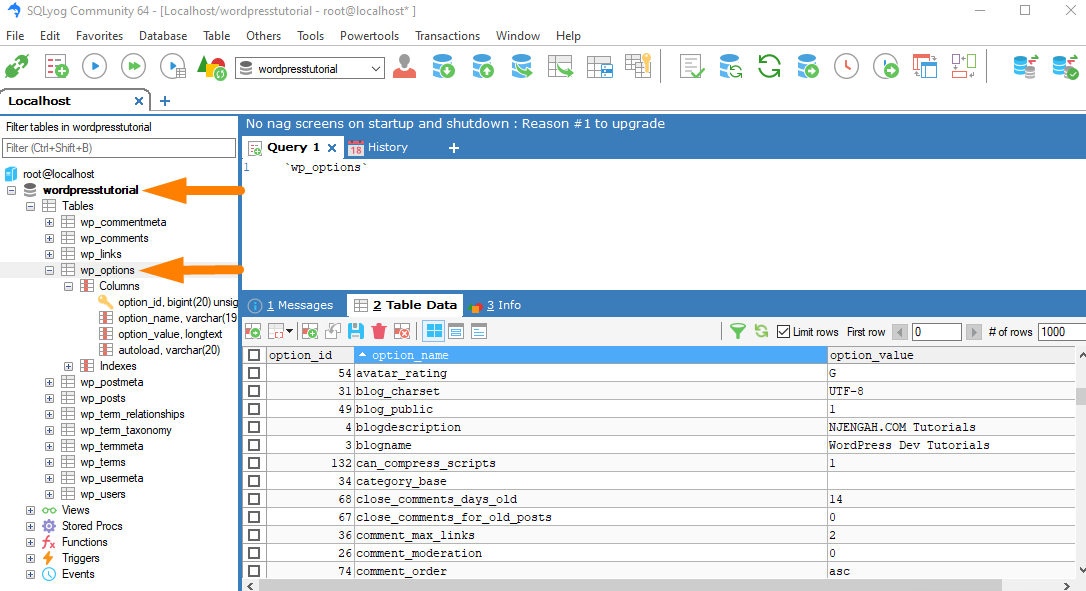
WordPress Database Connection via HeidiSQL
HeidiSQL is another useful tool that I use to connect to a remote WordPress database. It is free and easy to use and comes with a simple user interface that makes it easier for everyone, including complete beginners, to connect to remote WordPress databases from their PC.
To begin using HeidiSQL to connect to a remote WordPress database, you need to start downloading and installing HeidiSQL.
Once you have installed HeidiSQL, you can open it to begin your WordPress database connection. First, ensure your localhost MySQL is running, then click on the New button (Image Label – 2): as shown on the image below: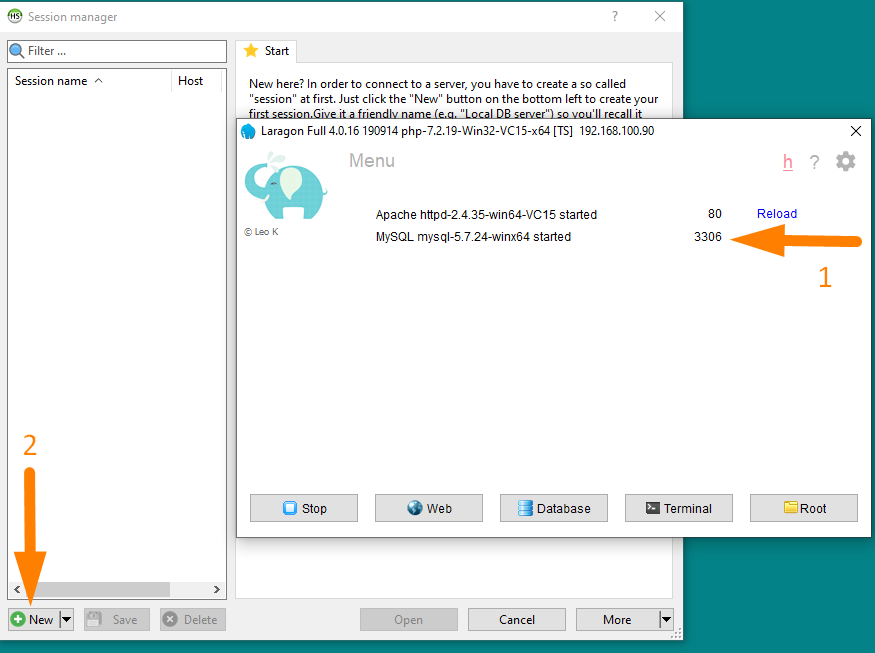
In the case of this illustration, I will still use the localhost database, but you can always substitute these login details with those of a remote database.
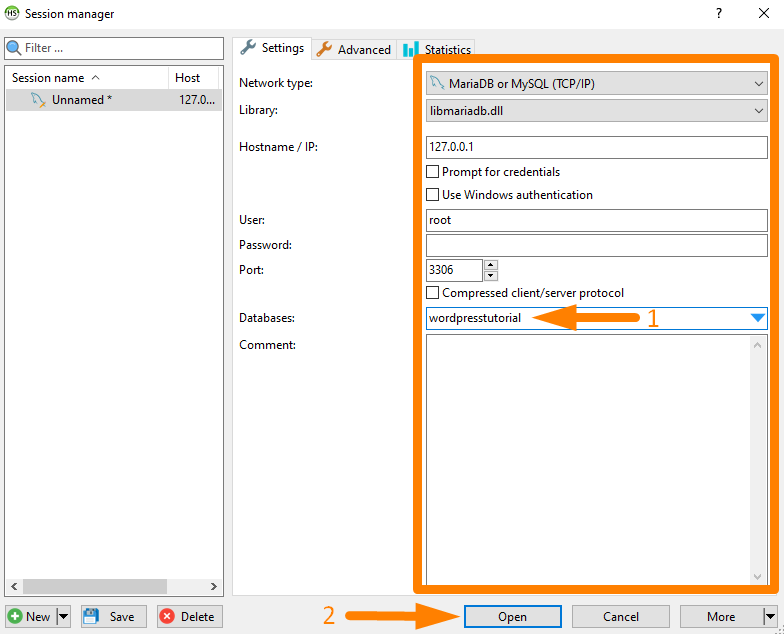
As you can see in the image below, I have added the database name and port of 3306. The host address is the localhost, click on the open button (Image Label – 2): after filling in the database details to open a connection to the WordPress database, you added to the databases field (Image Label – 1):
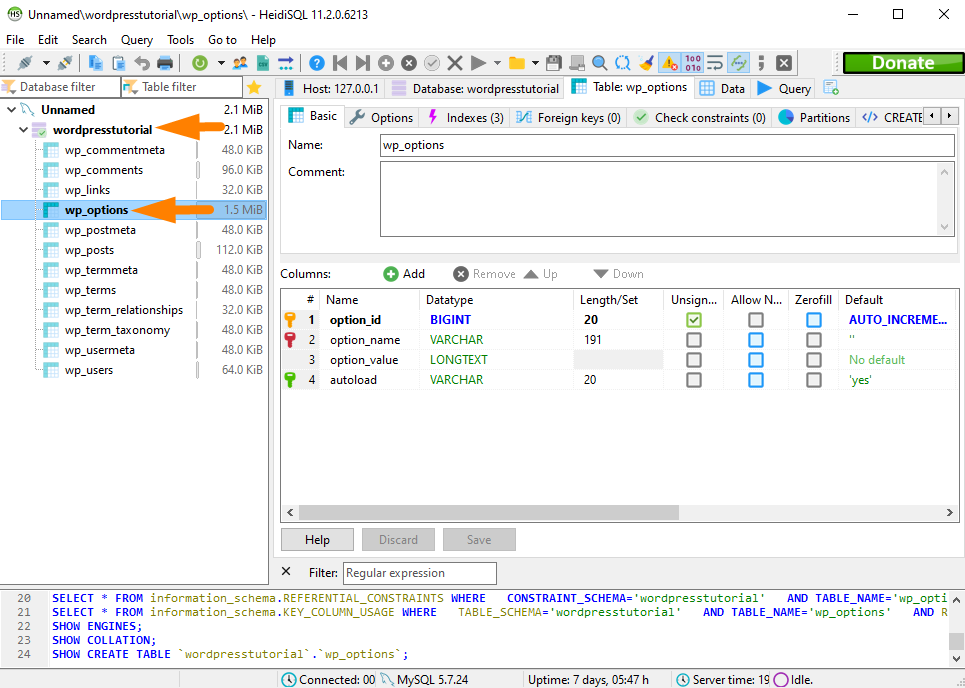
You can now see that you have connected to the database using this SQL database tool – HeidiSQL. You can go ahead and select a database and open a database table such as the wp_options table shown in the image below :
WordPress Database Connection via Commandline Terminal
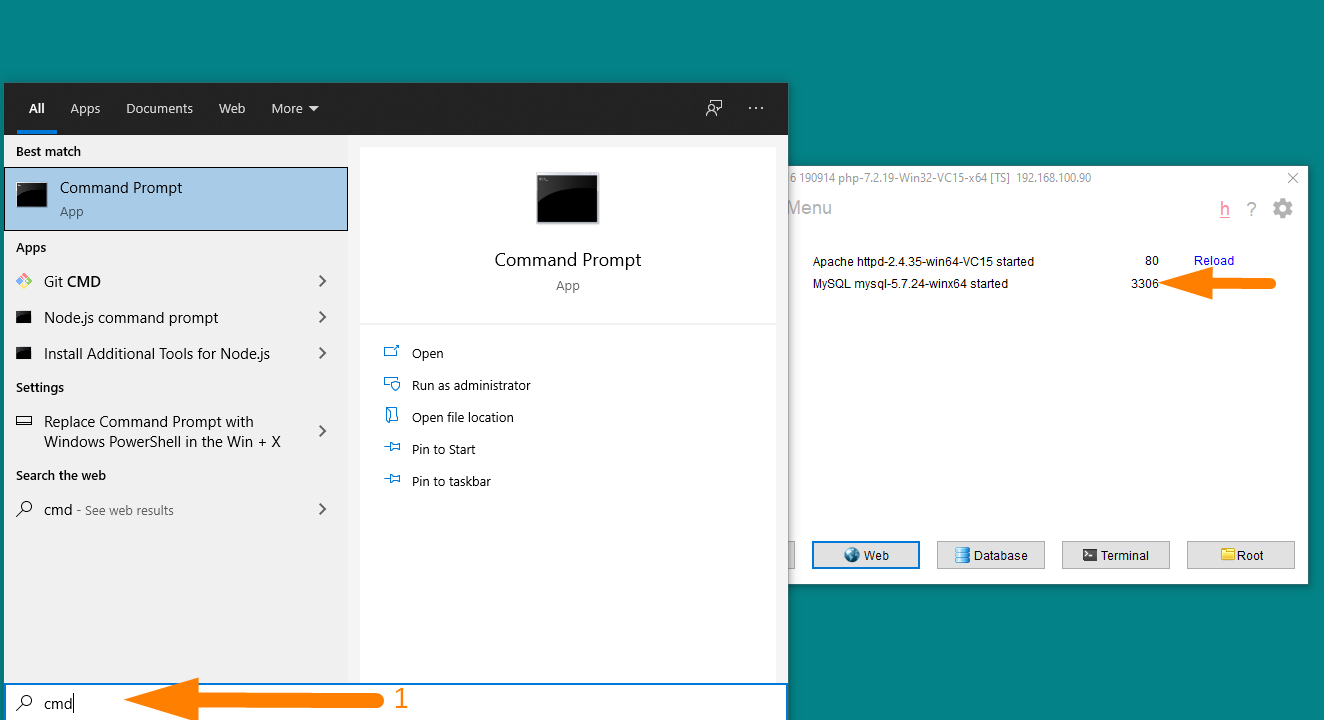
It is also possible to connect to the WordPress database through the Commandline terminal. In Windows 10, you can open the command line by typing ‘cmd‘ on the search bar, as shown on the image below (Image Label – 1)
Once the command line is open, ensure the localhost MySQL database is running and you are not ready to connect to the WordPress database via the command line.
Connecting to the WordPress database via the command line is an important skill for users who want to manage WordPress databases on VPS hosting or cloud hosting. The default access to the server is through SSH.
To connect to the WordPress databases, you need to run the MySQL command to connect to the database on CLI, which includes the username and the password as shown below:
mysql -u username -p
For example, to connect to WordPress databases on my localhost, I need to run this command on the CLI terminal as shown on the image below (Image Label -1)

Once I have connected to my localhost WordPress MySQL databases, I can use the show databases command to display all the databases available on the server.
show databases;
The show database command is as follows: show databases; when you run this command on the CLI terminal, you should see all the databases you have on your server, just like using the other GUI tools like PhpMyAdmin.
The image below shows how to display all the databases on your localhost or server using the show databases command: (Image label -1)
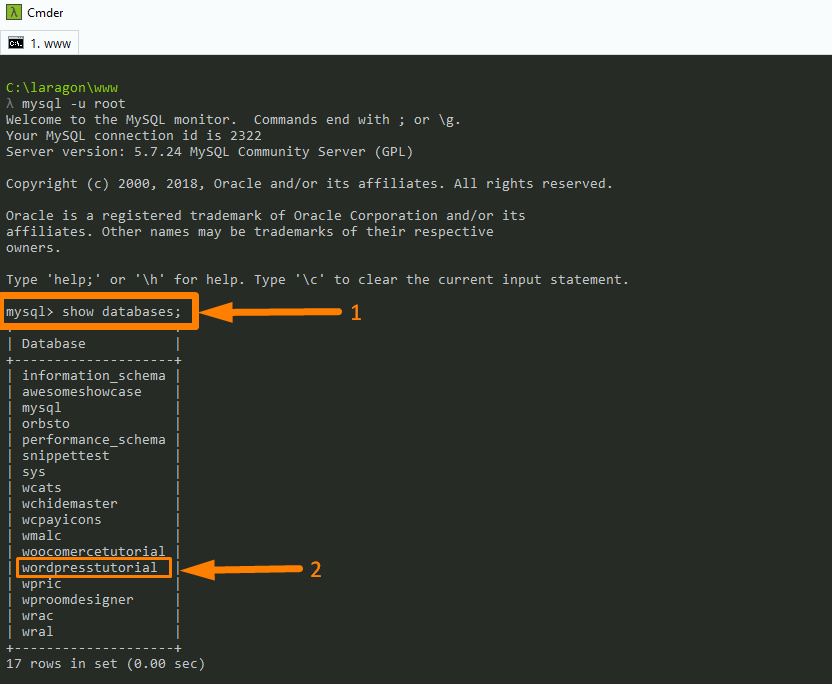
The next step is to select the database we need to manage; on the image above (Image label -2), we can now select the ‘wordpresstutorial’ database using the select database command – user database name;
use wordpresstutorial;
When you want to select the database, use the command above and replace the database name, and you should see the database has been selected as shown by the message ‘database changed. On the image below (Image label -1):
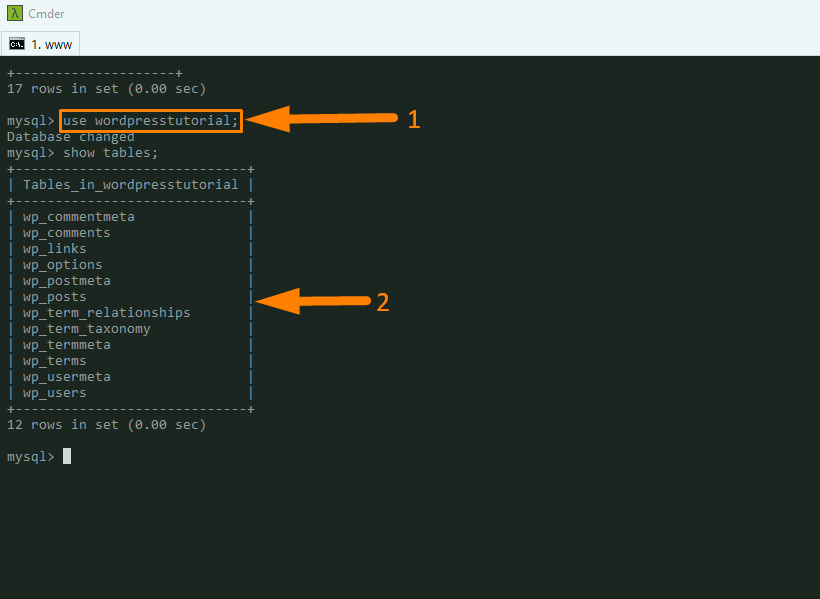
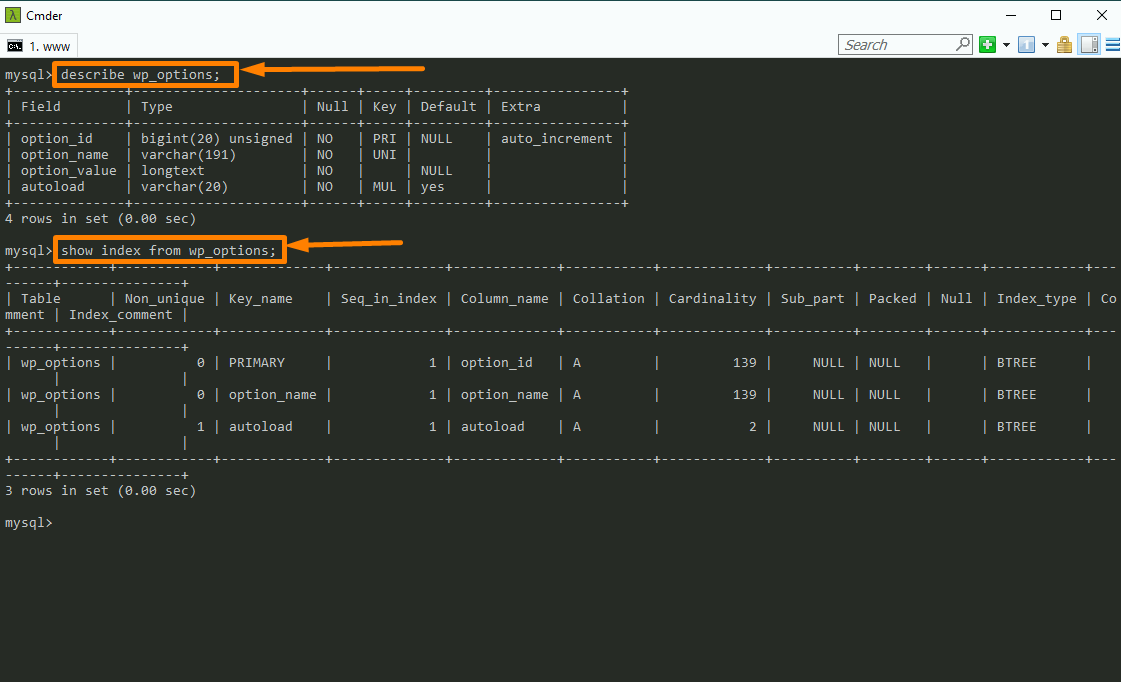
You will also see the database tables as shown in the image above (Image label -2). You can now go ahead to edit the data in the wp_options table. You can begin with the commands to show the table structure, such as:
describe wp_options;

 show index from wp_options;
You can view the database tables on the CLI for every command you run, as shown in the image below:
You can update the database records by selecting and using the MySQL commands to update the database. Here is a collection of the MySQL commands you can use on CLI to manage the WordPress MySQL database.
How to Migrate WordPress Database?
One of the most common reasons you want to understand how WordPress database works is the migration of WordPress sites. When you are migrating a WordPress site, you need to understand there are two main steps:
- Migrate the WordPress installation files
- Migrate the WordPress Database
You can migrate the site using the several free plugins that create the backup of the WordPress site by cloning it, but manual migration of WordPress is faster and lets you be in control. It is not as complicated as it may sound; you simply need to understand how to migrate the WordPress database.
In this section, I want to show you step-by-step how you can migrate the WordPress database from one server (web hosting) to another.
For example, if you want to migrate your website from your current web hosting to Bluehost (one of the best-shared hosting I use and recommend), you need to learn how to migrate the WordPress database.
To migrate the database, there are two steps that we will discuss in detail:
- WordPress Database Export
- WordPress Database Import
For this tutorial, I want us to focus on using PhpMyAdmin TO learn how to export and import the WordPress database. You can also use the other MySQL tools I shared above to export or import the WordPress database.
WordPress Export Database: Exporting WordPress Database Using Phpmyadmin
To export the database via PhpMyAdmin, you need to log in to the PhpMyAdmin panel. If you are on your web host, you can access the PhpMyAdmin on your CPanel.
When you access the databases on the left column, select the database you want to export and click on it as shown on the image below:
The next step is to click on the Export menu that is located on the top menu after you open the database you want to export, and you can see the database tables as shown on the image below (Image Label -2)
When you click on the Export menu, you will be presented with the WordPress database export page with two options, Quick and Custom.
In most cases, it will be set to the Quick option, and the other option is the SQL option, as shown in the image below:

When you click on the go, you should download the database and save it on your local drive. You can also save this database copy on cloud storage or any other place to get it for restoration.
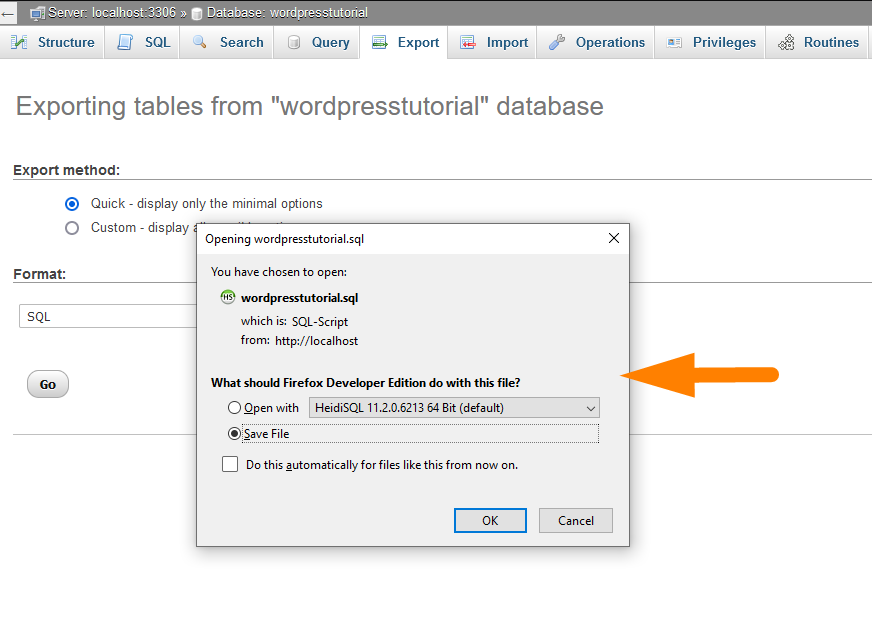
The database is a set of rules that you can open on the notepad and view.
They are a set of commands that make sense to the database software and can recreate your database with all the data it had stored.
When you open the database file on the notepad, you should see the database queries that are used to create the WordPress database, as shown in the image below the command that creates the wp_posts table:
You can skim through this file to view all the SQL queries used to create a WordPress database and add data. This brings me to the common question for WordPress beginners – What is a database dump MySQL?
What is a WordPress MySQL Database Dump?
When creating a managing WordPress MySQL database, you will often hear the term ‘MySQL database dump’ or WordPress database dump.
This simply means the database record that you just downloaded above in the WordPress database export step.
This is a record of all the table structure and data that you can use to reconstruct the database, as we will do in the next step on how WordPress database import.
WordPress Import Database: Importing WordPress Database Using Phpmyadmin
When you have successfully exported the WordPress database, you need to learn how to import the WordPress database.
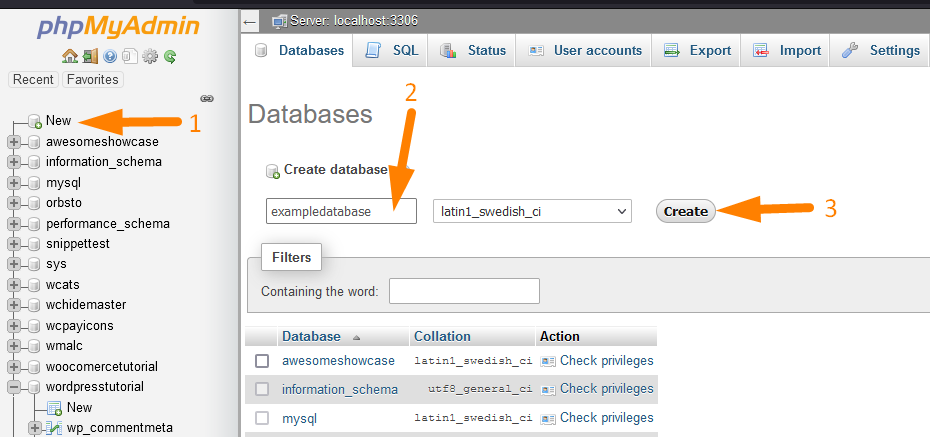
The first step is to create a WordPress database via PhpMyAdmin.
You can create the database by clicking on the new database and adding the name of the database as shown in the image below:
When you have created the database, you now need to open it and click on the import menu at the top that will open the database import screen that allows you to upload the database dump you exported on the step above – WordPress database export.
You should create a zip file of the SQL database dump you will upload during the WordPress database import.
You simply need to zip the file and upload it leaving all the other settings on the import screen as default, as shown on the image below:
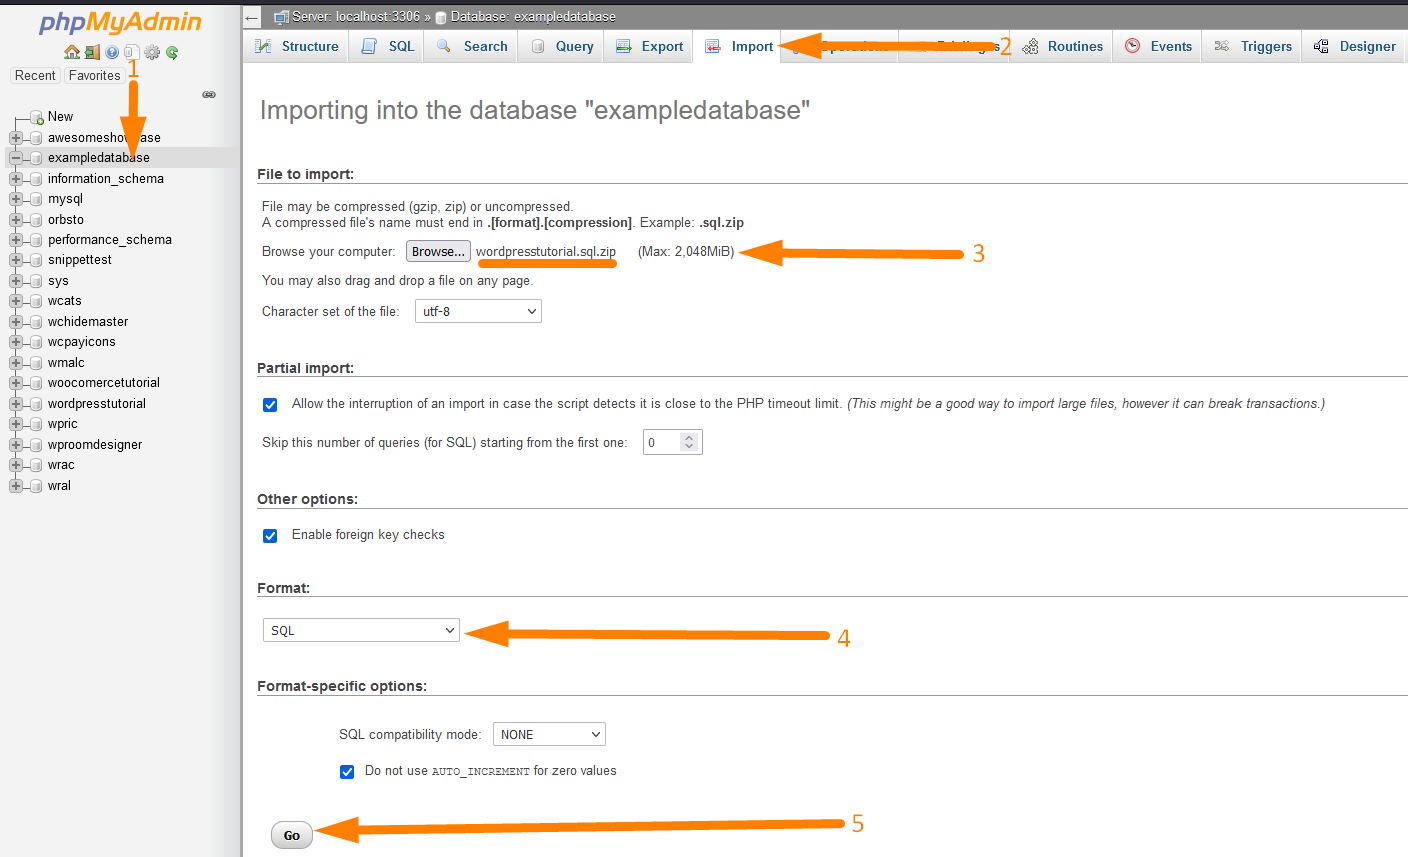
One of the most important steps when importing a database is to ensure you create the sql.zip file format before uploading the file on the import screen, as underlined in step labeled 3 on the image above.
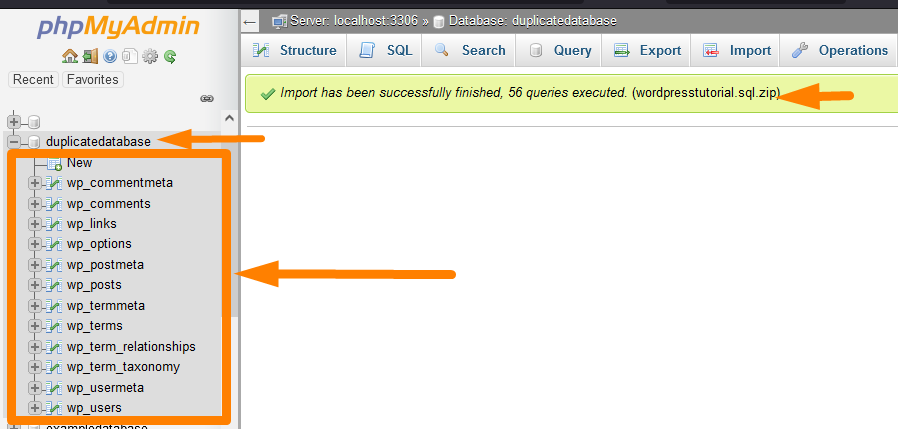
When you have this format of the database, and you click on the go, the database should be successfully imported, and you will see the message as shown on the image below (Image label -2):
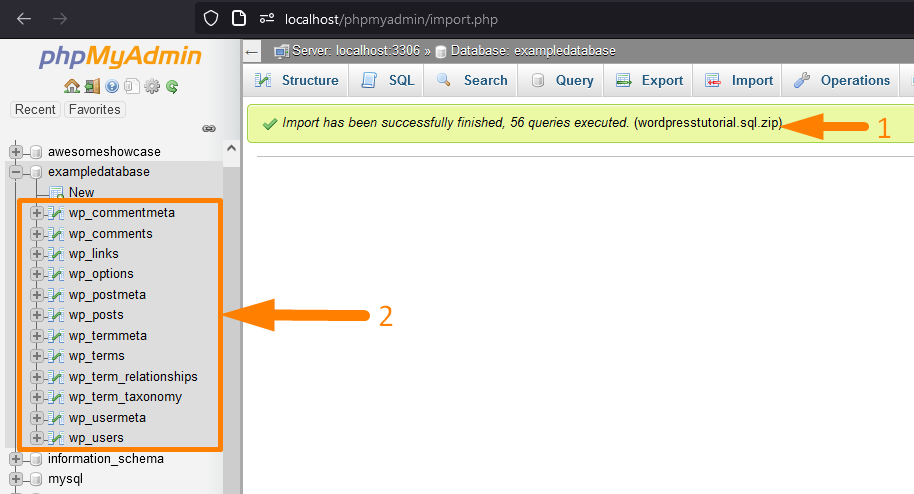
You will also see the default WordPress tables are created on the database, as shown in the image above (Image label -2). These WordPress database tables will contain the data you had in the previous database and the WordPress MySQL database dump.
WordPress Import Database by Query on PhpMyAdmin
On PhpMyAdmin, there is a console to run database queries that you can use to import the WordPress database. The first step is to create the database, as we outlined in the step above.
The second step is to open the database and click on the SQL menu at the top, as shown in the image below (Image Label -2).
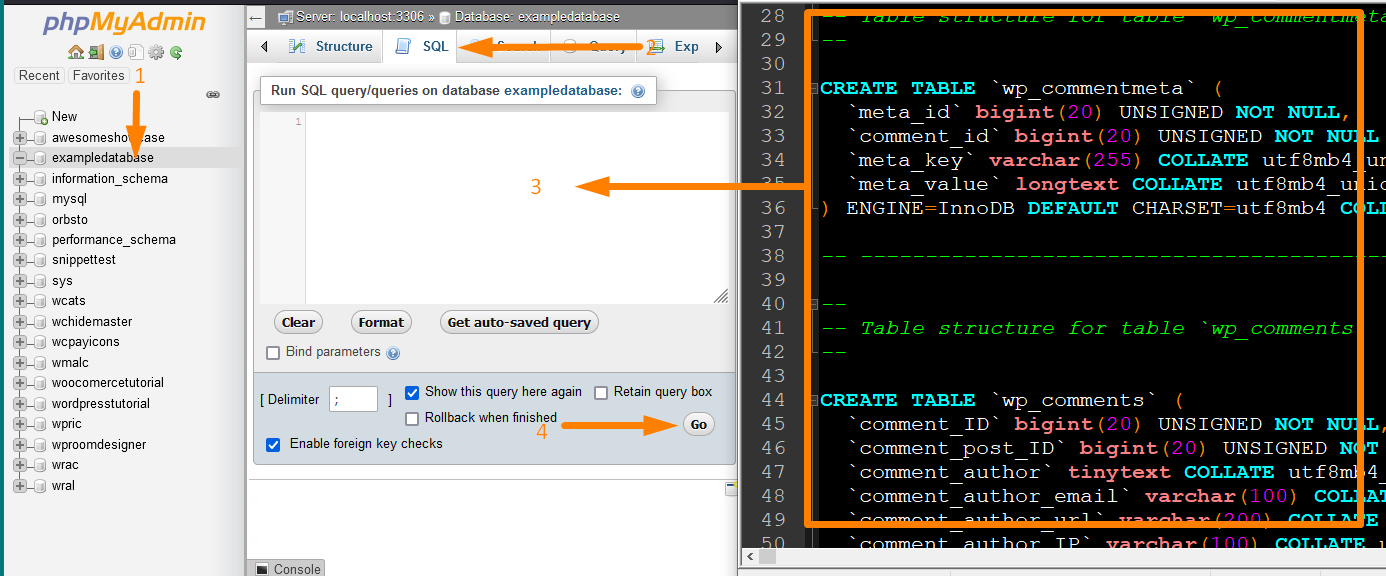
When you have the SQL Query window open, you can copy the WordPress MySQL data from the notepad to this section, and you click on the Go button as shown on the image below:
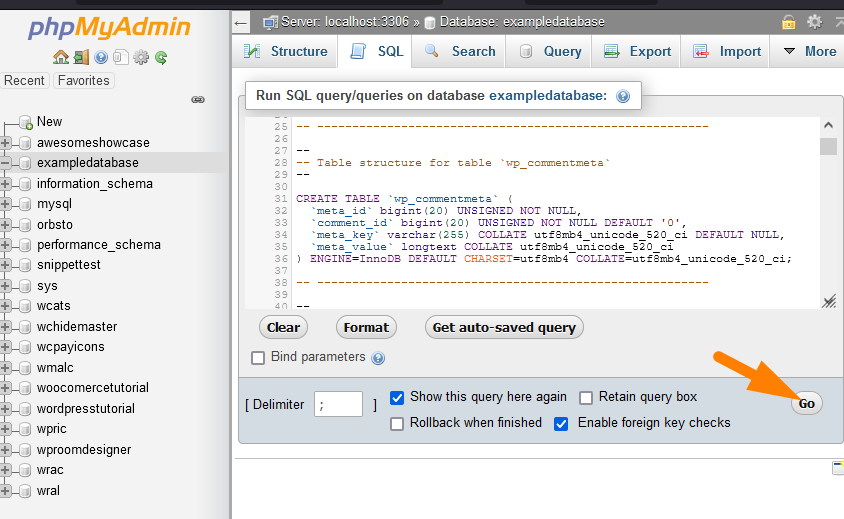
This will successfully import the database and create the WordPress database tables. These are the two ways you can import a WordPress database using PhpMyAdmin.
Now let us look at how you can create the backup of your current site database via PhpMyAdmin.
WordPress Database Backup
You can create a WordPress database backup using the PhpMyAdmin panel or several free WordPress backup plugins.
This section will show you how to create a WordPress database backup using PhpMyAdmin and briefly mention the best plugins to help you create a database backup.
Creating WordPress Database Backup Using Phpmyadmin
To create a WordPress database backup, you need to open the PhpMyAdmin panel and select the database you wish to create a backup.
You can access the PhpMyAdmin through the CPanel database section, as shown in the image below:
When you have logged in on the PhpMyAdmin, click on the export menu on the top menu and select the Quick option and the SQL format, then click go to export the database and save a copy of your database backup.

Creating WordPress Database Backup Using a Plugin
The best WordPress plugin for Database backup is the Database Backup for WordPress plugin. This plugin allows backing up the core database tables.
This is a free plugin that you can install and use to back up the WordPress database tables, and you can use PhpMyAdmin to restore the WordPress backup.
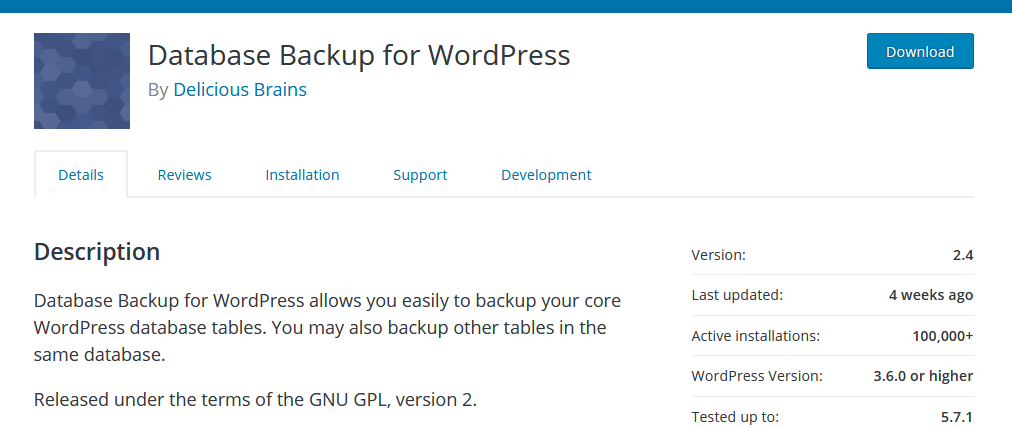
To create a database using a plugin, you need to install and activate the plugin – Database Backup for WordPress.
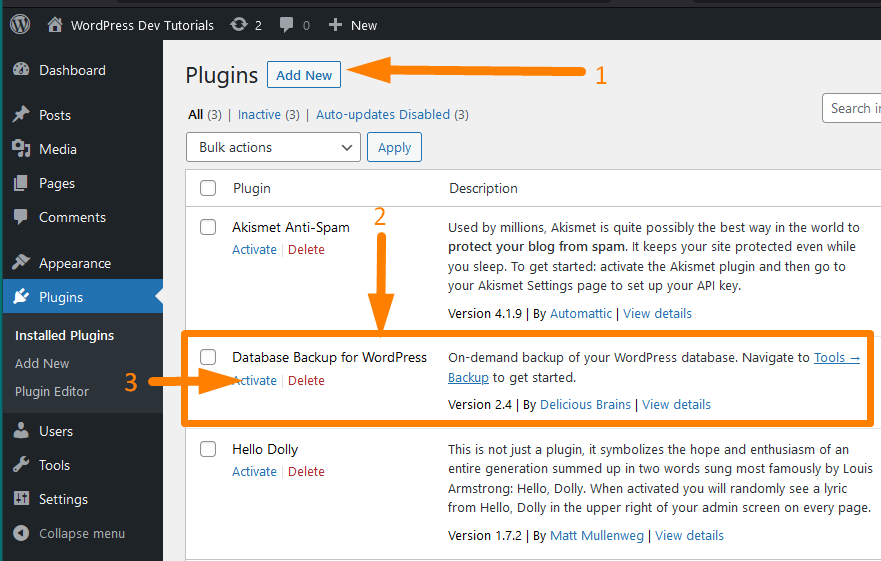
To begin creating database backup using the plugin, you need to navigate to WordPress main menu Tools > Backup as shown in the image below:
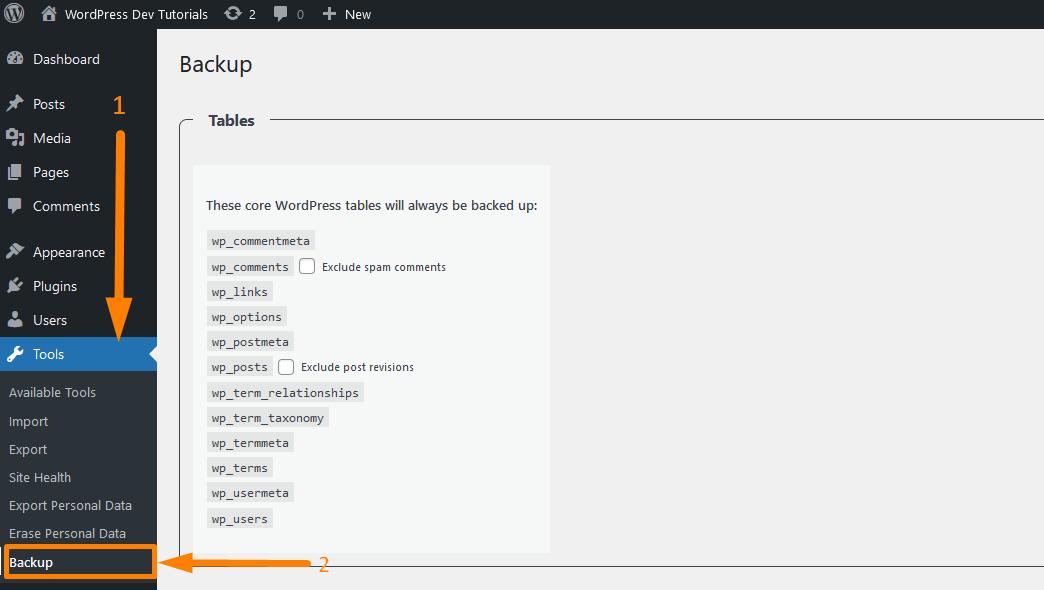
On the settings page, you can see the WordPress database tables that you will back up when you click the option to backup, as shown on the image below:
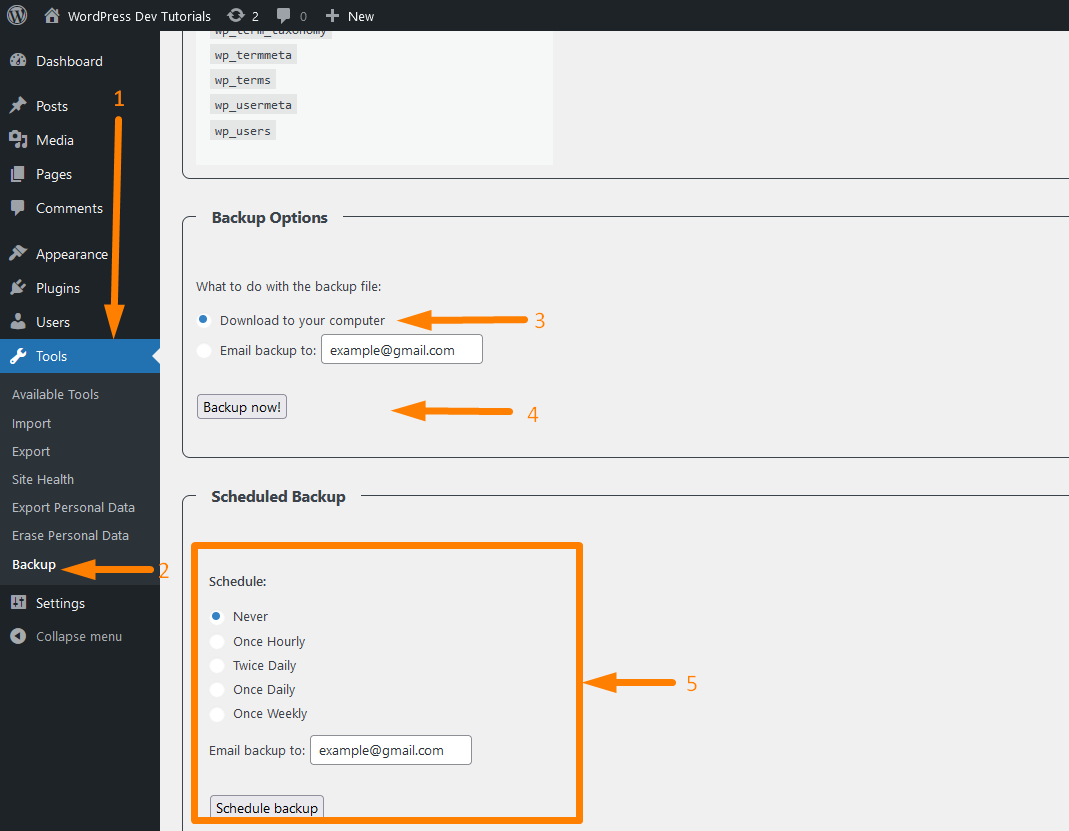
You can also schedule the backups to run and get the email of the backup on the last section of the settings page labeled
This is one of the simplest and easy to-use database backup plugins that just creates the WordPress database backup and does not backup WordPress files.
Best WordPress Database and Site Backup Plugins
If you are looking for the best WordPress database backup plugin that also backs up the other WordPress installation files, the following is the list of the best WordPress backup plugins:
- UpdraftPlus
- BackupBuddy
- Jetpack Backups
- BackWPUp
- BackUpWordPress
- Duplicator
- Backup
- WP Database Backup
Each of these plugins presents you with useful features that you can use for migration of your site but, most importantly, to create a WordPress database backup.
Now let us focus on several changes you can execute on the WordPress database via the PhpMyAdmin panel or any other WordPress database management tools.
WordPress Database Management
WordPress database access allows you to accomplish several tasks that may include creating, reading, updating, and deleting data.
In this section, I want to share several tips you can use to update data on the WordPress database.
This includes changing database content, updating users, and deleting or creating new records. For this section, we will use PhpMyAdmin to manage the WordPress database.
Reset WordPress Password in Database: Reset WordPress password using phpMyAdmin
The following are the quick steps you can take to reset the WordPress password in the database. Suppose you want to change the password of the administrator on the WordPress site via the database; you would follow the following steps:
- To reset the WordPress password in the database, you need to access PhpMyAdmin as the first step.

- The next step is to select the database you need to change the user password. For example, in this case, I have selected the ‘wordpresstutorial’ database.

- The third step is to select the wp_users table that stored all the users’ user information on your WordPress site.
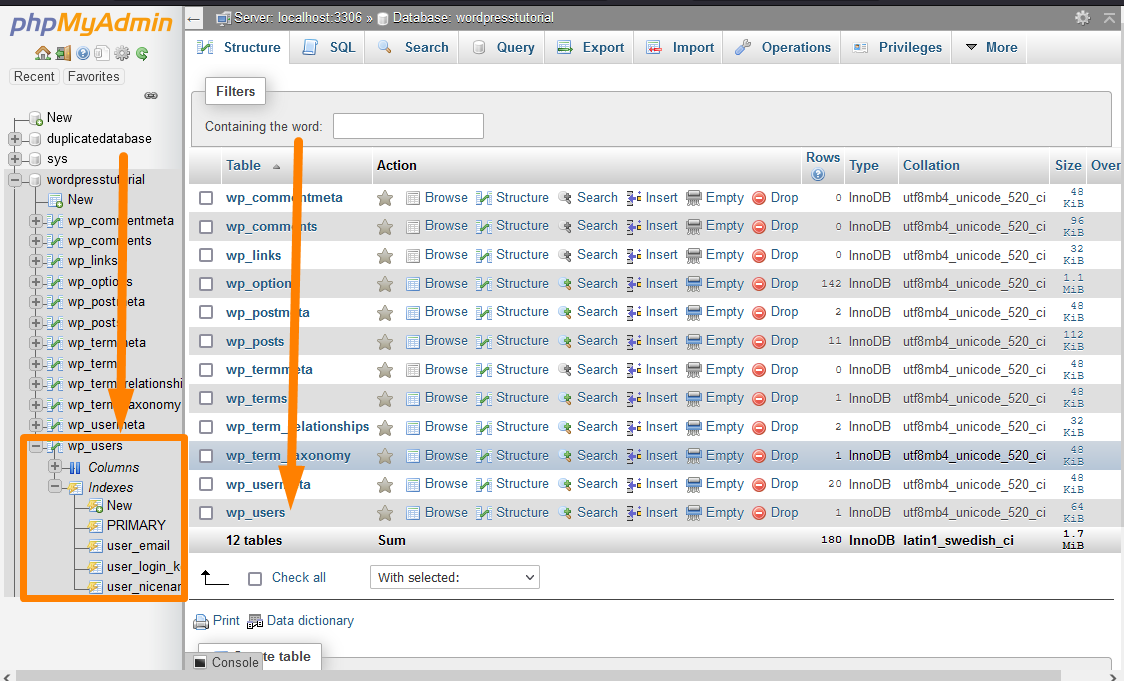
- The fourth step is to select the user and click on the edit button to open up the page to reset the WordPress password in the database via the PhpMyAdmin panel.
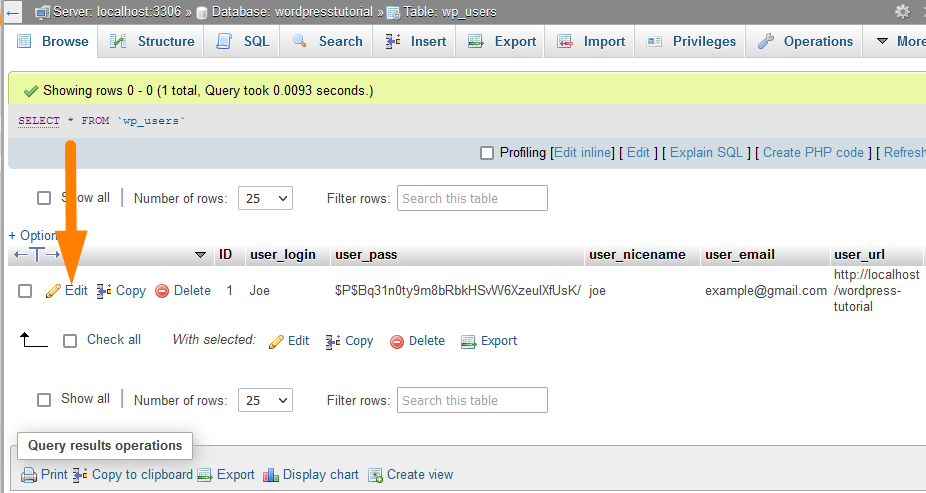
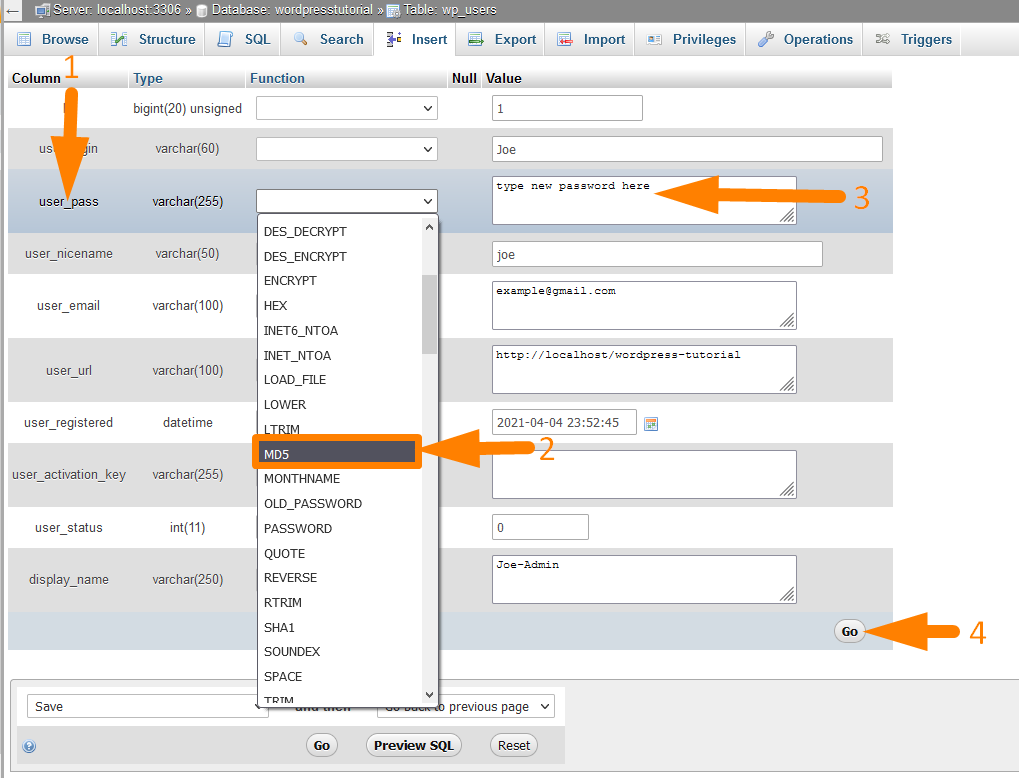
- The last step is to change the entry on the value column on the user_pass row and select the encryption option for your new password as MD5. Then click on the Go button, and the password will be successfully reset.
WordPress Change URL in Database
Another common task that you can accomplish on the WordPress database is to update the site URL. This is an important step when you are moving your site from one domain to another.
The following are the steps you should take to change the WordPress URL in the database:
- The first step is to access the PhpMyAdmin on your web hosting panel
- The next step is to select the database you need to change the site URL. For example, in this case, I have selected the ‘wordpresstutorial’ database.
- The third step is to select the wp_options table that stores all the general options of your WordPress site.
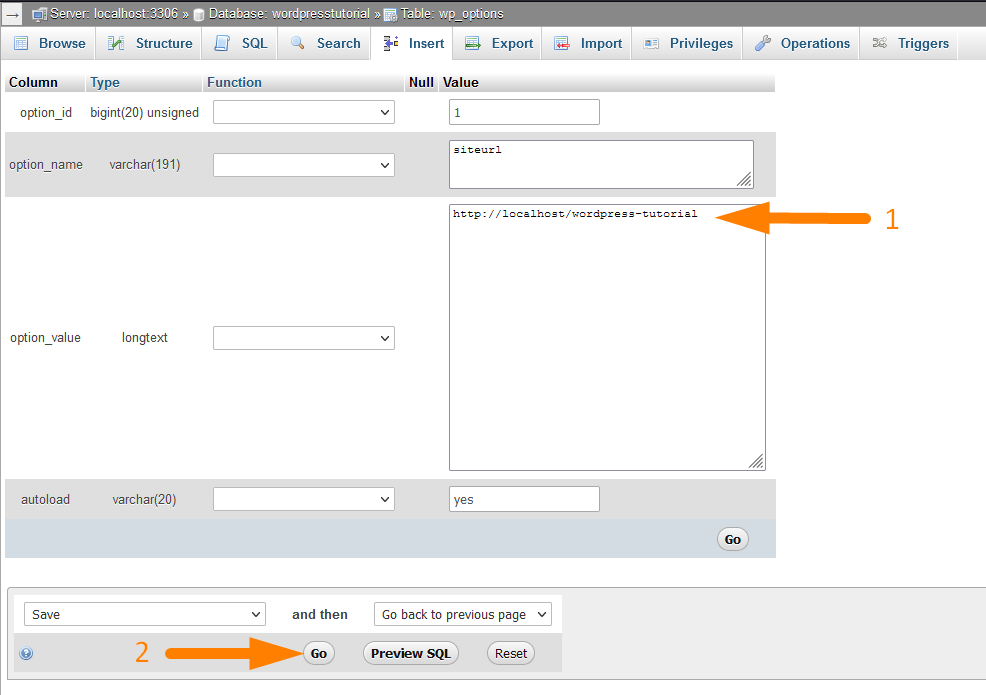
- The fourth step is to select the siteurl option and click on the edit button to open up the page to change the WordPress site URL in the database via the PhpMyAdmin panel.
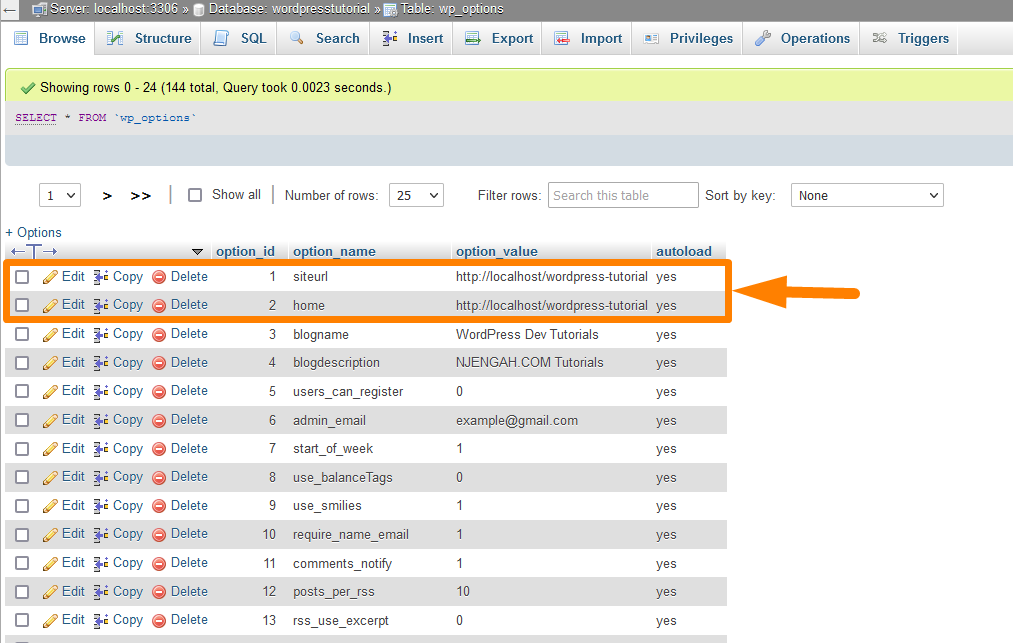
- The last step is to change the option value with the new site URL and then click on the Go button, and the site URL will be successfully changed.
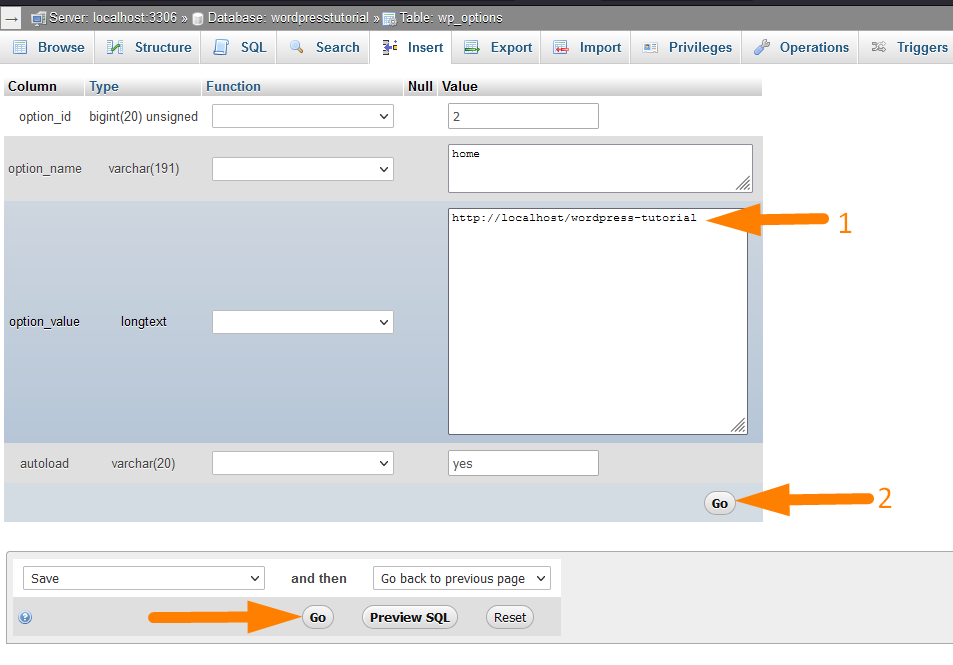
- You also need to change the home options and reflect the new siteurl value you added on the step above. Both should have the same value for the site URL to work.
New Admin User to WordPress on WordPress Database: Adding a New WordPress Admin User via phpMyAdmin
You can also add new users to WordPress through the database and assign the roles like administrator, editor, etc. To create a WordPress user via the database, you need to follow these steps :
- The first step is to access the PhpMyAdmin on your web hosting panel
- The next step is to select the database you need to add new users if you have multiple databases on the PhpMyAdmin panel. For example, in this case, I have selected the ‘wordpresstutorial’ database.
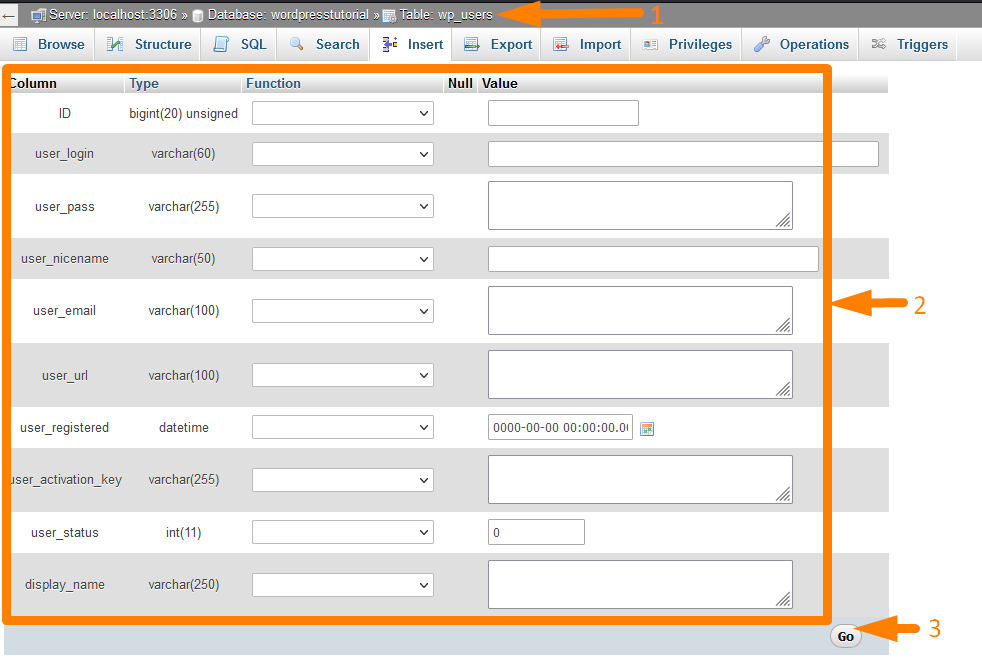
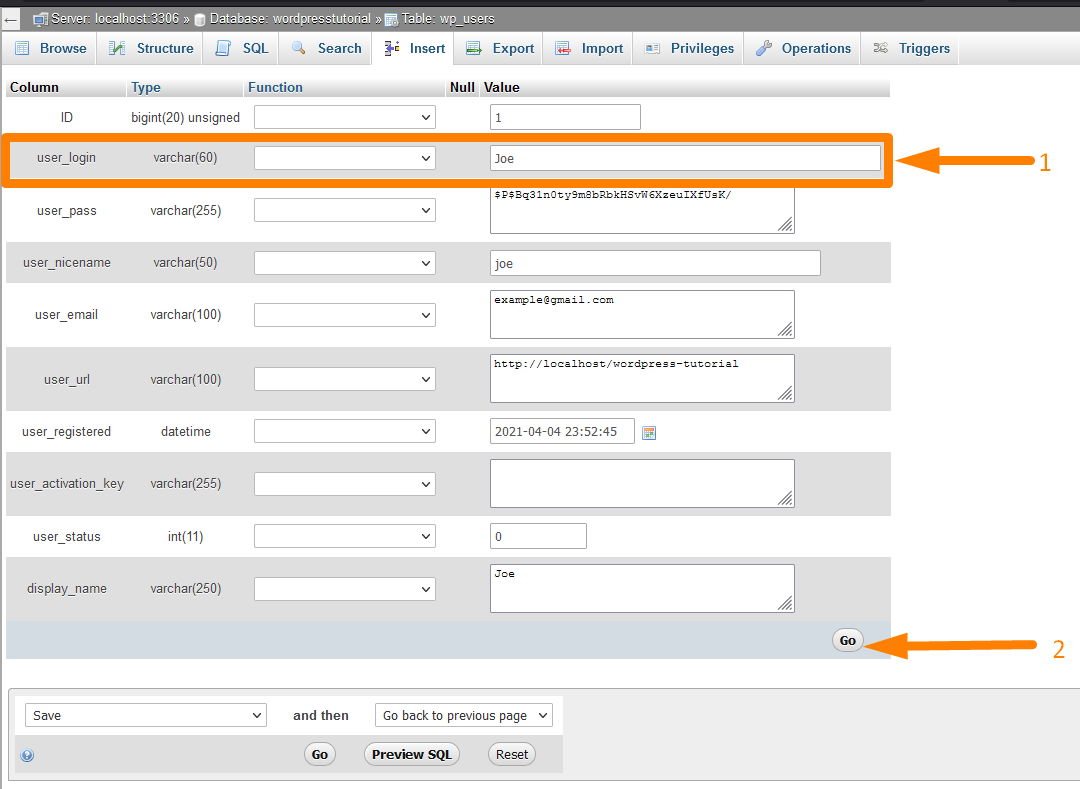
- The third step is to select the wp_users table that stores all the user’s data, and here we will add our new users.

- The fourth step is to click on the Insert menu on the top menu of PhpMyAdmin and fill in all the users’ details that include the following and click on the Go button:
- ID — Enter any available ID number. Ensure you note this number since you will use it again.
- user_login — The username for this user.
- user_pass — The raw password the user will log in with and set the encryption to MD5, just like we did in the section above for the password reset.
- user_nicename — The author slug or name.
- user_email — The email address associated with this user.
- user_status — Set this to 0
- display_name — The display name for the user.
- Click on the second go button and move to the wp_usermeta table to add the WordPress user meta details. Click on the Insert menu again at the top and add the following details:
- user_id – Same ID from the step above
- meta_key – wp_user_level
- meta_value – 10
- You can now successfully test your new user login, and it should work.
Change Domain Name in WordPress Database | How to Change Domain in WordPress Database
Change the WordPress site domain name on the database is the same as changing the siteurl option on the database. You should follow the following steps to change the domain in the WordPress database successfully:
- The first step is to access the PhpMyAdmin on your web hosting panel
- The next step is to select the database you need to change the domain name. For example, in this case, I have selected the ‘wordpresstutorial’ database.
- The third step is to select the wp_options table that stores all the general options of your WordPress site.
- The fourth step is to select the siteurl option and click on the edit button to open up the page to change the WordPress domain name in the database via the PhpMyAdmin panel.
- The last step is to change the option value with the new domain name and then click on the Go button, and the WordPress site domain name will be successfully changed.
- You also need to change the home options and reflect the new domain name value you added on the step above. Both should have the same value for the WordPress domain name change to work.
Change a WordPress Username: Changing a WordPress Username Using phpMyAdmin
You can change the WordPress username on the WordPress database just like we changed the password on the database via PhpMyAdmin. The following are the steps to change a WordPress username on the database:
- To change the WordPress username in the database, you need to access PhpMyAdmin as the first step.
- The next step is to select the database you need to change the username. For example, in this case, I have selected the ‘wordpresstutorial’ database.
- The third step is to select the wp_users table that stored all the users’ user information on your WordPress site.
- The fourth step is selecting the user and clicking on the edit button to open up the page to change the WordPress username in the database via the PhpMyAdmin panel.
- The last step is to change the entry on the value column on the user_login row and then click on the Go button, and the WordPress username will be successfully changed.
Deactivate all WordPress Plugins on WordPress Database
It is also possible to deactivate all the WordPress plugins from the database. You can disable all the plugins active on your site through the database edit in the following steps:
- To disable all the WordPress plugins in the database, you need to access PhpMyAdmin as the first step.
- The next step is to select the database you need to deactivate the WordPress plugins. For example, in this case, I have selected the ‘wordpresstutorial’ database.
- The third step is to select the wp_options table that stored all the general site settings, including the plugin settings like active or deactivated.
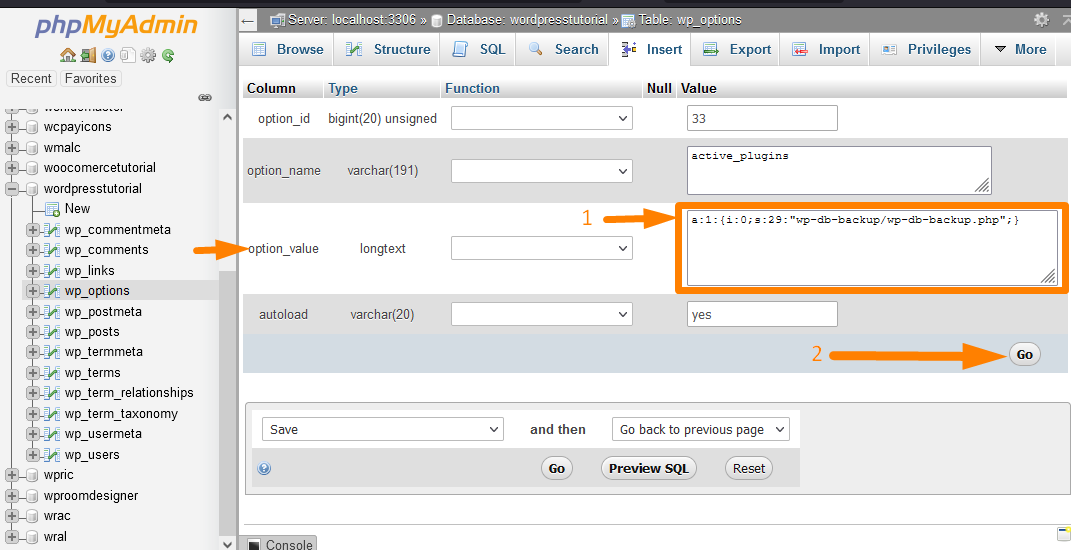
- The fourth step is to select the active_plugins row and open up the row to change the WordPress plugin’s active status in the database via the PhpMyAdmin panel. You can use the shortcut on the browser (CTR + F) to quickly find this row since several rows are on the wp_options table. This tip is shown in the image below label – 2:
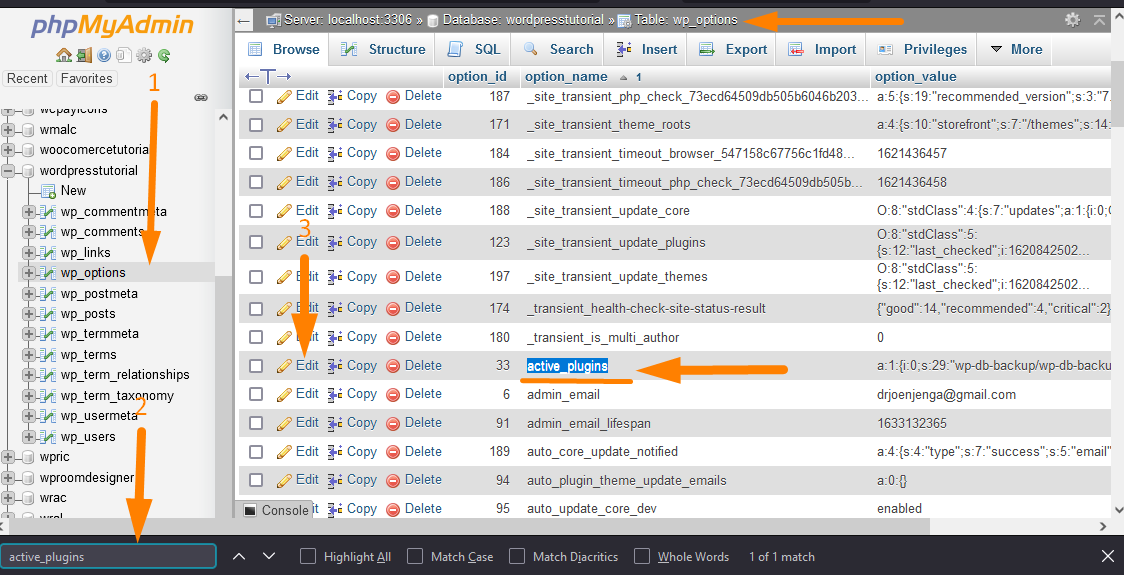
- The last step is to change the entry on the option value column, simply delete the data in this column as shown below, and then click on the Go button, and the WordPress active plugins will be successfully deactivated.
Duplicate WordPress Database via phpMyAdmin
It is possible to create a duplicate WordPress database via PhpMyAdmin. You can create a duplicate WordPress database when you want to clone your WordPress site.
The following are the steps to create a duplicate WordPress database via PhpMyAdmin:
- The first step is to login into the PhpMyAdmin on your web hosting through the CPanel or on the local host, as I explained in the previous sections of this article.
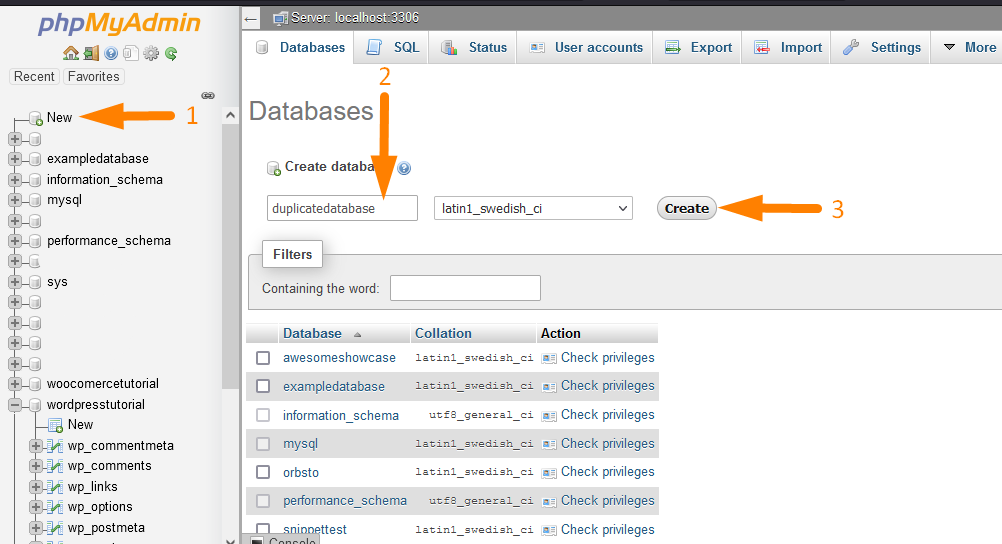
- The second step is to create a new database to add the same data from the existing WordPress database. To create the database, click on the new link and add the name of the database as shown in the image below:
- Once you have created the new database, you need to open the old database and export the data you wish to add to the duplicate database. For example, if we wish to add the data from the ‘wordpresstutorial ’database, we need first to export the data as explained in the previous section of this article on how to export data from the WordPress database.
- After exporting the data, we now can easily import the data from the old database to our new ‘duplicate database.’ To import the data, you need to refer to the section of this article where I explained how to import data into the database.
So, in summary, to create a WordPress duplicate database on PhpMyAdmin, you need first to create a new database, secondly, export the data from the old database and finally import the data in the new database and you should have successfully duplicated a WordPress database.
Change WordPress Theme via phpMyAdmin
It is also possible to change the WordPress theme from the database via PhpMyAdmin. You can use the active theme on the WordPress database in the following steps:
- To change the WordPress theme in the database, you need to access the PhpMyAdmin as the first step.
- The next step is to select the database you need to change the WordPress theme. For example, in this case, I have selected the ‘wordpresstutorial’ database.
- The third step is to select the wp_options table that stored all the general site settings, including the theme settings like the status of active or deactivated themes.
- The fourth step is to select the template row and open the row to change the WordPress theme active status in the database via the PhpMyAdmin panel.
You can use the shortcut on the browser (CTR + F) to quickly find this row since several rows are on the wp_options table. This tip is shown in the image below label – 3: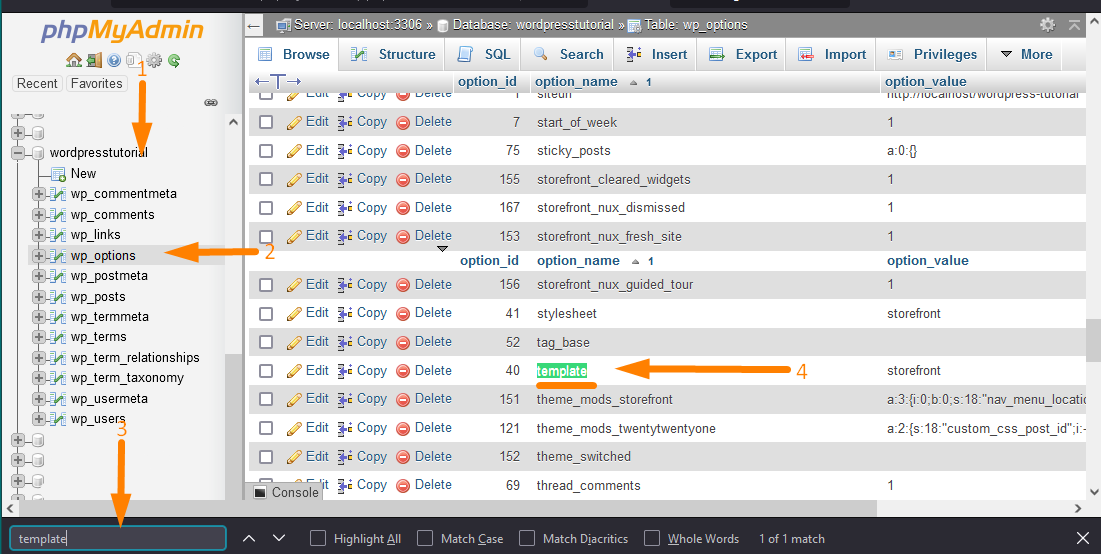
- Change the value of the option_value row to the name of the theme you want to change to. For example, you can change the name of the active theme ‘storefront’ in the image below to Avada or any other theme you want to change to:
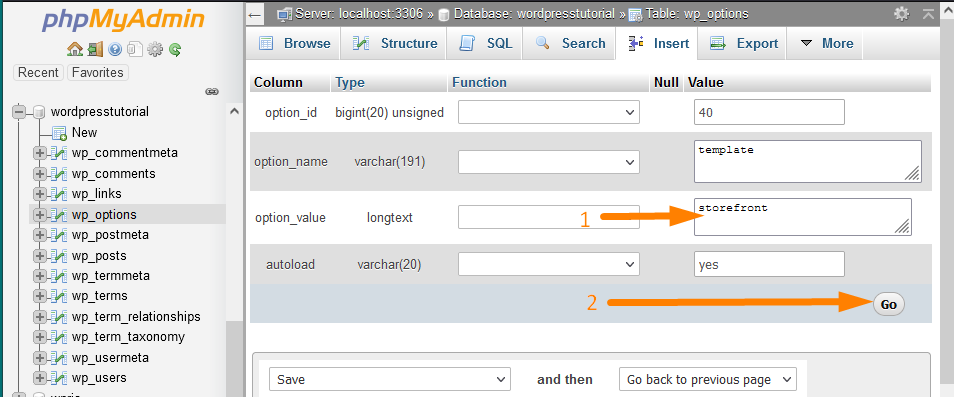
Click on the Go button to successfully change the active WordPress theme to the WordPress database.
Find and Replace Text in WordPress Database
You can find and replace text in the database in posts and pages or custom post type on your WordPress site.
To find and replace text in the WordPress database, you need to access the database table that stores the text in the WordPress database.
The database table is wp_posts which stores all WordPress posts, pages, and custom post types. The following are the steps to take to find and replace text in the WordPress database:
- First, you need to access the PhpMyAdmin on your web hosting or your localhost server.
- The next step is to select the database you need to change, find and replace text. For example, in this case, I have selected the ‘wordpresstutorial’ database.
- The third step is to select the wp_posts table that stored all the posts and pages’ content.
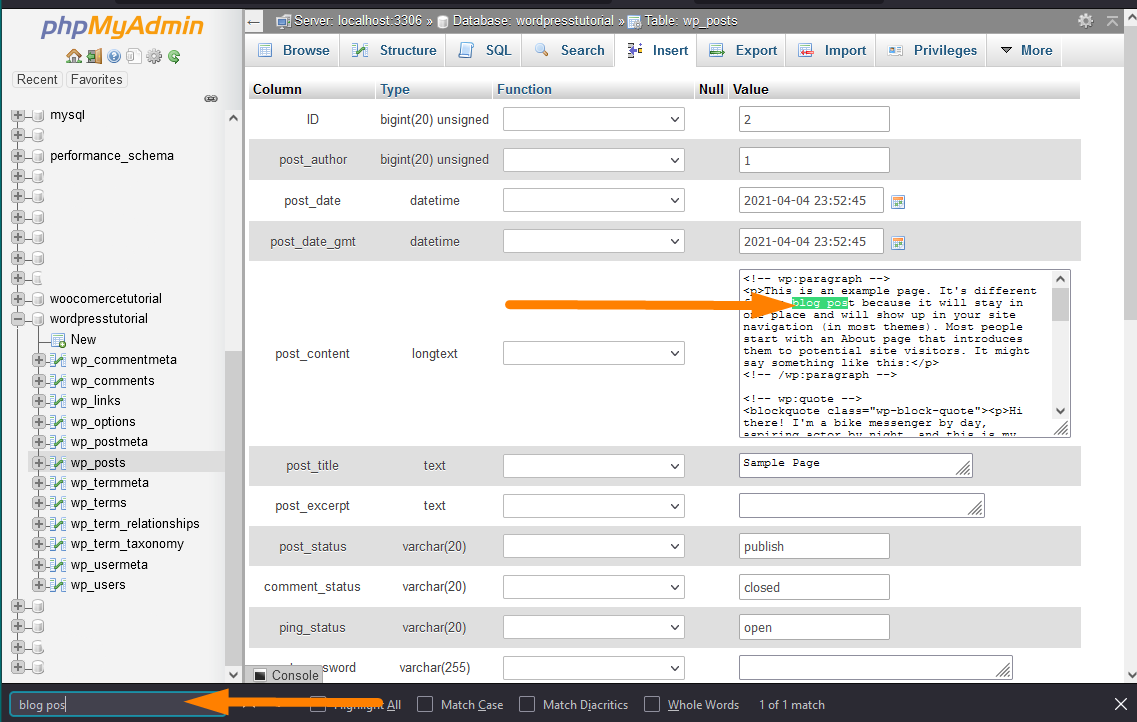
- The fourth step is to search the post or the page we are looking for to change the text on this post. You can use the shortcut on the browser (CTR + F) to quickly find this row since several rows are on the wp_posts table.
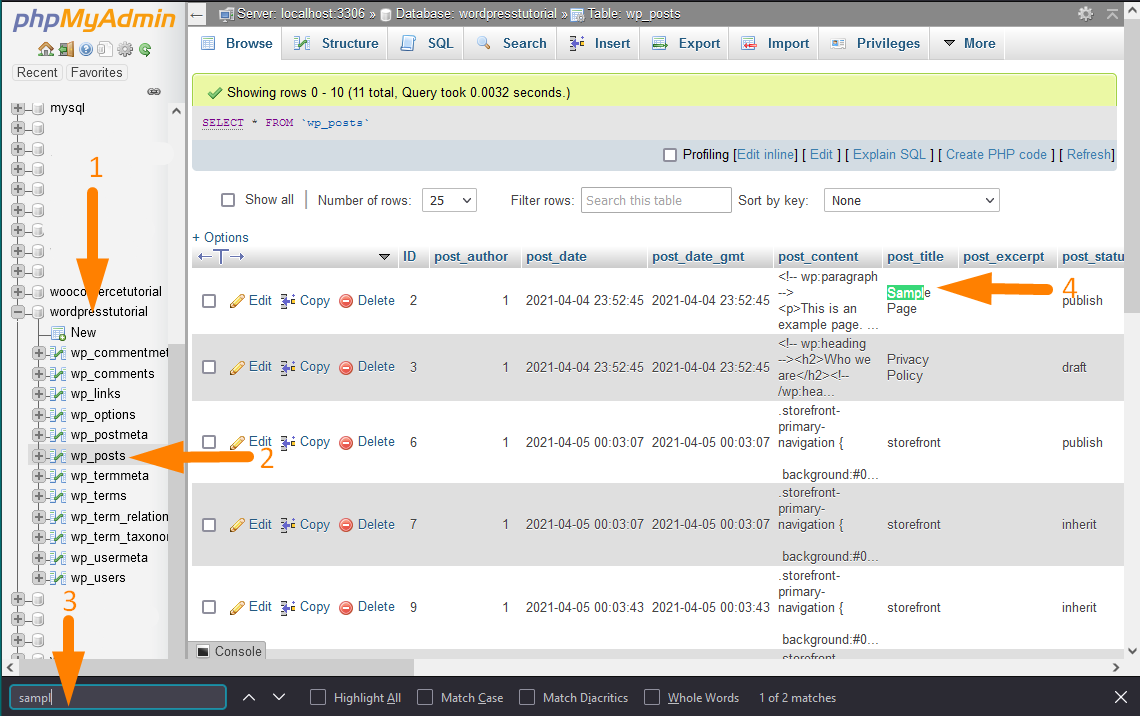
- When you have identified the post that we would like to change, click on the edit button and open the post details page as shown on the image below:
- You can now use the CTRL+F to quickly find the text in the post_content value column and replace it with the new text as shown in the image below:
Create Custom Database Tables in WordPress
In the WordPress database, you can create custom database tables directly on the PhpMyAdmin, or you can use some code in the plugin to create a custom WordPress database table. It is important to remember when you create custom database tables in WordPress, the database prefix is important.
Let us start with how to create custom database tables in the WordPress database via PHPMyAdmin.
- First, log in to your PhpMyAdmin panel on the hosting or the localhost server and access all the WordPress databases.
- The second step is to select the database you wish to create custom database tables as shown on the image below, where I have selected the ‘wordpresstutorial’ database.
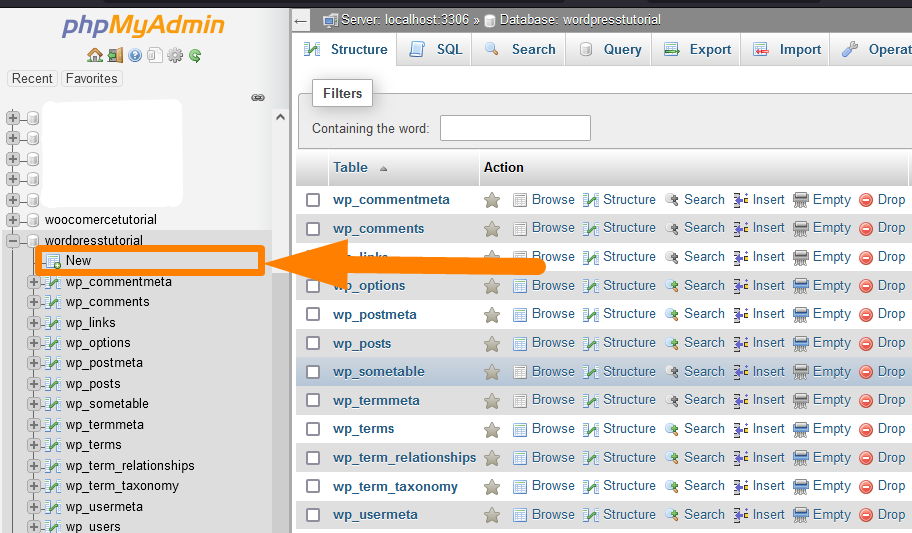
- Under the database table name, you can see a ‘New’ link that you should click to open up the page to add the new database table details as shown on the image below :

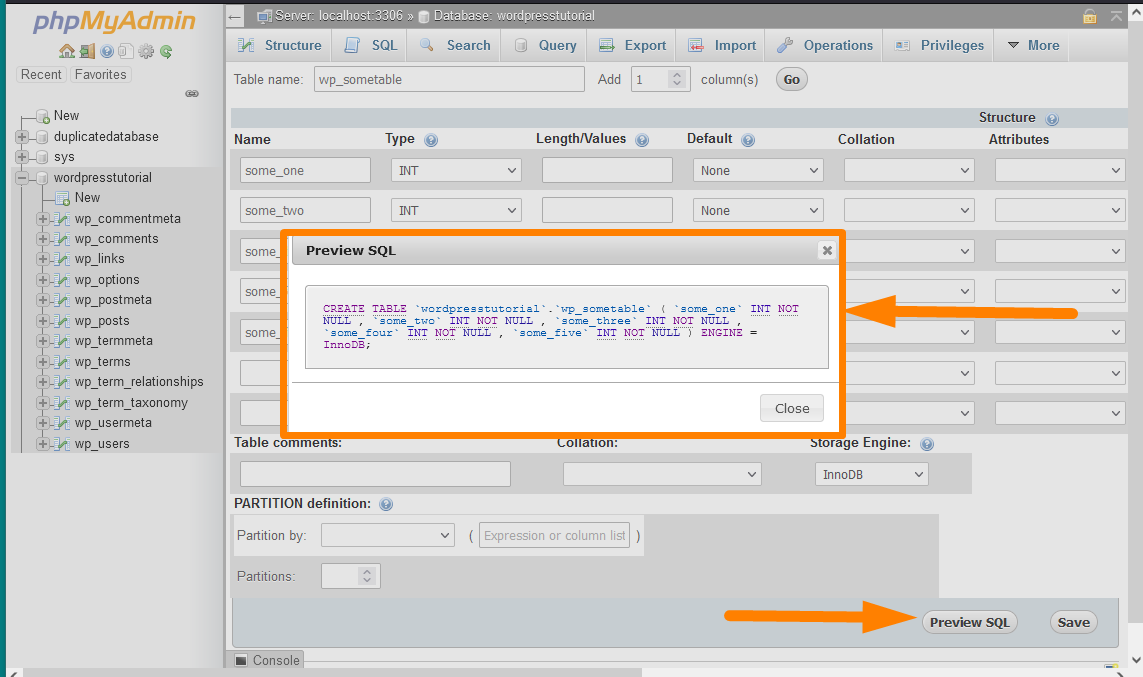
- Fill in the custom database table name, the number of columns, and the other details related to WordPress database table columns.
When you have filled in all the details, you can click on the Go button to automatically add the columns below the database title. - To create the custom WordPress database table, you can also click on the Save button. Still, before creating the custom WordPress database table, you can preview the query as shown in the image below using the Preview SQL button.
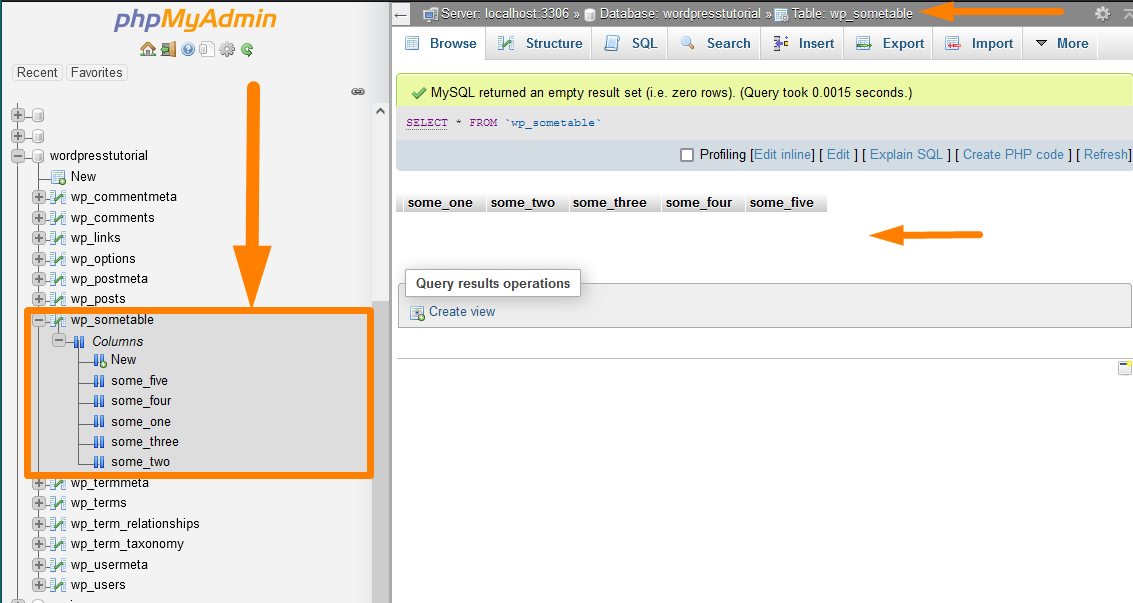
- When you save the settings, the SQL query will run and create the custom database table, as shown in the image below.This custom database table has the same database prefix. Since we were adding the database name in the step above, I added the name with the wp_ WordPress database prefix. This is important when you want to access the database table and manipulate the data in your code.
Create Custom WordPress Database Table with PHP
When creating a WordPress plugin, you are likely to store data in a WordPress database, especially when you have a huge plugin.
The default way of storing WordPress plugin data is in the WordPress database wp_options table.
For a huge plugin with advanced logic, this approach may be limited, and creating a custom database table with PHP function in your plugin files can be the best way out.
To create custom WordPress database tables using the plugin, you need to create a function with the query to create the WordPress database table. The following is a sample code that you can use to create the custom database table in your plugin:
global $wpdb;

$charset_collate = $wpdb->get_charset_collate();

$sql = "CREATE TABLE $table_name (

  id mediumint(9) NOT NULL AUTO_INCREMENT,

  time datetime DEFAULT '0000-00-00 00:00:00' NOT NULL,

  name tinytext NOT NULL,

  text text NOT NULL,

  url varchar(55) DEFAULT '' NOT NULL,

  PRIMARY KEY  (id)

) $charset_collate;";

require_once( ABSPATH . 'wp-admin/includes/upgrade.php' );

dbDelta( $sql );
Ideally, this code should be wrapped in a function and tied to an action hook that will guarantee that the database will be created when a certain event occurs.
For example, you can create a custom database table when the user activates the plugin. In this case, you would hook this code in an activation hook as shown in the code sample below:
register_activation_hook( __FILE__, 'njengah_create_custom_db_table' );

function njengah_create_custom_db_table(){

global $wpdb;

$charset_collate = $wpdb->get_charset_collate();

$sql = "CREATE TABLE $table_name (

  id mediumint(9) NOT NULL AUTO_INCREMENT,

  time datetime DEFAULT '0000-00-00 00:00:00' NOT NULL,

  name tinytext NOT NULL,

  text text NOT NULL,

  url varchar(55) DEFAULT '' NOT NULL,

  PRIMARY KEY  (id)

) $charset_collate;";

require_once( ABSPATH . 'wp-admin/includes/upgrade.php' );

dbDelta( $sql );

}
You can learn more about how to create custom WordPress database tables from the Codex documentation.
WordPress Database Security: Securing your WordPress Database
Improving WordPress database security plays a vital role in preventing exploits and reducing the vulnerability of your WordPress site.
The most common type of WordPress hack is compromising the connection of WordPress to the database. In my professional experience, I have resolved hundreds of WordPress database hacked sites and the most common reason is a WEAK WordPress database password.
I want to briefly share with you my 5 golden tips you can employ to ensure you secure your database from getting hacked or corrupted. The following are the best practices of securing your WordPress database:
#1) Set Strong Database Passwords
You cannot compromise on this since it’s the primary security of your database. You need to create or generate a strong WordPress database password that you use during WordPress installation.
I have found the auto-generate passwords by the WordPress installers available in most shared web hosts to be bogus. You don’t want to use this type of auto-generated password by the installer software.
#2) Install WordPress Manually Instead of Third-party Installers
If you want to have bulletproof WordPress database security, you can only be sure to control the WordPress installation process 100%.
WordPress installers like Softaculous are wonderful and save a great deal of time, but they can be compromised and expose your WordPress site to exploits.
#3) Restrict WordPress Database User Privileges
When you have several users working with your data, you need to be careful and only allow the absolutely necessary users to have the global privileges of your WordPress database.
Ideally, normal WordPress users need limited privileges just to read data and write.
#4) Beware Not All Plugins & Themes are Safe
Nearly most free plugins out there have some vulnerabilities that can be exploited, and thus, you need to be careful when installing WordPress plugins.
You need to read the reviews and research more about the security issues related to a specific plugin. In the history of WordPress, there have been several cases where WordPress sites have been compromised due to an installed plugin getting hacked.
#5) Consider Changing WordPress Database Prefix
Changing the default database prefix is one way to improve the security of your WordPress database and prevent exploits.
By default, the WordPress database prefix is wp_, which gives the hackers an idea of the name of the database.
When this is combined with using free installers, it may be pretty easy for a hacker to identify the pattern used to create a database name and predispose your database to an exploit.
There are several other ways you can secure your WordPress site, but these 5 tips have proven very useful in my day-to-day WordPress site development.
Optimizing WordPress Database Using phpMyAdmin
You can use PhpMyAdmin to optimize your database since it provides the best way to optimize WordPress databases.
Before you begin optimizing your WordPress database using PhpMyAdmin, you need to back up your database first!
After you have backed up the database, you can optimize the WordPress database by following the following steps:
- Login to the PhpMyAdmin panel from your CPanel on your hosting account or the localhost server.
You can find the PhpMyAdmin icon on the CPanel Databases sections as shown on the image below: - The next step is to select the database you need to optimize. For example, in this case, I have selected the ‘wordpresstutorial’ database.
- Select all the database tables since we want to optimize the entire database. You can use the check all option shown on the image below to select all the database tables :
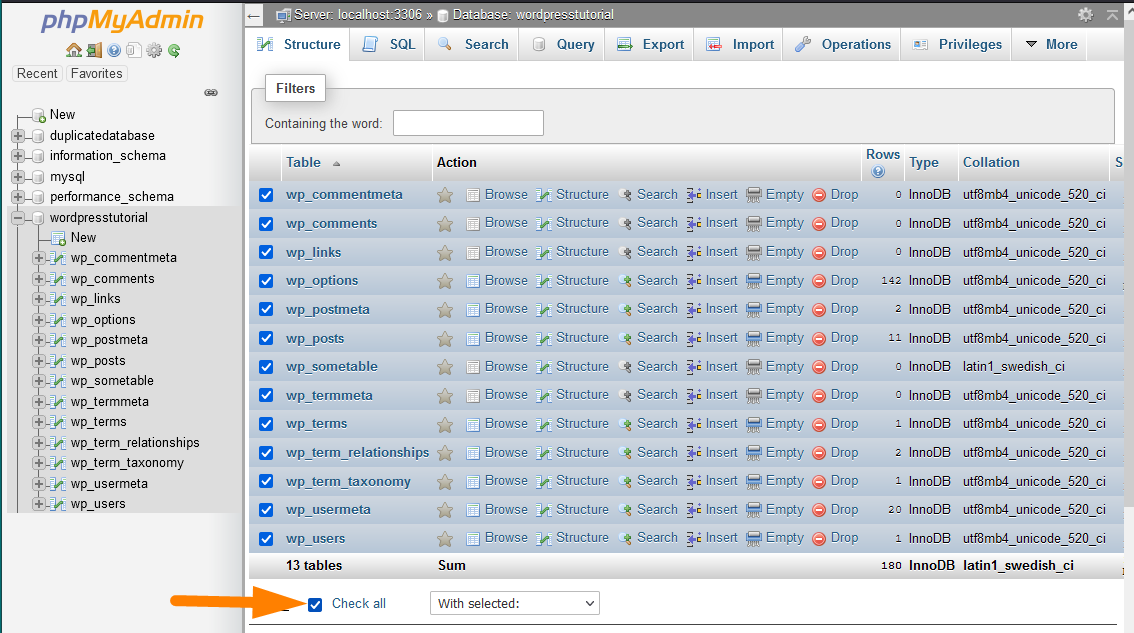
- Select the option to optimize the table from the select drop-down option next to the check all button as shown below:

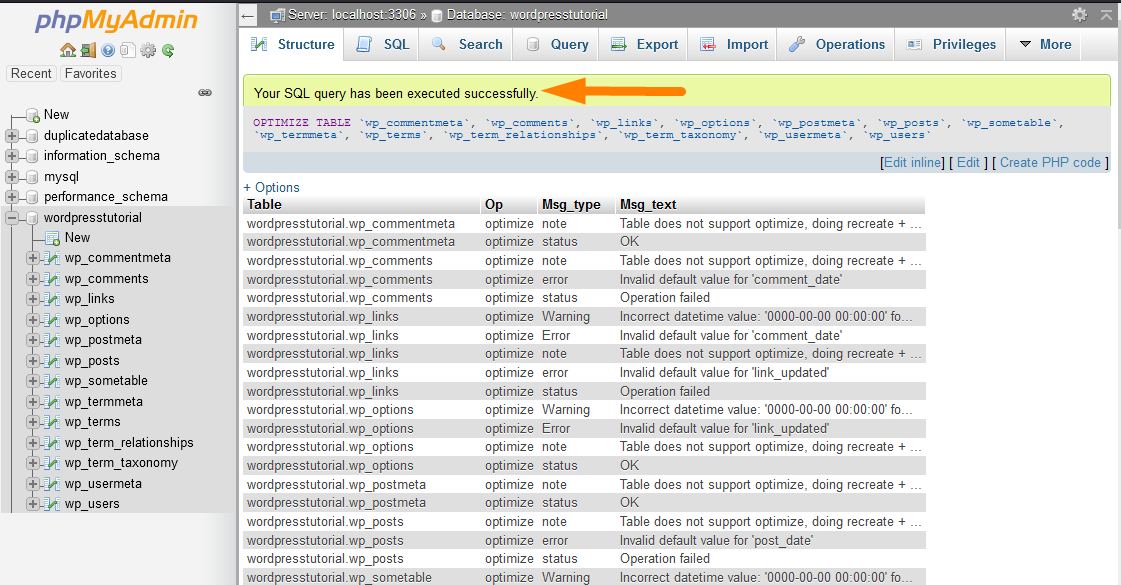
- After choosing Optimize Table option, you should see the message that the database tables have been optimized, and they are listed as shown in the image below:
WordPress Database Advanced Tutorials
There are several other ways you can change WordPress data on the database using PHP. You can use plugins or theme code to fetch and manipulate data and display it using various WordPress core functions.
In this section, I want to briefly explain how to use the database for advanced users and WordPress developers.
In the future, I will share specific in-depth tutorials for developers to understand how to create queries and interact with the WordPress database.
WordPress Plugin Database Tutorial: Getting Started with WordPress Database Plugin Development
WordPress plugin database can be a custom database or a custom WordPress database used to store WordPress plugin data.
By default, the WordPress plugins are designed to alter or add data to the options or WordPress metadata, such as post_meta and user_meta.
You can also create custom post types to leverage the WordPress post object to create custom post features that fit your plugin needs.
In this section, I want to highlight some tips that may be useful when creating custom WordPress plugin databases.
WordPress presents limitless possibilities since several key functions can be used to manage data in custom WordPress database tables or WordPress custom databases.
Let us briefly look at the most important functions and classes you need to understand as a WordPress developer when creating WordPress custom database features.
WP_Query Class: WordPress Database Query
The WP_Query class is the most important WordPress core function that helps developers query the WordPress database and return the results displayed on the front end.
The class plays an important role in the creation of the WordPress loop.
To create the WordPress loop, you need to instantiate the class and then use the have_posts() method to check if there are posts that you can then loop through to display using the while() loop.
The following is a simple code snippet that shows how WP_Query class works to display posts from the WordPress database:
<?php

// The Query

$the_query = new WP_Query( $args );

// The Loop

if ( $the_query->have_posts() ) {

    echo '<ul>';

    while ( $the_query->have_posts() ) {

        $the_query->the_post();

        echo '<li>' . get_the_title() . '</li>';

    }

    echo '</ul>';

} else {

    // no posts found

}

/* Restore original Post Data */

wp_reset_postdata();
Note: In the code snippet above, we create an object from the WP_Query class and use that object to access the posts stored in the database using the have_posts() method. This have_posts() method is a function in the WP_Query class. We can also sort the posts we want to return from the WordPress database using the $args (arguments), which is an array of criteria we want when selecting the posts to return from the database.
wpdb Class: Display Database Data in WordPress Page
wpdb is the most important WordPress database manipulation class designed to allow WordPress developers to interact with WordPress data directly.
This class is used to interact with the WordPress database without using the raw SQL statements. To use this class, WordPress provides a global object $wpdb, which is an instance of the wpdb class.
This $wpdb object can get data from the WordPress database using the get_results() method.
The following is a sample code of how you can use the wpdb class to get the data from the WordPress database to display it:
<?php

// 1st Method - Declaring $wpdb as global and using it to execute an SQL query statement that returns a PHP object

global $wpdb;

$results = $wpdb->get_results( "SELECT * FROM {$wpdb->prefix}options WHERE option_id = 1", OBJECT );
Note: When using the $wpdb object, you need to ensure you declare it as a global variable global $wpdb. It is also important to understand that this object can read the data from all WordPress database tables, including the custom WordPress database tables.
WordPress PHP Database Functions
There are several WordPress functions that you can use to interact with the WordPress database and accomplish specific tasks.
In this quick summary, I want to highlight these key WordPress core functions that you can use for various WordPress database updates.
It is important to remember that at the beginning of this guide, I highlighted that WordPress is a content management system that has four basic database functions:
- Create or Add data to the database
- Read data from the database
- Update data in the database
- Delete data in the database
In this regard, in the WordPress core function, some functions or methods help WordPress developers execute these four functions of a content management system.
Every WordPress developer needs to understand how these WordPress database interaction functions work.
The following is the summary table of functions to use to insert and update data in the WordPress database:
| CRUD Operation | Function | Description || Usage || WordPress Database Table |
WordPress Database Post Functions: wp_posts Table |
||
| Create a Post, Page, or Custom Post Type | wp_insert_post() | This function is used to insert or update a post in the wp_posts table of the WordPress database. |
| Update Post, Page or Custom Post Type | wp_update_post() | This function is used to update an existing post in the wp_posts table of the WordPress database. |
| Read Post, Page, or Custom Post Type | get_post() | This function is used to retrieve the post data from the wp_posts table for specific post ID or post Object of the WordPress Database. |
| Delete Post, Page, or Custom Post Type | wp_delete_post() | This function is used to delete a post or page that exists in the wp_posts table of the WordPress database. |
WordPress Database Post Meta Functions: wp_postmeta Table |
||
| Create Post Meta | add_post_meta() | This function is used to add a meta field for a given post to the wp_postmeta table of the WordPress database. |
| Read Post Meta | get_post_meta() | This function is used to retrieve the post meta field for a given ID from the wp_postmeta table of the WordPress database. |
| Update Post Meta | update_post_meta() | This function is used to update a post meta field in the wp_postmeta table of the WordPress database for a given post ID. |
| Delete Post Meta | delete_post_meta() | This function is used to delete the post meta field in the wp_postmeta table of the WordPress database for a given post ID. |
WordPress Database Settings Options Functions: wp_options Table |
||
| Create | Add Option | add_option() | This function is used to add a new option in the wp_options table of the WordPress database |
| Read Option | get_option() | This function is used to retrieve an option from the wp_options table of the WordPress database based on the option name. |
| Update Option | update_option() | This function is used to update the value of an option in the wp_options table of the WordPress database for an option that already exists. |
| Delete Option | delete_option() | This function is used to delete the option by name from the wp_options table of the WordPress database. This function also prevents the deletion of the protected WordPress options |
WordPress Database User Functions: wp_users Table |
||
| Create | Add User | wp_insert_user() | This function is used to insert a WordPress user in the wp_users table of the WordPress database. |
| Read User Data | get_userdata() | This function is used to get the user data from the wp_users table of WordPress database by specific user ID. |
| get_user_by() | This function is used to get the user information from the wp_users table of the WordPress database by a given field such as User ID, Slug, Email, or login name | |
| Update User | wp_update_user() | This function is used to update a user who exists in the wp_users table of the WordPress database. |
| Delete User | wp_delete_user() | This function is used to delete a user who exists in the wp_users table of the WordPress database by user ID. |
WordPress Database User Functions: wp_usermeta Table |
||
| Create | Add User Meta | add_user_meta() | This function is used to add user meta to the wp_usermeta table of the WordPress database for the specific user ID. |
| Read User Meta | get_user_meta() | This function is used to retrieve the user meta for a specific user from the wp_usermeta table of the WordPress database by specific user ID. |
| Update User Meta | update_user_meta() | This function is used to update the user meta value for an existing user meta in the wp_usermeta table of the WordPress database. |
| Delete User Meta | delete_user_meta() | This function is used to delete the user meta and remove it from the wp_usermeta table. |
WordPress Database User Functions: wp_terms Table |
||
| Create | Add Term | wp_insert_term() | This function is used to create a new term for the WordPress database in the wp_terms table. |
| Read Term | get_term() | This function is used to get all term data from the WordPress database wp_terms table by Term ID. |
| Update Term | wp_update_term() | This function is used to update the term in the WordPress wp_terms table based on the arguments passed.
|
| Delete Term | wp_delete_term() | This function is used to delete term from the wp_terms table of the WordPress database by the Term ID |
WordPress Database User Functions: wp_termmeta Table |
||
| Create | Add Term Meta | add_term_meta() | This function is used to add term meta to the wp_termmeta table of the WordPress database by the Term ID
|
| Read Term Meta | get_term_meta() | This function is used to get metadata for a term from the WordPress database wp_termmeta table by Term ID. |
| Update Term Meta | update_term_meta() | This function is used to update the term meta in the WordPress wp_termmeta table based on the Term ID.
|
| Delete Term | delete_term_meta() | This function is used to delete metadata for a specific term from the wp_terms table of the WordPress database by the Term ID.
|
WordPress Database User Functions: wp_comments Table |
||
| Create | Add Comment | wp_insert_comment() | This function is used to create a comment to the wp_comments table of the WordPress database by the user ID and other comment data.
|
| Read Comment | get_comment() | This function is used to get comments for a comment ID or comment Object from the WordPress database wp_comments table. |
| Update Comment | wp_update_comment() | This function is used to update an existing comment in the WordPress wp_comments table.
|
| Delete Comment | wp_delete_comment() | This function is used to delete comments or trash comments from the wp_comments table of the WordPress database by the comment ID.
|
WordPress Database User Functions: wp_commentmeta Table |
||
| Create | Add Comment Meta | add_comment_meta() | This function is used to add a metadata field to comment in the wp_commentmeta table of the WordPress database by the comment ID.
|
| Read Comment Meta | get_comment_meta() | This function is used to get meta field for comment from the WordPress database wp_commentmeta table by comment ID. |
| Update Comment Meta | update_comment_meta() | This function is used to update the comment meta field in the WordPress wp_commentmeta table based on the comment ID.
|
| Delete Comment Meta | delete_comment_meta() | This function is used to delete comment metadata from the wp_commentmeta table of the WordPress database by the comment ID.
|
WordPress Database Terms Relationships Functions: wp_term_relationships Table |
||
| Create Terms Taxonomy Relationship | wp_set_object_terms() | This function is used to create terms and taxonomy relationships if it does not exist in the wp_term_relationships table of the WordPress database. |
| Read Terms Relationship | wp_get_object_terms() | This function is used to get the terms associated with the objects in the provided taxonomies. |
| Delete Terms Relationship | wp_delete_object_term_relationships() | This function unlinks objects from the taxonomy or taxonomies. |
Fixing Common WordPress Issues Using PhpMyAdmin
As we have seen in the sections above, we can fix common WordPress issues using PhpMyAdmin.
The following are the issues you can fix using PhpMyAdmin as it has been highlighted in the sections above:
- Reset the WordPress admin password or any other user password using PhpMyAdmin
- Change WordPress site URL or domain name using PhpMyAdmin.
- Fix the WordPress white screen of death by deactivating all the plugins using PhpMyAdmin.
- Change the WordPress administrator username using PhpMyAdmin.
- Add a new user to WordPress using PhpMyAdmin if you have accidentally deleted the user.
- Optimize and repair WordPress database using PhpMyAdmin.
Conclusion
In this post, we have looked at every topic related to WordPress databases and shared how to accomplish various WordPress database management tasks.
I have distilled all the knowledge from my year of experience working with WordPress databases and shared it with you in this guide.
I hope you have seen the vital role played by MySQL database management tools and, in particular, PhpMyAdmin in helping manage WordPress databases.
I hope this guide sets you on a path to discovering more about WordPress databases and WordPress development in general.
If you find this guide useful, consider sharing it with your friends or followers. If you would like specific assistance on any topic discussed in this post, feel free to contact me.

Joe is an experienced full-stack web developer with a decade of industry experience in the LAMP & MERN stacks, WordPress, WooCommerce, and JavaScript – (diverse portfolio). He has a passion for creating elegant and user-friendly solutions and thrives in collaborative environments. In his spare time, he enjoys exploring new tech trends, tinkering with new tools, and contributing to open-source projects. You can hire me here for your next project.