 Do you want to fix the menu bar in WordPress? In this brief tutorial, we will share the simple steps you need to follow if you want to create a sticky header in WordPress.
It is important to note that we will be using CSS to solve this problem. This means that you need some coding skills to implement this solution.
However, we will try to explain each step in detail to help beginners implement the solution.
Sticky menus are very important because users do not have to scroll all the way to the top to navigate to another page.
It creates convenience and provides a seamless user experience. In addition, it encourages deep site navigation and helps visitors to other important pages on your site.
Sticky menus are always accessible and allow visitors to navigate your website more easily.
These menus are important because good navigation improves dwell time by providing more content for users to consume.
Summary
- Types of Sticky Headers
- How to Create a CSS Sticky Navbar In WordPress
Types of Sticky Headers
It is important to note that there are three types of sticky headers. Most websites implement the top bar placement. However, you can be a little creative and place it on the right or left side depending on the design.
Here are the types of Sticky Headers:
- Fixed top Navbar – This sticky header always stays fixed at the top. We recommend it for blog posts, long pages, and category pages.
- Fixed left Navbar – The Navbar is fixed on the left side to make the menu items less intrusive.
- Fixed right Navbar – This stick header is placed on the right side. However, this method is not popular because most people are accustomed to a left-to-right design.
Now that you know the different types of sticky headers, it is time to implement the solution.
How to Create a CSS Sticky Navbar in WordPress
Here are the simple steps you need to follow:
- Log into your WordPress site and access the Dashboard as the admin user.
- From the Dashboard menu, click on Appearance Menu > Customize.
- Click Additional CSS.
- Add the following CSS code:
nav {

background:#ffff;

height:70px;

z-index:999;

margin:0 auto;

border-bottom:1px solid #dadada;

width:100%;

position:fixed;

top:0;

left:0;

right:0;

}
- The next step is to replace the #website-navigation with the CSS class and Id of your navigation menu.
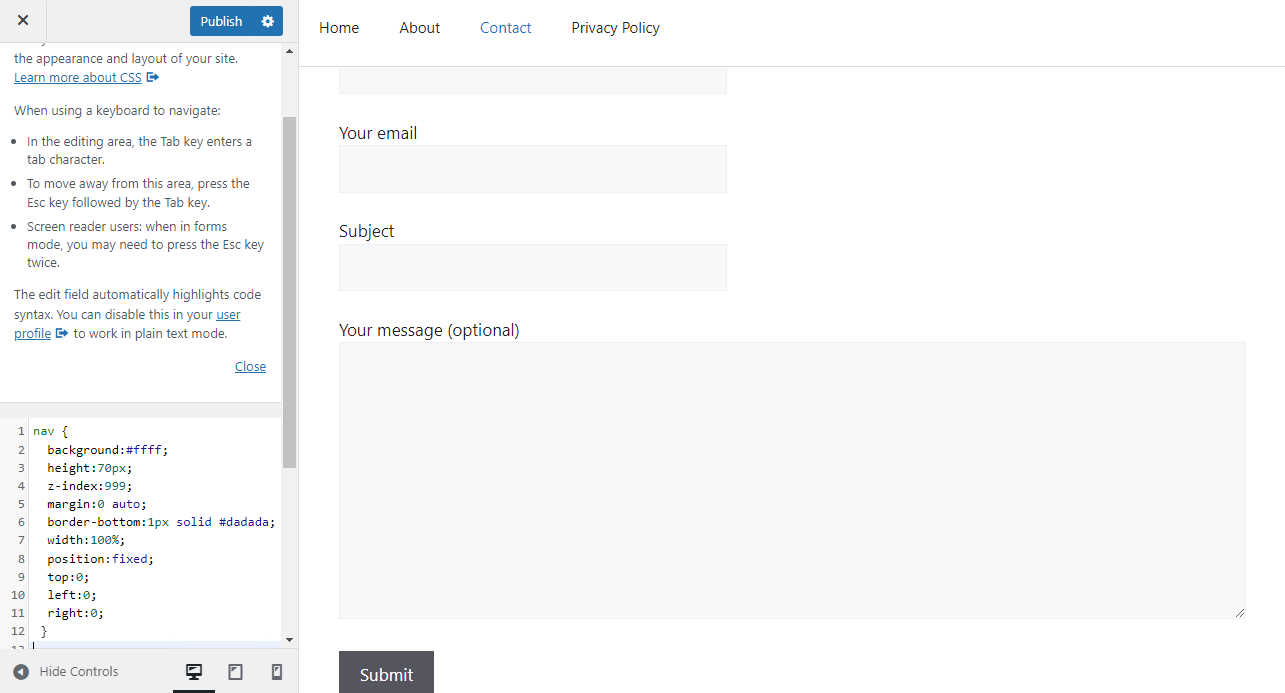
- Click the blue Publish button to save changes.
Conclusion
In today’s post, we have shared the simple steps you need to follow when creating a sticky header in WordPress. In addition, we have highlighted the different types of sticky headers.
If you are having a hard time implementing this solution, we recommend using a plugin myStickymenu or hero menu.
As you have seen, it is very easy to create a sticky menu to improve your website’s primary navigation.
If you need any custom solution, it is important to contact a qualified WordPress developer. We hope that this post helped you to fic the menu bar in WordPress.

Joe is an experienced full-stack web developer with a decade of industry experience in the LAMP & MERN stacks, WordPress, WooCommerce, and JavaScript – (diverse portfolio). He has a passion for creating elegant and user-friendly solutions and thrives in collaborative environments. In his spare time, he enjoys exploring new tech trends, tinkering with new tools, and contributing to open-source projects. You can hire me here for your next project.
Similar Articles