 Do you want to allow customers to upload images or other files directly on the single product page? Read on, as this post aims to provide you with a solution to solve this problem.
If you own an online print shop, imagine how it would be helpful if customers could upload a photograph, PDF, or even an Excel file. Giving them a simple way to add extra files will do wonders for your workflow.
By default, WooCommerce does not have a built-in solution to achieve this. The only way you can do this is with a plugin or custom code. However, it is important to note that if you have many plugins, they might bloat your site. This will definitely affect the loading speed of your site.
In addition, this minor change can be accomplished using custom PHP code. This means that you need to have some coding skills to implement this solution. If you are a beginner, we will explain all the steps you have to follow in detail.
WooCommerce Upload Image On Product Page
In this brief guide, we will share a custom code snippet we created to allow customers to upload files on the product page. For illustration purposes, we will be using the Storefront theme. This is the official WooCommerce theme.
Without wasting much time, let us get right into it.
Steps to Allow Customers to Upload Images and Files on the Products Page
Here are the simple steps you need to follow:
- Log into your WordPress site and access the Dashboard as the admin user.
- From the Dashboard menu, click on Appearance Menu > Theme Editor Menu. When the Theme Editor page is opened, look for the theme functions file where we will add the function that will allow customers to upload images and other files on the product page.
- Add the following code to the php file:
add_action( ‘woocommerce_before_add_to_cart_button’, ‘njengah_additional_product_fields’, 9 );
function njengah_additional_product_fields(){
?>
<p class="form-row validate-required" id="image" >
<label for="file_field"><?php echo __("Upload Image") . ‘: ‘; ?>
<input type=’file’ name=’image’ accept=’image/*’>
</label>
</p>
<?php
}
// Add custom fields data as the cart item custom data
add_filter( ‘woocommerce_add_cart_item_data’, ‘add_custom_fields_data_as_custom_cart_item_data’, 10, 2 );
function add_custom_fields_data_as_custom_cart_item_data( $cart_item, $product_id ){
if( isset($_FILES[‘image’]) && ! empty($_FILES[‘image’]) ) {
$upload = wp_upload_bits( $_FILES[‘image’][‘name’], null, file_get_contents( $_FILES[‘image’][‘tmp_name’] ) );
$filetype = wp_check_filetype( basename( $upload[‘file’] ), null );
$upload_dir = wp_upload_dir();
$upl_base_url = is_ssl() ? str_replace(‘http://’, ‘https://’, $upload_dir[‘baseurl’]) : $upload_dir[‘baseurl’];
$base_name = basename( $upload[‘file’] );
$cart_item[‘file_upload’] = array(
‘guid’ => $upl_base_url .’/’. _wp_relative_upload_path( $upload[‘file’] ), // Url
‘file_type’ => $filetype[‘type’], // File type
‘file_name’ => $base_name, // File name
‘title’ => ucfirst( preg_replace(‘/\.[^.]+$/’, ”, $base_name ) ), // Title
);
$cart_item[‘unique_key’] = md5( microtime().rand() ); // Avoid merging items
}
return $cart_item;
}
// Display custom cart item data in cart (optional)
add_filter( ‘woocommerce_get_item_data’, ‘njengah_custom_item_data’, 10, 2 );
function njengah_custom_item_data( $cart_item_data, $cart_item ) {
if ( isset( $cart_item[‘file_upload’][‘title’] ) ){
$cart_item_data[] = array(
‘name’ => __( ‘Image uploaded’, ‘woocommerce’ ),
‘value’ => str_pad($cart_item[‘file_upload’][‘title’], 16, ‘X’, STR_PAD_LEFT) . ‘…’,
);
}
return $cart_item_data;
}
// Save Image data as order item meta data
add_action( ‘woocommerce_checkout_create_order_line_item’, ‘njengah_field_update_order_item_meta’, 20, 4 );
function njengah_field_update_order_item_meta( $item, $cart_item_key, $values, $order ) {
if ( isset( $values[‘file_upload’] ) ){
$item->update_meta_data( ‘_img_file’, $values[‘file_upload’] );
}
}
// Admin orders: Display a linked button + the link of the image file
add_action( ‘woocommerce_after_order_itemmeta’, ‘njengah_image_link_after_order_itemmeta’, 10, 3 );
function njengah_image_link_after_order_itemmeta( $item_id, $item, $product ) {
// Only in backend for order line items (avoiding errors)
if( is_admin() && $item->is_type(‘line_item’) && $file_data = $item->get_meta( ‘_img_file’ ) ){
echo ‘<p><a href="’.$file_data[‘guid’].’" target="_blank" class="button">’.__("Open Image") . ‘</a></p>’; // Optional
echo ‘<p><code>’.$file_data[‘guid’].'</code></p>’; // Optional
}
}
// Admin new order email: Display a linked button + the link of the image file
add_action( ‘woocommerce_email_after_order_table’, ‘njengah_email_new_order_custom_meta_data’, 10, 4);
function njengah_email_new_order_custom_meta_data( $order, $sent_to_admin, $plain_text, $email ){
// On "new order" email notifications
if ( ‘new_order’ === $email->id ) {
foreach ($order->get_items() as $item ) {
if ( $file_data = $item->get_meta( ‘_img_file’ ) ) {
echo ‘<p>
<a href="’.$file_data[‘guid’].’" target="_blank" class="button">’.__("Download Image") . ‘</a><br>
<pre><code style="font-size:12px; background-color:#eee; padding:5px;">’.$file_data[‘guid’].'</code></pre>
</p><br>’;
}
}
}
}
[/php]
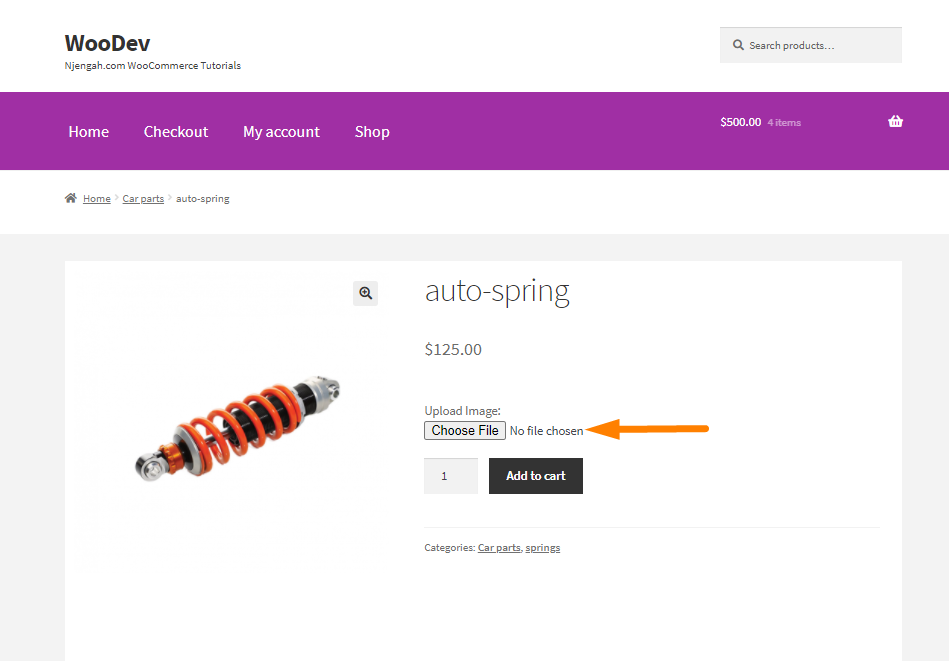
- This is the outcome:
Conclusion
In summary, we have shared a PHP code snippet to allow customers to upload images and other files on the product page. From this post, you can see how WooCommerce is flexible to customization, just like WordPress.
However, we recommend using a child theme. This will ensure that your changes are not lost during an upgrade. There are many child themes available, but it is very easy to create one.
If you are not familiar with coding, we recommend using a plugin. However, we hope that this post provided a quick and easy solution for you.
Similar Articles
- How to Change WooCommerce Storefront Featured Image Size
- How to Add WooCommerce Invoice Checkout Page
- How to Add Extra Text to Price WooCommerce
- How to Upload Theme to WordPress Step by Step Guide
- How to Get Current WooCommerce Product Category
- How to Set Up WooCommerce Product Price Per Kg
- How to Change Currency Symbol In WooCommerce
- How to Customize Product Category Page In WooCommerce
- How to Get Current WooCommerce Shipping Zone
- How to Backup WooCommerce Database
- How to Translate WooCommerce Checkout Page
- How to Change Coupon Code Placeholder WooCommerce
- How to Integrate MailChimp With WooCommerce
- How to Migrate from Shopify to WooCommerce
- 35+ Best Image Optimization Plugins for WordPress Loading Speed Optimization
- How to Add Local Pickup to WooCommerce
- How to Remove Category from Product Page WooCommerce
- How To Display Product Attributes In WooCommerce
- How to Customize WooCommerce Product Pages With Elementor Pro