 Are you looking for a way to keep your store customers interested? In today’s post, we will show you how you can allow customers to subscribe to your monthly, weekly, or daily newsletters. It is worth mentioning that we will be using custom code snippets to achieve this.
Customers are always interested in promotional offers like sales or if a new product is being launched. It is important to note that these offers cannot be sent out as occasional emails.
In addition, there are several plugins available for sending out emails. For example, you can use a standalone WordPress newsletter plugin, like MailPoet. Alternatively, you can also use an integration plugin like MailChimp.
However, these plugins are not integrated directly into your WooCommerce store. They usually add a subscription option only on a checkout or registration form. This is why we created this guide to help you add another subtle option.
WooCommerce Subscribe or Unsubscribe To Our Newsletter
By the end of today’s brief tutorial, you will be able to add a subscribe and unsubscribe option like a button on a customer’s account page. The customer can use this button to subscribe (or unsubscribe) to your email notifications. This is a great way to improve the user experience in your WooCommerce store.
It is worth mentioning that we will be editing some of WooCommerce’s core files. This means that you need to install or create a child theme to ensure your changes are not lost when updating your theme.
Let us get right into it.
Steps to Add Subscribe or Unsubscribe Option in WooCommerce
Here are the simple steps you need to follow:
- The first step is to display the Subscribe/Unsubscribe Option by overriding the WooCommerce ‘my-account.php’ template. To do this, add the following code to this the ‘my-account.php’ template file:
<p><a href="/my-account/?wdmsubs=true" value="subscribe" name="subscribe" id="wdm_subscribe">Subscribe</a></p>
<?php else: ?>
<p><a href="/my-account/?wdmsubs=false" value="subscribe" name="subscribe" id="wdm_subscribe">Unsubscribe</a></p>
<?php endif; ?>
[/php]
- After the user clicks on the button, and subscribes, we need to display an acknowledgment message by adding the following code to the functions.php file of your child theme:
function njengah_woo_subscribe()
{
if(isset($_REQUEST[‘wdmsubs’]) && $_REQUEST[‘wdmsubs’] == true)
{
update_user_meta(get_current_user_id(),’_wdm_subscribe’,’yes’);
wc_add_notice( __( ‘Yayy! You have subscribed to our email notification.’, ‘woocommerce’ ) );
}
}
[/php]
- If you want to add the email recipient list to a newsletter plugin, you need to find a filter or hook to add it. For example, if you use MailPoet, you can use refer to how you can add subscribers here.
- Finally, we need to add an ‘Unsubscribe’ link in WooCommerce Email footer, by overriding the ’email-footer.php’ template. Add the following code:
function njengah_woo_unsubscribe_processing_order($recipients)
{
$recipients = explode(‘,’,$recipients);
$final_recipient = array();
foreach($recipients as $r)
{
$user = get_user_by_email( $r );
$user_id = $user -> ID;
/* check user meta, to verify if user has to be excluded from recipient list. */
if( get_user_meta($user_id, ‘wdm_subscribe’, true) == ‘no’)
{
$final_recipient[] = $r;
}
}
$final_recipient = implode(‘,’,$final_recipient);
return $final_recipient;
} [/php]
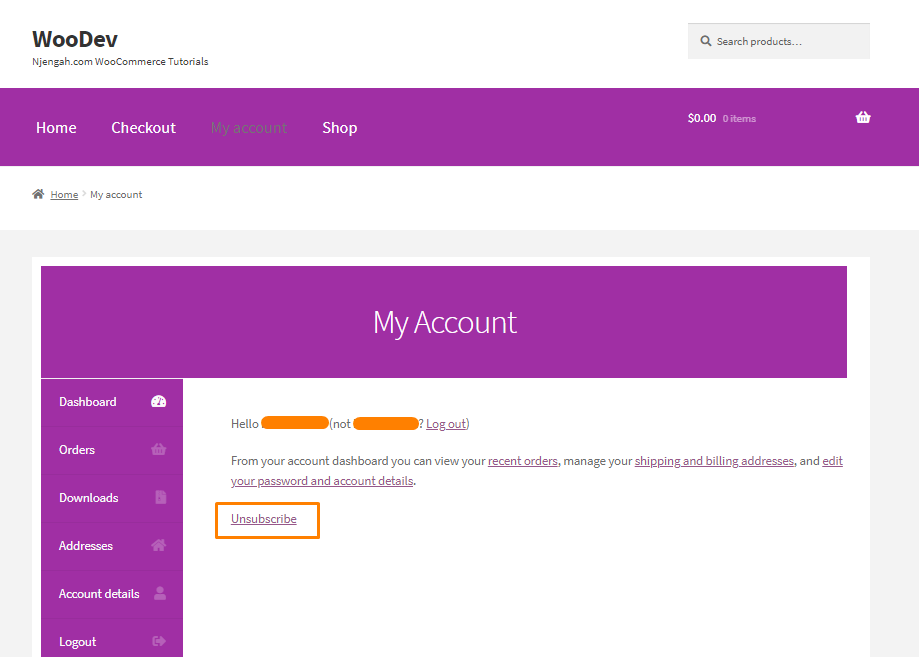
- This is the outcome after a user subscribes:
Wrapping Up
In summary, we have shared how you can allow customers to subscribe or unsubscribe to your newsletter. You can use this opportunity to market your products and offers.
It is important to back up your site before making any changes. This will ensure that you can revert to the previous version if you make a mistake.
We hope that this post provided a solution to your problem.
Similar Articles
- How to Add WooCommerce Invoice Checkout Page
- How to Change Coupon Code Placeholder WooCommerce
- How to Customize Product Category Page In WooCommerce
- WooCommerce Accept Terms and Conditions Checkbox On Registration Form
- How to Add PayPal Express Checkout to WooCommerce
- How to Set Up WooCommerce Buy One Get One
- How to Add CAPTCHA WooCommerce Login
- What is the Best Payment Gateway for WooCommerce
- How to Add WooCommerce Products to Facebook Shop
- How to Connect Printful To WooCommerce
- How to Update WooCommerce Database
- How Many Products Can WooCommerce Handle?
- How to Skip Cart and Redirect to Checkout Page WooCommerce
- How to Add Custom Product Fields WooCommerce
- 26 Best WooCommerce Plugins for Customer Feedback
- How to Set Number of Products Per Page WooCommerce
- 30 Best WordPress Events Plugin for Better Events Management
- 30+ Best Popup Plugins With Trendy Designs & Cool Features
- 30+Best WordPress Membership Plugins Collection