 Many people use hero images on their sites because of issues caused by homepage sliders. Using homepage sliders is discouraged, as it will slow down your WooCommerce store, and it does not have good conversion rates. If you are using the Storefront theme and looking for a suitable alternative, you should consider adding a hero image instead.
WooCommerce Storefront Hero
The most important thing about using a hero image is that it immediately arrests a visitor’s attention. Moreover, people respond positively to visual content. Therefore, having a high-resolution image on your website is an excellent way to entice visitors to explore your site further.
A good design influences a visitor’s opinion of your company and plays an important role in increasing conversions. Having the right hero image can establish trust among visitors and make them interested in what you are offering, while the wrong one can drive them away.
Hero images are used to engage with site visitors directly. You can add a Call to Action button or a sign-up form asking them for a trial service. It would be best if you made it look attractive and relative to the entire site’s content.
However, it is worth mentioning that selecting a perfect hero image for your website is a tricky task. You should choose a hero image depending on whether you offer a product, a service, or only content. You can use videos if you want to provide in-depth details about your WooCommerce store.
Here are some few tips, which can help you to select the best hero image:
- Pick a high-resolution images (1920x1080px)
- Focus on the products that you are offering
- Use an image that focuses on the value proposition
- Use images that show simple illustrations of what your store offers
Steps to Add a Hero Image in the WooCommerce Storefront Theme
To add a full-width hero image to the Storefront theme, here are the steps that you need to follow:
- Log into your WordPress site and access the Dashboard as the admin user.
- From the Dashboard menu, click on Appearance Menu > Theme Editor Menu. When the Theme Editor page is opened, look for the theme functions file to add a hero image in the WooCommerce Storefront theme.
- Add the following code to the php file. Remember to add an image link that is on your site.
add_action( 'init', 'woa_add_hero_image_init' );

function woa_add_hero_image_init () {

   add_action( 'storefront_before_content', 'woa_add_hero_image', 5 );

}

function woa_add_hero_image() {

   if ( is_front_page() ) :

      ?>

         <div id="hero-image">

             <img src="image-link " width="100%">

         </div>

      <?php

   endif;

}
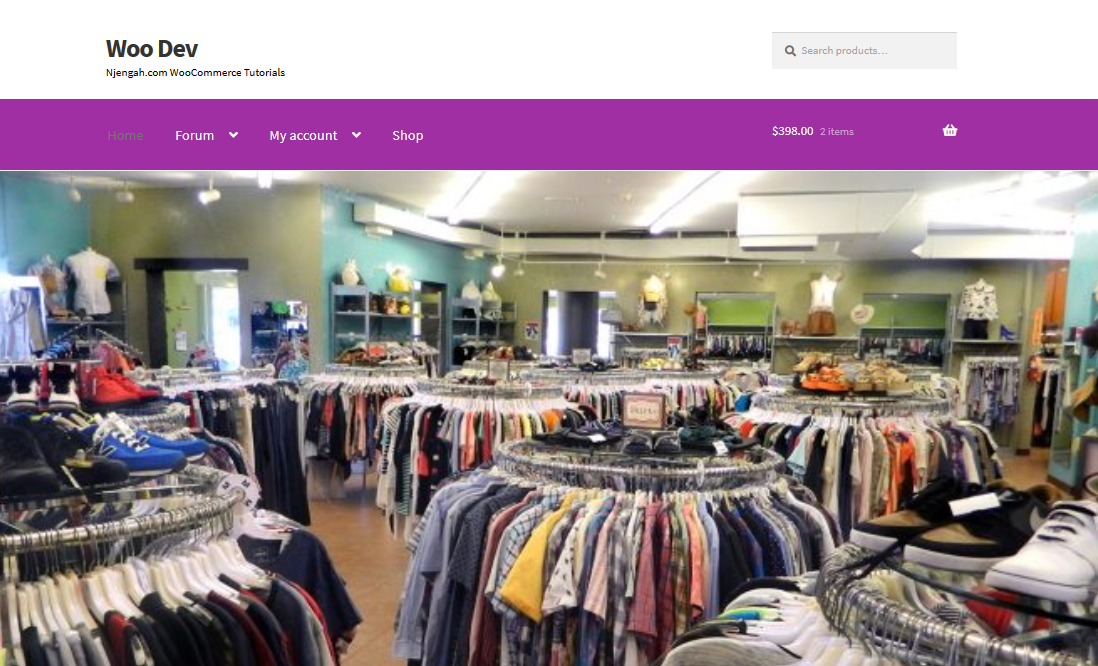
- This is the outcome:
Conclusion
In summary, I have highlighted some tips on how you can find the best hero image for your WooCommerce Store. In this tutorial, you have seen that it is very easy to add a hero image. All you need to do is find the best one that represents what your store is offering.
However, if you are a novice user, we recommend using My Custom Functions plugin to insert the code. If you make an error in the functions.php file, it will cause your entire site to crash.
Similar Articles
- How to Change Size of Site Title WooCommerce Storefront Theme
- 30+ Best Comment Plugin for WordPress to Boost Engagement
- How to Change WooCommerce Email Footer Text
- 100+ Best Free WordPress Plugins By Popularity, Ratings & Users
- How to Set WooCommerce Storefront Thumbnail Sizes
- 5+ Best WooCommerce Store Examples
- How to Make WooCommerce Storefront Header Transparent
- How to Set Up Homepage in WooCommerce Storefront
- What is WooCommerce Storefront Theme ? [Answered]
- Move Price WooCommerce Storefront Hooks
- How to Add Search Box on Top of Page Storefront Theme
- How to Change Storefront Theme Tagline WooCommerce
- How to Remove Gravatar Storefront Blog WooCommerce
- How to Add Disclaimer Storefront WooCommerce
- How to Add Storefront Theme Header Background Image
- How to Setup WooCommerce Storefront Mega Menu
- Getting Started With Vue Storefront [ Beginner Guide ]
- 30+ Best WordPress Inventory Management Plugins
- How to Customize Storefront Theme Using Customizer