 Whether you are selling digital products or physical goods, you must take advantage of the WooCommerce built-in tax system unless you are well versed in dealing with online sales tax protocols. Manually determining appropriate tax rates is challenging.
WooCommerce Taxes
Taxes are undoubtedly a challenge for many people. Configuring taxes in your WooCommerce store can be challenging, but this tutorial aims to make this process easier for you. The main thing you need to do is set the tax display and adding the right tax rates.
Steps to Enable WooCommerce Taxes on the Checkout
Here are the steps that you need to follow:
- Log into your WordPress site and access the dashboard as the admin user
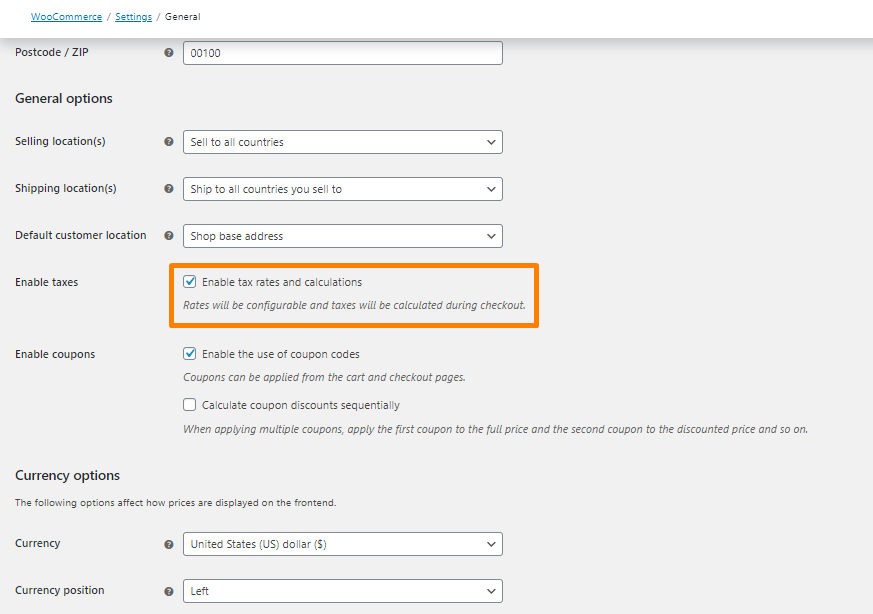
- To enable WooCommerce tax configuration, go to WooCommerce > Settings.
- Click on the General tab and check the option to enable taxes as shown.
- Save the changes. The tax tab should appear:
Tax Options
Go to menu WooCommerce > Settings > Tax > Tax Options.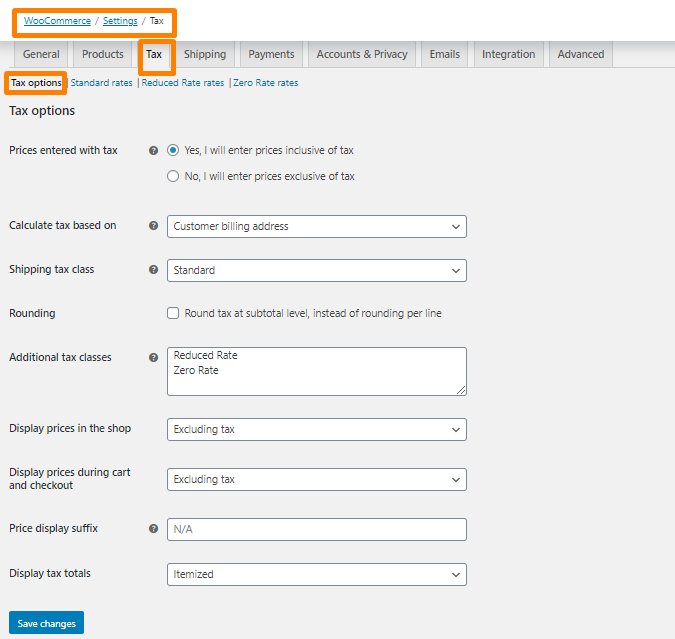
You can find most of the WooCommerce tax settings in the Tax Options section.
- Prices entered with tax – Decide whether you will enter product prices inclusive or exclusive of tax.
- Yes, I will enter price inclusive of tax – all newly created products will include tax according to the defined rate.
- No, I will enter prices exclusive of tax – not all new products will include tax. During checkout, the prices will be increased by tax according to the defined rate.
- Calculate tax based on – Select an address to calculate taxes. The options here are:
- Customer shipping address
- Customer billing address.
- Shop address
- Shipping tax class – as a standard, tax class is applied basing on products in the cart. If there are products with different tax rates in the cart, the highest rate will be applied to the shipment. You can set your shipping rate, which will be applied to shipping costs.
- Rounding – if you want to round tax at subtotal level, tick this option.
- Additional tax classes – tax classes are attributed to products, although usually, you will probably use Standard rates. You can also add your classes here.
- Display prices in the shop – do you want to display prices, which already include tax, or not.
- Display prices during cart and checkout – determine if prices displayed in the cart and checkout should include tax or not.
- Price display suffix – decide what should be displayed at the price. If you display prices including tax, you can use the suffix “inc. VAT” or “gross”.
- Display tax totals – decide whether taxes should be displayed as a total or if they should be broken down into individual tax rates.
Tax Classes
Configuration of tax rates for classes is in the menu WooCommerce > Settings > Tax > Tax class name.
Tax classes are additional “categories” for products used to group products according to the tax rate.
For example, if you sell products with different tax rates, it will be best for you to create two tax classes. Later on, during configuration, choose the right tax class, and a given tax will be applied to this product.
Tax Rate Configuration
You can configure tax rates under the Standard rates class. To enter a new rate, click Insert row: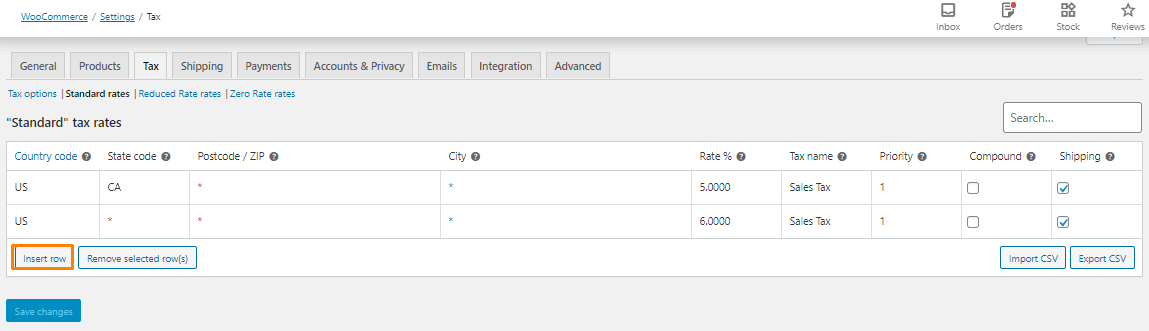
Here are the fields you need to fill:
- Country code
- State code
- ZIP/Postcode
- City
- Rate %
- Tax name
- Priority
- Compound
- Shipping
Priority and compound are useful when national and local taxes are effective in a given country.
Additional Classes
Tax classes are used to determine tax rates for selected products. If you need to create additional tax classes, you can do it in the menu Tax Options. Add each new class in a new row and save the changes.
New classes will be displayed as a submenu in the menu Taxes.
You can select tax classes to products in the menu: Products > edit selected product > box Product data > tab General Settings.
This is how the Sales Tax is displayed on the WooCommerce checkout page:
Conclusion
In summary, you have learned how to display taxes on the WooCommerce checkout page. The first step is to enable taxes in your store, then configuring the tax options. After that, I have highlighted the different tax classes and tax rate configuration.
If you need advanced options, please consider using a plugin or hiring a qualified WordPress developer.