 By default, WooCommerce allows you to add product attributes. WooCommerce product attributes are a great way of highlighting the major features of a product. If you are not convinced, think of it from the customer’s viewpoint. If you were a potential customer, you would need to know about the attributes of a certain product, so that you can make informed decisions, especially on the financial side. This would greatly improve the customer shopping experience in your WooCommerce Store.
WooCommerce Product Attributes
In this tutorial, I will be showing you how to use product attributes to provide distinctions such as color or size as well as providing more technical information about your products and setting variables. Moreover, you will learn more about how to use product attributes in WooCommerce. Additionally, I will provide you with a PHP snippet that will help you to Display WooCommerce Product Attributes on your online store.
The default version of WooCommerce allows you to set global attributes that can be applied later to any new or existing products such as sizes. Additionally, you can add custom attributes. It is worth mentioning, that if you have many products requiring the same custom attribute then you may want to consider predefining the repeating attribute.
However, it is important to note that the default page setup does not offer prominent features to display WooCommerce product attributes. In other themes, this section is located so far below that the customers do not view them. With all that said, let us take a deep dive into how you can Use and display WooCommerce Product attributes.
a) Steps to Add Predefined Attributes to Your Store
Here are the steps that you need to follow:
- Log into your WordPress site and access the Dashboard as the admin user.
- From the Dashboard menu, click on Products > Attributes.
- Under the name field, you need to input the name of the attribute.
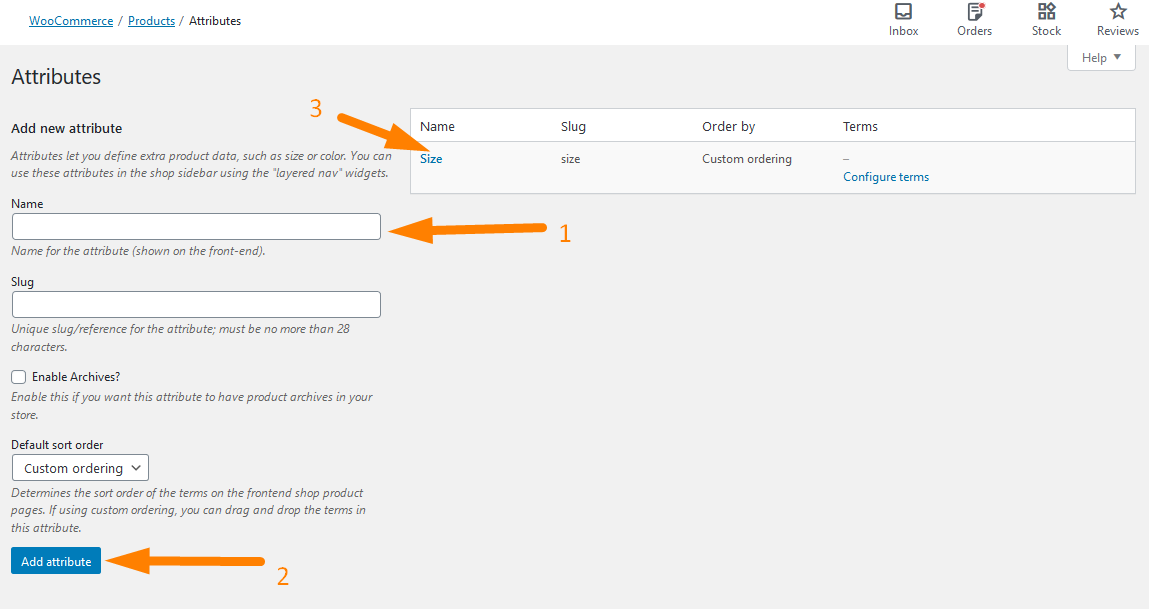
To enter the values for the attributes you can click on Configure terms.
- Click on Add Attribute.
b) Steps to Add Custom Attributes to Individual Products
As earlier indicated, you might find it better to assign a custom attribute to a unique product rather than going through the steps above. This is the default look of a product without custom attributes: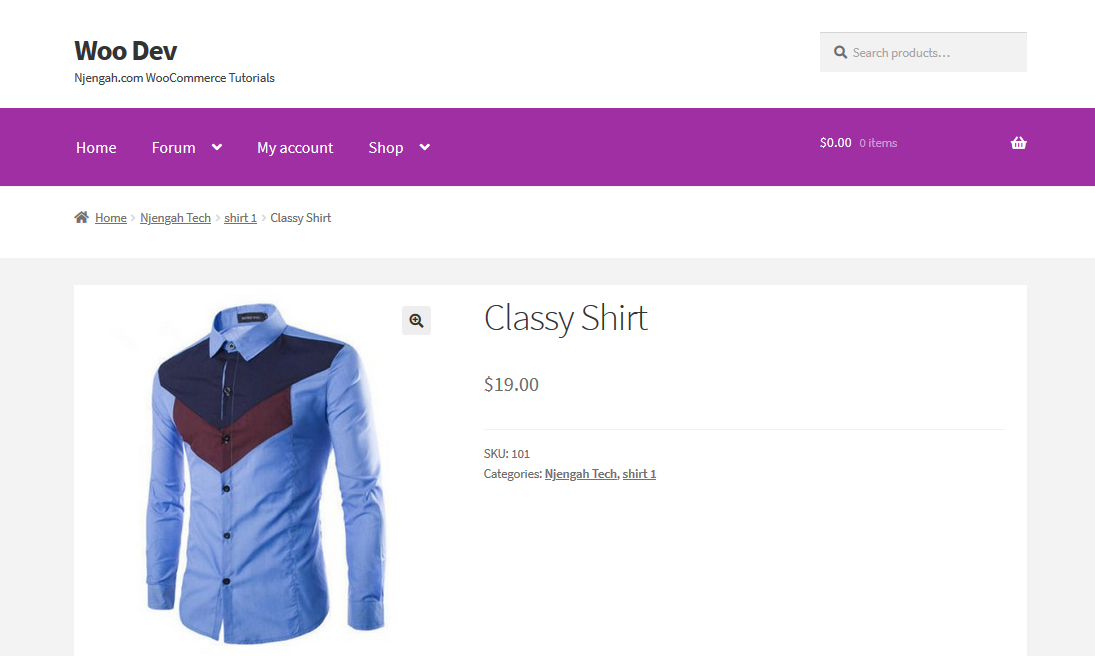
Here are the simple steps that you need to follow:
- Log into your WordPress site and access the Dashboard as the admin user.
- From the Dashboard menu, click on Products > All Products.
- After that, you need to scroll down to the Product Data section and click on Attributes and the dropdown menu for “Custom product attribute” Click on add. You need to name your Attribute and add your values and separate them with a pipe as shown below:
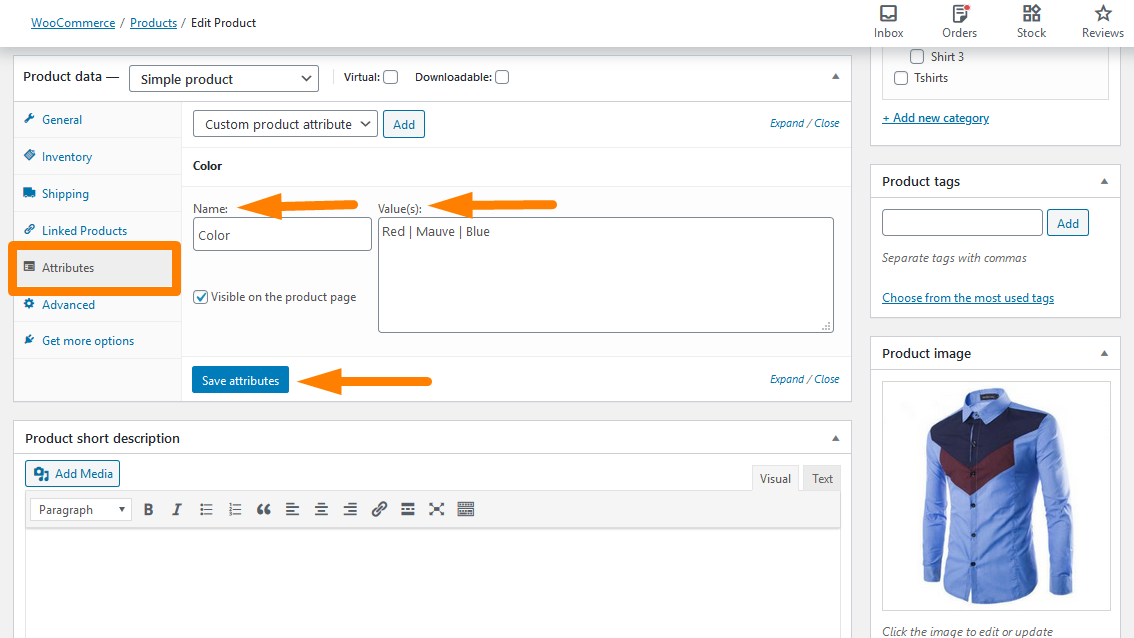
- Click on save attributes.
Now that we are done with these simple steps, how can you display these attributes on the Product Page?
c) Steps to Display Custom Products Attributes on the Products Page
Before we go to the coding bit of this section, it is important to note that this code only works for regular attributes and not for Variations.
- Log into your WordPress site and access the Dashboard as the admin user.
- From the Dashboard menu, click on Appearance Menu > Theme Editor Menu. When the Theme Editor page is opened, look for the theme functions file where we will add the function that will display the custom product attributes.
- Add the following code to the functions.php file:
/**

 * @snippet       Display Custom Products Attributes on the Products Page

*/

function cw_woo_attribute(){

    global $product;

    $attributes = $product->get_attributes();

    if ( ! $attributes ) {

        return;

    }

    $display_result = '';

    foreach ( $attributes as $attribute ) {

        if ( $attribute->get_variation() ) {

            continue;

        }

        $name = $attribute->get_name();

        if ( $attribute->is_taxonomy() ) {

            $terms = wp_get_post_terms( $product->get_id(), $name, 'all' );

            $cwtax = $terms[0]->taxonomy;

            $cw_object_taxonomy = get_taxonomy($cwtax);

            if ( isset ($cw_object_taxonomy->labels->singular_name) ) {

                $tax_label = $cw_object_taxonomy->labels->singular_name;

            } elseif ( isset( $cw_object_taxonomy->label ) ) {

                $tax_label = $cw_object_taxonomy->label;

                if ( 0 === strpos( $tax_label, 'Product ' ) ) {

                    $tax_label = substr( $tax_label, 8 );

                }

            }

            $display_result .= $tax_label . ': ';

            $tax_terms = array();

            foreach ( $terms as $term ) {

                $single_term = esc_html( $term->name );

                array_push( $tax_terms, $single_term );

            }
            $display_result .= implode(', ', $tax_terms) .  '<br />';

        } else {

            $display_result .= $name . ': ';

            $display_result .= esc_html( implode( ', ', $attribute->get_options() ) ) . '<br />';

        }
    }

    echo $display_result;

}
add_action('woocommerce_single_product_summary', 'cw_woo_attribute', 25);
- To view the outcome, simply refresh the products page and you should see this:
How the Code Works
This code picks up the attributes for regular products and displays them on the Product page. However, it does not pick the attributes for variable products.
Conclusion
The main aim of this post was to help you learn how to use WooCommerce Product attributes. I have highlighted how you can add predefined attributes and also custom attributes. To top it all off, I have shares a PHP snippet that you need to add to your functions.php file. Moreover, I have emphasized that displaying WooCommerce product attributes on product pages is a great way of encouraging customers to make purchases. By now, I am sure you know how to use WooCommerce Product Attributes.
Similar Articles
- How to Set Featured Products In WooCommerce
- How to Add Remove Icon to WooCommerce Checkout Page
- How to Remove Has Been Added to Your Cart Message WooCommerce
- How to Add Woocommerce Product from Frontend
- How To Quickly Find Your Product ID in WooCommerce
- How to Disable Ship to Another Address Option
- How to Remove Zoom Effect on WooCommerce Product Image
- How to Sort WooCommerce Categories for Better User Experience
- How to Hide or Remove the Quantity Field from WooCommerce Product Page
- How to Add GTIN Numbers On Products In WooCommerce
- How to Rename Order Status Messages in WooCommerce
- How to Sell Digital Products With WooCommerce
- How Add Text Before the Price in WooCommerce » Add Text Before Price
- How to Display WooCommerce Products By Category
- How to Change Product Price Programmatically in WooCommerce
- How to Hide the WooCommerce Coupon Code Field
- How to Hide All Products From Shop Page in WooCommerce
- How to Add Product Image WooCommerce Checkout Page
- How to Replace Add to Cart Button With Link WooCommerce
- How to Skip Cart and Redirect to Checkout Page WooCommerce
- How to Get Current Product Category Name in WooCommerce
- How to Get Order ID In Woocommerce
- How to Hide WooCommerce Product from Search Results
- How to Resize WooCommerce Product Images
- How to Add Description after Price in WooCommerce
Comments are closed.