 WooCommerce is very flexible to customization with some built-in options. There are several ways to set up the checkout process with or without registration. This entirely depends on how you want your checkout process to be.
The most common checkout process is the public WooCommerce store with guest checkout. This setup allows customers in your store to buy products without having to log in. Customers have the option to create an account during checkout. This post shares how you can create this checkout process.
The other checkout process is the public WooCommerce store with mandatory user accounts. Stores using this setup require customers to register or login into their account to complete their purchase.
WooCommerce Enable Guest Checkout
Many online stores let anyone view and buy their products, whether or not they are logged in. to enable guest checkout, here are the steps that you need to follow:
- Log into your WordPress site and access the Dashboard as the admin user.
- From the Dashboard menu, click on WooCommerce > Settings.
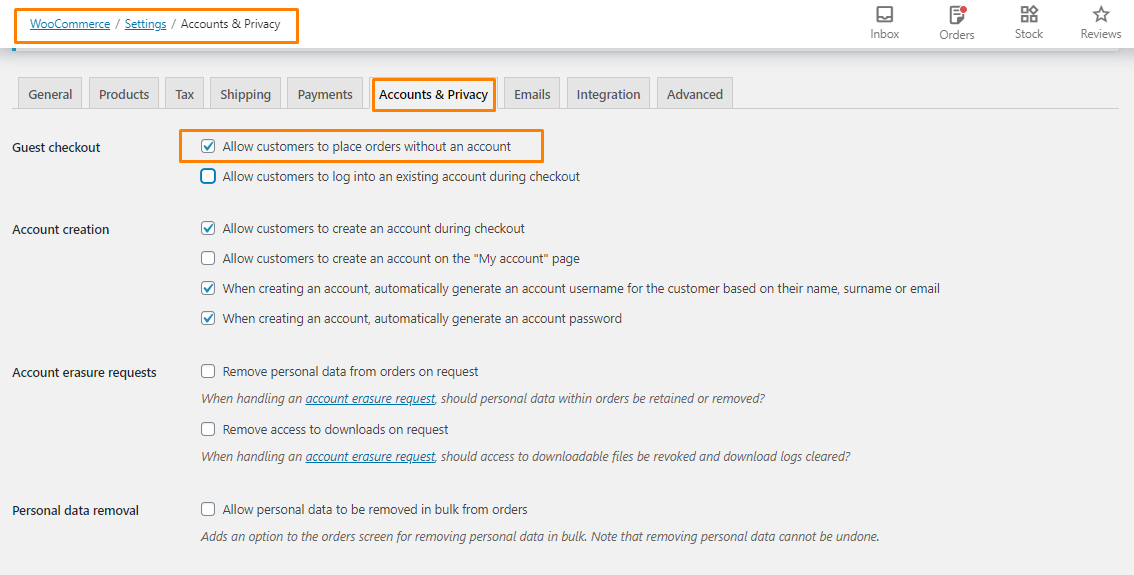
- Go to the Accounts and Privacy section under the Settings tab. You will see a box with the label “Guest checkout”.
- Check this box to allow customers to purchase without logging in or creating a user account, as shown in the screenshot below:
WooCommerce Allow Login For Existing Users During Checkout
You may also want users to log in from their existing account on your website when they checkout. Here are the steps that you need to follow:
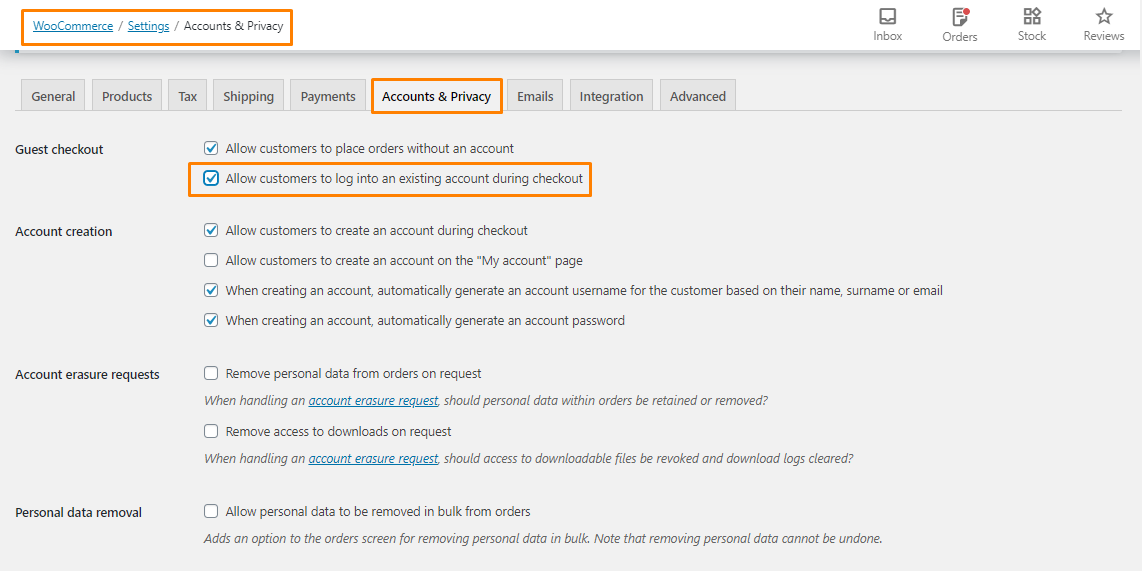
- On the settings tab under WooCommerce, click on Accounts and Privacy.
- Tick the checkbox that reads – ‘Allow customers to log in to an existing account during checkout’, as shown below:
WooCommerce Enable Customer Registration on the Checkout Page
You can allow visitors to create an account on the checkout page. Here are the steps that you need to follow:
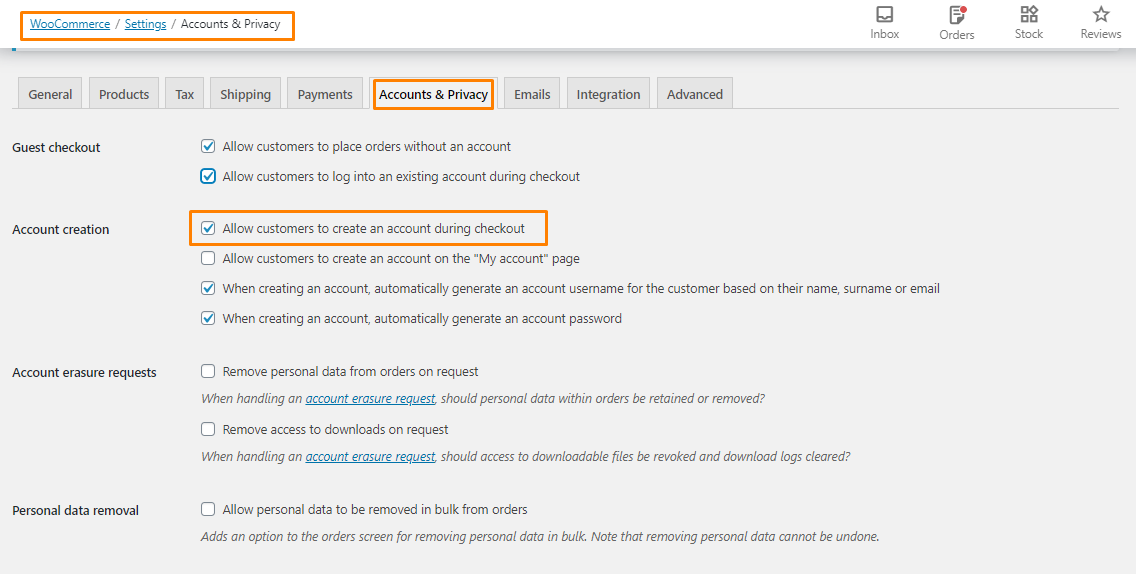
- Go to the Settings tab under WooCommerce.
- Click on the Accounts & Privacy tab.
- Click on the checkbox placed against this option – ‘Allow customers to create an account during checkout’.
Remember always to save your changes.
Conclusion
In summary, this post shares how you can enable guest checkout. You have also learned how to allow a login for existing users and allow visitors to register on the checkout page. WooCommerce, by default, has built-in options to make these changes. Remember to save the changes so that they can reflect on the front end.
Similar Articles
- How to Hide Company Name Field WooCommerce Checkout Page
- How to Hide Tax On Checkout If Field Value Exists WooCommerce
- How to Remove Cart Page WooCommerce Storefront Theme
- How to Add Extra Field in WooCommerce Checkout Form
- How to Hide WooCommerce Product from Search Results
- WooCommerce Logout PHP Snippet to Create Logout Button
- How to Hide WooCommerce Marketing Hub Admin Option
- How to Hide Product Description Heading WooCommerce
- How to Hide Order Status In WooCommerce
- How to Hide WooCommerce Update Notifications
- How to Simplify Checkout Free Items Storefront Theme
- How to Hide Price If Zero In WooCommerce
- How to Hide Price and Add to Cart for Logged Out Users WooCommerce
- How to Hide Tax Label In WooCommerce
- How to Hide, Change or Remove WooCommerce On Sale Badge
- How to Hide Prices From Google In WooCommerce
- How to Add WooCommerce Storefront Sitemap
- How to Get Payment Methods in WooCommerce » Code Example