 Are you looking for a way to customize the WooCommerce “My Account” page? Editing the account page is one of the most important pages in any WooCommerce store. This page should have a stunning design because it is vital to the smooth running of your entire online store.
It should be designed in a way to allow users to fully make most of the account management, convert more sales, and or entice customers to make a repeat purchase.
The ‘my account’ page and its subpages can be displayed anywhere on your site using a shortcode. Shortcodes are an easy way to add dynamic content to your WordPress posts, pages, and sidebars.
WooCommerce Custom My Account Page
In this brief tutorial, we show you how you customize the look, feel, layout, content, and design of the ‘my account’ page using custom PHP scripts. This means that you need to have some coding knowledge before you proceed.
You can achieve almost anything in WooCommerce if you are familiar with PHP customization. This means that you can add a custom tab, rename a tab, remove a tab, or merge tab contents.
Let us look at how you can achieve this.
Steps to Edit the My Account Page Using PHP Snippets
In this section, we will use WooCommerce hooks. This is because it is one of the best practices that WordPress recommends when customizing your site.
We will add a custom tab, rename a tab, remove a tab, and merge tab contents.
Here are the steps you need to follow to edit the My Account page programmatically:
- Log into your WordPress site and access the Dashboard as the admin user.
- From the Dashboard menu, click on Appearance Menu > Theme Editor Menu. When the Theme Editor page is opened, look for the theme functions file where we will add the PHP code snippets.
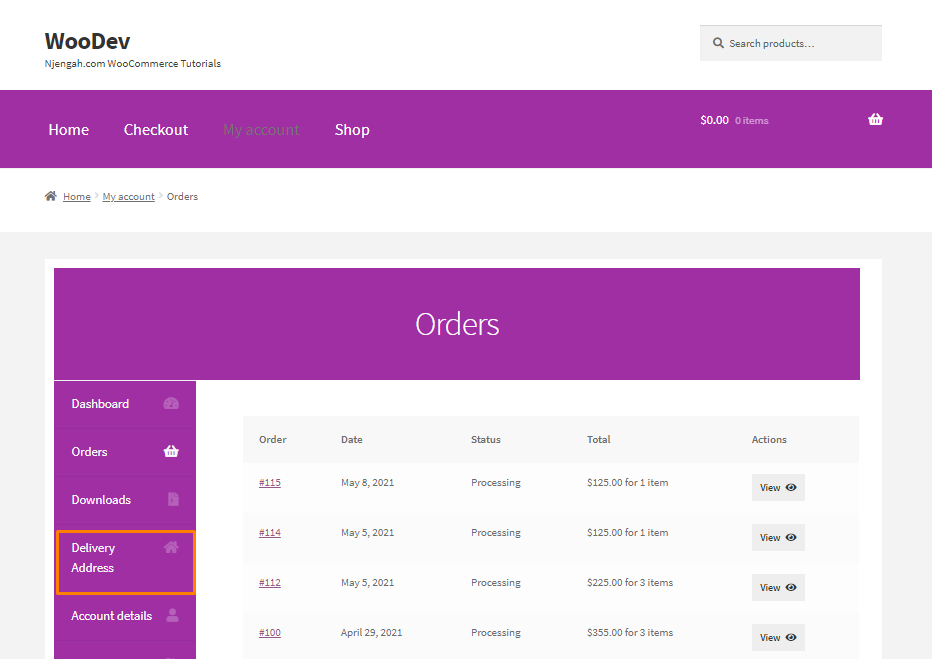
- If you want to rename the Address tab to Delivery Address, add the following code to the php file. You can use the same code to rename any tab.
function njengah_rename_address_my_account( $items ) {
$items[‘edit-address’] = ‘Delivery Address’;
return $items;
}
[/php]
- This is the outcome:
- If you want to remove the Address tab, add the following code to the php file:
function njengah_remove_address_my_account( $items ) {
unset( $items[‘edit-address’] );
return $items;
}
[/php]
- Here is a full list of the tabs slug in the $items array, so that you can choose the one you want to remove:
‘dashboard’ => __( ‘Dashboard’, ‘woocommerce’ ),
‘orders’ => __( ‘Orders’, ‘woocommerce’ ),
‘downloads’ => __( ‘Downloads’, ‘woocommerce’ ),
‘edit-address’; => _n( ‘Addresses’, ‘Address’, (int) wc_shipping_enabled(), ‘woocommerce’ ),
‘payment-methods’ => __( ‘Payment methods’, ‘woocommerce’ ),
‘edit-account’ => __( ‘Account details’, ‘woocommerce’ ),
‘customer-logout’ => __( ‘Logout’, ‘woocommerce’ ),
);
[/php]
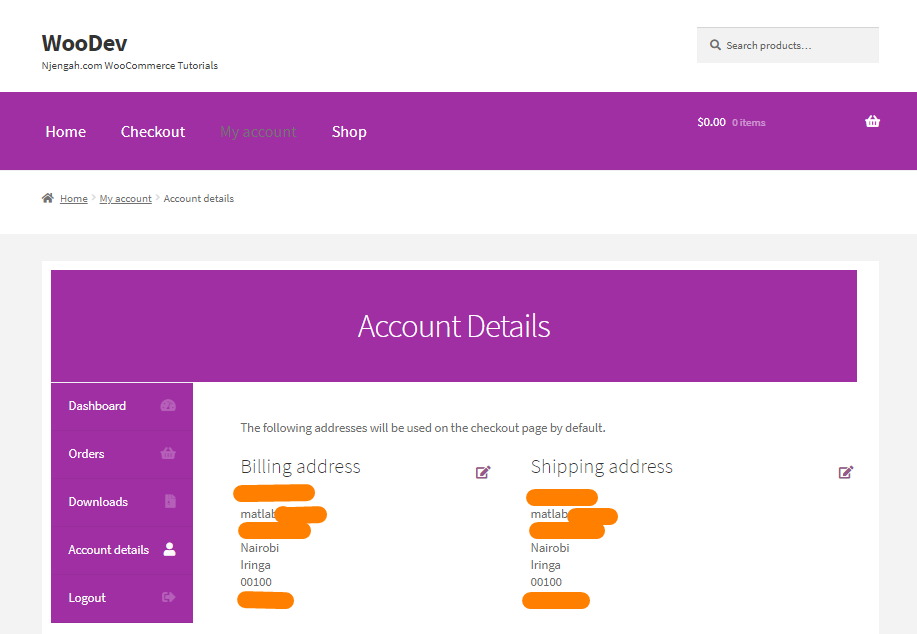
- It is also possible to merge tabs and content. For example, you can remove the Addresses tab and move its content to the Account tab. You can achieve this by adding the following code to the php file:
// 1. Remove the Addresses tab
add_filter( ‘woocommerce_account_menu_items’, ‘njengah_remove_acc_tab’, 999 );
function njengah_remove_acc_tab( $items ) {
unset($items[‘edit-address’]);
return $items;
}
// ——————————-
// 2. Insert the content of the Addresses tab into an existing tab (edit-account in this case)
add_action( ‘woocommerce_account_edit-account_endpoint’, ‘woocommerce_account_edit_address’ );
[/php]
- This is the outcome:
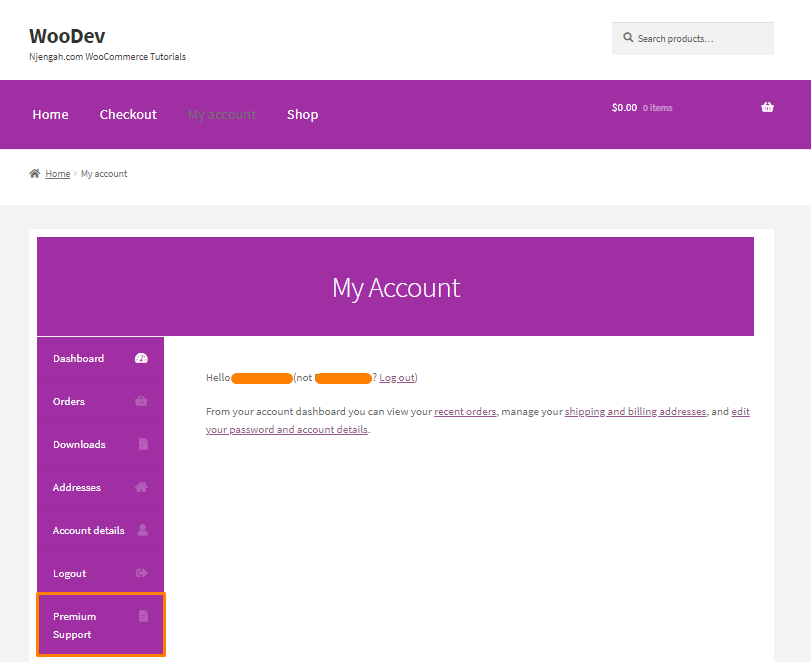
- You can also create a custom tab on this page. For example, you can add a new tab called Support where users can easily have a look at their support tickets. To achieve this, add the following code to the php file:
* Add New Tab on the My Account page
*/
// ——————
// 1. Register new endpoint (URL) for My Account page
// Note: Re-save Permalinks or it will give 404 error
function njengah_add_premium_support_endpoint() {
add_rewrite_endpoint( ‘premium-support’, EP_ROOT | EP_PAGES );
}
add_action( ‘init’, ‘njengah_add_premium_support_endpoint’ );
// ——————
// 2. Add new query var
function njengah_premium_support_query_vars( $vars ) {
$vars[] = ‘premium-support’;
return $vars;
}
add_filter( ‘query_vars’, ‘njengah_premium_support_query_vars’, 0 );
// ——————
// 3. Insert the new endpoint into the My Account menu
function njengah_add_premium_support_link_my_account( $items ) {
$items[‘premium-support’] = ‘Premium Support’;
return $items;
}
add_filter( ‘woocommerce_account_menu_items’, ‘njengah_add_premium_support_link_my_account’ );
// ——————
// 4. Add content to the new tab
function njengah_premium_support_content() {
echo ‘Premium WooCommerce Support. Welcome to the WooCommerce support area. As a premium customer, you can submit a ticket should you have any WooCommerce issues with your website, snippets or customization. <i>Please contact your theme/plugin developer for theme/plugin-related support.</i></p>’;
echo do_shortcode( ‘ /* your shortcode here */ ‘ );
}
add_action( ‘woocommerce_account_premium-support_endpoint’, ‘njengah_premium_support_content’ );
// Note: add_action must follow ‘woocommerce_account_{your-endpoint-slug}_endpoint’ format
[/php]
- You can use a third party plugin like WPForms to create the support page. After that, you can paste the shortcode in the final line. This is the outcome:
Conclusion
By now, you should be able to customize the account page. We recommend creating a child theme before editing this page. This will ensure that your changes are not lost during an update. We hope that this tutorial provided you with the best solution.
Similar Articles
- 100+ Tips, Tricks & Snippets Ultimate WooCommerce Hide Guide
- WooCommerce Redirect After Checkout : Redirect to Custom Thank You Page
- How to Change WooCommerce Thank You Page
- How to Hide Tags In Storefront Theme WooCommerce
- How to Disable Payment Method for Specific Category
- Hide or Remove the Quantity Field from WooCommerce Product Page
- How to Add WooCommerce My Account Page Redirect
- How to Hide Dashboard on the My Account Page WooCommerce
- How to Get Payment Methods in WooCommerce » Code Example
- How to Set Up WooCommerce Buy One Get One
- How to Export Products In WooCommerce
- How to Duplicate a Product in WooCommerce
- How to Select All Except Last Child In CSS » CSS Not Last Child Example
- How to Remove Downloads Menu My Account Page WooCommerce
- How to Set Up WooCommerce Maximum or Minimum Order Quantity
- How to Set Up WooCommerce Upload File on Checkout
- How to Hide Category From Shop Page WooCommerce
- How to Change WooCommerce Checkout Field Placeholder Text
- How to Hide Downloads From My Account WooCommerce
- How to Change Coupon Code Placeholder WooCommerce