
Some situations require store owners to add custom checkout fields on a checkout page according to your requirements.
You might want to add a hidden field to the checkout page. Therefore, I made up a tutorial to help you get going.
In this post, I will show you how you can add a hidden field that can be displayed using a checkbox.
WooCommerce Add Hidden Field on the Checkout Page
There are many alternatives to modify your checkout pages. You can use third-party plugins, WooCommerce extensions, custom development.
In this post, we will use a custom PHP code snippet I created to optimize your checkout page.
A WooCommerce custom checkout field is important in assembling further data from the purchasers before they complete an order.
Steps to Add a Checkbox to Hide/Show a Checkout Field
Here are the steps that you need to follow:
- Log into your WordPress site and access the dashboard as the admin user
- From the dashboard menu, click on the Appearance Menu > Theme Editor Menu.
- When the theme editor page is opened, look for the theme functions file with the extension functions.php.
- Open this functions file to add the function to add a checkbox to hide/show a custom checkout field.
- Add the following code in the functions.php file:
/**

 * @snippet       Add a Checkbox to Hide/Show Checkout Field - WooCommerce

*/

add_filter( 'woocommerce_checkout_fields' , 'njengah_display_checkbox_and_new_checkout_field' );

 function njengah_display_checkbox_and_new_checkout_field( $fields ) {

  $fields['billing']['checkbox_trigger'] = array(

    'type'      => 'checkbox',

    'label'     => __('Checkbox label', 'woocommerce'),

    'class'     => array('form-row-wide'),

    'clear'     => true

);

  $fields['billing']['new_billing_field'] = array(

    'label'     => __('New Billing Field Label', 'woocommerce'),

    'placeholder'   => _x('New Billing Field Placeholder', 'placeholder', 'woocommerce'),

    'class'     => array('form-row-wide'),

    'clear'     => true

);

  return $fields;

  }

  add_action( 'woocommerce_after_checkout_form', 'njengah_conditionally_hide_show_new_field', 9999 );

 function njengah_conditionally_hide_show_new_field() {

    wc_enqueue_js( "

      jQuery('input#checkbox_trigger').change(function(){

                 if (! this.checked) {

            // HIDE IF NOT CHECKED

            jQuery('#new_billing_field_field').fadeOut();

            jQuery('#new_billing_field_field input').val('');

         } else {

            // SHOW IF CHECKED

            jQuery('#new_billing_field_field').fadeIn();

         }

              }).change();

  ");

}
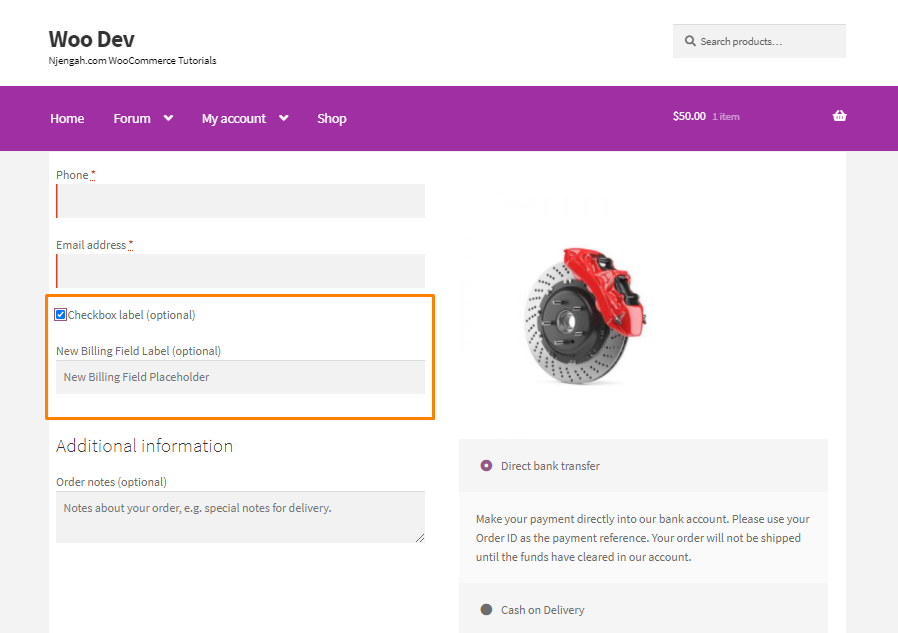
- This is the outcome:
Conclusion
In summary, you have learned how to create a new field on the checkout page using a custom code snippet that I created. The code snippet also allows users to hide or show the field using a checkout box.
In many cases, WooCommerce store owners often use the checkout page as an alternate customer data collection location. Combined with the landing pages and other data collection tactics, store owners can access very high-quality customer data.

Joe is an experienced full-stack web developer with a decade of industry experience in the LAMP & MERN stacks, WordPress, WooCommerce, and JavaScript – (diverse portfolio). He has a passion for creating elegant and user-friendly solutions and thrives in collaborative environments. In his spare time, he enjoys exploring new tech trends, tinkering with new tools, and contributing to open-source projects. You can hire me here for your next project.
Similar Articles
- How to Hide Prices From Google In WooCommerce
- How to Hide the Weight of Product in WooCommerce
- How to Hide Product Description Heading WooCommerce
- How to Limit WordPress Excerpt Length Like a Pro
- How to Add or Remove Icons to WooCommerce Checkout Page
- How to Change Quantity In Checkout WooCommerce
- How to Change WooCommerce Checkout Labels
- How to Add Text Before the Price in WooCommerce » Add Text Before Price
- How to Check If Plugin is Active In WordPress [ 3 WAYS ]
- How to Hide Company Name Field WooCommerce Checkout Page
- How to Remove Cart Page WooCommerce Storefront Theme
- How to Remove the Checkout Button WooCommerce
- How to Remove Additional Information Checkout Page WooCommerce
- How to Add WooCommerce Checkout Email Validation
- How to Customize Storefront Checkout Page
- How to Remove or Disable autop In WordPress Posts & Custom Post Types
- How to Hide Tax On Checkout If Field Value Exists WooCommerce
- How to Hide WooCommerce Products from Search Results
- How to Add Extra Field in WooCommerce Checkout Form
- How to Change WooCommerce Checkout Error Messages