 Many online stores need custom fields on the checkout page. For example, a cake shop might need a delivery date field on the checkout page.
The beauty of WooCommerce is that it allows you to add custom fields on the checkout page, like after billing and shipping fields, or before the place order button.
WooCommerce Add Date Field to Checkout
In this post, you will learn how to add a delivery date field on the WooCommerce checkout page. I will add it after the billing field. This field will allow customers to select the delivery date for their order. Additionally, I will share how you can display the custom field on the email notifications and order received page.
1. Adding the Custom Date Field on the WooCommerce Checkout Page
WooCommerce allows you to add custom fields to various places depending on the hooks you will use. There are many actions defined by WooCommerce on the checkout page. For this tutorial, I will add the field after the billing or shipping address fields.
To add the custom field here, we will use the action woocommerce_after_checkout_billing_form. Add the following code in the functions.php file:
add_action( 'woocommerce_after_checkout_billing_form', 'njengah_extra_fields_after_billing_address' , 10, 1 );

function njengah_extra_fields_after_billing_address () {

            _e( "Delivery Date: ", "add_extra_fields");

            ?>

            <br>

            <input type="text" name="add_delivery_date" class="add_delivery_date" placeholder="Delivery Date">

  <?php

}
This is the outcome:
Customers need to select the delivery date for the order. This means that we need to add a calendar for this field. Alternatively, you can try this with a simple text field to keep it simple.
We will use the jQuery datepicker. This means that we will need to include its necessary JavaScript and CSS files by using the WordPress wp_enqueue_scripts action.
add_action( 'woocommerce_after_checkout_billing_form', 'display_extra_fields_after_billing_address' , 10, 1 );

function display_extra_fields_after_billing_address () {

_e( "Delivery Date: ", "add_extra_fields");

?>

<br>

<input type="text" name="add_delivery_date" class="add_delivery_date" placeholder="Delivery Date">

<script>

jQuery(document).ready(function( $ ) {

$( ".add_delivery_date").datepicker( {

minDate: 0,

} );

} );

</script>

<?php

}

add_action( 'wp_enqueue_scripts', 'enqueue_datepicker' );

function enqueue_datepicker() {

if ( is_checkout() ) {

// Load the datepicker script (pre-registered in WordPress).

wp_enqueue_script( 'jquery-ui-datepicker' );

// You need styling for the date picker. For simplicity, I've linked to Google's hosted jQuery UI CSS.

wp_register_style( 'jquery-ui', '//code.jquery.com/ui/1.11.2/themes/smoothness/jquery-ui.css' );

wp_enqueue_style( 'jquery-ui' );

}

}
This is the outcome: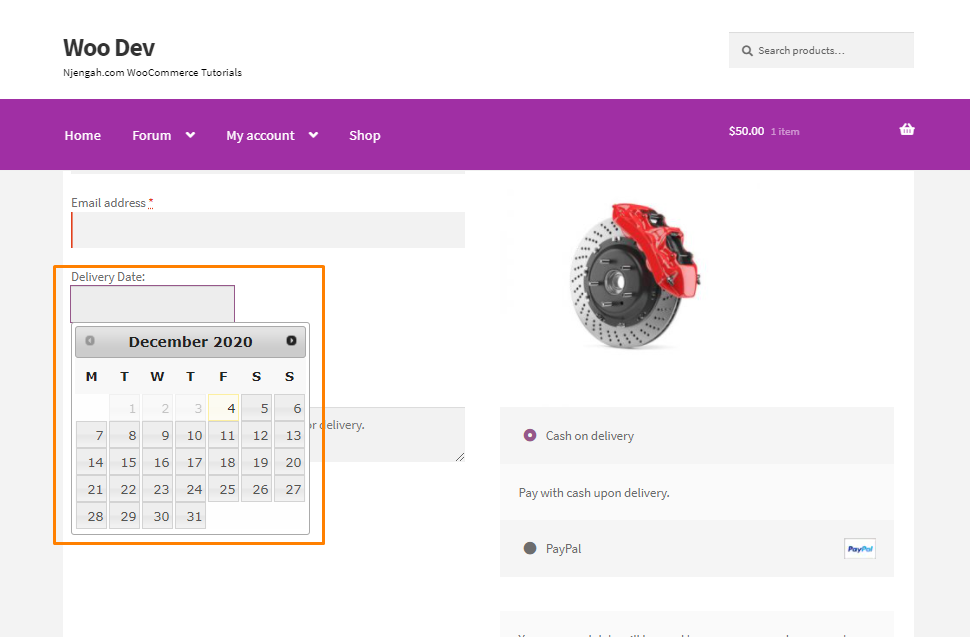
How the Code Works
I have attached the function display_extra_fields_after_billing_address() to the WooCommerce action. First, we print the label “Delivery Date” and add one input text type field for the date picker, which we can use the jquery datepicker() function.
After that, I have attached the enqueue_datepicker() function with WordPress action. In this function, I have added the jQuery datepicker and its style using the wp_enqueue_script().
Once we have added the above code snippet, it will display our custom field below the billing address fields.
2. Displaying the Custom Field in Email Notifications
The next step is to add the custom field to appear on the customer email. Add the following code to the functions.php file:
add_action( 'woocommerce_checkout_update_order_meta', 'add_order_delivery_date_to_order' , 10, 1);

function add_order_delivery_date_to_order ( $order_id ) {

if ( isset( $_POST ['add_delivery_date'] ) &&  '' != $_POST ['add_delivery_date'] ) {

add_post_meta( $order_id, '_delivery_date',  sanitize_text_field( $_POST ['add_delivery_date'] ) );

}

}
How the Code Works
I have attached the add_order_delivery_date_to_order() function to WooCommerce action. It will add the delivery date to the post meta table. It will verify that the customer has selected the date before adding it to the database.
If a customer selects the date, then it is stored in the wp_postmeta table using the WordPress function add_post_meta(). This function requires post_id, meta key & meta value. In our case, we have used Order id as our post_id, meta key will be _delivery_date & meta value will be the Delivery date selected the customer.
I recommend that you sanitize your $_POST variable data. It removes line breaks, tabs, and extra whitespace from the string.
After storing the Delivery date in the database, we will display in the customer email. Add the following code in the functions.php file:
add_filter( 'woocommerce_email_order_meta_fields', 'add_delivery_date_to_emails' , 10, 3 );

function add_delivery_date_to_emails ( $fields, $sent_to_admin, $order ) {

if( version_compare( get_option( 'woocommerce_version' ), '3.0.0', ">=" ) ) {

$order_id = $order->get_id();

} else {

$order_id = $order->id;

}

$delivery_date = get_post_meta( $order_id, '_delivery_date', true );

if ( '' != $delivery_date ) {

$fields[ 'Delivery Date' ] = array(

'label' => __( 'Delivery Date', 'add_extra_fields' ),

'value' => $delivery_date,

);

}

return $fields;

}
3. Displaying the Custom Field on WooCommerce Thank You Page
To display he custom field on the WooCommerce Order Received page, we will use WooCommerce filter woocommerce_order_details_after_order_table. Add the following code in the functions.php file:
add_filter( 'woocommerce_order_details_after_order_table', 'add_delivery_date_to_order_received_page', 10 , 1 );

function add_delivery_date_to_order_received_page ( $order ) {

if( version_compare( get_option( 'woocommerce_version' ), '3.0.0', ">=" ) ) {

$order_id = $order->get_id();

} else {

$order_id = $order->id;

}

$delivery_date = get_post_meta( $order_id, '_delivery_date', true );

if ( '' != $delivery_date ) {

echo '<p><strong>' . __( 'Delivery Date', 'add_extra_fields' ) . ':</strong> ' . $delivery_date;

}

}
This is the outcome: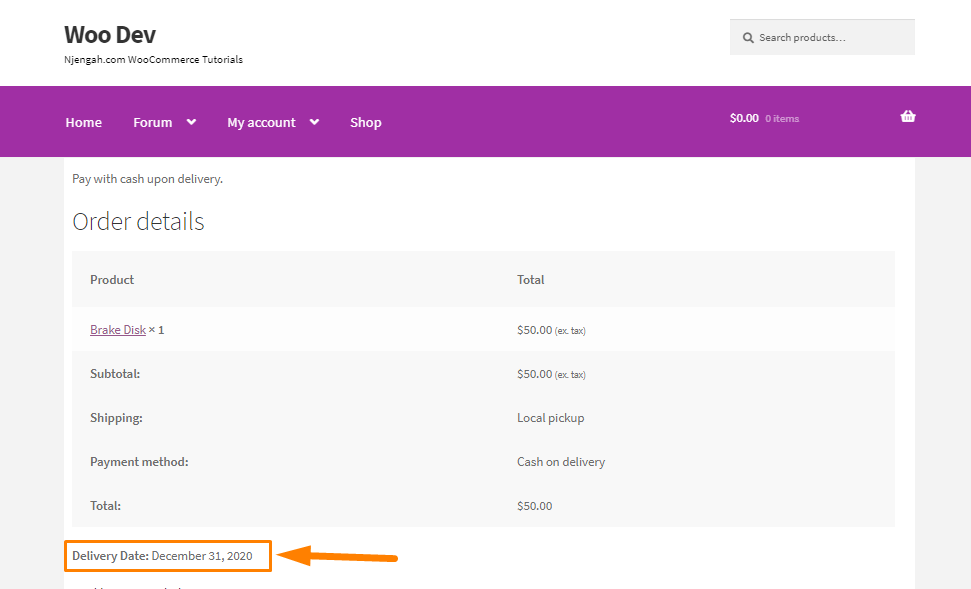
How the Code Works
I have attached add_delivery_date_to_order_received_page() to the WooCommerce filter. This function’s parameter is used to fetch the order id. The order id is needed to fetch the selected delivery date from the wp_postmeta table.
This is the outcome:
Full Code Snippet
In case you had problems following the tutorial, here is the full code snippet. Paste it in the functions.php file:
/*

Plugin Name: Add Fields on WooCommerce checkout page.

Description: A simple demo plugin on how to add extra fields on the WooCommerce checkout page.

*/

add_action( 'woocommerce_after_checkout_billing_form', 'display_extra_fields_after_billing_address' , 10, 1 );

function display_extra_fields_after_billing_address () {

_e( "Delivery Date: ", "add_extra_fields");

?>

<br>

<input type="text" name="add_delivery_date" class="add_delivery_date" placeholder="Delivery Date">

<script>

jQuery(document).ready(function($) {

$(".add_delivery_date").datepicker({

minDate: 0,

});

});

</script>

<?php

}

add_action( 'wp_enqueue_scripts', 'enqueue_datepicker' );

function enqueue_datepicker() {

if ( is_checkout() ) {

// Load the datepicker script (pre-registered in WordPress).

wp_enqueue_script( 'jquery-ui-datepicker' );

// You need styling for the date picker. For simplicity, I've linked to Google's hosted jQuery UI CSS.

wp_register_style( 'jquery-ui', '//code.jquery.com/ui/1.11.2/themes/smoothness/jquery-ui.css' );

wp_enqueue_style( 'jquery-ui' );

}

}

add_action( 'woocommerce_checkout_update_order_meta', 'add_order_delivery_date_to_order' , 10, 1);

function add_order_delivery_date_to_order ( $order_id ) {

if ( isset( $_POST ['add_delivery_date'] ) &&  '' != $_POST ['add_delivery_date'] ) {

add_post_meta( $order_id, '_delivery_date',  sanitize_text_field( $_POST ['add_delivery_date'] ) );

}

}

add_filter( 'woocommerce_email_order_meta_fields', 'add_delivery_date_to_emails' , 10, 3 );

function add_delivery_date_to_emails ( $fields, $sent_to_admin, $order ) {

if( version_compare( get_option( 'woocommerce_version' ), '3.0.0', ">=" ) ) {

$order_id = $order->get_id();

} else {

$order_id = $order->id;

}

$delivery_date = get_post_meta( $order_id, '_delivery_date', true );

if ( '' != $delivery_date ) {

$fields[ 'Delivery Date' ] = array(

'label' => __( 'Delivery Date', 'add_extra_fields' ),

'value' => $delivery_date,

);

}

return $fields;

}

add_filter( 'woocommerce_order_details_after_order_table', 'add_delivery_date_to_order_received_page', 10 , 1 );

function add_delivery_date_to_order_received_page ( $order ) {

if( version_compare( get_option( 'woocommerce_version' ), '3.0.0', ">=" ) ) {

$order_id = $order->get_id();

} else {

$order_id = $order->id;

}

$delivery_date = get_post_meta( $order_id, '_delivery_date', true );

if ( '' != $delivery_date ) {

echo '<p><strong>' . __( 'Delivery Date', 'add_extra_fields' ) . ':</strong> ' . $delivery_date;

}

}
That’s it!
Conclusion
In summary, you have learned how to add a custom date field to the checkout, display it in the email notifications, and display it on the thank you page. However, if you are not familiar with editing code, you can use a checkout customizer plugin. I recommend using a child theme so that your changes are not lost during an update.

Joe is an experienced full-stack web developer with a decade of industry experience in the LAMP & MERN stacks, WordPress, WooCommerce, and JavaScript – (diverse portfolio). He has a passion for creating elegant and user-friendly solutions and thrives in collaborative environments. In his spare time, he enjoys exploring new tech trends, tinkering with new tools, and contributing to open-source projects. You can hire me here for your next project.
Similar Articles
- How to Add Select Field to Checkout WooCommerc
- How to Set Up WooCommerce Checkout Field Placeholder
- How to Hide Products Without Price in WooCommerce
- How to Hide Products Without Image In WooCommerce
- How to Hide Any Tab My Account Page WooCommerce
- How to Hide Update Cart Button WooCommerce Cart Page
- How to Hide Quantity In Stock In WooCommerce
- How to Create Account at Checkout WooCommerce
- How to Edit Required WooCommerce Checkout Fields
- How to Create WooCommerce Conditional Checkout Fields
- How to Edit WooCommerce Checkout Page Template
- How to Add WooCommerce VAT Number Checkout Page
- How to Add Hidden Field on WooCommerce Checkout Page
- How to Move Primary Menu Storefront WooCommerce
- How to Hide Shipping Rates if Free Shipping Available WooCommerce
- How to Add WooCommerce Invoice Checkout Page
- How to Add Extra Field in WooCommerce Checkout Form
- How to Add WooCommerce Checkout Default Country
- How to Hide Product Description Heading WooCommerce