 WooCommerce product sorting is an important function as it forms part of the user experience. Users can sort products in a preferred order to pick the right product quickly and go ahead with the transaction.you can sort products using the default sorting options. Still, you can create custom WooCommerce product sorting options that are implemented using hooks.
WooCommerce Storefront Sorting Options
Moreover, sorting and displaying the product catalog by custom fields or other post meta values greatly helps the customers browse your WooCommerce store. They help to sort your inventory so that customers could discover products that were not visible to them before.
This tutorial will share how you can remove, rename, and add sorting options on the Shop Page.
These are the built-in sorting options available for WooCommerce Storefront: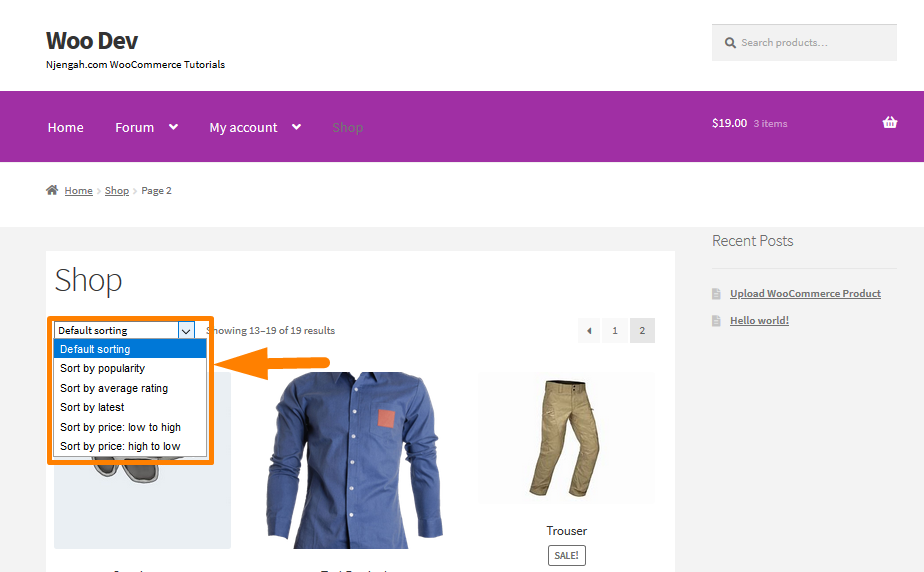
Steps to Remove a Sorting Option on the WooCommerce Shop Page
Here are the steps that you need to follow:
- Log into your WordPress site and access the Dashboard as the admin user.
- From the Dashboard menu, click on Appearance Menu > Theme Editor Menu. When the Theme Editor page is opened, look for the theme functions file to remove a sorting option on the WooCommerce Shop Page.
- Add the following code to the functions.php file of the Storefront theme.
/**

*   Remove Sorting Option @ WooCommerce Shop

*/

add_filter( 'woocommerce_catalog_orderby', 'njengah_remove_sorting_option_woocommerce_shop' );

function njengah_remove_sorting_option_woocommerce_shop( $options ) {

   unset( $options['rating'] );

   return $options;

}

// Note: you can unset other sorting options by adding more "unset" calls... here's the list: 'menu_order', 'popularity', 'rating', 'date', 'price', 'price-desc'
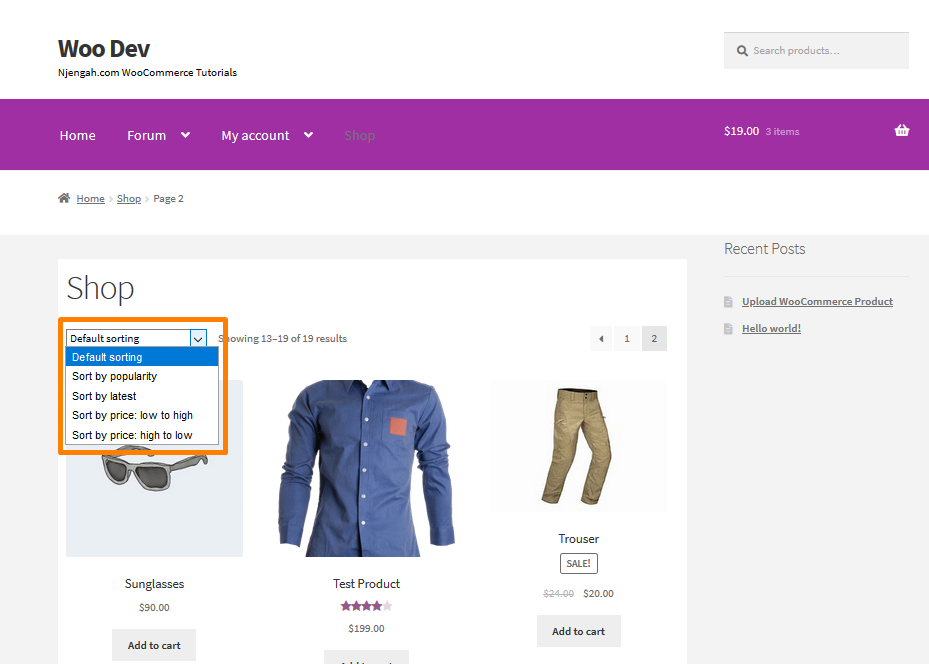
- This is the outcome:
Steps to Rename a Sorting Option on the WooCommerce Storefront Shop Page
Here are the steps that you need to follow:
- Log into your WordPress site and access the Dashboard as the admin user.
- From the Dashboard menu, click on Appearance Menu > Theme Editor Menu. When the Theme Editor page is opened, look for the theme functions file to rename a sorting option on the WooCommerce Shop Page.
- Add the following code to the functions,php file of the Storefront theme.
/**

*      Rename a Sorting Option @ WooCommerce Shop

*/

add_filter( 'woocommerce_catalog_orderby', 'njengah_rename_sorting_option_woocommerce_shop' );

function njengah_rename_sorting_option_woocommerce_shop( $options ) {

$options['price'] = 'Sort by price (asc)';

return $options;

}
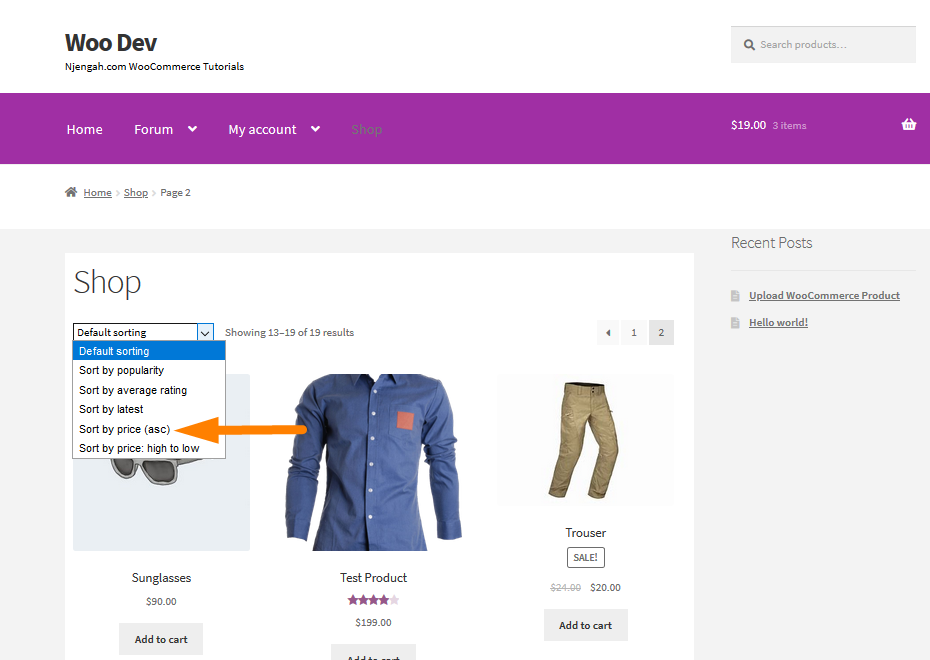
- This is the outcome:
Steps to Add a Custom Sorting Option on the WooCommerce Shop Page
Here are the steps that you need to follow:
- Log into your WordPress site and access the Dashboard as the admin user.
- From the Dashboard menu, click on Appearance Menu > Theme Editor Menu. When the Theme Editor page is opened, look for the theme functions file to add a custom sorting option on the WooCommerce Shop Page.
- Add the following code to the functions.php file of the Storefront theme.
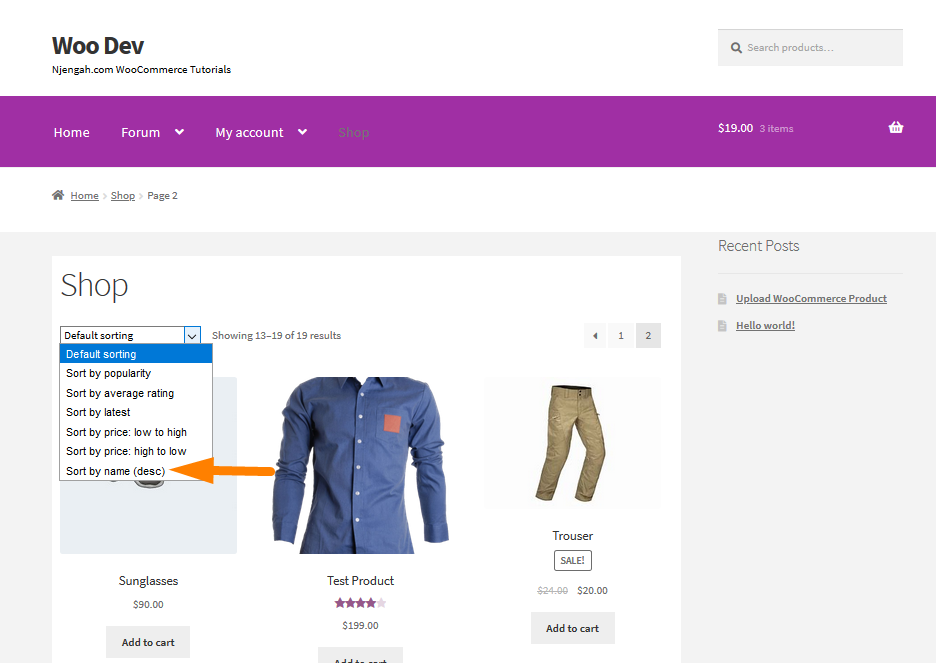
-
/**

*       Add a Custom Sorting Option @ WooCommerce Shop

*/

// 1. Create new product sorting rule

add_filter( 'woocommerce_get_catalog_ordering_args', 'njengah_sort_by_name_woocommerce_shop' );

function njengah_sort_by_name_woocommerce_shop( $args ) {

$orderby_value = isset( $_GET['orderby'] ) ? wc_clean( $_GET['orderby'] ) : apply_filters( 'woocommerce_default_catalog_orderby', get_option( 'woocommerce_default_catalog_orderby' ) );

if ( 'name' == $orderby_value ) {

$args['orderby'] = 'title';

$args['order'] = 'DESC';

}

return $args;

}

// 2. Add new product sorting option to Sorting dropdown

add_filter( 'woocommerce_catalog_orderby', 'njengah_load_custom_woocommerce_catalog_sorting' );

function njengah_load_custom_woocommerce_catalog_sorting( $options ) {

$options['name'] = 'Sort by name (desc)';

return $options;

}
This is the outcome:
Conclusion
In summary, I have shared how to remove, rename, and add a custom shipping option. Moreover, I have highlighted that WooCommerce product sort and display come in two flavors: Default and Custom. It is also important to note that product sorting options greatly helps the customers browsing your WooCommerce store. These options help sort your inventory so that customers could discover products that were not visible to them before.
Similar Articles
- How to Change Storefront Theme Product Page Tabs Colors
- How to Count Items Added to Cart WooCommerce Cart Count Code
- How to Reorder Categories Shop Page WooCommerce Storefront Theme
- How to Add GTIN Numbers On Products In WooCommerce
- How to Hide a Product in WooCommerce or Hide Products by Category or Roles
- How to Add Categories to WooCommerce Products
- How to Remove Breadcrumbs WooCommerce Storefront
- How to Turn off Next Product Tabs In WooCommerce Storefront
- How to Change Storefront Number of Products Per Row
- How to Change Storefront Theme Order of Products
- How to Hide Mobile Footer From Storefront WooCommerce
- How to Remove Related Products WooCommerce Storefront Theme
- How to Hide Tags In Storefront Theme WooCommerce
- How to Remove or Rename Sale Badge WooCommerce Storefront
- How to Setup Storefront Stock Quantity & Manage Inventory
- How to Change Products per Page WooCommerce Storefront Theme
- How to Remove Cart from Storefront Theme Header
- How to Remove Cart Page WooCommerce Storefront Theme
- How to Add Custom Order Status in WooCommerce