
Are you looking for a way to programmatically separate the Login and Registration pages? This brief tutorial will provide an easy solution for you.
You may want to send logged-out customers to a Login page and unregistered customers to a separate page.
By default, WooCommerce displays the login form and the registration form on the same page.
It is worth mentioning that the WooCommerce My Account page is displayed by the [woocommerce_my_account] shortcode.
Having both the Login and Registration forms on the same page might not be a good idea if you want to use landing pages or sales pages with a specific goal like user registration.
This means that the login form is not required on this page.
How to Create Separate Login and Registration Pages in WooCommerce
In this brief tutorial, we will show you how to separate the login and registration pages.
We will show you how to create two new shortcodes, one for the login form and one for the registration form. These shortcodes can be used anywhere on your site.
Let us see how you can achieve this.
Steps to Create Separate Login and Registration Pages in WooCommerce
Before you proceed, it is important to note that the content used to create the shortcode is copied from WooCommerce template files.
This means that when WooCommerce releases any changes on these files during an update, you need to change some parts of the code.
Read on, as we will also show you how to use the shortcodes.
Here are the steps you need to follow:
- Log into your WordPress site and access the Dashboard as the admin user.
- From the Dashboard menu, click on Appearance Menu > Theme Editor Menu. When the Theme Editor page is opened, look for the theme functions file where we will add the function that will create the registration page shortcode.
- Add the following code to the PHP file:
add_shortcode( 'wc_reg_form_njengah', 'njengah_separate_registration_form' );

function njengah_separate_registration_form() {

if ( is_admin() ) return;

if ( is_user_logged_in() ) return;

ob_start();

// NOTE: THE FOLLOWING <FORM></FORM> IS COPIED FROM woocommerce\templates\myaccount\form-login.php

// IF WOOCOMMERCE RELEASES AN UPDATE TO THAT TEMPLATE, YOU MUST CHANGE THIS ACCORDINGLY

do_action( 'woocommerce_before_customer_login_form' );

?>

<form method="post" class="woocommerce-form woocommerce-form-register register" <?php do_action( 'woocommerce_register_form_tag' ); ?> >

<?php do_action( 'woocommerce_register_form_start' ); ?>

<?php if ( 'no' === get_option( 'woocommerce_registration_generate_username' ) ) : ?>

<p class="woocommerce-form-row woocommerce-form-row--wide form-row form-row-wide">

<label for="reg_username"><?php esc_html_e( 'Username', 'woocommerce' ); ?> <span class="required">*</span></label>

<input type="text" class="woocommerce-Input woocommerce-Input--text input-text" name="username" id="reg_username" autocomplete="username" value="<?php echo ( ! empty( $_POST['username'] ) ) ? esc_attr( wp_unslash( $_POST['username'] ) ) : ''; ?>" /><?php // @codingStandardsIgnoreLine ?>

</p>

<?php endif; ?>

<p class="woocommerce-form-row woocommerce-form-row--wide form-row form-row-wide">

<label for="reg_email"><?php esc_html_e( 'Email address', 'woocommerce' ); ?> <span class="required">*</span></label>

<input type="email" class="woocommerce-Input woocommerce-Input--text input-text" name="email" id="reg_email" autocomplete="email" value="<?php echo ( ! empty( $_POST['email'] ) ) ? esc_attr( wp_unslash( $_POST['email'] ) ) : ''; ?>" /><?php // @codingStandardsIgnoreLine ?>

</p>

<?php if ( 'no' === get_option( 'woocommerce_registration_generate_password' ) ) : ?>

<p class="woocommerce-form-row woocommerce-form-row--wide form-row form-row-wide">

<label for="reg_password"><?php esc_html_e( 'Password', 'woocommerce' ); ?> <span class="required">*</span></label>

<input type="password" class="woocommerce-Input woocommerce-Input--text input-text" name="password" id="reg_password" autocomplete="new-password" />

</p>

<?php else : ?>

<p><?php esc_html_e( 'A password will be sent to your email address.', 'woocommerce' ); ?></p>

<?php endif; ?>

<?php do_action( 'woocommerce_register_form' ); ?>

<p class="woocommerce-FormRow form-row">

<?php wp_nonce_field( 'woocommerce-register', 'woocommerce-register-nonce' ); ?>

<button type="submit" class="woocommerce-Button woocommerce-button button woocommerce-form-register__submit" name="register" value="<?php esc_attr_e( 'Register', 'woocommerce' ); ?>"><?php esc_html_e( 'Register', 'woocommerce' ); ?></button>

</p>

<?php do_action( 'woocommerce_register_form_end' ); ?>

</form>

<?php

return ob_get_clean();

}
[/php]
-
The second shortcode is the [wc_login_form_bbloomer]. You should add it to a brand new page. Add the following code in the same file:
[php]
add_shortcode( 'wc_login_form_njengah', 'njengah_separate_login_form' );

function njengah_separate_login_form() {

if ( is_admin() ) return;

if ( is_user_logged_in() ) return;

ob_start();

woocommerce_login_form( array( 'redirect' => 'https://custom.url' ) );

return ob_get_clean();

}
How to Use the Shortcodes
As mentioned earlier, the [woocommerce_my_account] shortcode displays the My Account page. If you want to keep the login form and the account page dashboard while logged in on the same page, you should use the first shortcode: [woocommerce_my_account].
If you want to have login + my account, and a separate registration page:
- [wc_reg_form_njengah] on the Register Page
- [woocommerce_my_account] on the Login + Account Page
If you want to have separate login, registration, and account pages:
- wc_reg_form_njengah] on the Register Page
- [wc_login_form_njengah] On the Login Page
- [woocommerce_my_njengah ] on the My Account Page
However, you need to disable “Allow customers to create an account”, as shown below: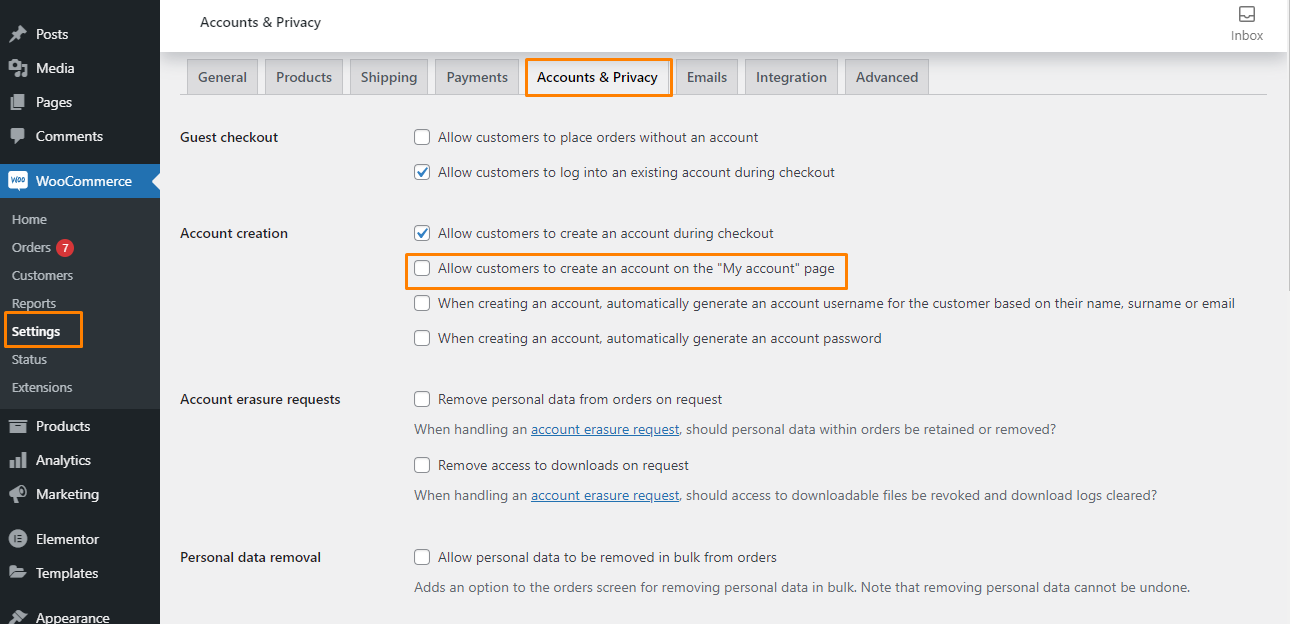
Conclusion
That’s all you need to do to separate the login and registration pages. Remember to copy and paste the shortcode on a new page.
We recommend creating a child theme. This will ensure that your changes are not lost during an update.
We hope that this post helped to solve your problem.

Joe is an experienced full-stack web developer with a decade of industry experience in the LAMP & MERN stacks, WordPress, WooCommerce, and JavaScript – (diverse portfolio). He has a passion for creating elegant and user-friendly solutions and thrives in collaborative environments. In his spare time, he enjoys exploring new tech trends, tinkering with new tools, and contributing to open-source projects. You can hire me here for your next project.
Similar Articles
- How to Add WooCommerce My Account Page Redirect
- How to Redirect to Cart after Login in WooCommerce
- How to Clear Cart on Logout In WooCommerce
- How to Hide Dashboard on the My Account Page WooCommerce
- How to Hide Any Tab My Account Page WooCommerce
- How to Remove Downloads Menu My Account Page WooCommerce
- How to Get Payment Methods in WooCommerce » Code Example
- How to Attach PDF Invoice to Email WooCommerce
- How to Access WooCommerce Database
- How to Change Email Sender In WooCommerce
- How to Export Products In WooCommerce
- How to Create WooCommerce Login Logout Shortcode
- How to Create WooCommerce Redirect After Checkout Per Product
- 30 Best WordPress Security Plugins to Protect Your Site
- How to Add Social Login In WooCommerce Social Login
- How to Add Fields in WooCommerce Registration Form
- How to Login to WooCommerce Admin
- How to Redirect Users after Successful Login in WordPress without Using a Plugin
- How to Create My Account Page In WooCommerce
- How to Access WordPress Admin Dashboard or log in to your WordPress Dashboard