 When you are installing WooCommerce Mpesa payment gateway, you need to access Mpesa web portal to apply Mpesa certificate. If you try to access the Mpesa web portal – Safaricom’s MPesa organization portal, one is required to have an M-PESA digital certificate installed on the computer they are using.
The Mpesa web portal https://org.ke.m-pesa.com/ portal is certificate-based to identify you as a valid entity. This post will guide you on how to apply and install the Mpesa digital certificate on your computer.
However, it is important to note that if you want to login to the MPesa web portal from a different computer at any time, you will need to register for a separate Mpesa digital certificate installed on that PC. Nevertheless, this comprehensive tutorial will show you how to do that.
Additionally, this portal is currently accessible on Internet Explorer, Google Chrome, or Safari browsers. Moreover, this certificate can ONLY be applied and installed on the Windows operating system.
- If you are having a problem with WooCommerce or WordPress Mpesa integration, you should not waste time trying to figure out what is wrong since I offer expert advice and quick help.
- With more than 100+ & Counting++++; WooCommerce WordPress, PHP and Python Django Mpesa integration projects completed, I don’t bring guess work to your project, but a wealth of experience and speedy resolution to your current stalemate.
- I also do not charge a fortune for this service but rather make it affordable for everyone since every one deserves a fairly priced service and stellar results.
- I have build Mpesa integration custom plugins for several businesses and continue to build both Free and Premium versions of these plugins to make it easy for everyone to use Mpesa payment on the web.
- I work with both developers as well as store owners who want to get the Mpesa integration done for a budget or custom to advanced Mpesa integration solutions that work for any type of business – travel, food, tickets etc.
- If you would like to ask me anything about Mpesa integration , please feel free to Contact Me.
Mpesa Web Portal Access
If you try to access the portal, you will be required to provide a secure connection as shown below: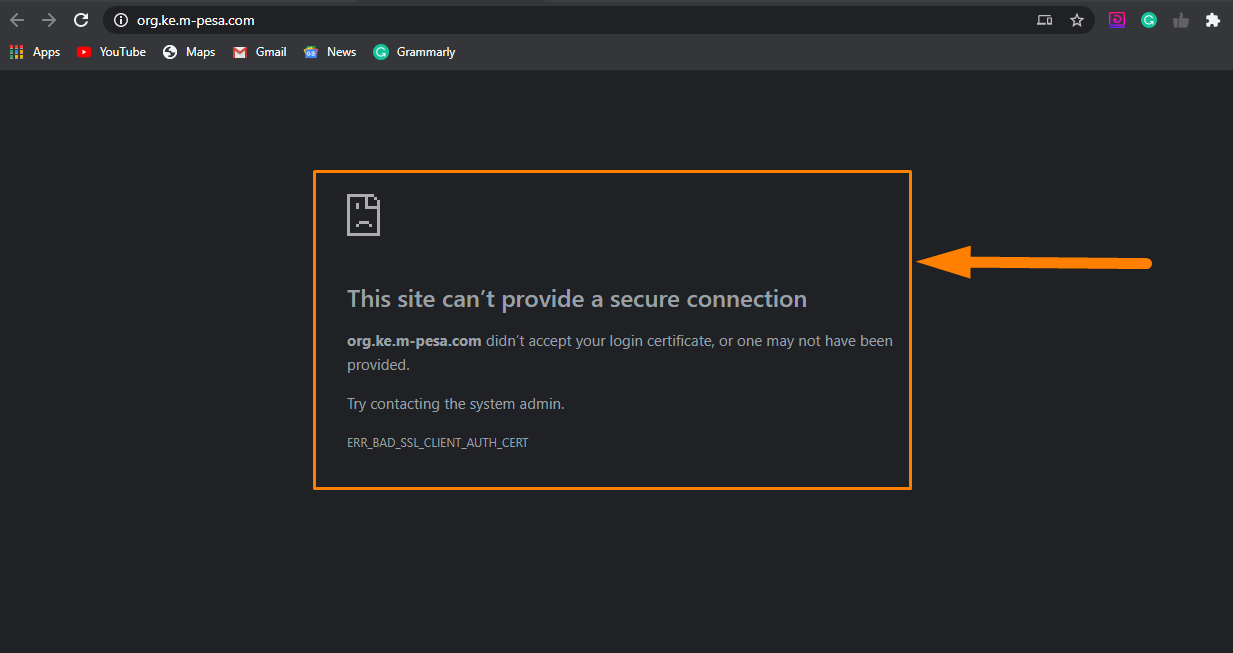
This certificate is valid for 2 years from the time it has been installed unless the computer has been formatted. You do not have to worry about any costs, as the certificate application and installation if free and not charged.
Until the MPesa certificate is installed in your Windows PC, you will receive the error prompt when you try to access the MPesa web portal. It is also worth mentioning that you can install Mpesa certificate on many machines as possible.
Steps to Apply for MPesa Certificate
 Without wasting much time, here are the steps that you need to follow, to apply for a digital MPesa certificate:
Step 1: You need to send a blank email to M-PESACertpassword@safaricom.co.ke
Step 2: In about 5-10 minutes, you will receive an email. This email will contain a username and password that you will use.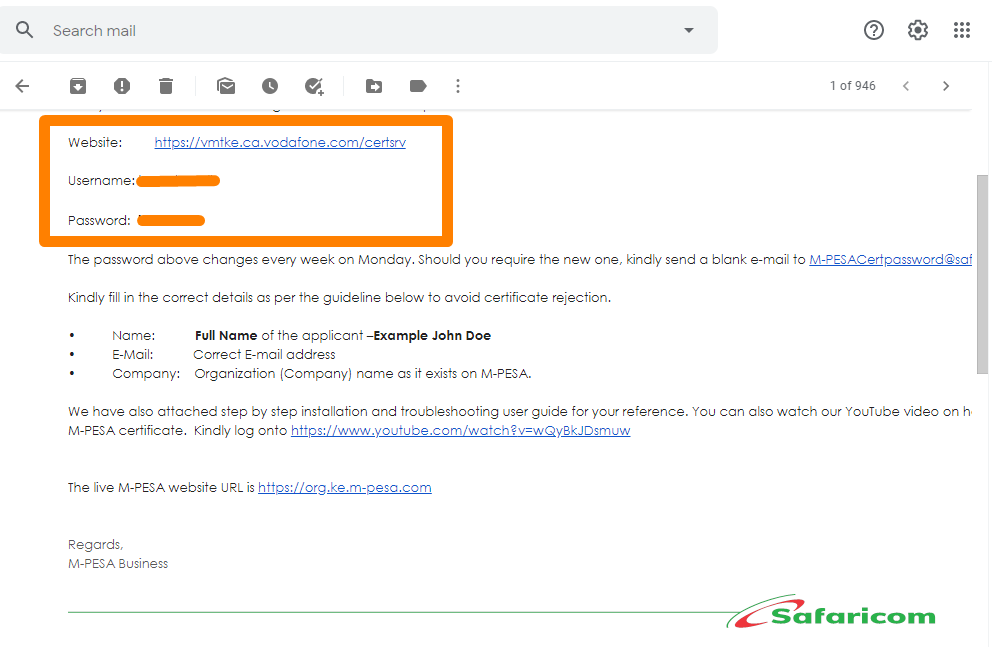
Step 3: Then you need to open https://vmtke.ca.vodafone.com/certsrv using the Internet Explorer browser. The M-Pesa portal uses Visual Basic on the back-end, which is not supported by any other browser. This means that if you use any other browser, it will return an error message.
Step 4: After accessing the Mpesa web portal a pop-up requesting for a username and password input will appear as shown below: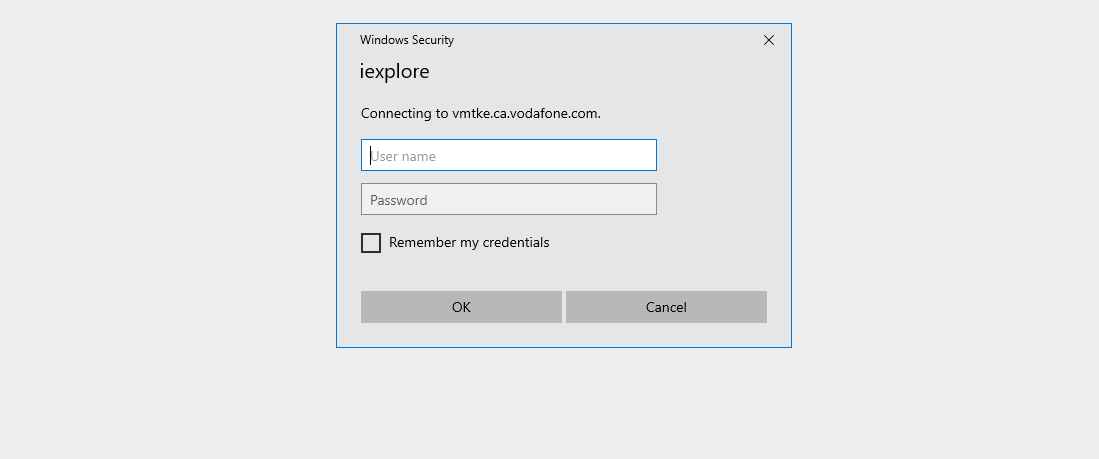
Step 5: You need to enter the credentials sent to your email. It is also worth mentioning that the password is reset every week on Monday for security purposes. However, if you canceled the first username and password request, subsequent requests will automatically cancel. This means that you have to clear cookies and restart your Internet Explorer browser, and then try again.
Step 6: Then fill in the requested details, and then click on ‘Submit’.
Step 7: However, if you receive an error message, then it could be as a result of browser compatibility issues or blocked elements from the site. Nevertheless, here are some simple steps to fix the problem.
Step 8: Go to Tools > Compatibility View Settings. Then add the site ‘vodafone.com’ to the ‘Compatibility View’ list as shown below: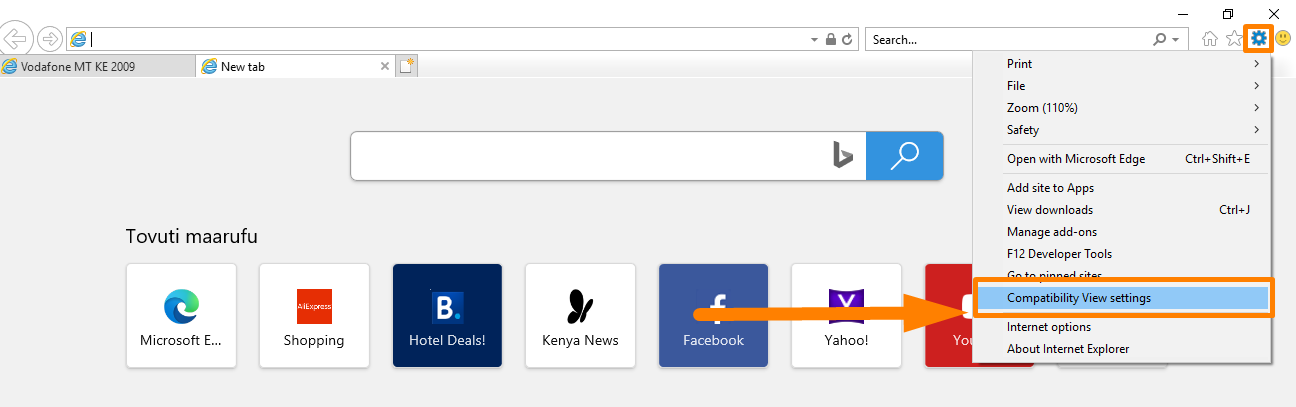
Then

Step 9: Go to Tools > Internet Options > Advanced. Then under the ‘Settings’, look for the options ‘Use SSL 3.0’, ‘Use TLS 1.0’, ‘Use TLS 1.1’ and ‘Use TLS 1.2’, then check them all as shown below: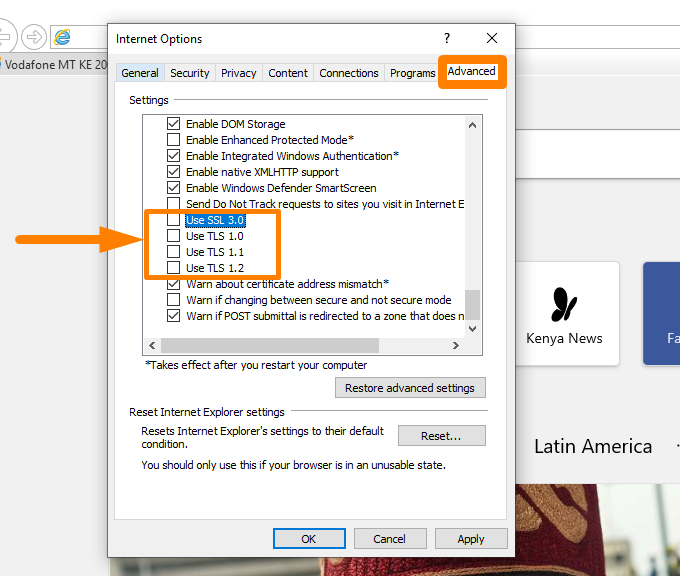
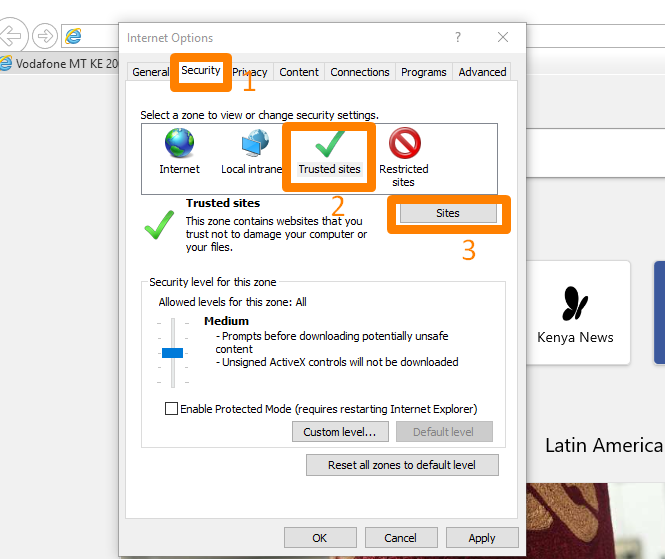
Step 10: Go to Tools > Internet Options > Security then click on ‘Trusted Sites’ zone, under it click on ‘Sites’ and add the site ‘https://vmtke.ca.vodafone.com’ to the zone list, then click on ‘OK’. Still under ‘Trusted Sites’, click on ‘Default Level’ to reset the security level defaults and show the levels slider, then set the Security level to Low on the slider as shown below:
Then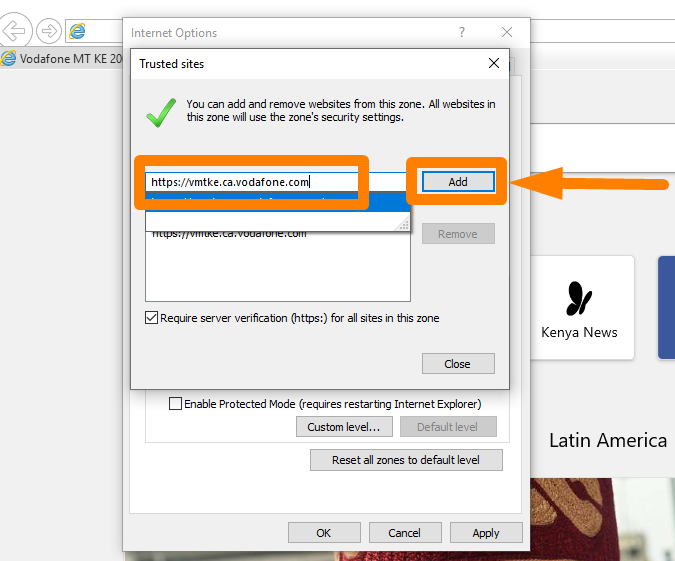
Step 11: After completing the steps, you need to restart or reopen your Internet Explorer browser and try submitting the details again.
Step 12: After successfully logging in, the first step is to ensure that the certificate web site is added in the compatibility view settings. This can be accessed via Tools > Compatibility View > Compatibility View Settings.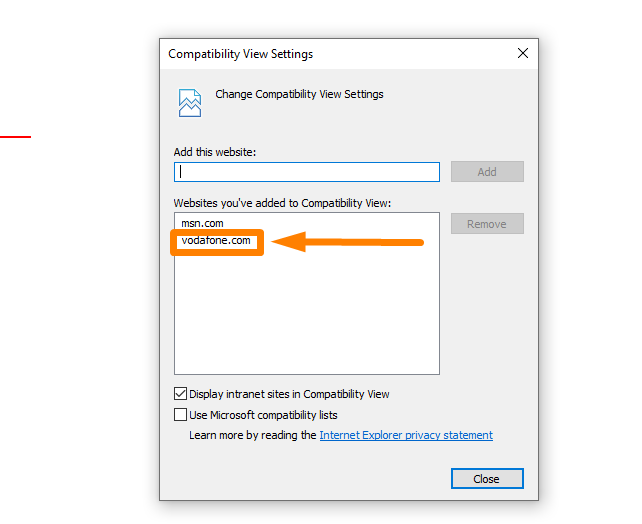
Step 13: A dialog pop up window will appear, and you need to add the site ‘vodafone.com’ and click on ‘Close’.
Step 14: After that, you will then be directed to the homepage of the Managed Services, Vodafone MT Certificate Authority.
Step 15: Click on ‘Yes’
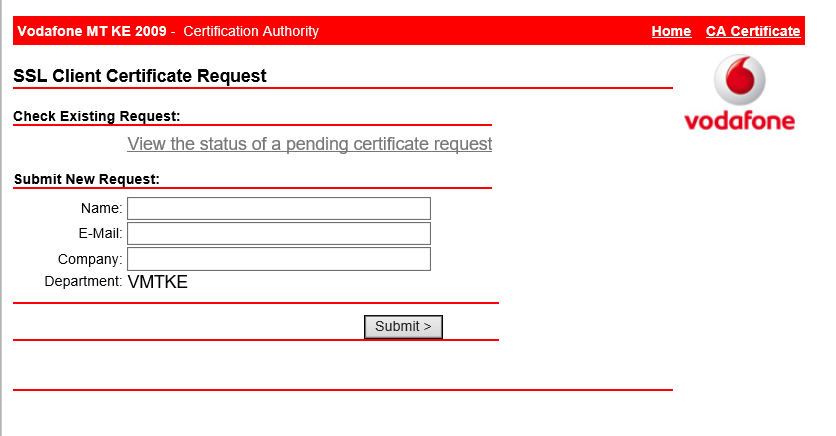
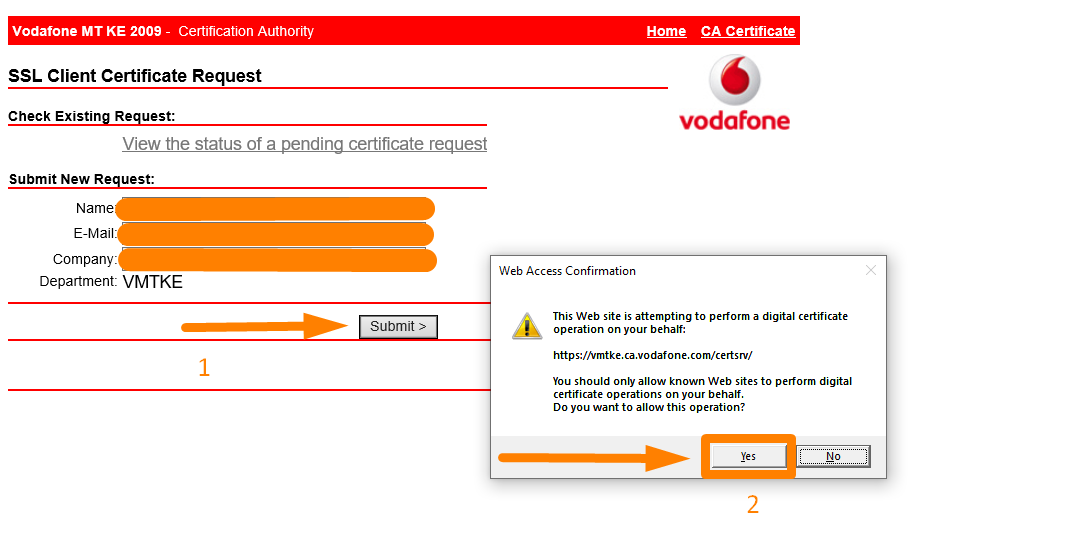
Step 16: Then you need to request a new certificate by filling in the details requested. However, it is important to note that your certificate application shall be denied if you fill incorrect or invalid details like a single name, invalid email, or incorrect organization name. Ignore the department do not change it. Just leave it as ‘VMTKE’. These details will be used to verify that you should be given access to the system.
Step 17: After submitting, a warning prompt will appear asking you to confirm that you want to proceed with the request for a certificate. Click on ‘Yes’ as shown below:
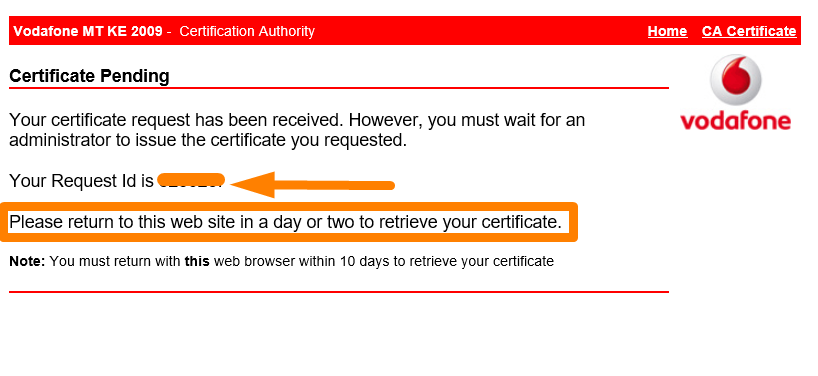
Step 18: After doing that, you will be presented with a notification confirming that your certificate application has been received. The message will also have your ‘Request ID’
Step 19: This usually takes 24 – 48 hours for your certificate to be issued to you by M-Pesa.
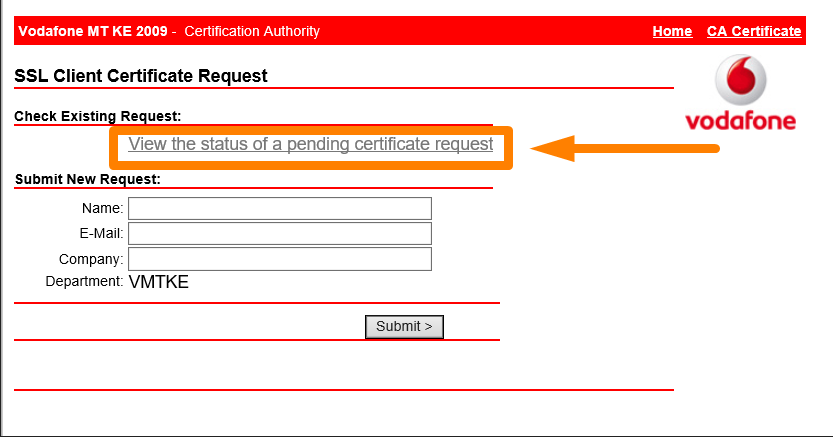
Step 20: To view the details you can go back to the same site and click on the View the status of a pending certificate request link to view pending requests.
Step 21: After your request has been processed, you will get a download or install link for your certificate.
Step 22: Download the certificate to install on any supported browser that is mentioned above.
However, if you are having trouble with the login, here is a detailed guide to troubleshooting.
Procedure to Troubleshoot
Here are the steps that you need to follow:
Step 1: If you are having trouble login to the site using the default account, select ‘Use another account’ and type the login credentials.
Step 2: You need to ensure that the date and time settings on your computer are correct.
Step 3: Do not check the ‘Remember my credentials’ option as the password changes weekly.
Step 4: Try to type in the password. If the password has special characters like #$%@, be keen to confirm on your keyboard.
Step 5: However, if you are copy-pasting, be keen to ensure you do not copy a space after the password, which will amount to an extra character.
Step 6: Additionally, if you input the wrong password severally, it will time out and you get ‘You are not authorized to view this page’ error. If this occurs, just reload the page and retry again.
Step 7: If you have tried all the steps above and you still cannot log in, you could have selected the ‘Remember my credentials’. This means that it is remembering the wrong password.
Step 8: To resolve the issue, click Start > Control Panel > Credential Manager > Credential Manager> Windows Credentials. The Vodafone website will be listed under the Windows Credentials category.
Step 9: To remove the saved password, click on it to expand, and then click on ‘Remove from Vault’ to delete the saved password.
Step 10: After that, try to log on again.
Additionally, you need to note the following:
- It is required that you do not delete browsing history, cookies, cache, or Reset your internet explorer settings after this application. This will delete the certificate application and you will be forced to repeat the process. However, it is okay to close the browser or even shut down the computer once done with the application.
- Moreover, you should ensure that you check back on the status of this certificate application and finish installing it within 10 days. Otherwise, the certificate will expire and automatically disappear, forcing you to repeat the application process.
- Additionally, you should remember to request for the latest password for the week in case your application and installation fall on two different weeks.
After 24-48 hours, you need to install the Mpesa digital certificate onto your computer.
Steps to Install the MPesa Digital Certificate
Step 1: After the waiting period is over, you will be required to return to the certificate request website https://vmtke.ca.vodafone.com/certsrv. This is done to check if the certificate has been issued.
Step 2: You need to fill in the login details required to access the Certificate Authority website.
Step 3: After that, send a blank email to M-PESACertpassword@safaricom.co.ke to get the username and password.
Step 4: After a few minutes, you will receive an email, with a username and password as shown below:
Step 5: After logging in successfully, you will then be directed to the home page of the Managed Services, Vodafone MT Certificate Authority as shown:
Step 6: Then, under the heading ‘Check Existing Request’, you need to click on the link titled ‘View the status of a pending Mpesa digital certificate request’ as shown:
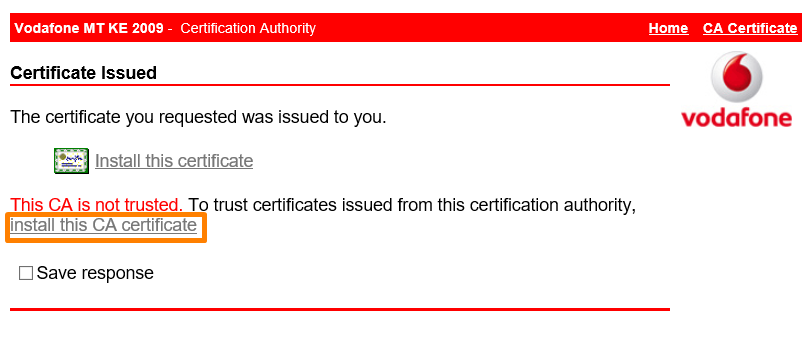
Step 7: This will open a new page with the issued certificate. However, if the certificate has not been issued, you will see a message titled ‘Certificate Pending, but if it is there, you should see this: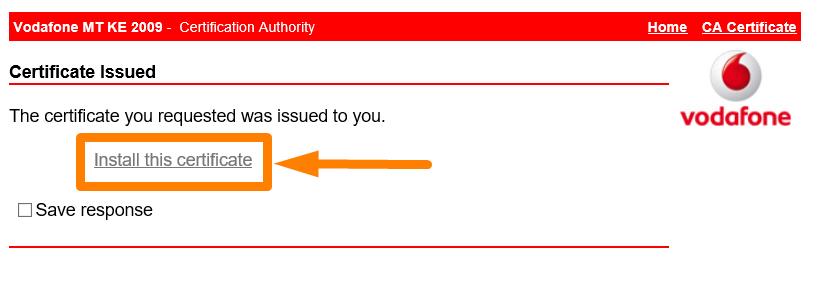
Step 8: On this page, you will be given an option to install the certificate. To install it, click on the link titled ‘Install this certificate’. If you are using the Internet Explorer browser, you can install the certificate directly, but for other browsers, you will need to download the certificate to install it.
Step 9: This will trigger a popup named ‘Web Access Confirmation’ warning will appear asking you to confirm the operation. You need to click on ‘Yes’ to allow the site to perform digital certificate operations on your behalf.
Step 10: After that, click on ‘Install this CA certificate’ as shown below:
Step 11: After installing, it will prompt you to open or save the file. Click on ‘ Open’ in the prompt as shown below: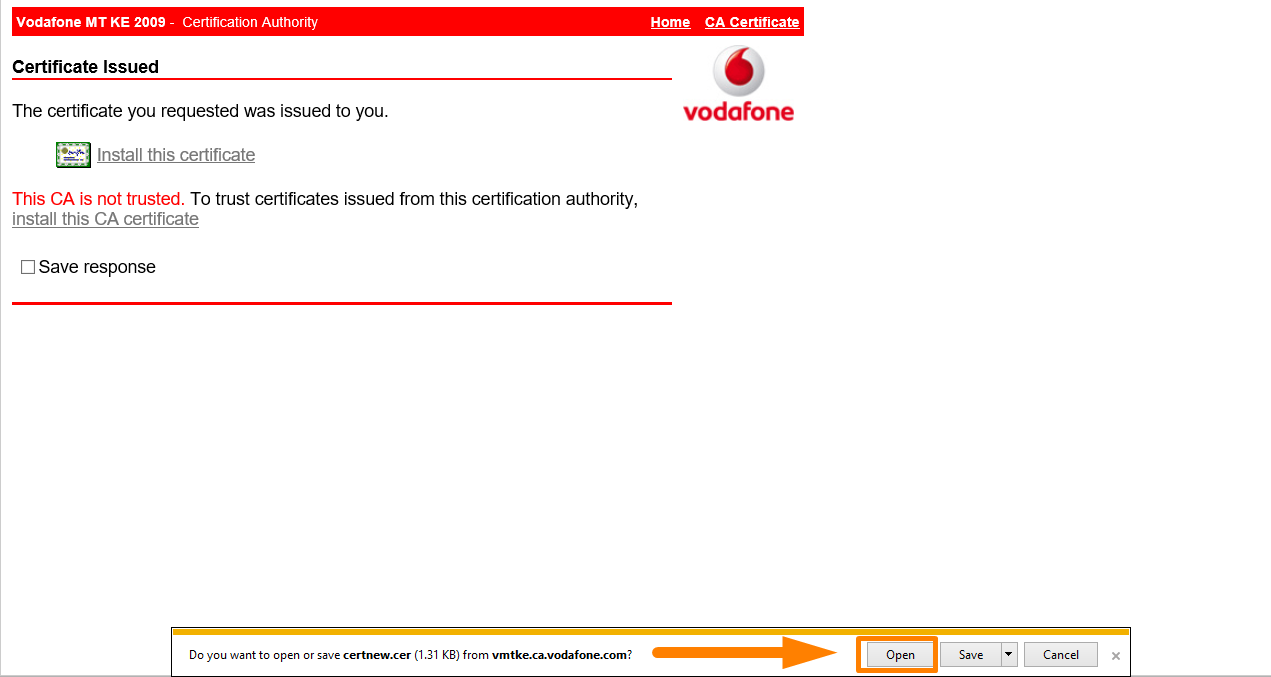
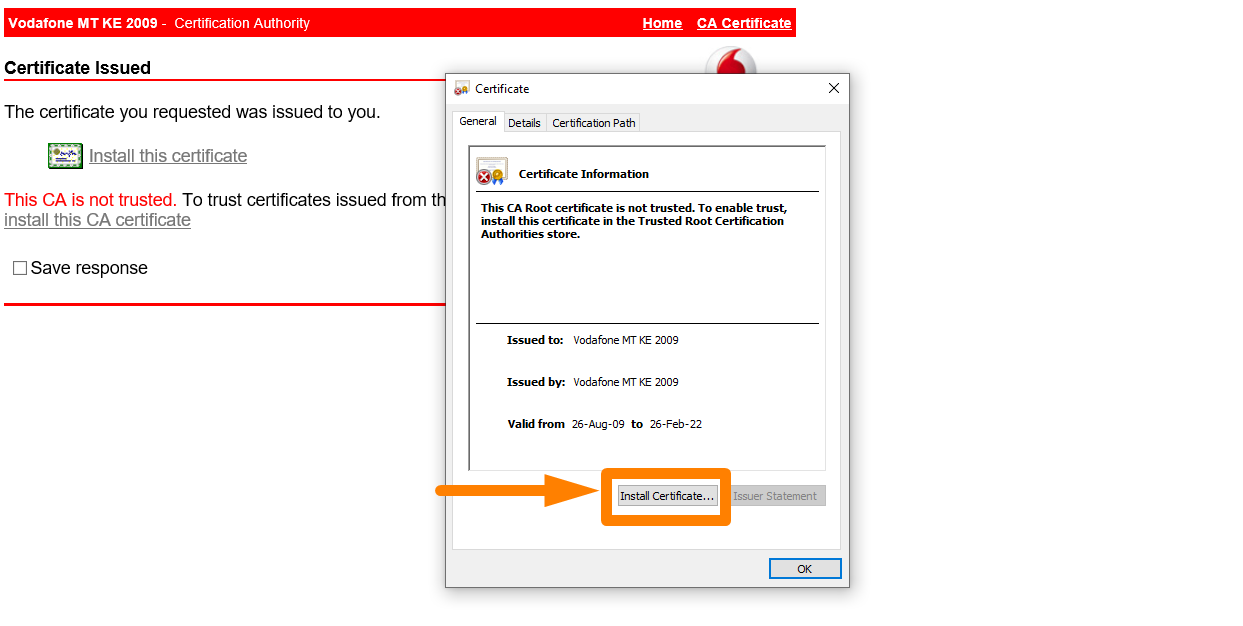
Step 12: After it has opened, select the ‘Install Certificate’.
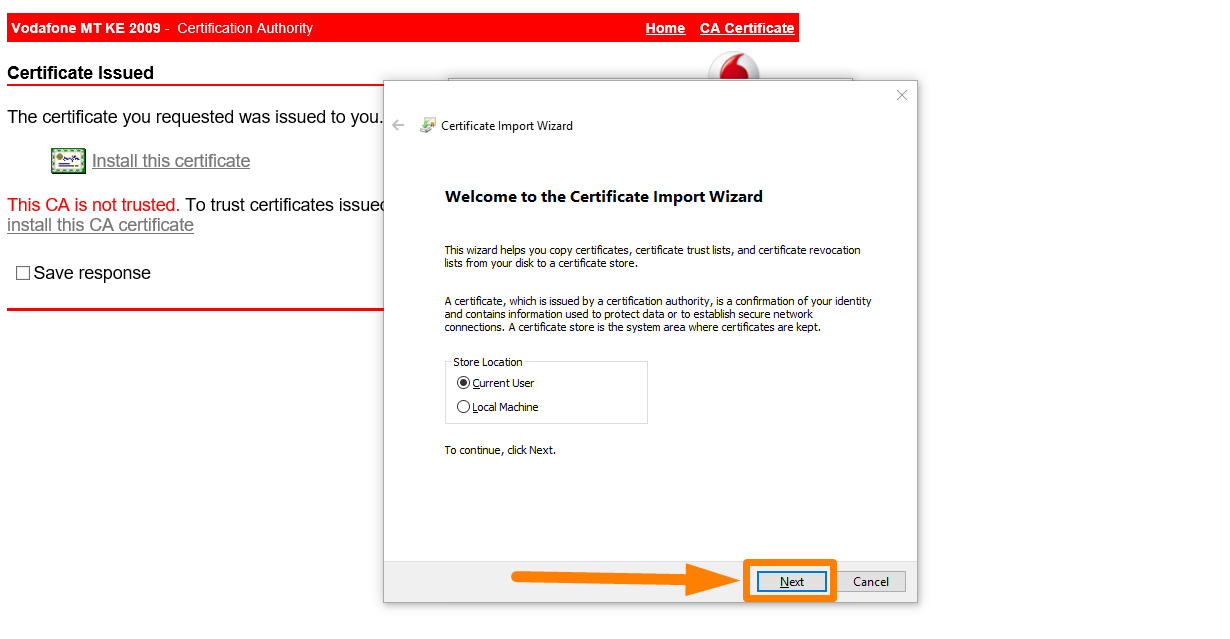
Step 13: Another window will appear and you need to click on ‘Next’.
Step 14: In the next window, click on ‘Place all certificates in the following store’.
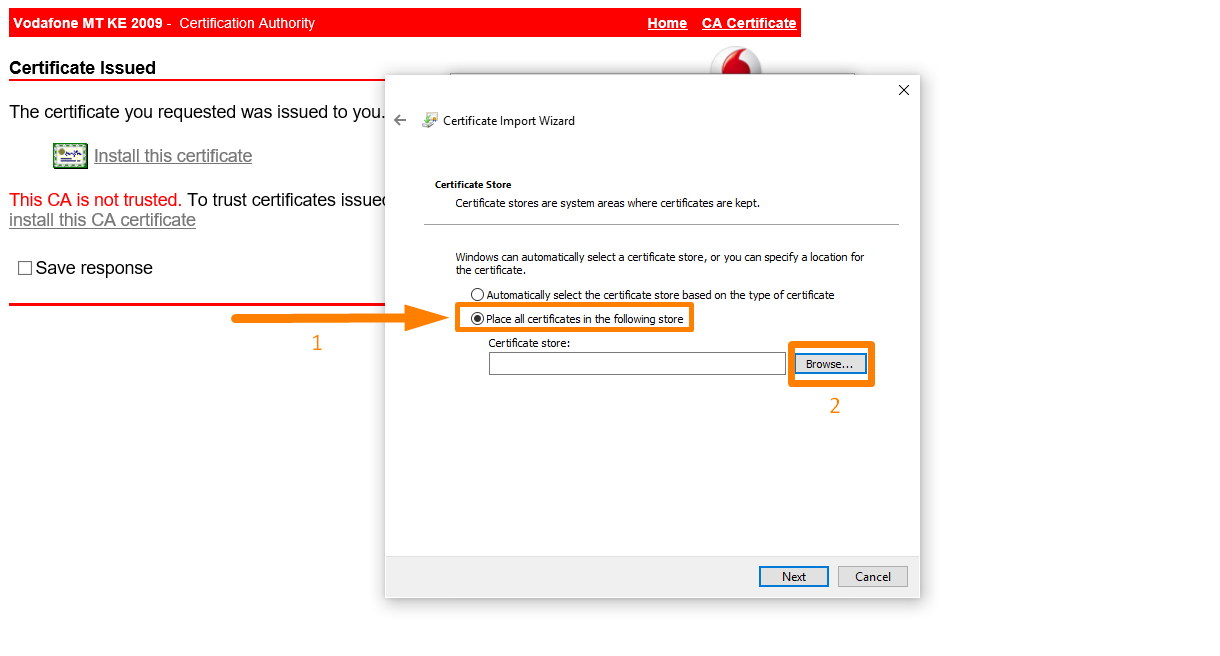
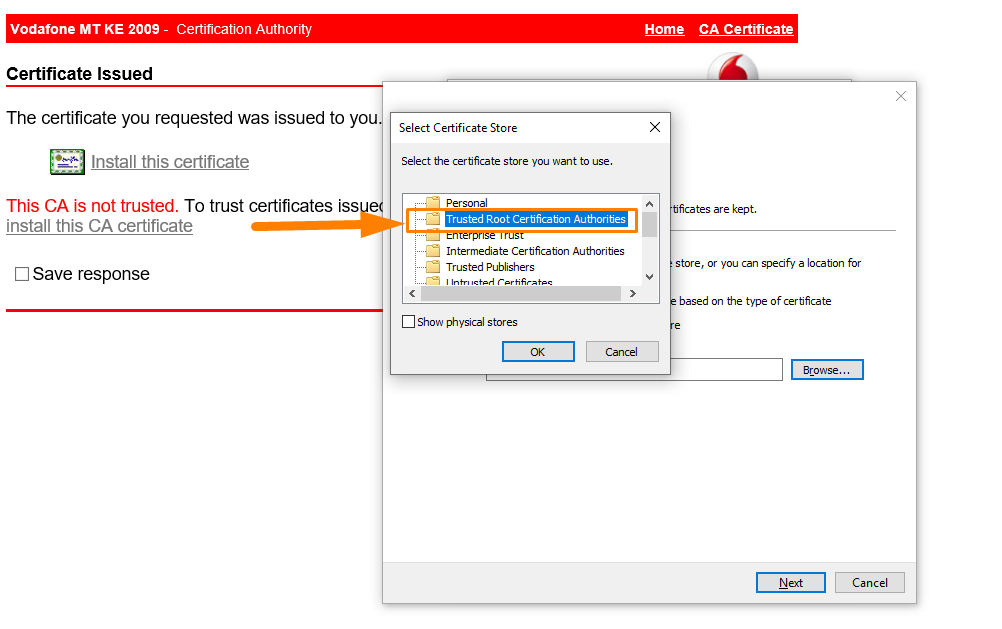
Then you need to click on ‘Browse’ and then select ‘Trusted Root Certification Authorities’ and after you are done, click on ‘Next’ as shown:
Step 15: A new window will appear. Click ‘Finish’.

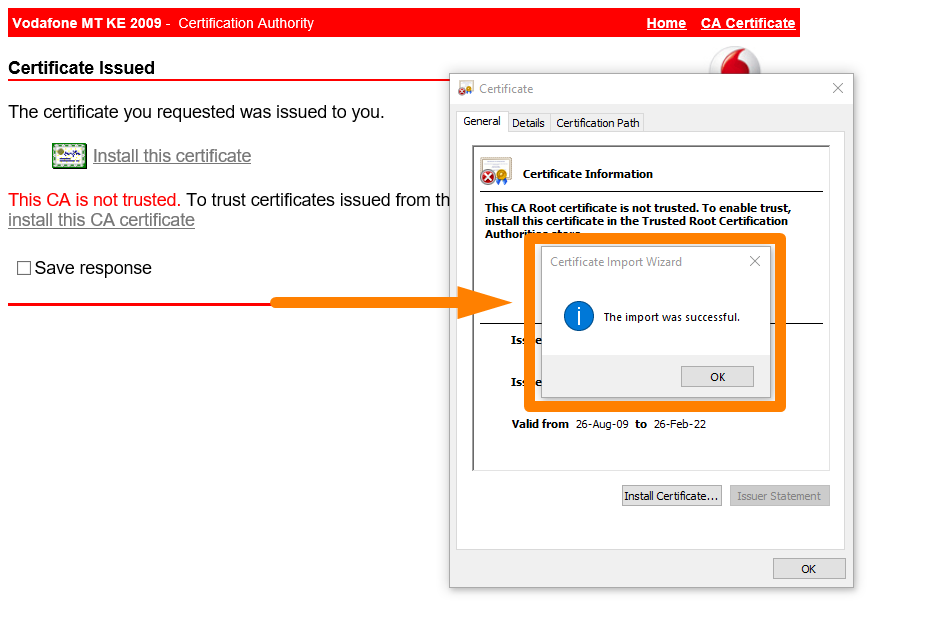
Step 16: After that, you will then get a prompt asking you if you are sure, you want to install the certificate. Click on ‘Yes’ to install the certificate.

Step 17: An alert box will appear and the certificate is now imported as shown:
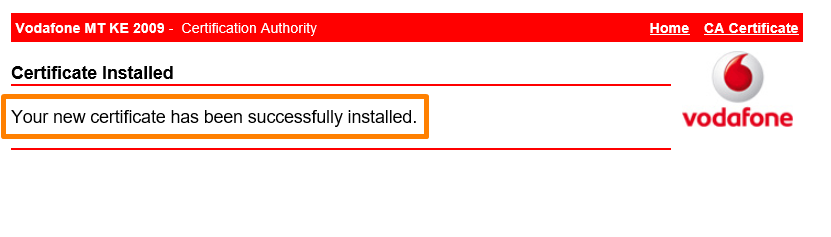
Step 18: To verify that the Mpesa digital certificate has been installed, go back to the certificate request website and click on ‘Install the certificate’.
Step 19: This will open a new page with a message, that the Mpesa digital certificate has been installed successfully.
Step 20: Now you can be able to login to the M-Pesa organization portal https://org.ke.m-pesa.com as shown below: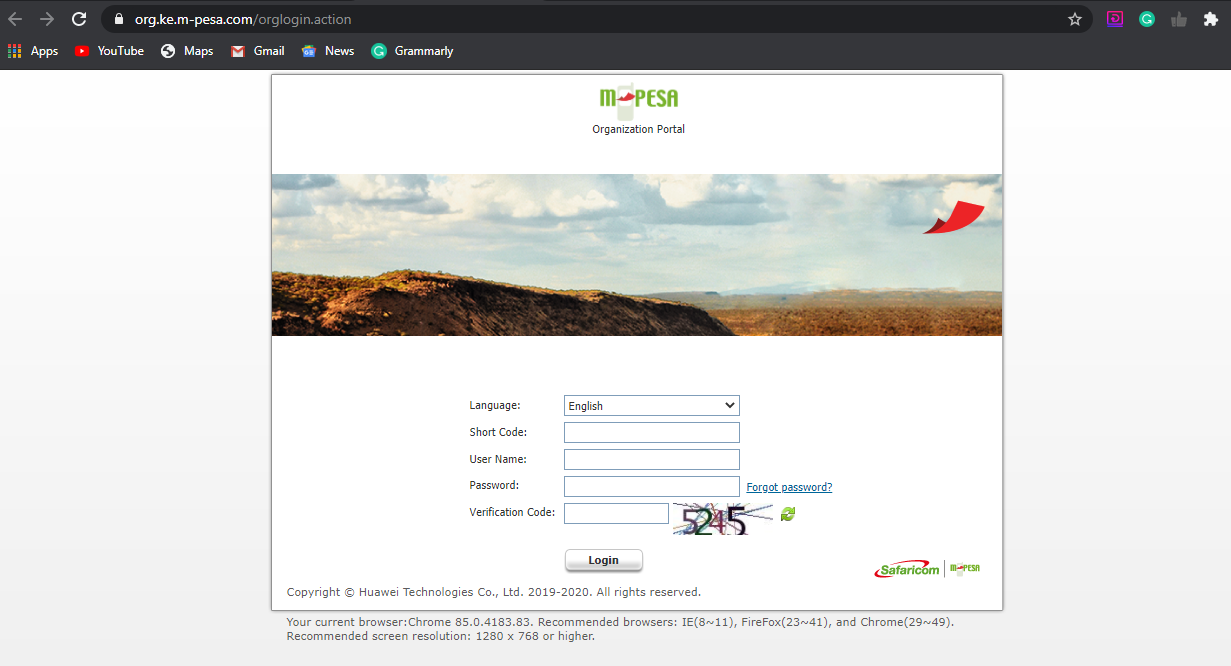
Step 21: It is important to note that you can use the same Mpesa digital certificate to install on multiple machines within the same organization. This means that it is not necessary to apply for a certificate for each machine. To do this, you require the private key associated with the certificate, which can be exported.
Conclusion
In this tutorial, I have shown you how you can apply and install a Mpesa digital certificate. It is important to note that you need to apply and install the Mpesa certificate using the Internet Explorer Browser, as the backend of the site uses Visual Basic. Each computer requires a separate certificate installed, but you can use the same certificate for an organization by exporting the private key.
Additionally, if you have trouble logging in, I have provided a comprehensive troubleshooting procedure that covers all the possible scenarios. If you are not able to log in, or you input a wrong password severally, it will time out and you get a ‘You are not authorized to view this page’ error. If this occurs, you just need to reload the page and retry again.
However, you need to remember that you need to request for the latest password for the week in case your application and installation fall on two different weeks. Ensure that you do not delete browsing history, cookies, cache, or reset your internet explorer settings, as this will delete the entire certificate.
With this comprehensive guide, I am sure that you will be able to log in to the MPesa web portal via the URL; https://org.ke.m-pesa.com, which can also be run on any browser able to execute JSP code and accepts custom certificates.

Joe is an experienced full-stack web developer with a decade of industry experience in the LAMP & MERN stacks, WordPress, WooCommerce, and JavaScript – (diverse portfolio). He has a passion for creating elegant and user-friendly solutions and thrives in collaborative environments. In his spare time, he enjoys exploring new tech trends, tinkering with new tools, and contributing to open-source projects. You can hire me here for your next project.
More Resources
Apply & Install Mpesa Digital Certificate PDF
- If you are having a problem with WooCommerce or WordPress Mpesa integration, you should not waste time trying to figure out what is wrong since I offer expert advice and quick help.
- With more than 100+ & Counting++++; WooCommerce WordPress, PHP and Python Django Mpesa integration projects completed, I don’t bring guess work to your project, but a wealth of experience and speedy resolution to your current stalemate.
- I also do not charge a fortune for this service but rather make it affordable for everyone since every one deserves a fairly priced service and stellar results.
- I have build Mpesa integration custom plugins for several businesses and continue to build both Free and Premium versions of these plugins to make it easy for everyone to use Mpesa payment on the web.
- I work with both developers as well as store owners who want to get the Mpesa integration done for a budget or custom to advanced Mpesa integration solutions that work for any type of business – travel, food, tickets etc.
- If you would like to ask me anything about Mpesa integration , please feel free to get in touch with me here.